Certain organizations may have established time logging practices and hence may not use the WRENCH timesheets. In such cases, it is required to import the time logs from the external systems to WRENCH. The timesheet data from such external systems may be exported into spreadsheet templates from where it can be imported into WRENCH. In addition to the time log entered in the Timesheet, values available here will also be taken while Resource Booking is made against a resource or role in a project.
 To bulk post time log
- In the Global Menu click Modules.
- In the menu displayed click Bulk Time Posting.
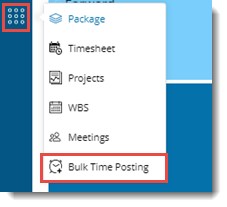
Bulk Time Posting window is displayed.

Figure: Bulk Time Posting wndow
In the window, current date is displayed in the To field and in the From field, date one week prior to current date is displayed. Time log entries between these dates will be displayed in the grid.
NOTE: To view time log entries between specific date, select From and To dates and click Show. Time log entries between the selected dates will be displayed in the grid.
- Select the radio button next to Role or Resource. Time log entry for role or resource can be made based on the option selected.
To post a time log
- In the tool bar click New.
New Time Log window is displayed.
If the option Resource is selected in the Bulk Time Posting window, the following window is displayed.
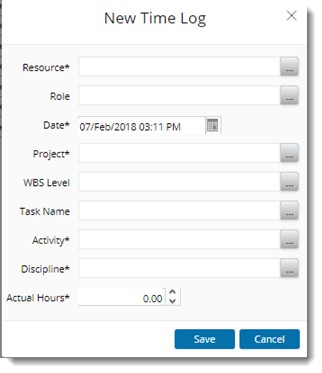
Figure: New Time Log window - Resource
If the option Role is selected in the Bulk Time Posting window, the following window is displayed.
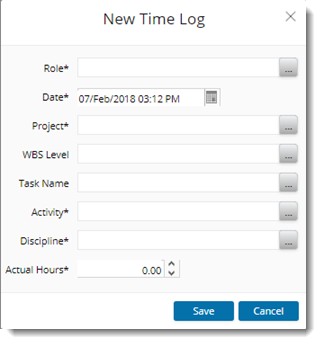
Figure: New Time Log window - Role
- In the window enter values for the following fields.
|
#
|
Item
|
Description
|
|
1
|
Resource
|
- Click the browse button to select a Resource.
- On clicking the browse button Search User window is displayed. Select the resource from this window.
- Select a Role. This field is not mandatory.
|
|
2
|
Role
|
If the radio button next to Role is selected, in the window instead of the label Resource, Role is displayed.
- Click the browse button to select a Role.
- On clicking the browse button User Group window is displayed. Select the role from the window.
|
|
3
|
Date
|
Select a date for the time log entry. Current date is displayed by default.
|
|
4
|
Project
|
Click the browse button to select a Project. This is a mandatory field.
|
|
5
|
WBS Level
|
Click the browse button to select a WBS Level.
|
|
6
|
Task Name
|
Click the browse button to select a task. On clicking the browse button Search Tasks window is displayed. All the tasks in the selected Project and WBS Level are displayed. If a WBS Level is selected, task will be filtered based on the WBS Level.
|
|
7
|
Activity
|
Click the browse button to select an Activity from the Activity window. This field is mandatory.
|
|
8
|
Discipline
|
Click the browse button to select a discipline from the Disciplines window. This field is mandatory.
|
|
9
|
Actual Hours
|
Enter the actual hours. This is a mandatory field.
|
- After entering the values click Save. Timelog entry created is displayed in the grid.
 To edit a time log
- In the Bulk Time Posting window grid select the time log corresponding to a role or resource that has to be edited.

Figure: Editing Time Log entries
- In the tool bar click Edit.
Edit Time Log window is displayed.
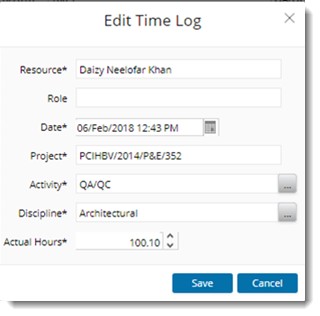
Figure: Edit Time Log window
- After editing the values click Save to store changes.
NOTE: Values for the properties Resource, Role, Project, WBS Level and Tasks cannot be edited.
 To delete time log entries
- In the Bulk Time Posting window grid, select the time log entries that are to be deleted and click Remove.

Figure: Deleting time logs
- An alert message "The selected Time Logs will be deleted. Do you want to continue?" is displayed. Click OK to continue.
Importing and Exporting time logs
Import and export of time log entries in bulk can be carried out from the Bulk Time Log posting window. On clicking the option Import/Export in the toolbar a menu with different options is displayed.

Figure: Time Log Import and Export operations
In the menu the following options are available.
Generate Template
Import New
Export
Update
Bulk Operation Log
Different options in this Import/Export menu is explained in the following sections.
Generating a Template
An MS Excel template is used as a medium for importing time log entries. If the radio button next to the option Role is selected then, the import template for importing actual time of roles will be generated. Similarly if the radio button next to the option Resource is selected then template for importing actual time of resources is generated.
 To generate a template
- In the Import/Export menu click Generate Template.
An import template is generated.
If the option Roles is selected, the template will contain the following columns.
|
#
|
Column Name
|
Details
|
|
1
|
Role
|
Select a role from the drop-down list. The list will display all the User Groups available in the Project.
|
|
2
|
Actual Date
|
Enter the date for which the time log entry is made.
|
|
3
|
Project
|
Select a Project from the drop-down list.
|
|
4
|
Activity
|
Select an activity from the drop-down list. All available activities will be displayed in the drop-down list.
|
|
5
|
Discipline
|
Select the discipline from the drop-down list. The drop-down list will display all the available disciplines.
|
|
6
|
Actual Duration
|
Enter the duration.
|
If the option Resources is selected, template will contain the following columns.
|
#
|
Column Name
|
Detail
|
|
1
|
Resource
|
Select a resource from the drop-down list. The list will display all the Users available in the Project.
|
|
2
|
Role
|
Select a Role from the drop-down list. The list will display all the user groups. When bulk time is posted; it is reflected in the respective Roles the user is assigned for that Project.
|
|
3
|
Actual Date
|
Enter the date for which the time log entry is made.
|
|
4
|
Project
|
Select a Project from the drop-down list.
|
|
5
|
Activity
|
Select an activity from the drop-down list. All available activities will be displayed in the drop-down list.
|
|
6
|
Discipline
|
Select the discipline from the drop-down list. The drop-down list will display all the available disciplines.
|
|
7
|
Actual Duration
|
Enter the duration.
|
- After entering values for the different columns displayed, save the template.
Importing time log entries
Time log entries saved in the MS Excel template can be imported to the system.
 To import time log entries
- In the Bulk Time Posting window tool bar click Import/Export.
- In the menu click Import New.
File selection window is displayed.
- Select the excel file from the location where it is stored.
Entries in the excel file is imported to the project.
Exporting time log entries
Occasionally need to update already saved time log entries may arise. For updating, time log entries are exported to an MS Excel file and values are updated.
 To export time log entries
- In the Bulk Time Posting window select the time log entries that you want to export.
- In the tool bar click Import/Export.
- In the menu click Export.
Selected time log entries are exported to an MS Excel file.
- Update the entries and save the file.
Updating time log entries
After making necessary changes in the exported time log entries, the updated entries are imported back using the Update option.
 To update time log entries
- In the Bulk Time Posting window tool bar click Import/Export.
- In the menu click Update.
File Selection window is displayed.
- Select the excel file with the updated time log entries.
Timelog entries will be updated with the values in the excel sheet.
Bulk Operations Log
Bulk operations log provides detailed information on the import/export operations carried out.
 To view the log
- In the Import/Export menu click Bulk Operation Log.
Bulk Operation Log window is displayed.
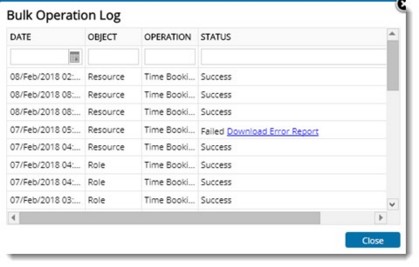
Figure: Bulk Operations Log window
In the window details of the operations are displayed. Also status of the operation, whether the operation was a Success or the operation Failed is displayed.
- Click the hyperlink Download Error Report, to know the reason for failure of the operation.


