Review of documents is a crucial activity during the lifecycle of most documents in projects. Conventionally, reviews are often performed disconnected and hence consolidation of review comments from multiple reviewers is often a difficult task.
Wrench allows online commenting directly on the PDF copies (Specter) of documents, allowing multiple reviewers to participate in simultaneous reviewing. Once the comments are made, Comments Response Sheet helps in downstream tracking of the comments.
While managing CRS the following security rights will be applied.
- Comments made by users can be edited only by users belonging to the origin of user who created the comment.
- Responses can be viewed only by users belonging to the origin of the user who updated the response and created the comment.
- Only users in the CREATOR origin can Close comments.
The main topics discussed can be accessed using the following navigation table.
Opening Comments Response Sheet window
For managing comment response, first comment response sheet is to be opened.
 To open comments response sheet
- In the Document Details window click CRS tab.

Figure: Opening Comment Response Sheet
Comments Response Sheet window is displayed.
Here you can create a CRS group, publish a group, add a comment, add a response for the comment, edit a comment, remove a comment, import and export comments.
Creating and managing CRS groups
CRS groups can be created, comments can be added under a group and a group can be published to required users.
 To create a CRS group
- In the Comments Response Sheet window click the tool bar item CRS. A menu is displayed.
- In the menu click New CRS.
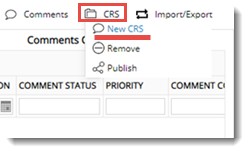
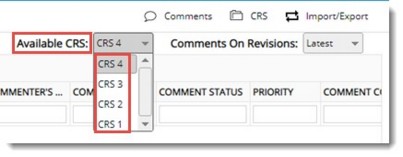
Group created successfully message is displayed. A new CRS group is displayed. Created group is displayed in the drop-down list next to Available CRS. Once you select a group from the list before adding comments, added comments will be grouped under the selected CRS group.
 To publish a group to selected users
- Select a group from the drop-down list.
- In the CRS menu click Publish.
Publish CRS window is displayed.
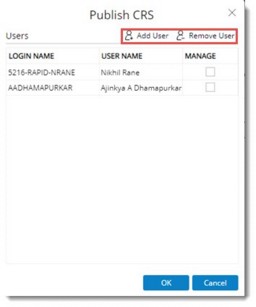
- In the window click Add User to add users from User Search window.
- Click Remove User to delete a selected user.
- Click OK to publish the groups to selected users.
Once a group is published to a set of users, comments under this group will be accessible only to these users.
 To remove a group
- Select the group that is to be deleted and in the menu click Remove.
- A warning message Any comments in this group also will also be removed. Proceed? is displayed.
- Click Yes to continue. Removed successfully message is displayed.
Capturing comment details
Comments details can be captured into the CRS in the following ways.
- Add Comments manually.
- Import Comments using MS Excel template.
 To add comments manually
- Select a group to which comment is to be added.
- In the CRS window toolbar click Comments. A menu is displayed.
- In the menu click New Comments.
Add Comments window is displayed.
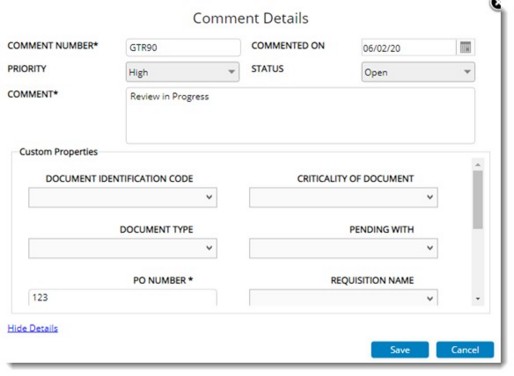
Figure: Adding Comments
- Enter value for following fields.
Comment Number: Enter a comment number.
Commented On: Enter the date on which the comment is captured.
Status: Select a status for the comment from a drop-down list. Available status are:
- Open: This status denotes comment is in created status.
- Reopen:
- Ongoing: This status denotes comment is in its review process.
- Closed: This status denotes comment review is completed and closed.
Priority: Enter a priority.
Comments: Enter description for the comments in this field.
Custom Properties: If custom properties are assigned to CRS, they are displayed in the window. Enter values for custom properties.
- After entering details click Save.
Comments added successfully message is displayed. Added comment is displayed in the grid.
NOTE: In Projects where Client and Consultants are involved, entry in the columns Commenter's Origin and Responder's Origin will help to identify whether the commented user belongs to Client or Consultant.
Adding responses to a comment
Submitted comments are received by the receiver (normally a contractor) and the contractor incorporates the response against each comment.
 To respond to a comment
- Select a comment and in the tool bar click Comments.
- In the menu click Responses.

Figure: Adding Response
Add Response window is displayed.
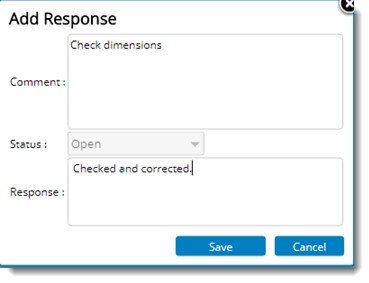
Figure: Add Response window
In the Add Response window Comment and Status is displayed.
- Enter a response for the comment and click Save.
Response added successfully message is displayed. Entered response is displayed in grid against the corresponding comment.

Figure: Comment Response Sheet - Displaying Response
Updating comments
In contractor-consultant scenario, Contractor prepares the document and send to consultant for approval. Once received by consultant, different engineers will review and mark their comments on the design. Once commented, the lead engineer will review the comments and assign each comment with a ‘Comment Code’ which reflects the relevance and importance of each comment. Based on such comment codes, the final approval status code is then decided.
For handling such scenarios provision to update comment code against each comment is desirable.
 To update comments
- In the CRS window select single or multiple comments and in the tool bar click Comments.
- In the menu click Update Code.
Update Comment Code window is displayed.
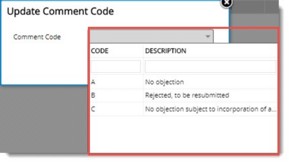
- Select a Code from the list and click OK.
The selected code is updated in the window.
Editing a comment
A comment can be edited.
 To edit a comment
- Select the checkbox next to the comment that is to be edited.
- In the menu click Edit.
Comment Details window is displayed.
- Edit values for different fields and click Update.
Updated Successfully message is displayed.
Values are updated successfully.
Importing Comments
In a typical design review scenario, when multiple people comment in a design, it is consolidated before sending to the designer for making changes. In certain other scenario, the designers themselves consolidate comments before incorporating changes.
SmartProject has native capabilities to help users comment in documents using the document viewer. Once commented, the comments can be pulled into the CRS where it can be consolidated (duplicate/ unwanted comments removed, and any extra comments added). This way, the CRS becomes a single reference for incorporating changes.
When Adobe Acrobat viewer is used to create comments inside PDF documents, Acrobat system allows limited external access to the comments using which they can be extracted from the PDF file automatically. But the functionality is limited, and it does not allow any other interactions.
Comments can be imported to CRS.
 To import comments
- In the CRS window toolbar click Comments.
- In the ensuing menu click Import Comments and in the pop-up menu, click From Markups.
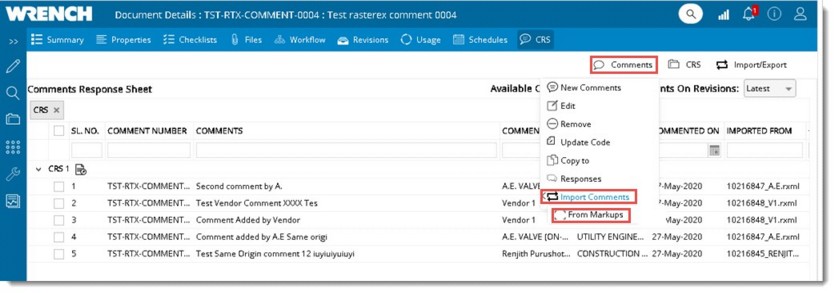
Figure: Importing comments from Markups
Import Comments from Markup window is displayed.
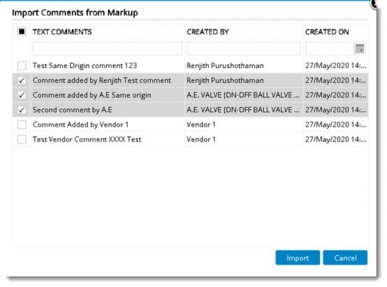
Figure: Import Comments from Markup window
- Select the checkbox next to the comments that are to be imported and click Import.
A message Comments Imported Successfully is displayed.
Imported comments will be added to the latest open CRS group. If no such open groups available, comments will be imported to a new group.

NOTE: Markups / PDF comment files can only be imported into a latest revision of the document. Importing to older version is of no use as no changes can be made to such revisions, restrict such operation.
Comments imported from Markups / comment files cannot be edited in CRS -as they are imported from comments made by other people. Properties like Property, Status etc. can be edited. Any changes required are to be made in the markups / comment files and imported again. But imported comments can be removed if required.
in the column IMPORTED FROM the name of the comment file, from which the comment is imported is displayed.
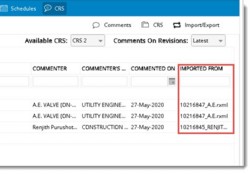
The imported comments might be created by users from different origins. Those users will not have access to the group in CRS into which the comments are imported, until the group is published to them. Hence CRS group is published automatically to the respective commenter's. This helps the commenter's to review the response updated against their comments.
If user remove or replace the comment file after importing comments to CRS, this is indicated in the CRS tab in the column called “Comment file status” in CRS grid.
Importing/Exporting Comments Response Sheet
Comment details can be exported or imported using an MS Excel template. For this WRENCH CRS properties are to be mapped with columns in the MS Excel template. This mapping helps the system to identify the excel columns from where data is to be extracted and updated in the corresponding WRENCH property as well as export back to the Excel template.
This mapping is carried out from Project Properties window.
 To map template columns
- In the Project Properties window click More and in the menu click CRS Mapping.
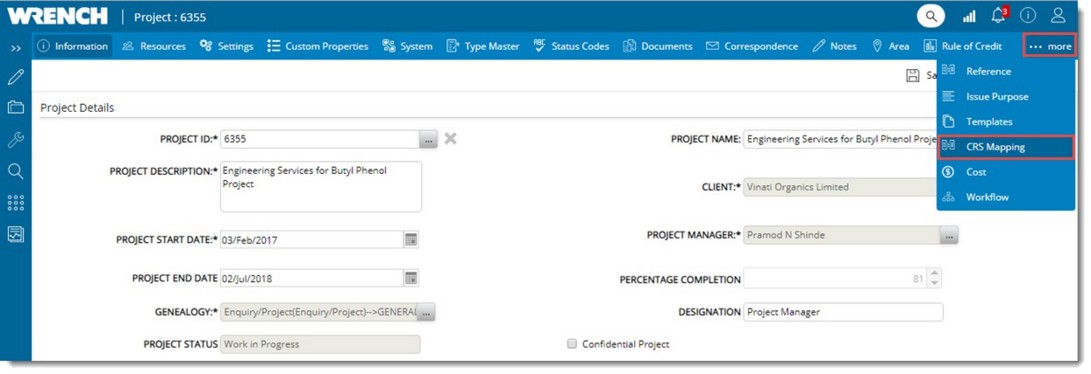
Figure: Opening CRS Template
CRS Mapping Template window is displayed.

Figure: Adding a template
- In the window click Add.
Template Mapping window is displayed.
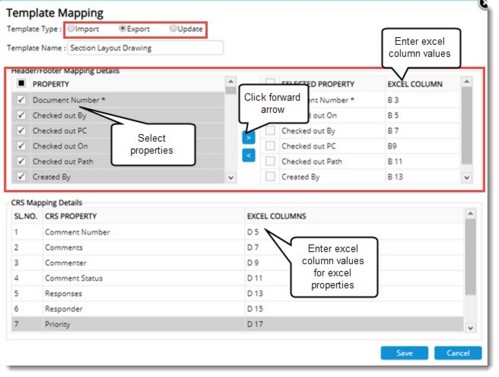
Figure: Configuring the mapping template
- Select the radio button next to a Template Type. Options available are Import, Export and Update. For mapping values to Import and Export template, procedures are the same.
- Enter a template name.
Next step is to select the document properties that are to be mapped and define a location for the mapped values in Excel sheet.
- Select the checkbox next to properties that are listed under Header/Footer Mapping Details.
- After selecting the required properties click the arrow pointing forward. Selected properties will now be available under Selected Columns.
- For each property enter the location where the values should be mapped in Excel sheet.
Next step is to enter the location where values for CRS properties should be displayed.
- Corresponding to the CRS Properties, enter the location where values are to be mapped in Excel template.
- Click Save to store values.
Created templates are displayed in the grid.

Figure: Created templates
 To import CRS
- In the Comments Response Sheet window tool bar click Import/Export.
- In the menu click Import From.
CRS Import Wizard is displayed.
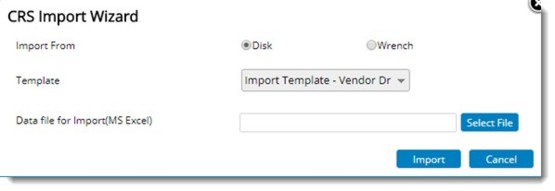
Figure: CRS Import Wizard
CRS data can be imported from files stored in the disk or from files in WRENCH. In some cases user adds the CRS file received from the client as a reference document inside the main document. If user wants to import data from a document already available in the system, then user may select the option My Wrench. MS Excel files containing CRS data, attached as reference documents can be selected.
 To import data from excel file saved locally
- Select the radio button next to Disk.
- In the drop-down list, templates that contains details for mapping CRS file data will be available. Select the template from the list.
- Next step is to select the Excel file containing data. Click Select File.
- File selection window is displayed. Select the excel file where CRS details are saved.
- After selecting the file click Import.
If the data is successfully imported, Imported Successfully message is displayed. Mapped CRS details will be displayed in the grid.
 To import data from attached data file
- In the CRS Import Wizard window click the radio button next to Wrench.
- Select a template from the drop-down list.
- Click Select File.
Document Attachments window is displayed.
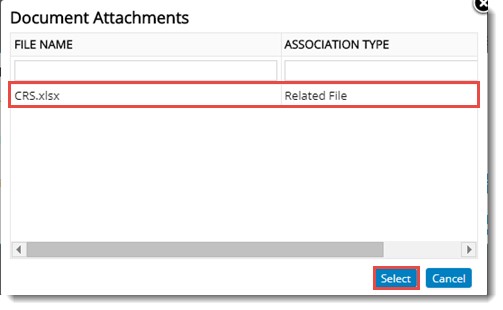
Figure: Document Attachments window
- Select the file from the window.
- Click Import button.
If the data is successfully imported, Imported Successfully message is displayed. Mapped CRS details will be displayed in the grid.
Exporting CRS Data
CRS values can be exported to a file saved in the disk or an associated file (excel file) of the document. Select Disk to export the values to an excel file stored in the system. In some cases user adds the CRS template received from the client as a reference document inside the main document. If user want to export the data to an excel file already available in the system, then the option Wrench is selected.
To export CRS data
- In the CRS window tool bar click Import/Export.
- In the menu click Export To.
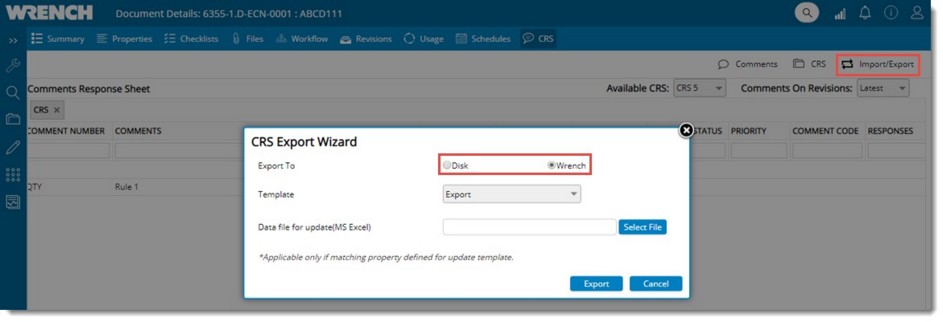
Figure: CRS Export Wizard
CRS Export Wizard is displayed. In the wizard options to export to Disk and WRENCH are available.
 To export to disk
- In the CRS Export Wizard select the radio button next to Disk.
- Select the template from the drop-down list.
- Click Select File to choose the data file stored locally.
Update Existing Template: This option is applicable only if matching property is defined for update template
- Click Export.
Data is exported to Excel sheet.
 To export to WRENCH
- In the CRS Export Wizard select the radio button next to Wrench.
- Select the template from the drop-down list.
- Select the button Select File.
Document Attachments window is displayed.
- In the window select the file.
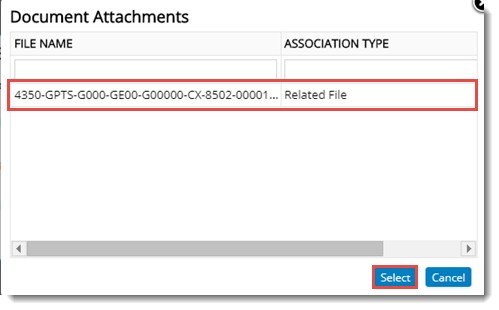
Figure: Selecting file
- Click Select.
Comment Resolution Sheet data is exported successfully to the selected associated document.


 To open comments response sheet
 To publish a group to selected users
 To import data from excel file saved locally
 To import data from attached data file