A schedule is a list of planned activities or things to be done showing the time or dates when they are intended to happen or be done. The project schedule includes all elements of the project from the pre-planning stages of the project through all on-going project processes that may take place during the active project period, to all project related process that may occur at the conclusion and or closing stages of the project.
Scheduling a task is freezing the schedule dates of the task. A proper scheduling of the tasks is required for the timely completion of a project. Once a task is scheduled the project manager monitors the task to ensure that the activities are carried out as per the defined schedule . Various dates related to the task are defined here.
In the button strip, on clicking Schedules, schedule details are displayed. These details are explained in the following sections.
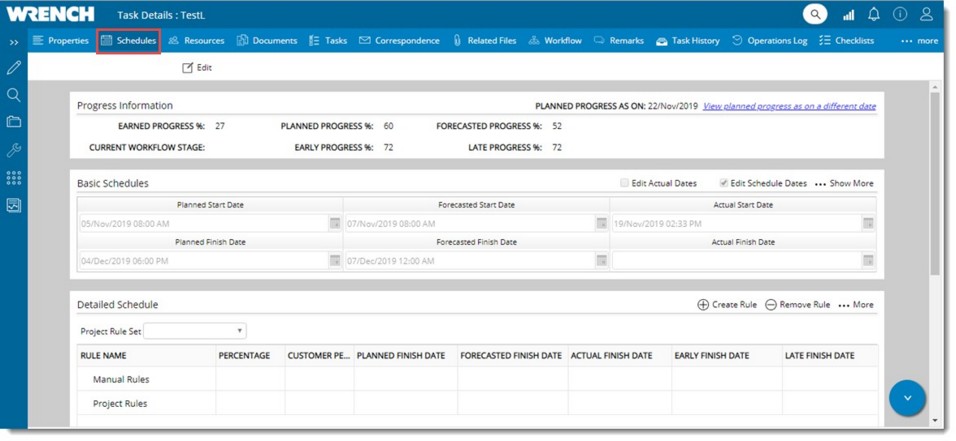
Figure: Task - Schedule details
The information in the Schedules window is divided into three sections. They are
 Progress Information
The Progress Information area display the current progress and the Planned Progress of the task . If the task is in an active stage of the workflow and there is some planned date assigned to that stage, the information is displayed here.

Earned Progress: Total progress achieved by the task is displayed here.
Planned Progress: The intended progress of the task is displayed here.
Forecasted Progress: Progress that is forecasted for the task is displayed here.
Current Workflow Stage: Current stage of the workflow assigned to the task is displayed here.
Early Progress and Last Progress: This progress is calculated based on Early and Late Start Dates. Progress will be calculated only if these dates are provided.
Planned Progress As On: Planned Progress for the current date is displayed here. On clicking the hyperlink View planned progress as on a different date, Planned Progress As On window is displayed.
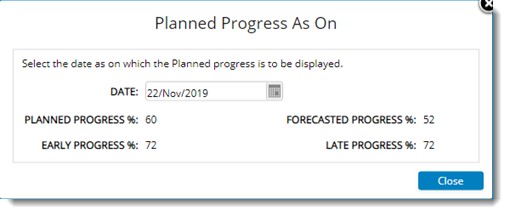
Figure: Planned Progress As On window
Here progress details as on current date is displayed. On selecting a date from the date picker Planned Progress is displayed for the selected date. Progress as on date selected should be greater than Project Start Date.
 Basic Schedules
The basic schedules displays the schedule assigned for the task like start and Finish date.
The schedule details displayed here are mentioned in the following table.
|
#
|
Property
|
Description
|
|
1
|
Planned Start Date and Planned Finish Date
|
The planned start date and planned finish date are displayed here.
|
|
2
|
Forecasted Start Date and Forecasted Finish Date
|
Once an approximate duration of a task is estimated, a forecasted start date and forecasted end date is specified. By default system assigns current date as the schedule start and schedule end date. The forecasted start and forecasted end date is entered accordingly. The reports submitted to the client are based on the forecasted date. On scheduling the task, these dates are freezed and are only editable when the task is revised. Forecasted start date should be greater than the project start and Forecasted end date should always be less than the project end date.
|
|
3
|
Actual Start Date
|
System automatically updates this field when the Task is initiated. You can also manually update this date.
|
|
4
|
Actual Finish Date
|
System automatically updates this field when the Task is actually completed. You can also manually update this date.
|
 Show More
Most organization use MS Project, Primavera or other scheduling applications to plan their project schedules. These applications will auto calculate the Early and Late dates of activities based on their activity provided in the schedule. By knowing how early an activity can start and how late it will finish will give the planners the flexibility to reallocate resources between other activities that can potentially impact critical path, and hence the project completion date.
Organizations using WRENCH, may import schedule from MS Project or Primavera to WRENCH WBS. While performing the import, they may want to capture Early and Late schedules. Therefore, date fields in task schedule to capture early and late schedules is available. Also, early progress and late progress of the tasks and levels in WBS is displayed.
These dates are described briefly as follows.
Early Start: Earliest date by which an activity can begin.
Early Finish: Earliest date by which an activity can finish.
Late Start: The latest date by which an activity can begin without delaying the project finish date.
Late Finish: The latest date by which an activity must finish without delaying the project finish date.
In the Task Schedules tab, under the option Basic Schedules on clicking the option Show More, option to enter these dates will be available. The dates entered should be between the Project Start Date and End Date.

Figure: Early and Late Dates
In the WBS tree and grid view, the following columns will be available.
- Early Start Date
- Early Finish Date
- Late Start Date
- Late Finish Date
- Early Percentage
- Late Percentage.

These columns will be available in Import and Export templates also.
 Detailed Schedule
Detailed schedule details are displayed in this section. This includes information related to rules and their progress. In addition you can carry out the following operations here:
Create and Remove Rule
Update Interim Progress
Micro Scheduling
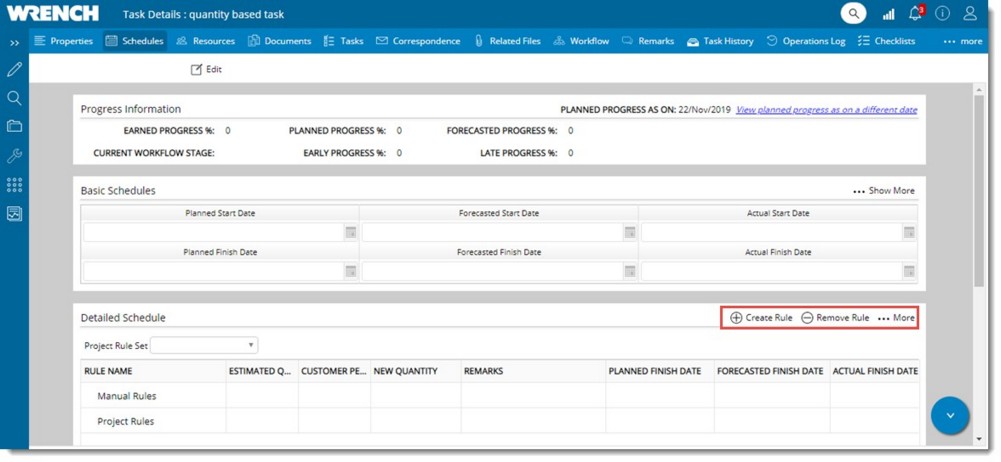
Figure: Detailed schedule information
Adding rules to a task
Apart from the rule sets defined for a specific project you can add additional rules to a task. Manually added rules can also be removed.
 To add rules to a task
- In the Detailed Schedule grid tool bar click Create Rule .
Create Rule window is displayed. The field Rule Name will be populated with a default Rule Name. You can change the default Rule name.
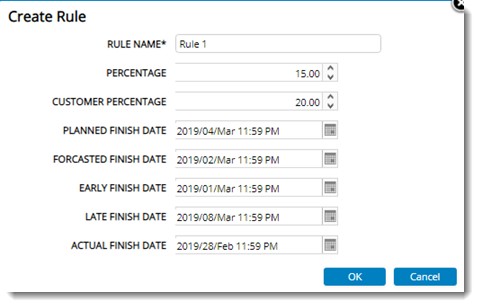
Figure: Create Rule window
- Enter values for different fields in the window and click OK to save changes.
A rule is created and is displayed in the grid.
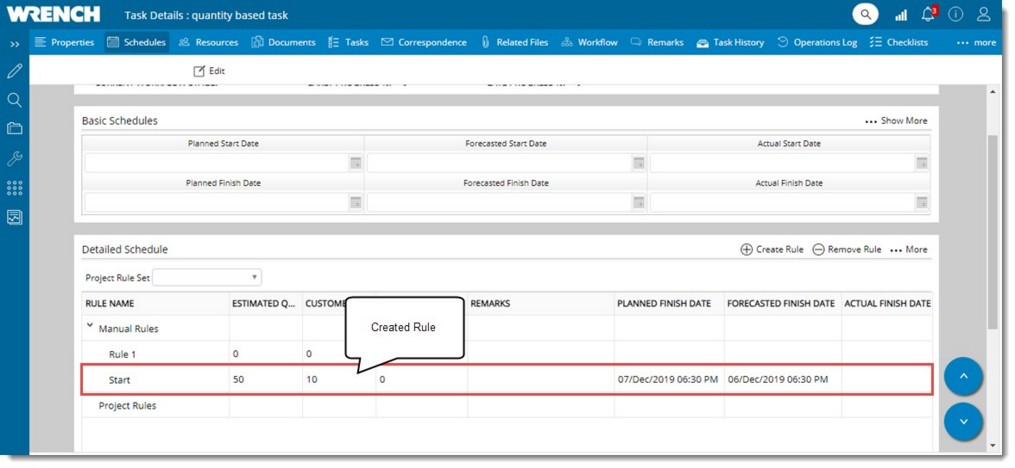
Figure: Created Rule
 To remove rules
- Select the manual rule which you want to delete.
- In the Detailed Schedule grid tool bar click Remove Rule.
The selected rule is removed.
- Click OK to store changes.
NOTE: If there is no workflow assigned to the task, the percentage information will not be displayed in the area. Only the earned percentage will be displayed.
Updating Interim Progress
Update Interim Percentage is used to add an interim percentage between the earned percentage and anticipated progress percentage for the next milestone defined in the rule set window. When you achieve one rule of credit and is heading to achieve the next rule of credit stage, you might enter and update the progress percentage in between these rule of credits. An interim stage can be defined as a manual rule to show the percentage completion as to the actual completion date.
 To update interim progress
- Select the rule for which you want to update interim progress.
- In the Detailed Schedule window, click the link More>>Update Interim Progress.
Update Interim Progress window is displayed.

Figure: Updating Interim Progress
- Enter the value for the following fields.
- New Percentage: Enter the new progress percentage for the task. Only a value between the current earned and next milestone can be entered here.
- Actual Finish Date: Select the actual finish date from the date picker.
- Click OK to continue.
Updating earned quantity
In the case of construction tasks i.e. tasks with Progress Captured as values equal to Quantity, option to update earned quantity of rule is available.
 To update earned quantity
- In the task properties window click Schedules tab.
- In the Detailed Schedule window click More>>Update Earned Quantity.
Update Earned Quantity window is displayed.
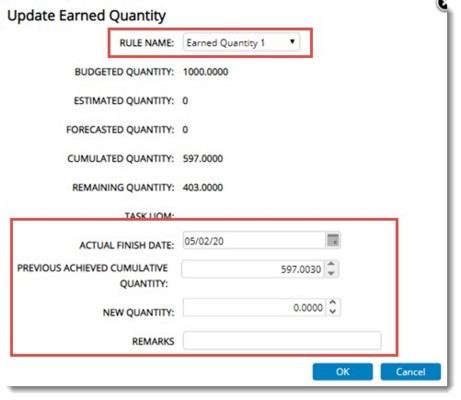
Figure: Update Earned Quantity
- Select the Rule for which quantity has to be updated.
- Select actual finish date.
- In the Project Settings window if the setting Enable Previous Cumulative Achieved Quantity is selected, in the Update Earned Quantity window a field Previous Achieved Cumulative Quantity will be displayed. If Previous Cumulative Quantity is entered after selecting a rule, the entry is saved against the corresponding rule. If a rule is not selected, a manual rule is created with the provided date.
- Enter value for new quantity and Remarks.
- Click OK to update value.
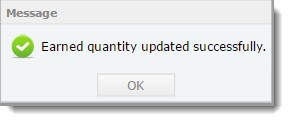
Earned quantity updated successfully window is displayed.
- Click OK to continue.
Updated earned quantity is displayed against the rule as shown in the following figure.

Figure: Earned quantity updated.
Updating earned quantity without selecting a Project or Manual rule
User can update the earned quantity without selecting a project or manual rule.
To update earned quantity
- Click More.. and in the menu click Update Earned Quantity.
Update Earned Quantity window is displayed.
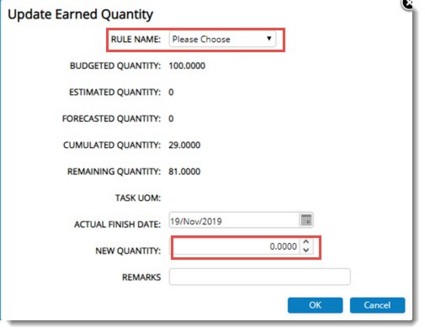
Figure: Update Earned Quantity
- In the window select the rule name from a drop-down list.
- After entering the values click OK.
Once the earned quantity is updated, the rule will be automatically linked under the project or manual rule where the Actual date falls under the planned finish date of the rule.

Figure: Updating earned quantity
NOTE: For manual rule, the updated actual quantity will be added under the corresponding project rule based on planned finish date. On scheduling, if the planned, forecast, early or late start date and Planned forecast, early or late finish date is not specified for quantity-based task, the corresponding dates will be updated automatically from project or manual rules.
Micro scheduling
Here you can specify the duration from one milestone to another, and based on the duration other milestone planned dates can be automatically calculated. Rule of Credit dates are generated automatically based on; a single input, Schedule Start Date, Client Submission Date etc. This process is referred to as Micro Scheduling.
A calendar can be assigned to a milestone based on which the calculation can be carried out. In case a calendar is not assigned calculation is carried out based on the normal Wrench working calendar.
NOTE: Micro Scheduling duration is based on days not on hours.
 To generate rule of credit automatically
- In the Detailed Schedule grid click More>>Micro Scheduling.
Formulate Micro Scheduling window is displayed.
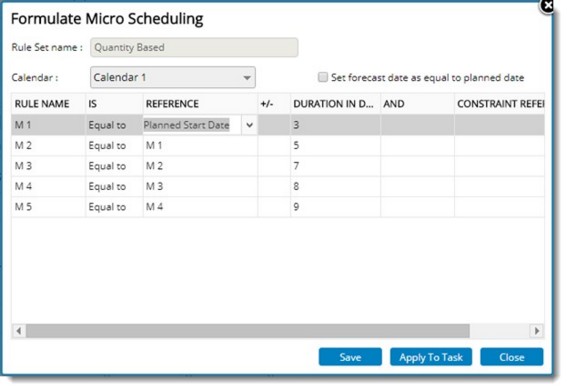
Figure: Micro Scheduling window
In the window the selected Rule set is displayed. The following selections can be made before defining the condition for generating a rule of credit date automatically.
Calendar: Select a calendar from the drop-down list. Calculations are made based on the selected calendar.
Set Forecast Dates as equal to Planned Date: Select the check box if you want to set the forecast dates the same as the planned dates.
- Next step is to define the formula for generating the Rule of Credit dates.
- Specify the Milestone, the Reference milestone, and the Duration in days from the reference milestone . The reference milestone can be Start date, Finish date or any other milestone. The duration could be plus or minus.
For Example: In case the values for calculating rule of credit dates are defined as in the following table.
|
Rule
|
IS
|
Reference
|
+/-
|
Duration in Days
|
|
CHECK
|
equal to
|
Draw
|
+
|
2
|
The dates for activity CHECK will start 2 days after the activity Draw has started. This means if the activity Draw was started on May 25th 2013, then the activity CHECK will start on May 27 th 2013, provided there are no holidays in between.
- Once the formula is defined click Apply.
Dates are updated successfully and the formula is applied to the tasks in WBS.
Select an existing rule set
Click the drop-down arrow next to Project Ruleset. Select the Rules assigned in the project to the task. Existing rule can be only changed for a task in Unscheduled/Scheduled status.

Beta Distribution
In conventional planning, the planner decides the start and end dates of all project tasks and the project progress is estimated based on the completion of these tasks (when actual end dates are captured). Here the progress of a task between the start and end is not known.
Beta distribution technique helps to overcome the inconveniences and overheads involved in planning activities related to a construction project. Task rules may be automatically created for each week / month between the Start and Finish dates of the task and the estimated progress at each of these week / month can be computed using this technique.
While calculating the beta distribution, the alpha value and beta value will be decided by the user. For Example: For a steady progressing task, both alpha and beta values are defined as 1. For a slow starting but faster finish type of tasks (more work in the beginning) a larger alpha value is assigned. For a task which has quick progress in the beginning, larger beta values are used.
To calculate beta distribution
- In the task properties window click Schedules tab. Schedules window is displayed.
- In the Detailed Schedule section click More. A menu is displayed.
- In the menu click Beta Distribution.
Beta Distribution window is displayed.
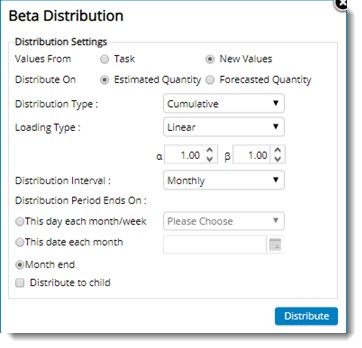
Figure: Beta Distribution window
- Select the radio button to define whether beta distribution has to be calculated using Values available in task or New Values. Selecting "Values from Task" will use the alpha and beta values entered in that Task's details. By default, "Values from-Task" will be selected. If the option "New values" is selected it will be possible to select alpha-beta combinations manually from four pre-defined Distribution Settings namely "Linear Loading", "Front Loading", "Back Loading" and "Bell-Shaped". On selecting a setting, the task/level is distributed based on the setting.
- Select a value for Distribute On. If the radio button next to Estimated Quantity is selected, then estimated quantity of the task will be distributed. By default Estimated quantity will be selected. If the radio button next to Forecasted Quantity is selected, then Forecasted quantity of the task will be distributed.
- Select a Distribution Type from a drop-down list. Values available are Periodic and Cumulative. If the option Periodic is selected, values will be distributed periodically across the interval. If the option Cumulative is selected, values will be distributed cumulative across the interval. By default this option is selected.
The distribution type can be explained with the help of an example. Suppose your activity is laying asphalt for a stretch of 100 kilometers spread for a time period of 10 weeks. Distribution of progress using Periodic and Cumulative methods are displayed in the table.
|
Week
|
Periodic
|
Cumulative
|
|
1
|
10 Km
|
10 Km
|
|
2
|
10 Km
|
20 Km
|
|
3
|
10 Km
|
30 Km
|
|
4
|
10 Km
|
40 Km
|
|
5
|
10 Km
|
50 Km
|
|
6
|
10 Km
|
60 Km
|
|
7
|
10 Km
|
70 Km
|
|
8
|
10 Km
|
80 Km
|
|
9
|
10 Km
|
90 Km
|
|
10
|
10 Km
|
100 Km
|
|
100 Km
|
|
- Select a Loading Type from a drop-down list. Values available are Linear Loading, Front Loading, Back Loading and Bell Shaped. Based on the loading type selected alpha and beta values will change. By default Linear Loading is selected.
- Enter an Alpha value and a Beta value if the default value requires modification.
- Select the interval over which the distribution needs to be done. The interval can be monthly or weekly.
If distribution option selected is monthly , then the interval between the planned start and the planned finish of the task will be split into quantity based manual rules equivalent to the number of months and estimated quantities will be assigned for the same.
Distribution Period ends on options:
If the option “Month end” is selected , the system will consider last day of the month in the calendar as the end of each distribution interval.
If the option This day each month/week is selected user will be able to select a day of a week so that system will consider the last day of the month as the end of each distribution interval. For example: if “Friday” is selected , then last Friday of every month will be considered as the end of each interval.
If the option “This date each month” is selected user will be able to select a date in a month to consider as the end of each distribution interval.
If distribution option selected is Weekly, then the interval between the planned start and planned finish date of the task will be split into quantity based manual rules equivalent to the number of weeks and estimated quantities will be assigned to them. Option This day each week will be enabled and user will be able to select the day in a week to consider as the end of each distribution interval.
If the checkbox next to the option "Distribute to child level”is selected, then for all the levels and tasks under that level, of quantity-based tasks, beta will be distributed. This setting will be enabled only when beta distribution is carried out for a WBS Level.


