|
Plug-In Configuration
|   |
|
Plug-In Configuration
| |
Plug-in configuration for Live commenting, MS Outlook integration with WRENCH meetings, Google Maps and Single Sign On using Office 365 can be carried out here.
Creating an integration gateway for live commenting
There are organizations that use Bluebeam application for online commenting. The IDC process of commenting is done after uploading the physical file into Bluebeam cloud and opening a session for commenting by inviting the users.
In the case of organizations that use Bluebeam and WRENCH, the IDC process would be automated in WRENCH wherein the users for IDC would be automatically populated based on the QMS matrix. The physical file in WRENCH would be directly pushed to Bluebeam cloud session from WRENCH for IDC commenting purpose.
An integration gateway is created from WRENCH.
To setup integration gateway between two applications, respective web services link and credentials should be available for connection.
To save Bluebeam credential in WRENCH
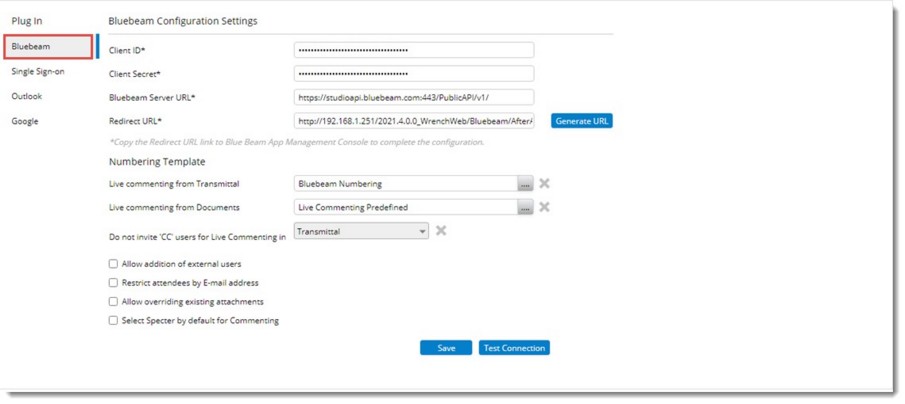
Figure: Opening Live Commenting configuration
Bluebeam Configuration Settings window is displayed.
In the window enter the following details.
Client ID: ID given by Bluebeam to its clients.
Client Secret: Authentication key generated by clients.
Bluebeam Server URL: Cloud Server URL for connection to Bluebeam. Value for this property will be hardcoded.
Redirect URL: Re-direct URL after authentication. Click Generate URL button to create the Redirect URL.
Numbering Template: Numbering template can be configured against the online commenting session in the Bluebeam Configuration Settings window. Numbering template for live commenting can be configured from transmittal and document. On clicking the browse button, the numbering template defined under the item Live Commenting is displayed. Select a single numbering template and proceed. Once the numbering template is configured, the numbering logic as defined in the numbering template is displayed for the live commenting session in the Create Session window.
Do not invite Cc users for live commenting in: While creating a Bluebeam session in some Projects ‘CC’ users are not required for document review. This option helps inlive selecting only To users in live commenting sessions. Cc users can be restricted for Transmittals and Workflow. In the drop-down list, options Workflow and Transmittal will be available. Based on the selection here, Cc users in the transmittal or workflow stages will be excluded from session creation. When this option is not selected, both the To and Cc users will be available as recipients in commenting session.
The following settings are also available.
Allow addition of external users: Select the checkbox next to this option to allow addition of external users (users not in Wrench) for invitation.
Allow sending session invitation Link through default mail: For external users, the URL to join the Bluebeam session will be included in the invitation email automatically. But for WRENCH users, this link is not sent. They have to join the session from WRENCH workspace.
This is to ensure that they use WRENCH workspace so that they will also update any associated checklists. This setting will help to override this restriction. If this setting is selected, the URL to join the Live Commenting session will be included in the invitation email sent to internal users also.
Restrict attendees by E-mail address: On selecting the checkbox next to this option, only users in the list of attendees can join the session and comment on the documents. Remaining users can join the session and view the documents, but cannot comment on the documents.
Select Specter by default for commenting: In some of the major organizations, specter files are used for commenting. In case of a P&ID and Isometrics for IDC, documents are issued in huge numbers. In this IDC Bluebeam session, originator have to spend a long time in selecting the specter file for all the selected Documents. To overcome this, setting “Select Specter by default for Commenting” in can be selected.
After saving the details Redirect URL has to be registered in Blue beam.
To register redirect URL
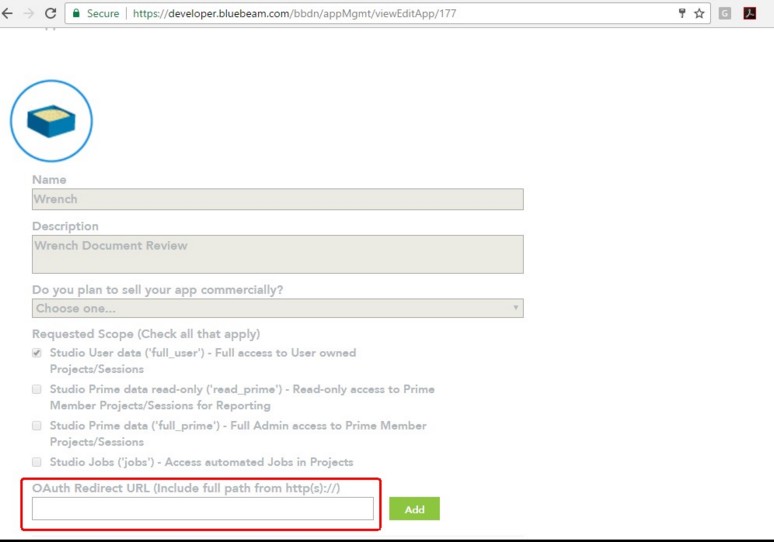
Figure: Bluebeam application manager window
If the connection to Bluebeam is successful, a message “Connection to Bluebeam Server is successful” is displayed.
Configuring MS Outlook integration with WRENCH meetings
Organizations which use MS Outlook, schedule events in Outlook calendar. Some organizations require WRENCH meeting schedules to be synchronized in Outlook Calendar as well, and receive alerts and notifications. To make this possible, an integration gateway is configured here.
To configure outlook settings
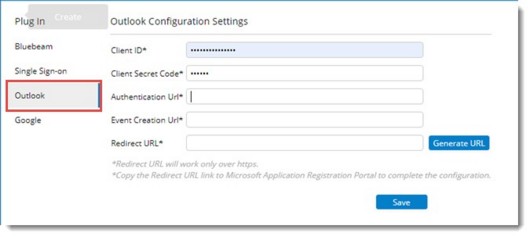
Figure: Outlook Configuration Settings
Enter values for the following properties.
Client ID: ID given by Outlook to its clients.
Client Secret Code: Authentication code generated by clients.
Authentication URL: URL for connecting to MS Outlook.
Event Creation URL: URL for creating an Outlook event.
Redirect URL: Redirect URL after authentication. This URL is generated on clicking Generate URL after entering values for all the properties.
It is necessary to establish a integration between SmartProject and Office 365 or Okta.
To configure single sign on
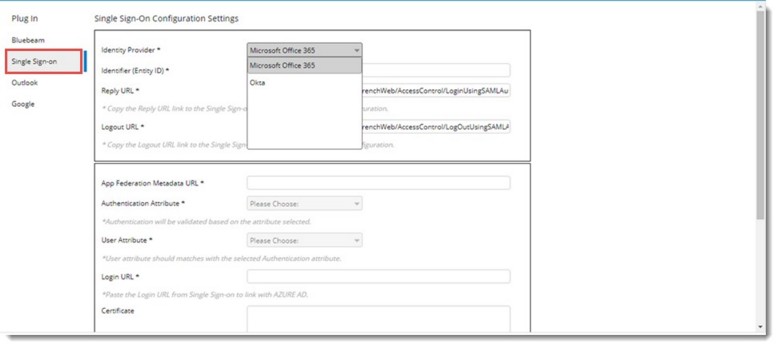
Figure: Configuring Single Sign On
Single Sign On Configuration Settings window is displayed.
Identify Provider: Select an Identity Provider from a drop-down list. Options available in the drop-down list are Microsoft Office 365 and Okta.
By default option Microsoft Office 365 is selected. If there are any saved configuration it is displayed in the window.
NOTE: When the Identity Provider is changed from the drop-down list, a warning message Do you wish to clear the existing configuration is displayed. On clicking Yes, existing configuration of the currently selected identity provider is removed, and the fields are cleared. On clicking No, existing configuration values are not cleared.
Identifier (Entity ID): This URL is unique and identifies the application. Copy-paste the same URL from Active Directory. Login URL from AD only contains the base URL path. Append the encrypted request using the reply URL and Identifier (Entity ID) while login.
Reply URL: This url specifies where the application expects to receive the SAML token. The reply URL is also referred to as the Assertion Consumer Service (ACS) URL.
Logout URL: This URL is used to send the Single Sign On Logout responses back to the application. This is mandatory if the selected identity provider is Microsoft Office 365. For Okta this URL is not mandatory.
App Federation MetaData URL: Specify this URL to allow user to access the metadata specific to the application.
Authentication Attribute: Specify the authentication attribute, which helps SmartProject to validate the user. Options Email ID and Login Name is available in the drop-down list. By default, Email Address is selected.
User Attribute: Specify the field name corresponding to the Authentication Attribute in the Federation MetaData XML retrieved using ‘App Federation MetaData URL. Once user pastes the metadata URL, corresponding attributes in the XML file will be listed in User Attribute drop down. User should select the right attribute relative to the authentication attribute.
Login URL: Specify the login URL. When a user opens this URL, the service provider redirects to Azure AD to authenticate and sign on the user. Azure AD uses the URL to start the application from Microsoft 365 or Azure AD My Apps.
Certificate: Enter the trust key to decrypt the response from Identity provider.
Configuring Okta SAML Settings
To enable Okta single sign on configuration, user has to configure SAML setting in Okta administration page.
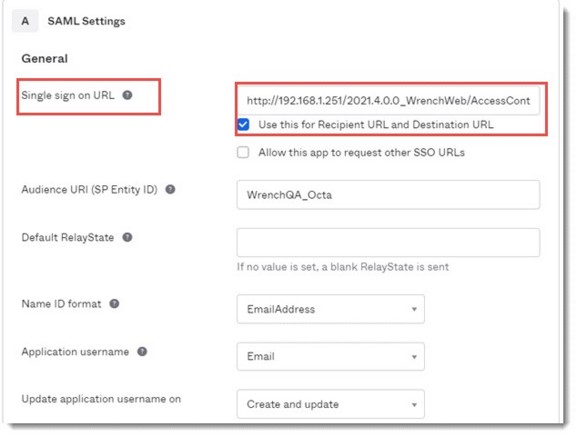
Figure: Configuring Okta SAML Settings
To Integrate SSO
If the authentication mode is configured for Okta sign on, user will be redirected to Sign on URL which will be the login page of Okta. Once successfully logged in with Okta, user will be redirected to the ‘Reply URL’ defined, where the ‘email address’ or the ‘Login Name’ (as configured) will be available. SmartProject will use this Okta login credentials to identify the corresponding SmartProject user account.