In some organizations there might be a need to add multiple documents to Wrench at a time. For Example: When a document controller in an organisation receives multiple documents from a vendor, it would be convenient for the document controller to add the documents together. The facility to add multiple documents together would be helpful in such scenarios.
The main topics discussed in this section can be accessed using this navigation table.
Navigation Table
Opening multiple document addition window
Multiple document addition window can be opened from the Global Menu.
 To open multiple document addition window
- In the global menu click Create.
- In the menu click the arrow next to Document.
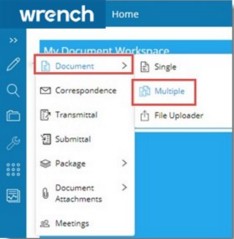
Figure: Opening multiple document window
- In the pop-up menu click Multiple.
Multiple Document Addition window is displayed.

Figure: Multiple document addition window
Adding multiple documents
In the multiple document addition window, before selecting files for addition, select or specify the following parameters.
Selecting the genealogy
Files are added under a folder which is referred to as genealogy in Wrench. Genealogies are created in the server and a genealogy is selected while adding documents.
 To select a genealogy
- In the multiple document addition window click the browse button next to Select Genealogy.
Document Genealogy window is displayed.
- Select the genealogy from the list and click OK.
NOTE: It is possible to change a selected genealogy. You can type in the genealogy and based on the characters you type in matching genealogies are listed. You can select the genealogy from the list.
Managing property set
A set of document properties are defined and they are stored under a unique name. This set of pre-defined properties are called as Property Sets. You can select an existing property set or create a property set. You can create a property set, rename a property set or remove a property set.
 To create a property set
- In the multiple document addition window click the link Manage Property Set.
Property Set window is displayed.

Figure: Property Set window
- In the drop-down box next to Select Property Set click Create New.
- Enter values for different properties displayed in the grid.
NOTE: Based on the values defined in the selected genealogy, values for some of the properties will be populated.
- After entering values click Save.
Save Property Set box is displayed.
- Enter a name for the property set and click OK.
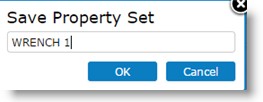
The property set created is saved.
 To edit a property set
- In the drop-down box next to Select Property Set choose the property set you want to edit.
The values defined for this property set is displayed in the grid.
- Edit the values and click Save button.
- Click Save As button to save the property set in a different name.
 To remove a property set
- In the drop-down box next to Select Property Set choose the property set you want to remove.
- Click Remove button to delete the property set.
A warning message is displayed.
- Click OK to continue.
Selecting files for upload
You can select multiple files and upload it to the system.
 To select files
- Click the button Click here to select files.

A File selection window is displayed.
- Select multiple files.
Selected files are listed in the grid. When files are listed different properties assigned to the property set is displayed in the grid. If a property set is not assigned, properties assigned to the genealogy are displayed in the grid.
NOTE: The values displayed by default in the grid can be edited or replaced.
Inserting and deleting rows
This option helps to add multiple documents without attaching a file So when adding documents there is no need to attach files, but the files can be attached later. Without attaching the file document properties can be assigned and the document can be saved to Wrench.
 To insert rows
- In the tool bar first define the number of rows that is to be inserted by click the up-arrow.

Figure: Inserting rows
- Click Insert Row.
Rows equal to the number selected is inserted.
Here you can provide different attributed and add the document without a physical file.
 To delete rows
- Select the files that you want to delete from the grid.
- Click More and in the menu click Delete.

Figure: Deleting Files
A confirmation message is displayed.
- Click OK to delete the files.
Generating document numbers
The tool strip has the option to generate document number for the files in the grid.
 To generate document numbers
- In the grid select the documents.

- Click Numbering Options.
Numbering Options menu is displayed.
The following options are available to generate a document number.
Generate different numbers for each selected file: New document numbers will be generated for each document, using the specified numbering template.
Generate a number and assign it to all selected files: A single document number will be generated using the specified numbering template and it will be assigned to all the selected documents.
Use the file name (without extension) as document number: The name of the file (without its extension) will be used as document numbers for all selected files. If this option is selected you need not choose a template.
- Select an item from the menu.
- Numbering Template window is displayed. Enter values and generate numbers.
- Numbers are generated for all the selected documents.
In case deleted numbers are available for selection the following message is displayed.
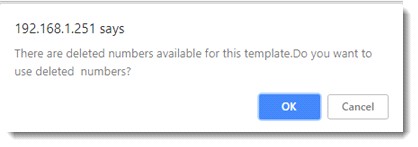
- Click OK to continue.
On clicking OK list of deleted numbers will be displayed in the Numbering Template window.
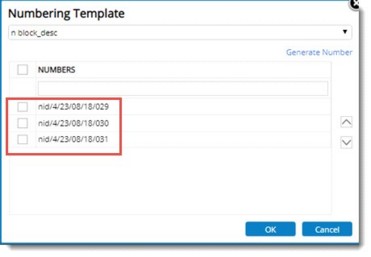
- Select a number and click OK. The following message is displayed.
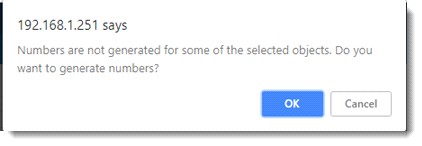
On clicking Cancel numbering template window is closed, and only deleted numbers will be assigned to the documents.
On clicking the option OK option to generate number is available in the Numbering Template window. User can generate new number as required.
After generating the new numbers and clicking ‘OK’, both the deleted and new number gets assigned to the selected documents.

Assigning workflow to documents
If a workflow is assigned to the selected genealogy system assigns the same workflow to the documents. However you can change the assigned workflow.
 To assign a workflow
- In the multiple document addition window click Assign Workflow.
Assign Workflow window is displayed.
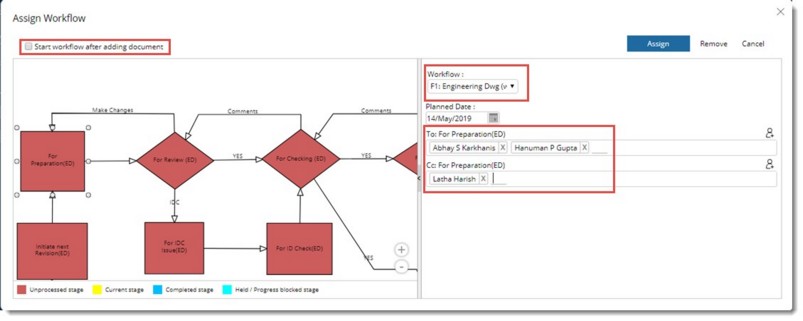
Figure: Assigning Workflow
- Select a workflow from the drop-down list.
- Enter To.. and Cc.. resources. Click user icon to select the users from Search User window.
- Click Assign button to save the selected workflow.
NOTE: If the checkbox next to Start Workflow automatically after adding document is selected, workflow of the document is started. This means the document is send to the workspace of the first stage user. If no users are assigned to the workflow stage, system will display a message asking to assign resources to the stage.
Selected workflow is assigned successfully to the documents.
Adding documents to Wrench
After generating document number and assigning a workflow, the next step is to add or upload documents to Wrench.
 To add documents to wrench
- In the multiple document add window click the button Add.
Documents added successfully window is displayed.
- Click OK to continue.
Generating templates and updating document properties
When bulk volumes of documents have to be added, an MS Excel template serves as the medium for updating document properties.The basic document properties are first exported to an MS Excel template, values for the properties are filled in and then the properties are imported.
This template can be generated automatically. This MS Excel template contains the same document characteristics that are uploaded to the grid. You can update the values in the template and import the details back to Wrench. For this, options to export the document characteristics to an MS Excel file and import the updated document properties back to the system are available. In the tool strip on clicking Importing from / Exporting to MS Excel the following options are available.
NOTE: Before using this option ensure that files are uploaded to the grid. Only document properties of these files can be updated using this option.
Export to MS Excel
Import from MS Excel

These options are explained in the following sections.
Exporting document characteristics to MS Excel
You can generate an MS Excel file and export the document characteristics to this file. The characteristics of the files uploaded to the grid are exported to MS Excel.
 To export to MS Excel
- In the tool strip click Import/Export.
Importing from / Exporting to MS Excel window is displayed.

- Click Export to MS Excel.
An MS Excel file is generated with document properties populated.
- Edit or update the document properties and save the MS Excel file.
Importing from MS Excel
The updated document properties are imported back to the system.
 To import from excel
- Save the updated values and close the MS Excel file.
- In the tool strip click Import/Export.
- Importing from / Exporting to MS Excel window is displayed.
- Click Import from Excel.
- File Selection window is displayed. Choose the excel file from the location where it is saved.
Document properties of the documents in the grid are updated.
Copying columns
In the multiple document addition grid it is possible to add additional columns by copying an existing column.
 To copy columns
- Select the check box next to a column.
- In the tool bar click More>>Copy.

- Click Paste. A new column is inserted.
Matching Tasks and Parent WBS Level
Based on the matching option provided in Task Linking Matching Option in document genealogy default properties, matching tasks can be linked to the document.
In the document default properties, if task linking is configured and for the option Auto Attach Documents to Task, value selected is Link; on clicking this option, a window for selecting Parent WBS Level is displayed. WBS Level can be selected from this window. For more information refer Adding a Single Document>>Linking Matching Tasks.
NOTE: Selection of a Project is mandatory for this feature to function.
In the Import template generated from Multiple Document Addition window, a new column Parent WBS Level is available. If a property set is defined, all the WBS levels of the specified Project in property set is exported. For more information Adding a Single Document>>Parent WBS Level.
Attaching Specter files
Specter files can be attached to selected documents.
 To attach specter files
- Select the checkbox next to the files to which you want to add specter files.
- In the More options click Attach Specter.
Select Specter box is displayed.

Here options to select a File Match Option or Browse Multiple Files are available. Different file match options are available in the drop-down list.
- Specter files can be added using the File Match Option or browsing multiple files by clicking the option Browse Multiple Files.


 To open multiple document addition window