While stringent monitoring of the milestone tasks is necessary for the timely completion of the project, the project manager needs to be informed of any delay in the Project well in advance so that appropriate preventive measures can be taken. The important milestone stages related to the progress in the deliverables are mentioned in the Rule of Credit module.
In the usual engineering scenario, the tasks in WBS are delivered to the client several times for review and approval. The progress of the tasks is constantly monitored through reports with the help of the Rule of Credit. The Rule of Credit provides the Planned and Actual dates for intermediate stages in the work flow.
User may select the appropriate issue purpose, approval status codes and internal status codes for the various work flow stages while creating rule of credit. By linking the issue purpose, approval status codes and internal status codes to the rules of credit actual dates for multiple issues to the client can be monitored.
Creating a rule set
Rule set can be defined for a group of tasks, documents, etc. for which the same rule of credits are to be monitored.
For Example: A rule set called Design Milestones can be defined, which can be set for a group of designing tasks in the genealogy.
 To create a rule set
- In the Project Properties window select Rule of Credit tab. Rule of Credit window is displayed.
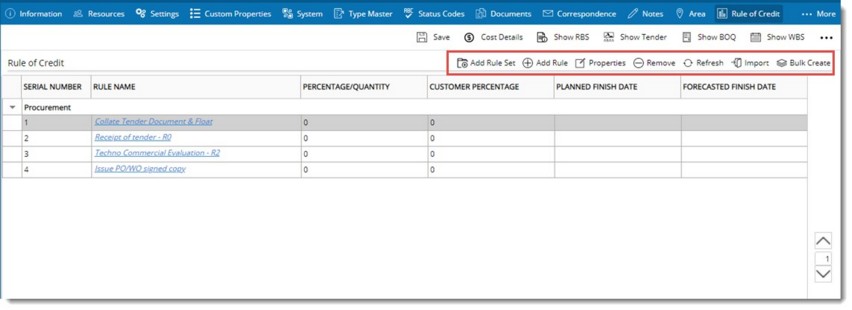
Figure: Rule of Credit window
- Click Add Rule Set.
New Rule Set Creation window is displayed.
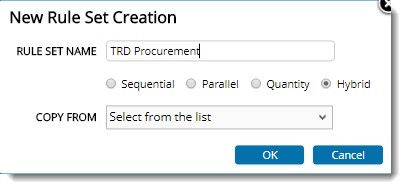
- Enter values for the properties mentioned in the following table.
|
#
|
Property
|
Description
|
|
1
|
Rule Name
|
Name of the Rule Set.
|
|
2
|
Sequential
|
If the radio button next to Sequential is selected work on the second rule or any succeeding rule cannot start unless the work on the first rule is over. This rule set can be termed as a sequential rule set.
|
|
3
|
Parallel
|
In most of the construction projects actual work is done in parallel. This means work can happen in parallel, and there is no any need to follow a sequence.
If the radio button next to Parallel is selected, the second rule or any succeeding rule can start even though the first rule is incomplete. This rule set can be termed as parallel rule set.
|
|
4
|
Quantity
|
Majority of the construction projects are planned for timeframes and not milestones. Planning is done for the completion of works for each time period which could be a day, a week or month.
If the radio button next to Quantity is selected it will be possible to define a quantity based or week based rule set that can hold the plan for weeks as well as accept actuals data for weeks.
|
|
5
|
Hybrid
|
In procurement scenarios, some items are procured as lots instead of a single purchase. Cement, steel, pipes are examples of such items. The reason for being procured as lots is that, their requirement will be spread over a longer time, so it is economically not viable for contractors to stock the complete material.
It means some of the activities occur as a single event but other occurs at different intervals. Progress of such activities, are captured using the Hybrid type rule set.
The Rule set type Hybrid is a combination of Sequential (Date based) and quantity Rule set. In this type of Rule set, user has the facility to update the progress of a rule by updating date against the rule or by updating quantity against the rule. The actuals updated are created as a sub rule under each rule.
|
|
6
|
Copy From
|
You can define a new rule set with all the details related to the existing rule. Select the existing rule set by clicking the down arrow next to 'Copy From' box.
|
- On clicking OK, a new group with the name of the rule set defined will be added to the grid.
Creating Rules of Credit
For the Rule set defined we can create rules of credit based on which the progress of deliverables related to the project is monitored.
 To create rule of credit
- Click Rule of Credit tab.
- Select the rule set for which you want to create a rule.
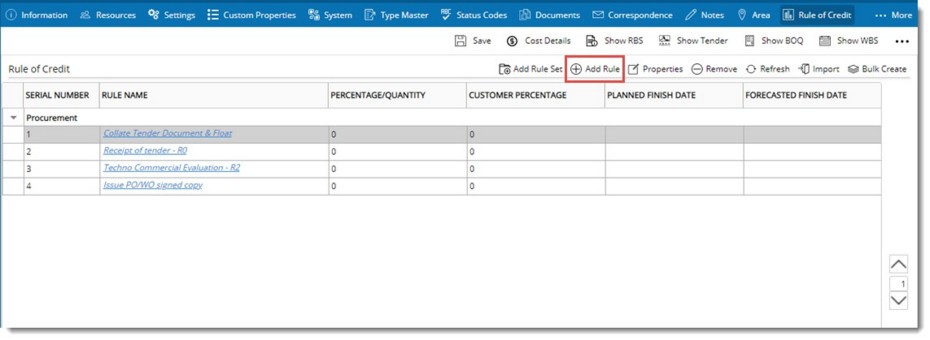
Figure: Adding Rule of Credit
- In the tool bar click Add Rule.
Add Rule window is displayed.
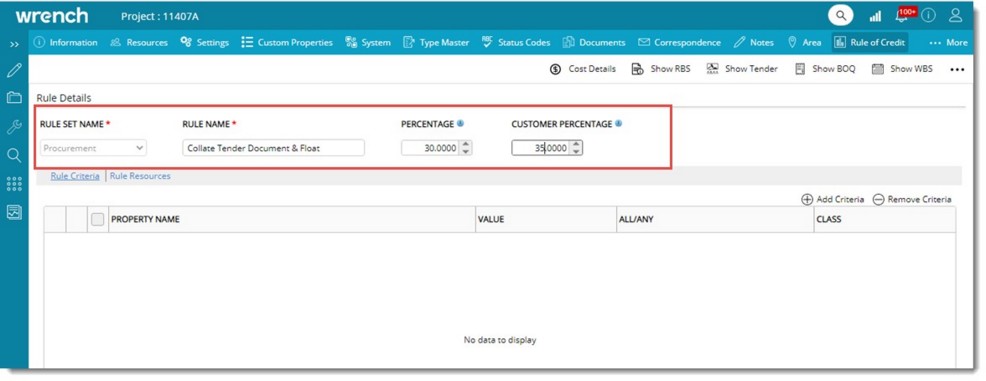
Figure: Add Rule window
- Enter values for basic rule properties mentioned in the following table.
|
#
|
Property
|
Description
|
|
1
|
Rule Set Name
|
Select the rule set for which the rule of credit is to be defined.
|
|
2
|
Rule Name
|
Enter a name for the project rule.
|
|
3
|
Percentage/Quantity
|
If the Rule set type is Sequential or Parallel, label will be ‘Percentage’. Enter a value for Percentage.
If the Rule set type is Quantity, the label will be ‘Quantity.’ Enter a value for quantity.
|
|
4
|
Customer Percentage
|
This denotes the percentage for customer milestones. This is applicable only if rule type is Sequential or Parallel.
|
After entering the basic rule properties, next step is to add rule details.
 To add rule details
- Click Add Criteria.

Select Rule Properties window is displayed.
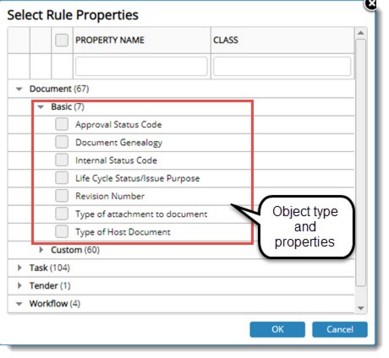
Figure: Select Rule Properties window
In the rule properties window different objects and object properties that can be added to rules are available. In the preceding figure properties are grouped based on Object Type and Property Type. Basic object properties and custom properties can be selected from this window. Custom Properties defined in the masters for documents and tasks are available here. Different object types and basic properties available under them are mentioned in the following table.
|
#
|
Object Type
|
Properties
|
|
1
|
Document
|
Basic document properties available for object type document is displayed in the following figure. Select the checkbox next to the property that you want to add to the rule.
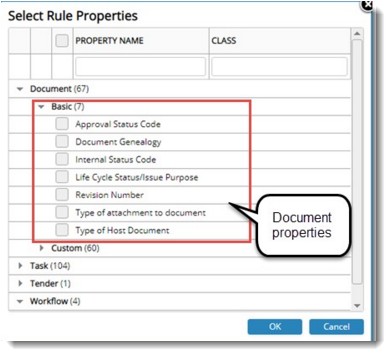
Figure: Selecting document properties
The selected properties will be displayed in the Rule Details window. In the rule details window, select values for the selected properties.
Approval Status Code: Select the Approval status code for the rule of credit.
Document Genealogy: Click the browse button to select the document genealogy. Once you select a genealogy, percentage progress for the rule is updated based on Type of Host Document and the selected genealogy.
For Example: If you select the Type of Host Document as "Link" and Document Genealogy as "Civil" then the task will be credited with the percentage defined for the selected rule, only when a document is linked to task from this genealogy in the selected stage.
NOTE: This option will not be enabled, if Type of Host Document is not selected. i.e, This option will be applicable only when the tasks are to be credited with a percentage progress on linking or referring documents from a genealogy.
Internal Status Code: Click the browse button to select the internal status code.
Life Cycle Status: Select a life cycle status for the rule of credit.
Revision Number: Enter the user revision number of the document.
Type of Host Document: Define whether the defined percentage is to be credited when the attachment is linked, referred or both .
Type of Attachment to Document: In some cases progress is achieved when a related file is added to a document. The rule would be active when any related file is linked or referred to a task and based on the rule specified progress will be captured.
Select the type of attachment based on which the task progress has to be captured. The options available are:
- Specter
- Related Files
- Comments
- Markups
- Client Comments
- Squad check comments
- Referenced documents

Figure: Selected document properties
|
|
2
|
Task
|
Basic task property available for object type task is displayed in the following figure. Only a single property Document Attachment Mode is available here.

Figure: Selecting task properties
Once this property is select you can choose whether the defined percentage is to be credited when the attachment is linked, referred or both, document is linked with physical file, document is referred with physical file or both. The options displayed in the following figure are available in the drop-down.

Figure: Selected task properties
|
|
3
|
Workflow
|
Here workflow related properties are available. The available properties are displayed in the following figure.
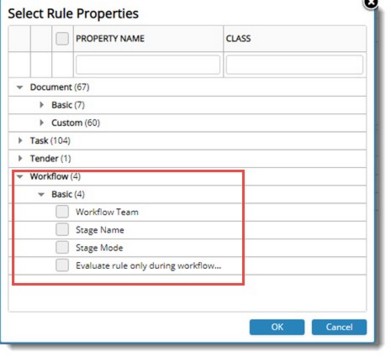
Figure: Selecting workflow properties
The selected properties will be available in the Rule of Credit window. Select values for the selected properties.

Figure: Selected workflow properties
Workflow Team: Click the down arrow to select a workflow team. Select a workflow from the drop-down list.
Stage Mode: Select the stage mode as 'Entry' or 'Exit' . i.e, while entering or exiting from the selected stage, the defined percentage will be credited for the rule.
Stage Name: Select the stage name for which the rule is to be defined.
Evaluate Rule only during workflow send operation (Yes / No): If the value for this property is selected as YES, the properties selected for this object will be applicable only during the sending operation and the actual finish date will be captured only during the SEND operation of the workflow provided all other conditions are satisfied when SENT. If this option is not selected, the actual finish date will be captured when all conditions are satisfied even after the SEND operation.
NOTE: If the property Stage Name is removed, properties Stage Mode and Evaluate Rule only during workflow send operation is also removed.
|
|
4
|
Tender
|
Here tender related properties are available.
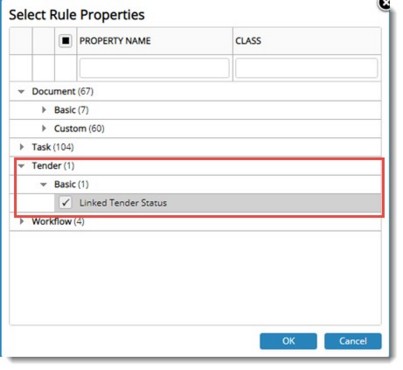
Figure: Selecting tender related properties
Actual finish dates of the rule based on linked tender can be captured.
For the criterion Linked Tender Status, different values can be selected from a drop-down list.

Figure: Selected tender properties
The following values are available in the drop-down list.
- Created
- Published
- Republished
- Recommended
- Part PO issued
- PO issued
- Bid Evaluation
- Closed
Based on the change in Tender status, the actual finish date of the rule is captured automatically depending on the status achieved against the linked tender.
|
- Click OK to save the entered criteria and exit the window.
- Click Save to store the rule criteria entered and continue with entering new rule criteria. Ruled Saved Successfully window is displayed.
Assigning permission to update actual finish dates
When rulesets are inherited to tasks from the project, certain rules (milestones) may have approvals from customer and actual finish date of such rule’s may need to be updated only by people with special privileges; while the ‘Actual Finish Date’ for the rest of the rules may be updated by anyone with rights to carry out the operation. Permission to edit Actual Finish Date of the rule can be assigned to selected user groups.
 To select user groups
- In the rule details window select the tab Rule Resources.
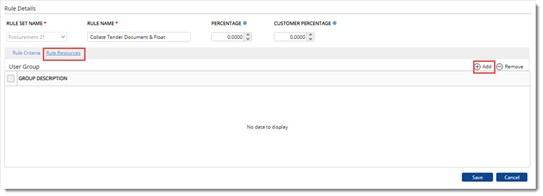
Figure: Adding Rule Resources
- In the window click Add. User Groups window is displayed.
- In the window select the required groups and click OK.
Selected groups are displayed in the Rule Resources window grid.

Figure: Selected user groups
- Click Save to store changes.
When a user tries to update Actual Finish Date of a rule, if the rule has any user groups assigned to the ‘Rule Resources’, and the current user is assigned with any of the specified roles in the current project updating is permitted. Or else updating is denied with an alert message.
During bulk update, if all other validations are successful and only the validation on ‘Rule Resources’ (as specified above) fail, the task details are updated except for any updating of the Actual Finish Date of the rule. The failure is notified as a warning.
Editing a rule / rule set
A rule or rule set can be edited.
 To edit rule/rule set
- Select Rule/Rule of Credit and click Properties.
Rule/Rule of Credit window is opened in edit mode.
- Edit the values and click Save.
Deleting a rule/rule set
Select a rule/rule set and click Remove to delete the rule/rule set from the project.
Importing rule of credit
Import of rule of credit helps in reusing of rules of credit data from similar projects. The project from which the rules of credit values are imported is defined as the Source project. The project to which the values are imported is defined as the Destination project. Rule of Credit can be imported from a Project or an MS Excel sheet.
Importing rule of credit from a project
Rule of credit can be imported from another project.
 To import rule of credit from project
- In the Rule of Credit window, click the Import button.

Import Rule of Credit window is displayed.
- Click the browse button to select a project. A list of projects is displayed.
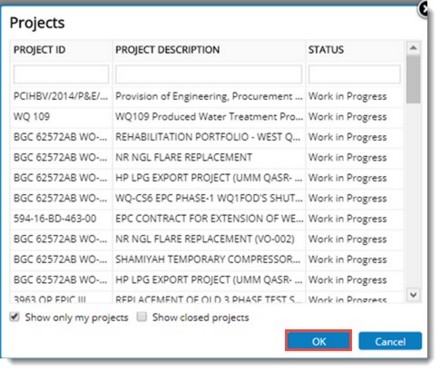
Figure: Projects Search window
- Select a Project from the list and click OK.
The details section will automatically be expanded if there are any rule sets in the selected project and all the rule sets will be displayed.
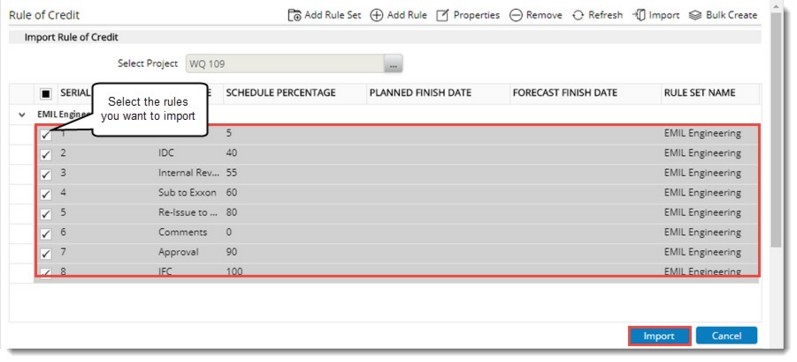
Figure: Importing Rules
- Select the rules sets you want and click Import.
Selected rules are imported.
Creating rule of credit in bulk
Rule of credit can be generated in bulk.
 To bulk create rule of credit
- In the Project Properties window click the tab Rule of Credit.
- Select a Rule of Credit.
- Click Bulk Create.
Bulk Create Rule of Credit window is displayed.
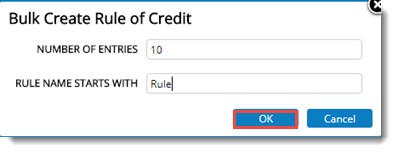
- Enter the following details in the window.
- Number of Entries: Enter the number of rules that has to be created.
- Rule Name Start with: Rules will be labelled based on the value entered here.
- Click OK.
Rules are created based on quantity entered in the field Number of Entries.
For Example: If you select number of entries as 3 and rule name start with value as Task, rule sets Task 1, Task 2 and Task 3 will be created.
Refreshing WBS
Once changes are made in Rule of Credit, changes have to be reflected in the WBS.
 To refresh WBS
- In the Rule of Credit tool bar click Refresh.
Refresh WBS window is displayed.
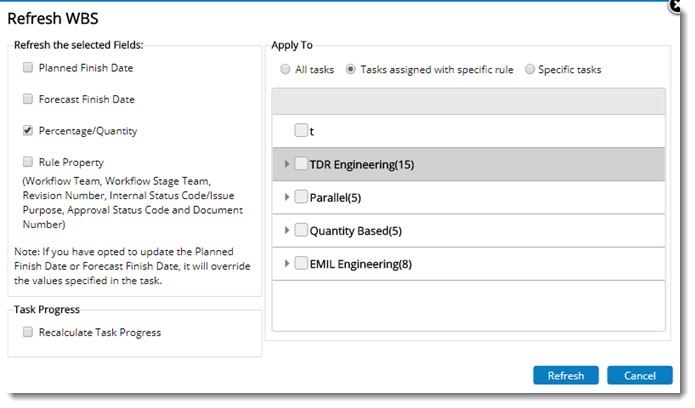
Figure: Refresh WBS window
In the window following options are available.
Refresh the selected Fields: Under this group fields Planned Finish Date, Forecast Finish Date, Percentage Quantity and Rule Property is available. If the option Rule Property is selected, on clicking Refresh button, properties Workflow Team. Workflow Stage Team, Revision Number, Internal Status Code, Issue Purpose, Approval Status Code and Document Number are refreshed.
Task Progress: Under this group option Recalculate Task Progress is available. If checkbox next to this is selected, on refreshing task progress is calculated and the latest progress percentage is updated.
Apply To: Under this group following options are available.
- All Tasks: On selecting the radio button next to this option all tasks will be refreshed.
- Tasks assigned with specific rules: On selecting this option rules assigned to the task is displayed. Select the rules from the list.
- Specify Tasks: On selecting the radio button next to this option, a browse button is displayed,. On clicking the browse button Advanced Search window is displayed. Search and select the tasks. In the Search Results window tool bar click Apply to selected tasks.
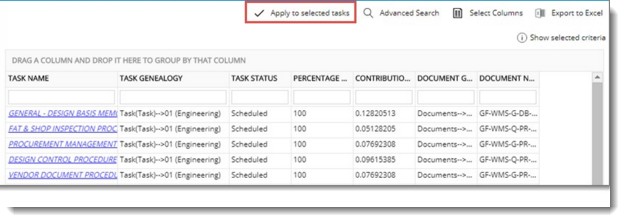
Selected tasks will be displayed in a new window. Click Refresh to continue the refresh operation.


 To import rule of credit from project