WBS is a collection of tasks. Different options are available for managing tasks in WBS. These options are housed in the menu that is displayed when the mouse is hovered above the Tasks button.
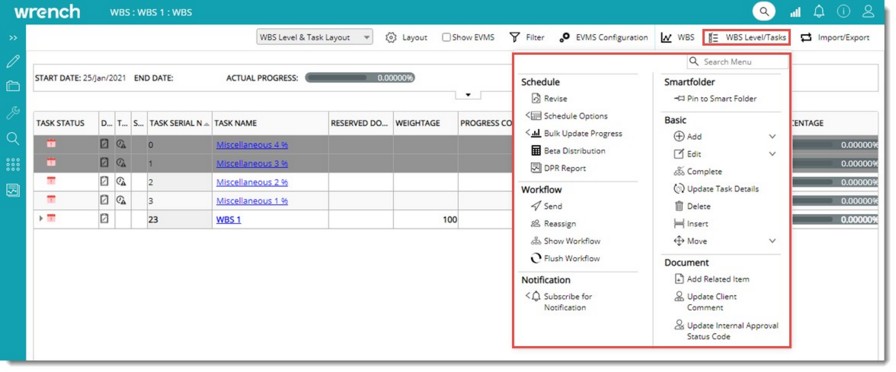
Figure: Task Operations
Different task related operations that can be carried out from this menu are mentioned in the following navigation table.
Add (Creating WBS Level and Tasks)
Using this option you can create a WBS Level and Task. A WBS Level is an independent task which may or may not have a Task under it. WBS Level can be created and edited only in the “WBS Level View” as well as when “Package based Progress Measurement” configuration is not selected in the Project. WBS Levels will never be a “Document Task”. Tasks are created under the WBS Level.
NOTE: Users with EDIT WBS permission can create WBS Levels in WBS. Those resources assigned to WBS Level with “Manage” permission may create WBS Levels/tasks under such WBS Levels.
 To create a task
- In the menu bar click WBS Level/Tasks>>Add>>Task.
Create Task window is displayed.
Here you can enter task related properties. For more information on creating a tasking see Creating a task and scheduling the task.
 To create a WBS Level
- In the menu bar click WBS Level/Tasks>>Add>>WBS Level.
Create Task window is displayed.
Here you can enter WBS Level related properties. For more information on creating aWBS Level see Creating a WBS Level.
Insert
Click this option to insert a new task serially above an already existing task. On clicking this option Create Task window is displayed. Enter values for different properties in the window and save the task.
Edit task
Editing a task involves activities like copying or cutting a task and pasting it. Editing also includes editing of task properties. Different edit options are explained in this section.
Cut: This operation is similar to copy operation. Irrespective of whether you paste the task after cutting or not, the task is removed from the WBS.
Copy: Select this option to copy the selected WBS Level Task and Leaf Level Task.
Paste: Paste and Paste special are two options available for pasting a selected WBS Level Task and a Leaf Level Task.
If you want to paste a selected task, then “Paste” option is selected.
Consider the following discussions when copying and pasting a WBS Level task:
- If a task at leaf level is selected as target, the copied summary (source) gets pasted under the selected task’s (target) parent.
- If a summary is selected as target, the copied summary gets pasted under the selected target.
- If the source summary itself is selected as the target, the source gets pasted as a new WBS Level under the target.
- In all cases, all the child tasks under the source will be available under the pasted task as well.
Consider the following discussions when copying and pasting a leaf level task:
- If a task at leaf level is selected as target, the copied summary (source) gets pasted under the selected task’s (target) parent.
- If a summary is selected as target, the copied source gets pasted under the selected target.
- If the source itself is selected as the target, the source gets pasted as a new task under the target’s parent.
On selecting Paste Special, 'Paste Options' dialog box is displayed. Select the check box against task information's which are to be copied. Select the check box against "Select All" to select entire task information's. The percentage progress is recalculated for both source and target tasks on completion of the operation.
Paste Special: Using this option you can select the task properties that are to be pasted along with the task. On clicking the Paste Special option after copying or cutting a task, Paste Options window is displayed. Select the checkbox against task information's which are to be copied. Select the checkbox against "Select All" to select entire task information's. The percentage progress is recalculated for both source and target tasks on completion of the operation. Click OK to complete the paste special operation.
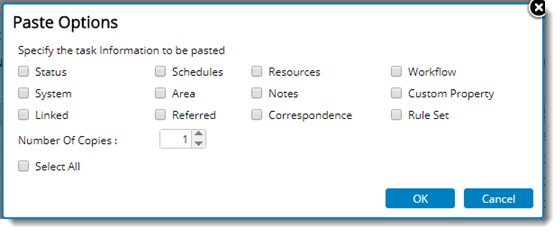
Figure: Paste Options window
Move
The position of the task in a WBS can be changed using this option. It is possible to move the task up or down or move the position of the task to the left or right. The following move operations can be carried out on a task.
Indent: Indent is applicable only for WBS Levels. After selecting a WBS Level and clicking “Indent” will make the selected level as Child WBS Level immediately above. If the selected task already has sub tasks under it, the entire hierarchy is indented to the new level.
NOTE: This operation is possible only if there are tasks above the selected task.
Outdent: Out-dent is applicable only for WBS Levels After selecting a WBS Level and clicking “Out-dent” will bring the selected level to the same level of its parent.
NOTE: This operation is possible only if there are parent tasks above the selected tasks.
Move Up: A selected task can be moved up from its current position. The sequence number of the task is changed accordingly.
Move Down: A selected task can be moved down from its current position. In this case also the sequence number of the task is changed accordingly.
Add Related Item
Using this option you can link or refer a task or document to a task. On clicking this option the following window is displayed.
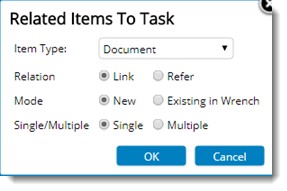
NOTE: Link operation is not applicable for WBS Levels
 To add a related item
- Select an Object Type. A task or document can be selected as an object type.
- Select a Relation. You can either Link or Refer a document or task to a selected task.
Linked documents are primary deliverables of a task. When a linked document is completed or released, the task is also completed. Also when the linked document is revised, task is also revised. Referred documents are only used for reference purpose. Referred documents does not have any control over the progress or completion of a task.
NOTE: If a task has no Rule of Credit assigned to it, but tasks linked to it have Rule of Credit assigned, the progress of the task is based on the progress of the linked tasks progress. On the other hand referred tasks are just for reference and does not have any effect on the execution of tasks.
- Select a Mode. Options available are New and Existing in WRENCH. You can either link or refer a new document to the selected task or a document existing in WRENCH. In the case of tasks, only an existing task in WRENCH can be linked or referred to a task.
- You can link single or multiple objects to a task. Depending on your need select between the options Single or Multiple.
Schedule options
Before starting to work with a task, it has to be scheduled and a workflow assigned to it. These activities are carried out using the schedule options available in the Task Operations menu. Different options available are explained here.
Schedule: When a task is created it is in the un-scheduled status. After the schedule of activities are fixed, the task is scheduled by the concerned user. The status of the task changes to "SCHEDULED." Once a task is scheduled, it can be changed to un-scheduled status only by revising the task. You can select single or multiple tasks and schedule it.
NOTE: Only users with edit permission in the task genealogy can schedule a task.
 To schedule a task
- In the WBS select single or multiple tasks.
- In the task operations menu click Schedule.
Task Scheduled Successfully window is displayed.
Start Workflow: Once a task is scheduled, a workflow is assigned to the task and the task is send to resources assigned to the task. This is done using the Start Workflow option.
 To start workflow
- In the WBS select single or multiple tasks.
- In the task operations menu click Start Workflow.
Workflow window is displayed.
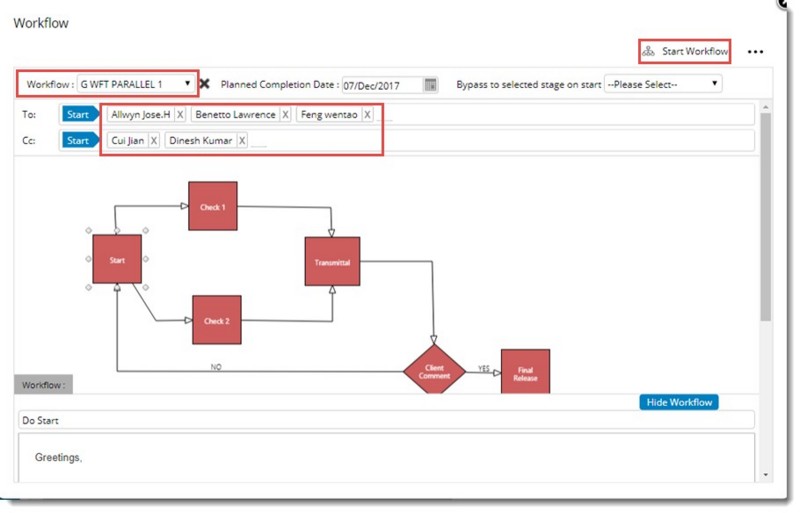
Figure: Workflow window
- Select a workflow from the drop-down list.
- Click To..to select resources for the workflow stage.
- Click Start Workflow.
NOTE: If the workflow has to be redirected to a different stage after starting the workflow, select a workflow stage in the drop-down list next to the option Redirect to selected stage on start,
In case there is a pre-defined workflow assigned, the task is started and the first stage is active with the pre-defined user.
Schedule and Start Workflow: After selecting single or multiple tasks click this option to perform schedule and start workflow operation in a single step. Task is first scheduled and then workflow is started.
 To schedule and start workflow
- In the WBS select single or multiple tasks.
- In the task operations menu click Schedule and Start Workflow.
If the selected tasks has workflow assigned to them. task is scheduled and the workflow is started. If there are no workflow assigned to the task, Assign Workflow window is displayed.
In case a workflow is not assigned to the added document, workflow window is displayed.
- Select a workflow from the drop-down list.
- Click To..to select resources for the workflow stage.
- Click Start Workflow.
NOTE: If the workflow has to be redirected to a different stage after starting the workflow, select a workflow stage in the drop-down list next to the option Redirect to selected stage on start,
Send
Using this option you can send a task from the active stage of a workflow to the next stage. Single or multiple tasks in a WBS can be selected and send to the next stage.
NOTE: When sending multiple tasks, ensure that selected tasks are assigned with the same workflow and all the tasks are in the same stage of the workflow.
 To send tasks through a workflow
- Select single or multiple tasks and in the menu click Send.
Send window is displayed.
- Click To..to add recipients from a User List window.
- Click the Send tab to send to next stage.
- Click Sequencing to define a sequence or to modify an existing sequence.
- Sequencing window is displayed. Here you can set the Sequence and Planned dates for each user in the next stage.
NOTE: The sequence of the existing user cannot be updated if the sequence is locked in the workflow.
Workflow: The name of the workflow assigned to the document is displayed here. A preview of the workflow is also displayed in the preview area.
Next Stage: Here the next stage in the workflow is displayed by default. You can bypass an existing stage and move to the next stage or redirect to a different stage.
 To re-direct to a stage
- In the Send window click Redirect.
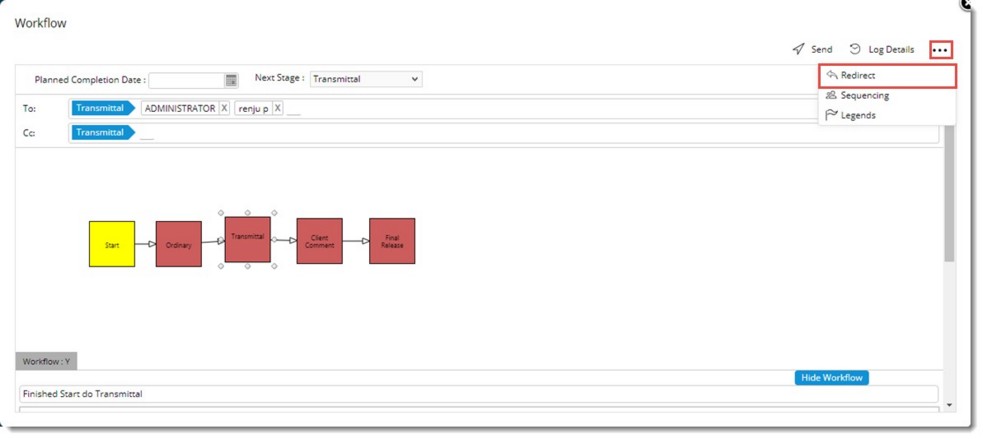
Figure: Redirecting stages
- Select the stage to which you want to redirect the document.

- Click OK to confirm changes.
If resources are assigned to the stage, task is sent to the next stage. Or else you have to select resources for the next stage.
 To select next stage resources
- Click the To. button.
User List window is displayed.
- In the user list window choose the users whom you want to add as recipients.
- Click OK to continue.
- Cc : Recipients to whom the document has to be sent for information can be selected here.
NOTE: When typing in the user name a list of users are displayed. Login name is displayed along with the user name as displayed in the following figure. This helps in preventing any confusion that may arise when users with identical user name exists.
In the Send window you can set a Planned Date for the next stage. Once a Planned Date is set, the workflow stage is closed, after the date expires.
Automatic closing of workflow stages after planned date
This is based on a setting defined in WRENCH Masters, when workflow stages are configured. Planned Date is calculated based on the lead time entered in workflow organizer. The number of hours entered as lead time is added to the current date.
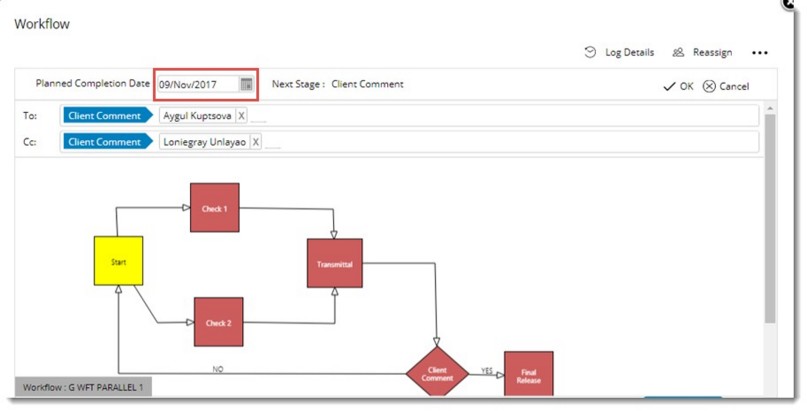
For more information on sending tasks refer Sending documents and tasks through a workflow.
Show Workflow
Click this option to display the workflow assigned to the task. Workflow window is displayed.
Update Client Comments
When a deliverable like an engineering design has been completed and gone through the internal review cycle, the design is released to client for review and approval. Once the document is reviewed by client the comments and the status code marked for the design is sent back. This is updated by client if the client is using WRENCH in the review cycle; else, the document controller updates the same on behalf of the client
 To update client comments
- In the WBS select the task and in the menu click Update Client Comments.
Update Client Comment window is displayed.
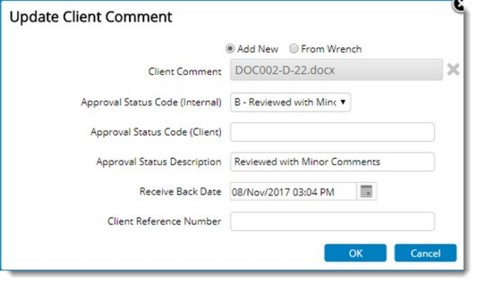
Figure: Updating Client Comment
Option to select comment file from WRENCH or from a location in your system is available. Select the respective radio button to select a comment file from your preferred location.
Select a File: Click this field to choose the comment file, if the radio button next to Add New is selected. File selection window is displayed. Select the client comment from the location where it is stored.
If the radio button next to From Wrench is selected, you can type in the client comment file number saved in WRENCH. As you type in a list of files with matching characters is displayed. Select the file from the list or enter the file name.
Approval Status Code (Internal): Select an approval status code from the drop-down list where a pre-defined list of codes will be available.
Fields Approval Status Code (Client) and Approval Status Description is filled in based on the internal status code selected.
Receive Back Date: This is the date on which the document was received after client comments. By default current date is displayed as the receive back date. Select the date from a date picker.
Client Reference Number: Enter the client reference number.
- Click OK to store changes.
Update Internal Response
For documents such as vendor documents which are received from external sources, the review is done by the engineering team and the approval status code is given for the same. This is the internal approval status code. These are also part of the engineering deliverable list and are reviewed through a workflow cycle.
 To update the internal status code
- In the WBS menu click the option “Update Internal Response”.
Update Internal Status Code window is displayed.
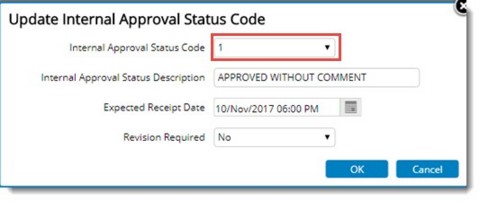
Figure: Update Internal Approval Status Code window
- Select the code from the drop down available and the corresponding description is auto-filled.
- Update Expected Receipt date using the date picker.
- Click OK to completes the operation.
This operation can be done for single and multiple tasks.
Delete
Click this option to remove single or multiple tasks from the WBS. Deleted tasks can be viewed from "View Deleted Tasks" option under WBS. Transmittal Released documents for which approval status codes are not updated cannot be deleted.
Total count of selected items is displayed in the confirmation prompt that is displayed before deleting.
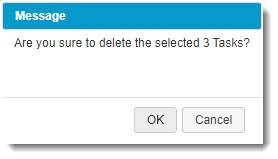
When the selected items for deleting are only tasks, the following message is displayed.
"Are you sure to delete the selected <<Selection Count>> Tasks?"
When the selected item for deleting includes WBS Levels and Tasks, the following message is displayed.
“All the WBS Levels and Tasks under the selected <<Selection Count>> items will also be deleted. Are you sure to proceed?”

NOTE: The same is applicable while deleting WBS Levels and Tasks from Smart Scheduler.
Update Task Details
There are scenarios where the schedule, workflow and metadata of multiple tasks need to be updated in a single go. In such scenarios this option can be used. Task Details can be updated for single or multiple tasks.
 To update task details for multiple tasks
- In the WBS select the tasks that are to be updated. Ensure the selected tasks are of the same WBS and same Status.
- In the menu click Update Task Details.
Task Details window is displayed.

Figure: Update Task Details window
- Click Edit to update task details. In the task details tab, Basic Task Details, Document Details, Origin Details, System Details, Area Details, Approval Status Code Details and Custom Details can be updated. After updating the values click OK to save changes.
Updating schedules
Schedule details can be updated from this window. In the Schedules tab, by default any value will not be displayed.
To update schedules
- Select a ‘Project Rule Set’ and update the schedules. User is not permitted to add manual rules.
- Click “OK”. Values get updated for the selected tasks. The schedules will be applied to the selected tasks.
- Click Cancel, to close without saving any changes.
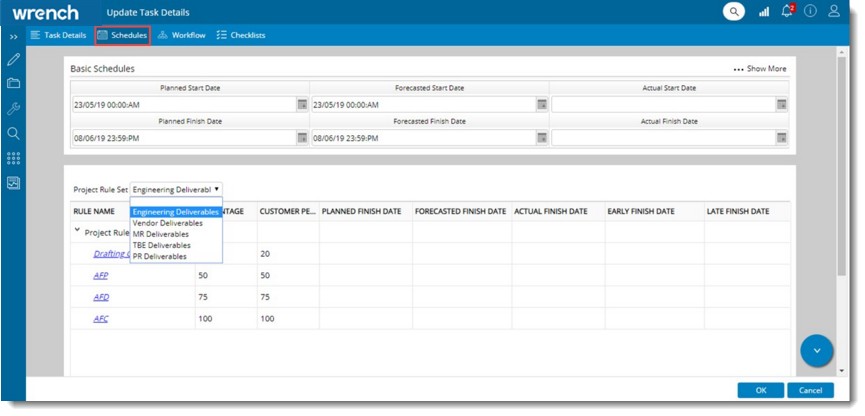
Figure: Updating Schedules
Updating workflow
Workflow tab will not display any workflow by default. Workflow of tasks that are Work In Progress cannot be changed.
To assign workflow
- Select a workflow from the drop-down list and click OK. Workflow is assigned to the selected task.
NOTE: Active workflow preview will be available only after workflow is started successfully.
Updating Checklists
Checklists tab will not display any values by default. User may choose a checklist and assign it to the selected tasks.
To update checklists
- Click Assign.
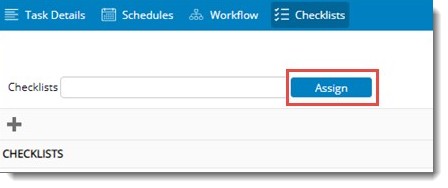
Checklist Master window is displayed.
- Select the checkbox next to the checklist names that is to be assigned to the task and click OK.
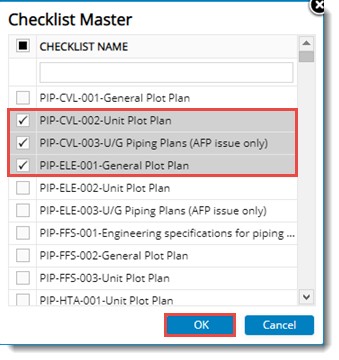
Figure: Checklist Master window
The selected checklists get assigned to the tasks along with already available checklists if any.
All the values updated in the task details tab, schedules tab, workflow tab and checklists tab will get updated in respective tasks while clicking the OK button and other properties remain unaffected.
On clicking OK button, the following notification is displayed.
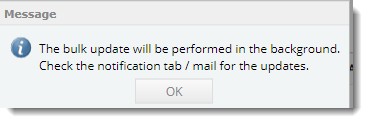
Revise Task
Using this option you can revise a completed task.
 To revise a task
- In the WBS select the task that you want to revise.
- In the WBS Level/Task Operations menu click Revise Task.
A warning message "Do you want to revise the selected task" is displayed.
- Click OK. Task Revised successfully message is displayed.
The status of the task changes to Unscheduled.
NOTE: This operation is not permitted on WBS Levels.
Flush Workflow
Using this option you can flush the workflow of the selected task. Active workflow of the task will be reset and all the progress will be reversed. Work will restart from initial stage.
Send To Personal Folder
Using this option you can send the selected task to a personal folder.
 To send a task to personal folder
- Select a task.
- In the task operations menu click Send to Personal Folder.
Pin To Smart Folder window is displayed. Task Smart Folders are listed here.
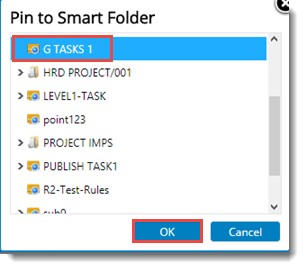
- Select the folder to which you want to send the task and click OK.
Item Pinned Successfully message is displayed.
Reassign Resources
Using this option, resources in workflow stages can be reassigned. This means you can replace the resources assigned to a workflow stage.
 To reassign resources
- In the WBS select a task.
- In the task operations menu click Reassign.
Workflow window is displayed.
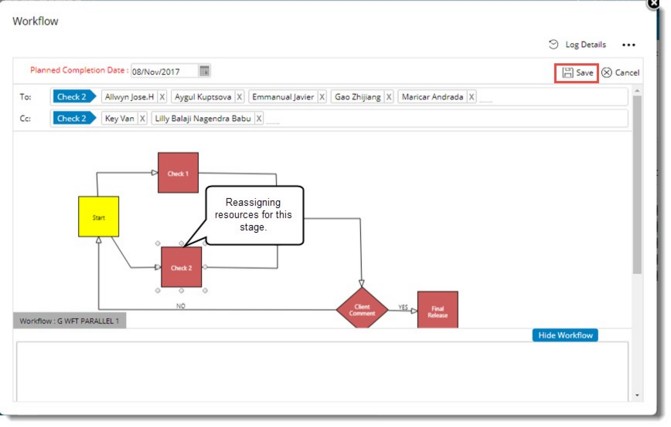
Figure: Reassigning stage resources
- Select a stage and replace the resources for that stage.
- Click Save to complete the reassigning process.
Complete
Using this option you can complete a task manually. Only a task in the final release stage can be completed. The task status changes to Completed.
Bulk Update Progress
In a typical construction project, there will be multiple activities happening at the same time. It would be very difficult for the users to open each task to update progress. To handle this, facility to update progress in bulk is available. Progress can be updated for multiple leave level tasks and multiple parent level task combination or multiple parent level task.
NOTE: Progress can be updated in bulk only for quantity tasks without project rule sets.
 To update progress in bulk for Quantity tasks
- In the WBS grid select the tasks.
- Click WBS Level/Tasks.
- In the menu click Bulk Update Progress>>Quantity.
Bulk Update Progress window is displayed. If the checkbox next to Show Pending Tasks Also is selected, all delayed tasks irrespective of the applied filter is also displayed.

Figure: Bulk Update Progress window (Quantity)
- Click Browse to change the selected WBS level.
- WBS Levels window is displayed. WBS Levels are displayed here. If the checkbox next to Select Multiple Levels is selected, option to select multiple WBS Levels is enabled.Select the required levels and click OK to complete selection.
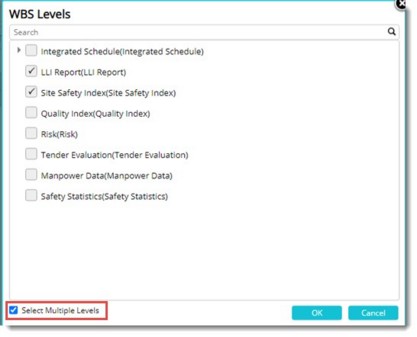
Figure: Selecting WBS Levels (Single and Multiple)
In the drop-down next to Filter Based On Planned Dates the following filters can be selected.
- If the filter Current Date is selected, all tasks that are not completed and the current date is within the ‘Start’ and ‘Finish’ dates of the task is filtered.
- If the filter Current Week is selected, all tasks that are not completed and the schedule falls within the start and finish of the current week is filtered.
- If the filter Current Month is selected, tasks that are not completed and the schedule falls within the start and finish of the current month is filtered.
NOTE: The preceding window is displayed in the case of quantity based tasks. In the case of date based tasks a different window is displayed.
- In the window enter the new quantity and date on which the progress was achieved (Achieved On.)
- Click Update Progress.
Updated Successfully message is displayed.
If zero or no value is provided as the value for earned progress percentage and achieved quantity, following warning message is displayed.
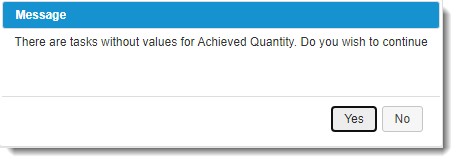
On clicking YES, tasks with value zero or no value is ignored, and remaining tasks are updated. On clicking NO, the same page is displayed.
Uploading files against each entry in Bulk Update Progress window
When updating the daily progress against a task in the Bulk Update window, it may be required to upload files or images against each update. For this a new column RELATED FILES is available in the window.
To upload files or images
- In the RELATED FILES column click the hyperlink View.

Figure: Uploading files
Related Files window is displayed.
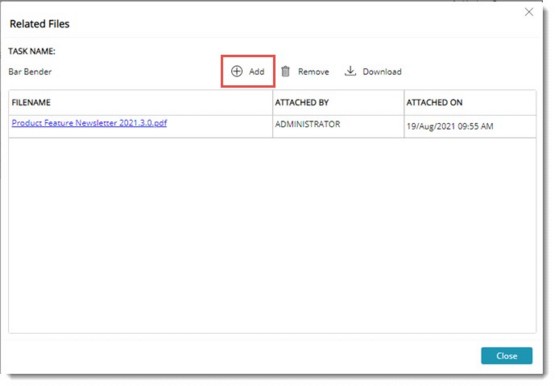
Figure: Related Files window
Related files already added are displayed in the window.
- Click Add to attach a related file. Select files window is displayed.
- Select the required file from the from the location where it is saved.
- Click Close to close the window.
Facility to delete the related file and download the related file are also available in the window.
Option to filter tasks based on achieved on date
In some scenarios, when user update the progress of tasks daily, the work in progress tasks is the same as the tasks which are updated on the previous day. Hence in the Bulk Update Progress window, for quantity-based tasks, facility to filter the tasks with ‘Actuals’ updated on previous day or a specific date is provided.
In the window if the Filter Type selected is Actual Achieved On, a date picker to choose the Achieved On Date is displayed.

User will be permitted to select only date lesser than the current date. On choosing the date, the list of tasks with a new quantity registered on the corresponding date are filtered and displayed.
 To update progress of date based tasks
- In the WBS grid select the tasks.
- Click WBS Level/Tasks.
- In the menu click Date.
Bulk Update Actual window for date is displayed. Here values for Last Updated Progress, Early Progress and Last Progress are displayed.

Figure: Bulk Update Actual (Date) window
- Enter values for earned progress and click Save. Progress will be updated based on the earned progress entered.
If zero or no value is provided as the value for earned progress percentage and achieved quantity, the following warning message is displayed.
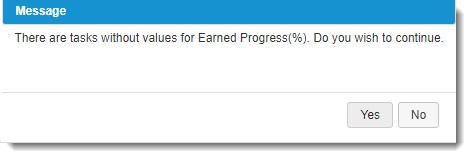
On clicking YES, tasks with value zero or no value is ignored, and remaining tasks are updated. On clicking NO, the same page is displayed.
When user update earned progress of the date-based tasks with rules, system verifies whether the given earned progress is less than or equals to planned percentage of subsequent rule. If not, an alert message is displayed in the Remarks column.
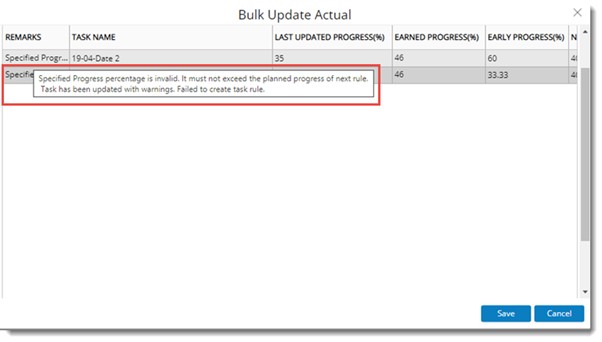
Figure: Bulk Update Actual window
Filtering Planned Dates
If it is required to update the progress for the tasks from the folder which contains delayed tasks also, a provision for filtering the selected task based on the planned dates in the rule name of tasks is available. By default there will be no selection. The options that can be selected from a drop-down list are Current day, Current week and Current month.
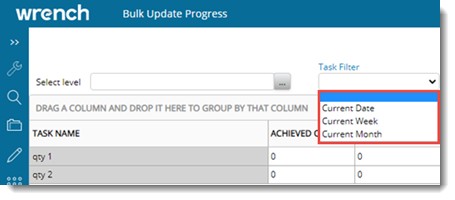
When Current Date is selected then all tasks with planned finish date in task rule name equals current date will get filtered.
When Current Week is selected then all tasks in the window with planned finish date in task rule name falling in the current week will get filtered.
When Current Month is selected, then the all the task in the window with planned finish date in task rule name falling in the current month will get filtered.
Beta Distribution
In conventional planning, the planner decides the start and end dates of all project tasks and the project progress is estimated based on the completion of these tasks (when actual end dates are captured). Here the progress of a task between the start and end is not known.
Beta distribution technique helps to overcome the inconveniences and overheads involved in planning activities related to a construction project. Task rules may be automatically created for each week / month between the Start and Finish dates of the task and the estimated progress at each of these week / month can be computed using this technique.
While calculating the beta distribution, the alpha value and beta value will be decided by the user. For Example: For a steady progressing task, both alpha and beta values are defined as 1. For a slow starting but faster finish type of tasks (more work in the beginning) a larger alpha value is assigned. For a task which has quick progress in the beginning, larger beta values is used.
For more information on beta distribution see Working from Task Details window>>Schedules>>Beta Distribution.
Subscribe for Notification
There are a number of events from WBS, to which users can subscribe so that these events will be notified to them by mail. Notifications can be configured for Task and Rule based events. This is a desirable function for a Project manager. Notifications can be configured or inherited.
 To configure notifications
- In the WBS select single or multiple tasks.
- In the WBS window click WBS Level / Tasks.
- In the menu click Subscribe for Notification>>Configure Notification.
Configure Notification window is displayed.
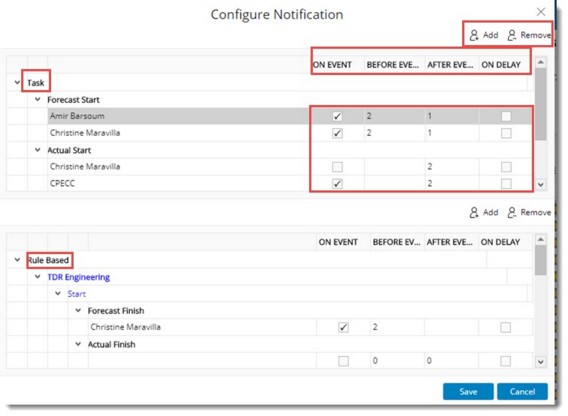
Figure: Configuring Notifications
Notifications can be configured for the following events or occasions.
- When a task/rule is started (Work started on a task).
- When a task/rule is completed (Hundred Percent).
- When a task /rule is delayed (Not hundred percent even after the scheduled finish date).
- Defined number of days before the scheduled start date of a task/rule.
- Defined number of days before the scheduled finish date of a task/rule.
- Defined number of days after the task/rule is started.
- Defined number of days after the task/rule is completed.
- Select an event and click Add to select the resources who are to be subscribed for notification. Search User window is displayed. Select the users for including in the notification subscription list.
- Against each of the selected user names, you may specify (select) the notifications as required.
NOTE: Configure the subject and content for the mails generated during various task notifications. In order to configure the mail subject and content click the link "Notification Mail Configuration." For more information on configuring the task notification mails refer WBS>>Mail Configuration. Suppose notification is set “On Event” for Forecast Start Date. User will receive a notification once the forecast start date is set. User will again receive a message when the forecast start date is changed. But notifications are not send when user changes the Forecast Start Date after updating the Actual Finish Date.
Inheriting Notifications
Using this option notifications configured for the selected task can be replaced by the notification configured in the task genealogy.
 To inherit notification
- In the WBS select single or multiple tasks.
- In the WBS window click WBS Level / Tasks.
- In the menu click Subscribe for Notification>>Inherit Notification.
Following message is displayed.
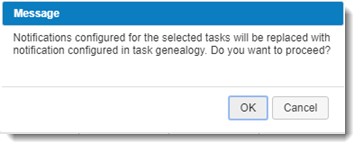
- Click OK to continue with inheriting notification configured in genealogy.
Filtering tasks
Using the Filter option, tasks can be searched based on ‘Task Status’, ‘Percentage of Completion’ , Schedule dates etc.
 To filter tasks
- In the WBS window tool bar click Filter.
Filter tasks window is displayed.
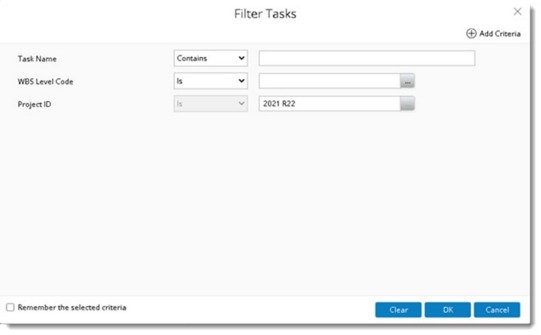
Figure: Filtering Tasks
The following properties are displayed in the window by default.
- Task Name: Enter a task name and select a comparison operator from a drop-down list. By default the value is Contains.
- WBS Level Code: Click the browse button to select a WBS Level Code from a WBS List.
- Project ID: Click the browse button to select a Project.
- In case additional filtering options are required, click Add Criteria.
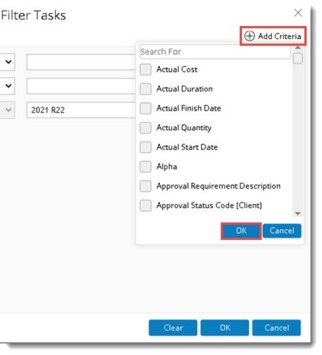
Figure: Selecting filter criteria
- Criteria selection box is displayed. Select the checkbox next to the required filter criteria and click OK.
- In the Filter Tasks window click OK to filter the tasks based on the selected criteria.
Tasks are filtered and displayed based on the selected criteria.
Generating DPR Reports
Progress details updated on a specific date or a date range can be viewed by generating a DPR report.
 To generate a DPR report
- In the WBS Level/Tasks menu click DPR Report.
DPR Report window is displayed.
- In the window select From date and To date and click Search.

Figure: Generating DPR report
A report is generated and is displayed in the grid.
Files uploaded for a rule can be viewed from DPR Report grid.
To view related files
- Click the hyperlink View, displayed in the column RELATED FILES.
Related Files window with the uploaded files against that rule is displayed.
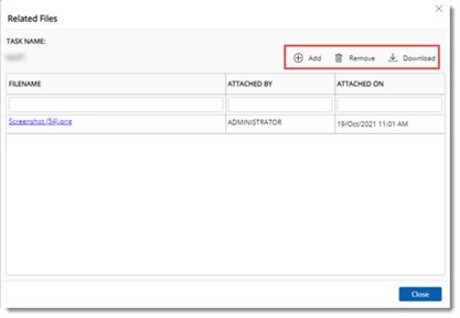
Figure: Related files window
In the window provision to add, remove and download a related file is available.


 To schedule and start workflow
 To send tasks through a workflow
 To select next stage resources
 To update the internal status code

 To update task details for multiple tasks
 To send a task to personal folder
 To update progress in bulk for Quantity tasks
 To update progress of date based tasks