Once a task is scheduled a lot of communications takes place between the client and the vendors. These communications might be in the form of letters, faxes and emails. All these are added to the correspondence area. These communications can be used for future references.
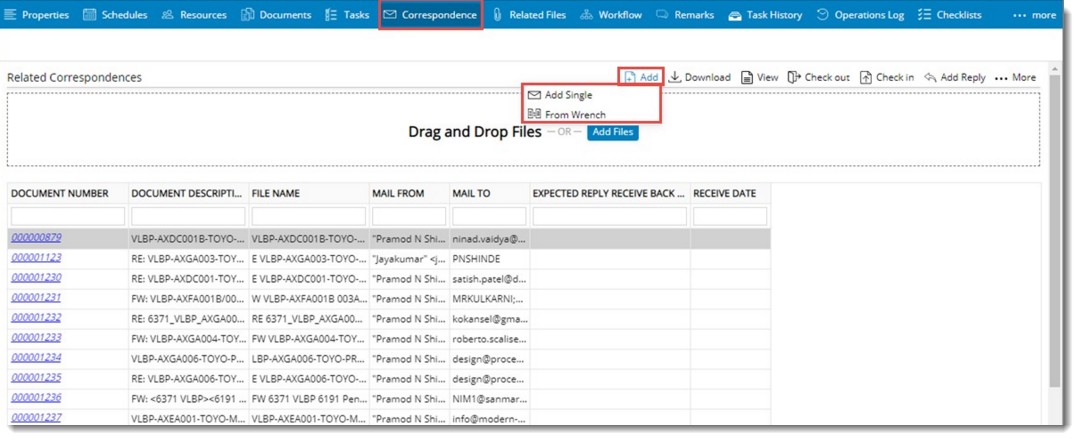
All the correspondences related to a specific Task will be added here. In addition details related to the correspondence like Document Number, Document Description etc. are available here.

Figure: Related Correspondences window
Adding a correspondence
You can add a single correspondence to a task.
 To add a correspondence
- In the Correspondence window, place the mouse pointer over the icon Add.
- A pop-up menu is displayed with the options
- Add Single
- Add from Wrench
On clicking Add Single, Document addition window is displayed.
- Enter values for the fields in the document addition window. For more information on entering values in the document addition window refer Adding a Single Document.
- Click Save to continue.
The correspondences are added to the task.
On clicking Add from Wrench, Search window is displayed.

Figure: Selecting documents from Wrench
- Carry out a search operation in the search window.
- From the search results select the correspondences you want to attach.
- Click Attach button.
The correspondences are added to the task.
NOTE: Correspondences can be dragged and added to the task. On dragging a correspondence to the drop-zone, document addition window is displayed. Enter values in the window and add the correspondence.
Operations from the correspondence window
Different operations can be carried out from the correspondence window. These operations are explained in this section.
Download: This option can be used to view the document directly without opening the document details window.
Check Out: This option is used to download the document for the purpose of editing. When the document is checked out, the document is downloaded and the document is indicated with a tick mark.
Check In: This option is used to upload the checked out document back to the server.
Add Reply: From here, user can add a new correspondence as reply to the mail available in the task.
 To add reply
- Click Add Reply>> New button.
Document addition window is displayed. For more information on adding documents refer Adding a Single Document.
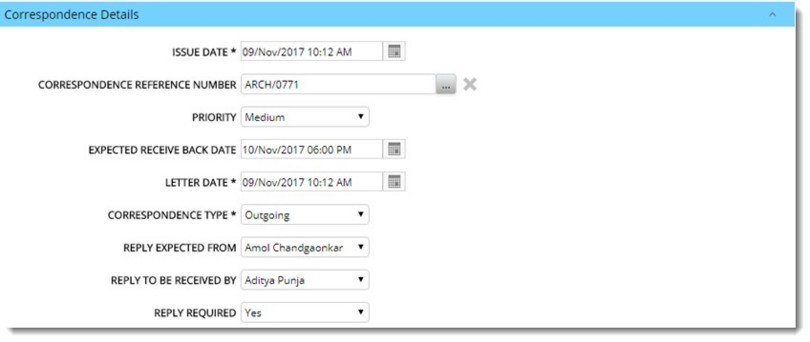
- After entering the basic document details enter the following Correspondence Details.

Figure: Correspondence Details window
Correspondence Type: Select a correspondence type from a drop-down list. Types available are incoming and outgoing.
Correspondence Reference Number: The value for this field is filled in automatically. The document number of the correspondence to which the reply is being added is displayed here.
Reply Required: You can specify whether a reply is required for the correspondence. Select Yes or No from a drop-down list.
Expected Received back date: Select a date on which a reply is expected.
Reply to be received by: Select the user who will be responsible for receiving the reply. Click the browse button to choose a user from the User List window.
Reply Expected from: Select the user responsible for sending a reply. Click the browse button to choose a user from the User List window.
Letter date: This is the actual date on which the letter was sent. Current date is displayed by default. You can select a new date from the date picker.
Issue Date: This is the date on which the reply was issued. Current date is displayed by default. You can select a different date from the date picker.
Priority: Select a priority for the correspondence from a drop-down list. The priorities available are Low, Medium and High.
- After entering the values click Add to save the values.
The reply added to the correspondence is displayed in the Correspondence window.
Additional operations
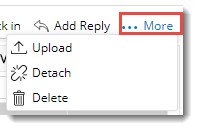
In addition to the operations mentioned in the preceding section, the following additional operations can also be carried out from the correspondence window. The additional operations are grouped under the group More in the tool bar.

Upload: Use this option to replace the correspondence with a different correspondence.
Detach: Use this option to detach the document from the task detail window. The selected correspondence will be detached from the task but will remain in Wrench.
Delete: Use this option to delete the document permanently from Wrench.


