|
Creating an RFI
|   |
Only resources in the selected project with Create RFI permission in the project genealogy are permitted to create an RFI.
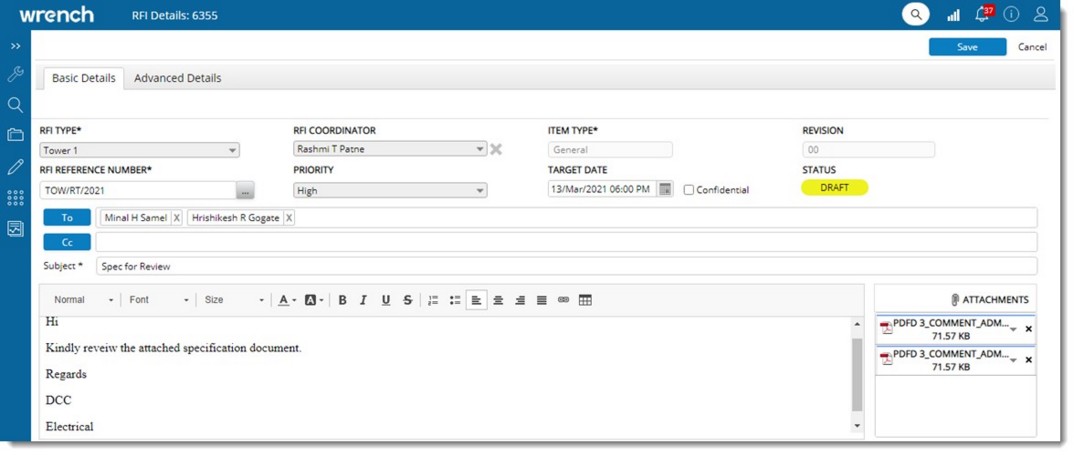
RFI Details window is displayed. The window consists of two tab, Basic and Advanced. By default Basic tab is selected. Enter values for different fields in the basic tab.

Figure: Creating RFI-Basic Details
RFI TYPE: Select an RFI type from a drop-down list. RFI types configured for the Project will be displayed here.
RFI COORDINATOR: Select a coordinator from a drop-down list. All the project resources with ‘Manage RFI’ permission in the respective project genealogy will be listed in the drop-down list. If an RFI coordinator is assigned to the selected RFI Type then the coordinator is displayed by default.
Unless the setting ‘RFI Coordinator is mandatory’ is enabled, it is not mandatory for assigning an RFI Coordinator to create an RFI.
ITEM TYPE: Value for this field is filled in automatically based on the RFI type selected.
RFI REFERENCE NUMBER: Enter a number for the RFI. If a numbering template is assigned to an RFI, the manual entry is not possible. Click the browse button to generate an RFI number using the numbering template.
PRIORITY: Select a priority from a drop-down list.
TARGET DATE: Enter a target date. Target date indicates the date by which a response is expected for the RFI. If any ageing-days is configured in the selected RFI Type, the target date will be populated automatically.
CONFIDENTIAL: RFIs may be marked as confidential if the RFI access needs to be limited within the Creator, RFI Coordinator, To and cc Users. Other users will not be able to view these RFIs in RFI Details.
The confidential option check box will be unchecked by default. User may check the check box if the RFI is to be made confidential. The confidential option can only be edited in Draft/ Approval Pending statuses. In other statuses this option will be a read only field while editing/saving.
To and Cc: Enter recipients for the RFI. Project resources will be available for selection.
Subject: Enter a subject for the RFI.
Attachments: Attachments and reference documents can be added to an RFI. On clicking the attachment icon, options to add attachments from Disk and SmartProject are available. Added attachments will be displayed in the attachments area. In the case of attachments added from SmartProject, options to download and view the details will be available. In the case of attachments added from disk options to download and replace the document will be available.
Linked Items: Documents or Tenders can be linked to an RFI. This is carried out form the Linked Item section in the RFI Details window. On clicking Add, option to add Document and Tender will be available. On clicking Document, document search window is displayed. Search and retrieve the required document. On clicking Tender, Search Tender window is displayed with a list of tenders. Select the tender from the list. Linked Item is displayed in the grid.

After entering basic details, enter advanced details.
The following advanced or additional details can be entered.
|
# |
Field |
Description |
|
1 |
Schedule Impact |
Any impact on schedule can be specified here. Options available are NA / Yes/ No, NA will be selected by default. |
|
2 |
Impact in Days |
This field will only be enabled if Schedule impact is chosen as Yes. Impact can be specified in days. |
|
3 |
Affected Task |
Click the browse button to select the affected task. On clicking the browse button, advanced task search window is displayed. User will only be able to select a single task. This Field will only be enabled if Schedule impact is chosen as ‘Yes’ . Project ID will be set as the selected project and user will not have provision to change the project ID. |
|
4 |
Cost Impact |
Any impact on cost can be specified here. Options available are NA/Yes/No, NA will be selected by default. |
|
5 |
Cost Impact (Base Currency) |
This Field will only be enabled if Cost impact is chosen as ‘Yes’. Specify the Impact in Base Currency. |
|
6 |
Linked Cost Code |
This Field will only be enabled if Cost impact is chosen as ‘Yes’. Click the browse button to select the Cost Code. Only the cost codes for which budget line items are available in the selected project will be displayed in the window |
|
7 |
Created By |
Name of created by user is displayed here. |
|
8 |
Created On |
Created On date and Time in configured format is displayed here. |
|
9 |
Last Edited By |
Name of user who edited the RFI for the last time is displayed here. |
|
10 |
Last Edited On |
Last Edited On date and Time in configured format is displayed here. |
|
11 |
Submitted By |
Name of user who Submitted the RFI is displayed here. |
|
12 |
Submitted On |
Is displayed here. |
|
13 |
Responded By |
Name of user who responded to RFI is displayed here. |
|
14 |
Responded On |
Date and Time on which response was made is displayed here. |
|
15 |
Closed By |
Name of user who closed the RFI is displayed here. |
|
16 |
Closed On |
Date and Time on which the RFI was close is displayed here. |
|
17 |
Reopened By |
User Name of Reopened By User.[Read Only][Auto populated] |
|
18 |
Reopened On |
Date and Time on which the RFI was opened is displayed here. |
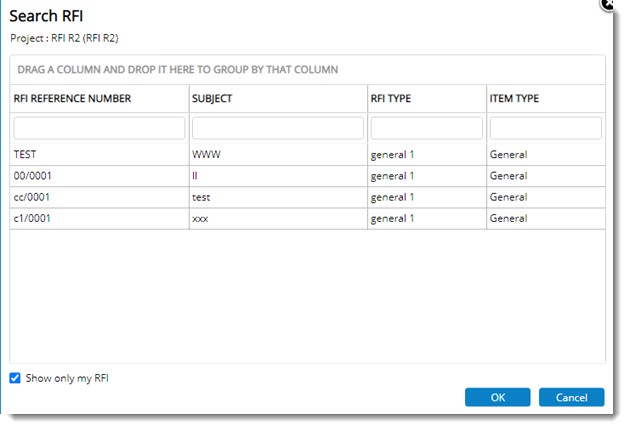
Add References: Reference RFI’s can be added here. When a new RFI needs to be created based on an existing RFI , the reference details can be obtained from the reference RFI’s added here.
Search RFI window is displayed.

 To create an RFI