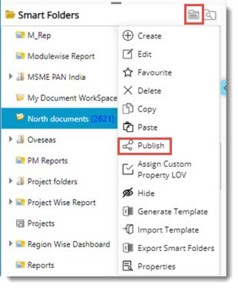
- Select a smart folder and click the smart folders icon.

Figure: Publishing Smart Folders
- In the menu click Publish.
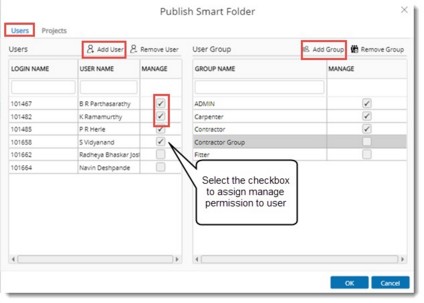
Publish Smart Folder window is displayed. Personal folders can be published to User, User Groups or Project. By default Users tab is selected.

Figure: Publish Smart Folder window
- Click the corresponding button to select users or groups.
- Select the checkbox under the column Manage to assign Manage permission to a user or group. A user with manage right will be able to publish a personal folder.
- After selecting the users or groups click OK to confirm. 'Smart Folder Published Successfully' message is displayed.
NOTE: Publisher of the personal folder will be able to assign manage rights to users and groups.
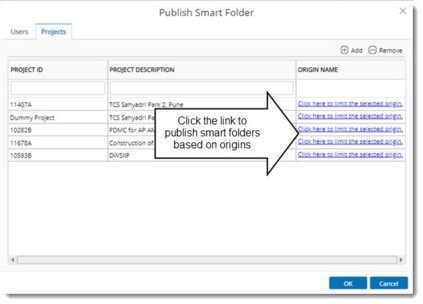
- In the Publish Smart Folder window select the tab Projects.
- Click Add.
- Projects window is displayed. In the window select single or multiple projects and click OK.
Selected folders will be displayed in the Publish Smart Folder window.

Figure: Selecting Origins
- In case you want to publish the smart folder based on Origin, click the hyperlink Click here to limit the selected origin.
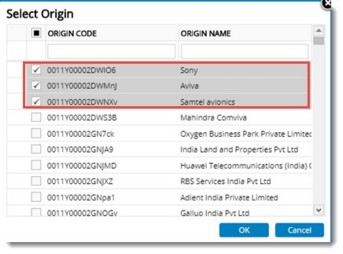
Select Origin window is displayed.

Figure: Select Origin window
By default, there will be no origin selected for publishing.
- Select the checkbox next to the required origin types/names for which the smart folder is to be published.
- Click OK to complete selection.
- Click OK to publish the folder.
A message Smart Folder published successfully is displayed.
Published folders and its sub folders are displayed for respective users/groups or Projects. Publish folders are distinguished from other folders by their appearance.
NOTE: Once a smart folder is published, if any changes are carried out on the parent folder, corresponding changes will be extended to child folders. An information text indicating this is displayed in the Publish Smart Folder window.


 To publish folders to projects