The project budget is a detailed estimate of money required to complete a project.
NOTE: The ‘Budget’ tab will be visible only for users who have View Budget permission configured in Modular Security or in Project.
 To view the budget details
- In the Cost Details window click the tab Budget.
Budget details window is displayed.

Figure: Budget Details window
Budget tab will display the cost codes in their hierarchical order, with the respective line items under each cost code. Budget is prepared by creating Budget Line Items under cost codes.
Creating Budget Line Items
Line items are the individual budget information, that are grouped based on the cost code to give the total Budget. Once a line item is created successfully, its hierarchical structure will be added to the budget.
 To create budget line items
- In the budgets window tool bar click Budget Line Items.
- In the menu click Create.
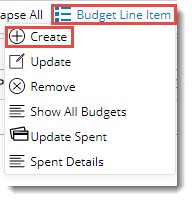
Create Budget Line Item window is displayed.
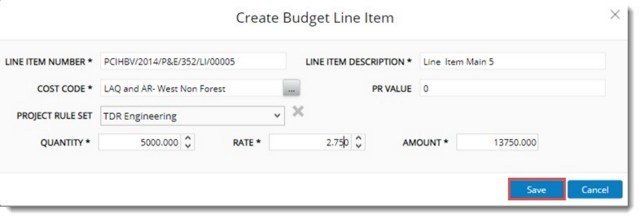
Figure: Create Budget Line Item window
- In the window enter values for different properties displayed, which is explained in the following table.
|
#
|
Property
|
Description
|
|
1
|
Line Item Number
|
The value for this property is generated automatically. User can edit the auto-generated value.
|
|
2
|
Line Item Description
|
Enter a description for the line item.
|
|
3
|
Cost Code
|
Cost code help organize budgets under standard categories. Click the browse button to select a cost code from a pre-define list. On clicking the browse button Cost Code window is displayed. Here list of cost codes and Project Type assigned are displayed. Select a Cost Code from the list.
|
|
4
|
PR Value
|
Enter a Purchase Requisition Value. Purchase requisition is a document that is used to inform the purchasing officer when any items, services, equipment etc. are to be purchased so that the purchasing department can start the purchasing process. The Purchase requisition document contains the expected total value of the items to be purchased, which is termed as PR value. Usually purchase requisitions (PR) are informally handled as emails and documents. Hence the cost engineers will consolidate the received PR and update the total PR value to the budget line item from time to time. Hence it is considered as a single property, which is manually updated.
|
|
5
|
Project Rule Set
|
Select a rule set from a drop-down list. Rule Sets created in the Project will be displayed in the list. Organizations may have standard Rules of credit to distribute the budget line items. These rules are created as Project Rule set in Project, which may be applied to the budget line items for distribution.
|
|
6
|
Quantity
|
Enter the quantity of line items. By default the value is 1.
|
|
7
|
Rate
|
Enter the rate for the line item.
|
|
8
|
Amount
|
Once Quantity and Rate are specified, Amount is calculated as product of Quantity and rate. Else, the value will be zero and user is supposed to edit this property. Taxes are not applicable.
|
- After entering the values click Save to store the values entered. Line Item Create Successfully message is displayed. Click OK to continue.
Line Item created is displayed under the Budgets tab. The cumulative budget value will be updated as shown in the following figure.

Figure: Line Item Details
Updating or Editing Line Items
A line item can be edited or the values can be updated.
 To edit/update line items
- In the Budgets tab select the line item that is to be edited.
- In the tool bar click Budget Line Items.
- In the menu click Update.
Edit Budget Line Item window is displayed.

Figure: Updating/Editing Budget Line Item
In the field ESTIMATED AMOUNT, the total BOQ amount in which the line item is linked is displayed. In the field AS ON, the date of fetching from BOQ is displayed. On clicking the button Fetch from BOQ, the total BOQ amount in which the line item is linked is fetched.
- Edit or Update the values and click Save.
NOTE: Values of all properties except PR VALUE, QUANTITY, RATE and AMOUNT can be edited.
Removing line items
It is possible to remove a line item that is already created. On removing a line item, total budget values will be recalculated.
 To remove line items
- Select single or multiple line items.
- In the tool bar click Budget Line Items.
- In the menu click Remove.
- A message "Do you want to remove the selected items" is displayed. Click YES to remove the line item.
Viewing Line Item list
The list of line items can be viewed without any hierarchy. Line Items can be grouped based on different properties.
 To view line item list
- In the tool bar click Budget Line Items.
- In the menu click Show All Budgets.
Line Item Details window is displayed. Line Items created for the project is displayed here.

Figure: Line Item Details window
Line Item can be created, edited or removed from this window.
Updating Spent
In Cost module, there is a facility to release payments against commitments (PO). In certain industry scenarios, payments are required to be made without reference to commitments. For Example: Travel reimbursements etc., which will not have any commitments.
Hence facility to update ‘Spent’ without referring to commitments is provided.
To update spent
- In the menu click Update Sent.
Update Spent Information window is displayed.
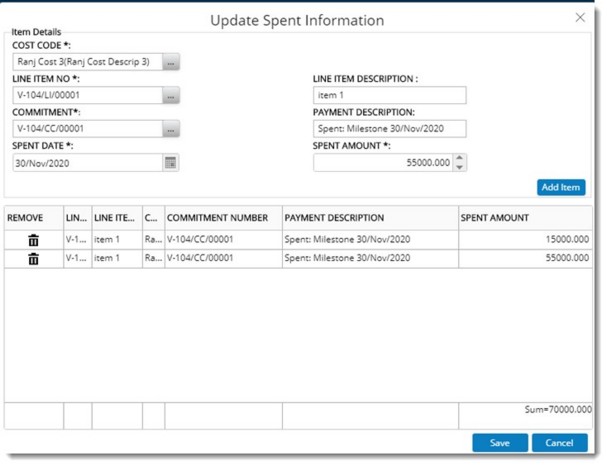
Figure: Update Spent Information window
In the window enter values for the following fields.
COST CODE: Value is displayed by default. Click the browse button to select a different CODE.
LINE ITEM NO: Value is displayed by default. Click the browse button to select a different value.
LINE ITEM DESCRIPTION: Values based on the selected line item is displayed here.
COMMITMENT: Click the browse button to select a commitment.
PAYMENT DESCRIPTION: Value is displayed by default.
SPENT DATE: Select the spent date from a drop-down list.
SPENT AMOUNT: Enter the spent amount.
- Click Add Item to create a spent against the line item.
On successfully validation, the item will be added to the grid in the bottom half of the window. Sum of the added items is displayed at the lower part of the window.
- Click Save. Spent Updated Successfully message is displayed.
Viewing Spent Details
Spent details can be viewed for items with spent.
To view spent details
- Select an item and in the menu click Spent Details. Spent Details window is displayed.

Figure: Spent Details window
If the selected line item does not have any spent, an alert message, Selected line item does not have any direct cost is displayed.
In the window click New to create a direct cost, click Update to edit the existing cost.
Changing views
Different layouts can be selected for displaying the budget details. Layouts available are Basic and Advanced.
On selecting the layout as Basic, the following window is displayed. Here basic details of the line item is displayed.

Figure: Basic Layout
On selecting the layout as Advanced, the following window is displayed. Here detailed information of the line item is displayed.

Figure: Advanced Layout
Distributing Budgets
Budgets allocated may be spent over a particular time interval. Therefore, these budget amounts have to be distributed across defined time interval. Budgets can be distributed using either manual or automatic distribution. Automatic distribution is made possible using Beta distribution. Option to distribute line items will be available in the Line Item Details window.
 To distribute line items
- In the line item details window select the line item budget that is to be distributed.
- In the options bar click Distribute Budget.
Distribute Budget window is displayed.
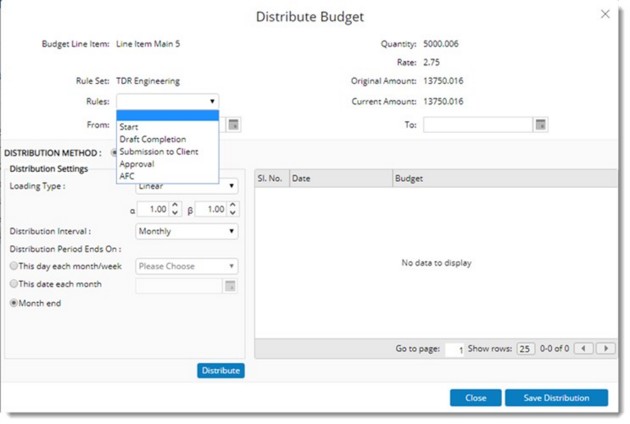
Figure: Distribute Budget window
Budget Line Item details will be displayed in the top portion of the window. The details displayed are explained in the following table.
|
#
|
Property
|
Description
|
|
1
|
Budget Line Item
|
Description of the selected budget line item will be displayed here. The value of this field is non-editable.
|
|
2
|
Quantity
|
Quantity provided in the selected line item is displayed here. The value of this field is non-editable.
|
|
3
|
Rate
|
Rate provided in the selected line item will be displayed here. The value of this field is non-editable.
|
|
4
|
Rule Set
|
Rule Set assigned to the selected line item will be displayed here. Rule Set cannot be changed from this window.
|
|
5
|
Rules
|
Different Rules corresponding to the selected rule set is displayed in a drop-down list. Select the appropriate rule from the list
|
|
6
|
Original Amount
|
The Total Amount (Internal) available in the selected budget Line Item is displayed here. The value of this field is non-editable.
|
|
7
|
Current Amount
|
Product of the percentage value of the rule of the selected Ruleset and the Original amount is displayed here. If no Ruleset is available for the line item, then Current amount will be equal to the Original amount. While distributing the budget the value in the Current Amount is considered.
|
|
8
|
From
|
Select the starting date of time interval in which the budget line item is to be distributed. The date should be between the Project Stat Date and Project End Date.
|
|
9
|
To
|
Select the ending date of time interval in which the budget line item is to be distributed. The date should be between the Project Stat Date and Project End Date.
|
Different Settings are available in the distribution setting section.
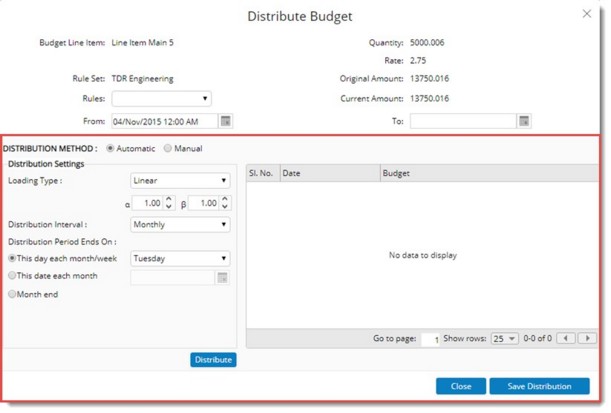
Figure: Distribution Settings window
This is mentioned in the following table.
|
#
|
Property
|
Description
|
|
1
|
Distribution Type
|
Distribution types available are Manual and Automatic. By default radio button next to Automatic is selected.
|
|
2
|
Loading Type
|
Select a loading type from a drop-down list. Values available are:
Linear: (Alpha =1 , Beta = 1)
Front Loaded: (Alpha = 1, Beta = 5)
Back Loaded: (Alpha = 5, Beta = 1)
Based on the selected loading type, Alpha and Beta values will be automatically selected. The values can be modified and should be always greater than one.
|
|
3
|
Distribution Interval
|
Select the distribution interval from a drop-down list. Options available are Weekly and Monthly.
|
|
6
|
Distribution Period Ends On
|
Define period on which the distribution ends. The following options are available.This day each month/week: On selecting this option all the days of the week will be available in the drop-down list. Select a week day, so that system will consider the date corresponding to the selected day in the last week of every month as the end date. For Example: If user selects Friday, then every interval ends on the last Friday of every month.
This day of each month: Select a date. Selected date of every month will be considered as the end period of an interval. For Example: If user selects the date as 25, then the interval period ends on 25th of every month.
Month End: If the radio button next to this option is selected, then end of every month is considered as the interval end date.
|
- After entering the values click Distribute. Budget is distributed based on the settings provided. A sample distribution is displayed in the following figure.
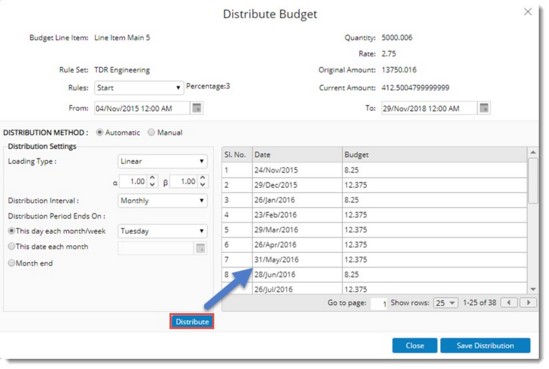
Figure: Distribution details
The following distribution details will be available on a budget is distributed.
Sl.No: This is auto generated.
Date: In the case of automatic distribution method these dates are generated automatically. For manual distribution method dates are entered manually by the user.
Budget: Distributed budget value is displayed here.
- Click Save Distribution to save the budget distribution.
Distributing budgets manually
In some cases budgets are distributed manually.
 To distribute budget manually
- In the Distribute Budget window select the radio button next to Manual.
- Select a Distribution Interval from a drop-down list. Options available are Monthly and Weekly.
- Define the period in which the distribution ends. Options available are This day each month/week, This date each month and Month End.
- After selecting the options click Distribute. Distribution table is created.
- Enter the budget distribution values manually.
- Click Save Distribution to save the budget distribution.
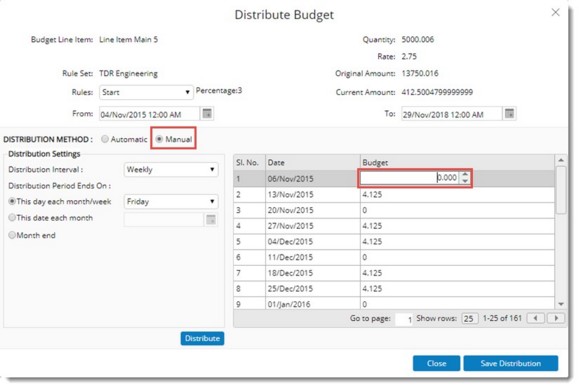
Figure: Distributing budget manually
Viewing distribution details
Distribution details of a line item can be viewed from Line Item Details window.
 To view distribution details
- In the Line Item Details window select the Line Item.
- In the options bar click Distribution Details.
Distribution Details window is displayed.
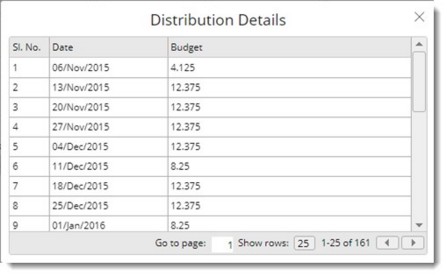
Figure: Distribution Details window
Here the details of budget distribution is displayed.
Creating and viewing cost baselines
Baselines are copies of existing cost details. A baseline is created for future reference. This can be done at any point of time. Created baselines can be viewed and multiple baselines can be compared.
 To create a baseline
- In the Budgets window click Baseline.
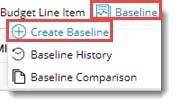
- In the menu click Create Baseline.
Create Baseline window is displayed.
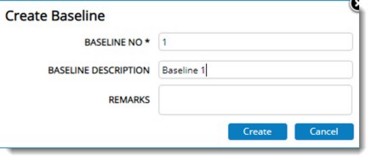
Figure: Create Baseline window
- Enter values for the following fields.
- BASELINE NO: Enter a number for identification. This field is mandatory.
- BASELINE DESCRIPTION: Enter a description for the baseline.
- REMARKS: Enter remarks.
- After entering values for the fields click Create.
Baseline Created Successfully message is displayed.
- Click OK to continue.
 To view baseline history
- In the Budgets window click Baseline.
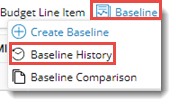
- In the menu click Baseline History.
Baseline Details window is displayed.

Figure: Baseline Details window
- Select the baseline that is to be viewed from a drop-down list.
Budget Details of the selected baseline is displayed in the window.
Comparing baselines
There may exist more than one baselines in Projects. User may compare any two baselines to understand the changes between them; as well as user may compare any of the existing baseline with the current budget.
 To compare baselines
- In the Budgets window click Baseline.
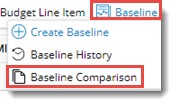
- In the menu click Baseline Comparison.
Compare Baseline window is displayed.
- Select the baselines that you want to compare from a drop-down list.

Figure: Comparing baselines
Details of the selected baseline will be displayed in separate panes.
Importing/Exporting Budget Line Items
Budget line items can be imported in bulk. Further line items can be exported to an MS Excel file, values can be edited and the edited details can be updated back to the system. An MS Excel template is used as the medium for generating a template. Following operations can be carried out from the Line Item Import/Export menu.

Figure: Import/Export Menu
Generate Template
Import
Export
Update
Bulk Operations Log
First step in carrying out an Import operation is generating an MS Excel template.
Generating MS Excel Template
MS Excel template is used as the medium for importing budget line items.
 To generate a template
- In the tool bar click Line Item Import/Export. A menu is displayed.
In the menu click Generate Template. An excel template is generated. Sample template is shown in the following figure.

Figure: MS Excel template
- In the generated template, enter the line item details and save the template.
Importing line item details
Line item details entered in the excel template is imported to the system.
 To import line item details
- In the Line items Import/Export menu click Import.
Bulk Import Wizard is displayed.
- In the wizard click Choose file. File selection window is displayed.
- Select the excel template from the location where it is stored.
- Click Next.
Bulk Operation Status window is displayed. Bulk Import operation is carried out in the background and you can continue with your work. User will receive a notification mail indicating the status of the operation.
- Click Finish to complete the operation.
Exporting line items
Existing list of budget line items can be exported to an MS Excel template.
 To export line items
- Select a line item and in the menu click Export.
Bulk Export Wizard is displayed.
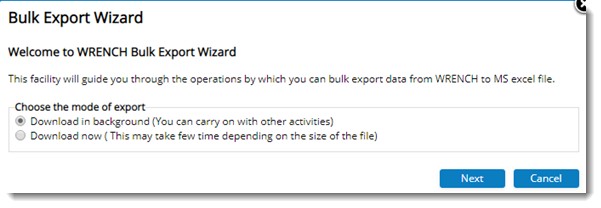
Figure: Bulk Export Wizard
- Select a mode of export by clicking the radio button next to the options available. By selecting the radio button next to a option it is possible to export the date in the background or now respectively.
- Click Next.
Selected line items are exported to the excel template and excel file is opened as shown in the following figure.

Figure: Export template with item details
- Update the line item values in the excel file and save the file.
Updating line item details
After exporting the budget line items using the export option, desired changes can be made in the exported line items in the MS Excel file. The changed values can be updated in the system.
 To update changed line item values
- In the menu click Update.
WRENCH Bulk Update Wizard is displayed.
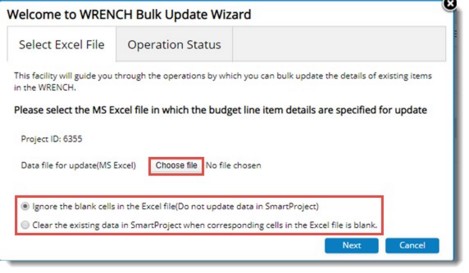
Figure: bulk Update Wizard
- Click Choose file to select the export file with updated line item details.
- Select the radio button next to the option preferred by the user.
- Click Next to perform the bulk operation.
Once the Update operation is complete, user will receive a notification indicating the status of the bulk update. If there any failure in the bulk update operation, failed line items are retained in the excel file and failure message is updated in the Error/Warning message column.
Operation Log
Bulk operations carried out and the status of the operations can be viewed from the bulk operations log.
 To open operations log window
- In the menu click Bulk Operation Log.
Bulk Operation Log window is displayed.
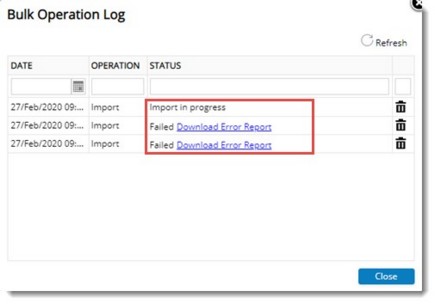
Figure: Bulk Operations Log
In the window, date on which the operation was performed, type of bulk operation performed and error log if any failure occurred in the operation is displayed .


 To update changed line item values