|
Creating a Certificate of Payment (C O P)
|   |
|
Creating a Certificate of Payment (C O P)
| |
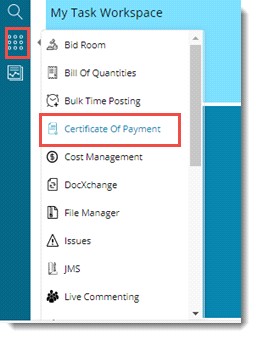
C O P is created the from the global menu.
In addition, an option to create a C O P is available in the following areas.
Invoice Details window: Since a C O P can be created with an invoice as a reference, an option to create a C O P from an invoice is available. A C O P can be created for multiple invoices.
JMS window: Since a C O P can be created with a JMS as a reference, an option to create a C O P from a JMS is available. A C O P can be created for multiple JMS.
To create a COP
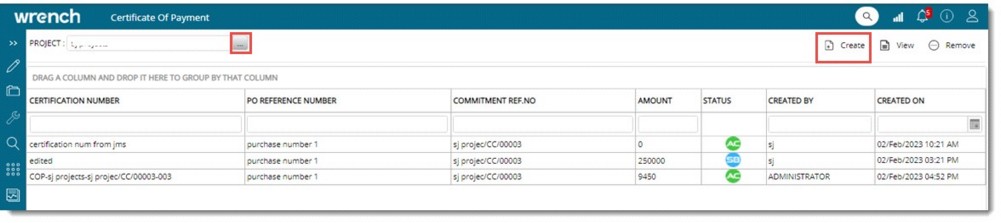
Figure: Certificate of Payment window
In the window, COP already created is displayed.
Create COP window is displayed.
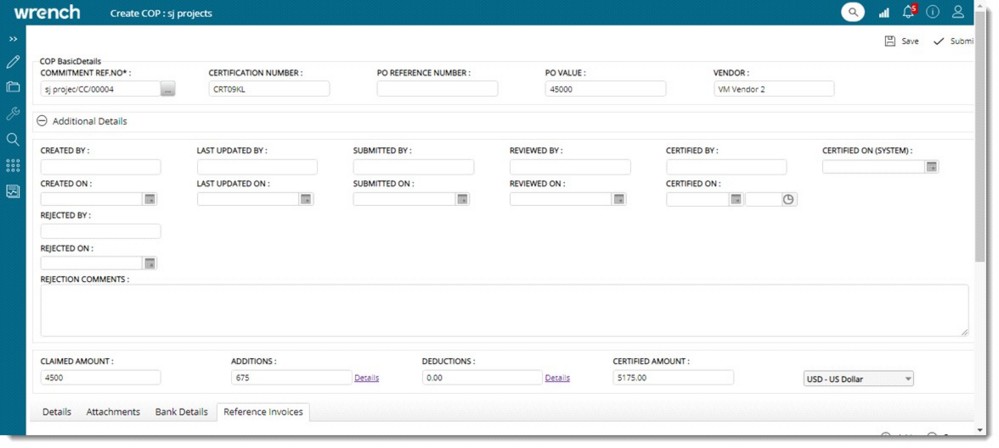
Figure: Create COP window
Enter values for different properties in the window. Properties are categorised as Basic Details and Advance Details. Different properties are explained in the following tables.
COP Basic Details
|
# |
Property |
Description |
|
1 |
Commitment Reference Number* |
Select the Commitment with the reference to which the COP was created. Click the browse button to select the commitment from the Select Commitment window. |
|
2 |
Certification Number |
Specify the number for the certification. |
|
3 |
PO Reference Number |
PO reference number of the COP captured from the commitment is displayed here. |
|
4 |
PO Value |
PO value of the selected commitment is displayed here. |
|
5 |
Vendor |
A PO is usually issued to a vendor. The name of this vendor is displayed here. |
Additional Details
|
# |
Property |
Description |
|
1 |
CREATED BY |
The username of the user who created the COP is displayed here. |
|
2 |
CREATED ON |
The date and time when the COP was created are displayed here. |
|
3 |
LAST UPDATED BY |
The username of the user who updated the COP last is displayed here. |
|
4 |
LAST UPDATED ON |
The date and time when the COP was updated are displayed here. |
|
5 |
SUBMITTED BY |
The username of the user who submitted the COP is displayed here. |
|
6 |
SUBMITTED ON |
The date and time when the COP was submitted are displayed here. |
|
7 |
REVIEWED BY |
The username of the user who reviewed the COP is displayed here. |
|
8 |
REVIEWED ON |
The date and time when the COP was reviewed are displayed here. |
|
9 |
CERTIFIED BY |
The username of the user who certified the COP is displayed here. |
|
10 |
CERTIFIED ON |
The date and time when the COP was reviewed are displayed here. This will be the same as the CERTIFIED ON (SYSTEM), ) if the field is empty at the time of certification. |
|
11 |
CERTIFIED ON (SYSTEM) |
The system date and time when the COP was reviewed are displayed here. |
|
12 |
REJECTED BY |
The username of the user who rejected the COP is displayed here. |
|
13 |
REJECTED ON |
The date and time when the COP was rejected are displayed here. |
|
14 |
REJECTION COMMENTS |
The comments on the latest rejection operation are displayed here. |
Claimed Amount Details
Details of the claimed amount properties are mentioned in the following table.
|
# |
Property |
Description |
|
1 |
CLAIMED AMOUNT |
By default, the claimed amount is the sum of all the amounts in the column Current of the details tab. The user may change this value if it is required. |
|
2 |
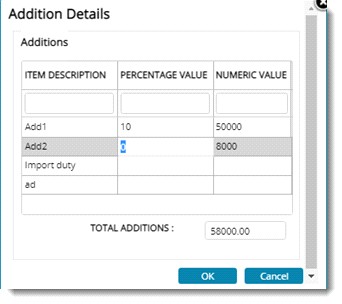
Additions |
Additions are the additional amount that is to be added to the claimed amount. This may include taxes and any other additional expenses incurred. To add additions
The Addition Details window is displayed.
Figure: Addition Details window Additions configured in the master are displayed in the window.
If a percentage value is entered, based on the claimed amount, the addition amount is calculated and is displayed in the column NUMERIC VALUE. The total addition amount is displayed in the column TOTAL ADDITIONS. |
|
3 |
Deductions |
The deductions are the additional amount that is to be reduced from the claimed amount. This may include the retention amount, any advance payment made, etc. To add deductions
If a percentage value is entered, based on the claimed amount, the deduction amount is calculated and is displayed in the column NUMERIC VALUE. The total deduction amount is displayed in the column TOTAL DEDUCTIONS. |
|
4 |
CERTIFIED AMOUNT |
This is the amount that the project manager will certify as the amount that is to be released to the vendor. The Sum of the claimed amount and additions or deductions is displayed here. |
|
5 |
CURRENCY |
A currency is selected from a drop-down list. |
Reference and related details
References and related details of the COP are displayed here. Information is grouped under the following tabs.
Details tab
COP can be created by adding BOQ and JMS as references. The references to the BOQ and JMS along with their corresponding quantities and amounts can be added here.

Figure: Adding BOQ and JMS References
To add BOQ references
Add BOQ window is displayed. The list of BOQs specified against the commitment is listed here.
BOQ items are added to the list and the message Items added successfully is displayed.
To add JMS as a reference
Select JMS window is displayed. JMS created against the selected commitment, which is approved are listed in the window.
JMS items are added to the list and the message Items added successfully is displayed.
Attachments
The option to add reference files related to the COP and view the added files is displayed here.

Figure: Adding Attachments
To add reference files
Added file is displayed in the grid.
Options to remove the file and download the file are also available on the toolbar.
Bank Details
Certificates of payment may be associated with certain bank documents like cheques and bank guarantees. Hence a provision to add the details of these documents to the COP is provided.

To add cheque details

Figure: Entering cheque details
To add bank guarantee details
Multiple cheque details and bank guarantee details can be added.
Reference invoices
Invoices can be attached as a reference to a COP.
To add reference invoices

Figure: Adding reference invoices
Select Invoices window is displayed.
If the COP was created from the invoice module the respective invoice is listed here.
NOTE: Those users with the right to edit the COP are permitted to edit reference invoices of the COP when it is in edit mode.
The added invoice is displayed in the grid.
A message COP created successfully is displayed.