|
SMS
|   |
|
SMS
| |
Multifactor authentication (MFA) allows users to have a second level of security apart from the conventional username-password authentication. The MFA authentication methods available for the user to receive a verification code is through the Wrench Authenticator App or their registered email address. Since many organizations required the facility to receive the verification code via their telecom operator, facility to receive MFA OTP through SMS is also available.
SMS settings are configured from the SMS option.
To configure SMS settings

Figure: SMS Configuration Settings window
SMS Configuration Settings window is displayed.
Enter values for different properties displayed in the window. The properties are described in the following table.
|
# |
Property |
Description |
|
1 |
Service Provider |
Select a service provider from the drop-down list. Currently, only Gupshup is listed for selection as the service provider. |
|
2 |
Username |
Enter the username of the Gupshup account used in the organization. |
|
3 |
Password |
Enter the password of the Gupshup account used in the organization. |
|
4 |
Authentication Scheme |
The authentication scheme supported is PLAIN. |
|
5 |
Version |
Enter the version of the Gupshup account used by the organization. |
|
6 |
Method |
Enter the method for performing a specific action. |
|
7 |
Format |
Specify the format for the response message. Suggested values are text. |
|
8 |
Principle Entity ID |
Principle entity defines that the message is to be sent through a specific telecom provider. Enter the Principle Entity ID of the organization's Gupshup account. |
|
9 |
Configure Template |
Due to telecom regulations, applications are allowed only to send pre-configured messages. This is to limit spam communications. The message templates are defined with the telecom provider. When sending each SMS, the telecom provider will validate whether the message is in line with the registered template. If not, the message will be rejected. Hence the template registered with the telecom provider is to be registered in SmartProject as well so that SmartProject can format messages accordingly before sending them to the telecom provider. Click the button Configure to configure the template. The procedure for configuring the template is described in the section Configuring SMS Template. |
|
10 |
Test the configurations |
Enter a mobile number to send a test SMS. Click the button Send SMS to send a test SMS to the number specified. |
To configure the SMS template
Configure Templates window is displayed.

Figure: Configure Templates window
Add Template window is displayed.
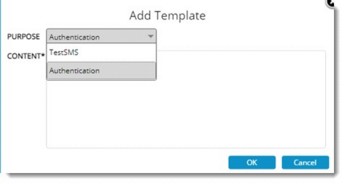
Figure: Add Template window
Options to edit the template and remove the template are also provided in the Configure Templates window.
Enabling SMS Authentication
In the authentication configuration against Internal, Vendor, Customer, and other units, the authentication method can be specified as SMS.
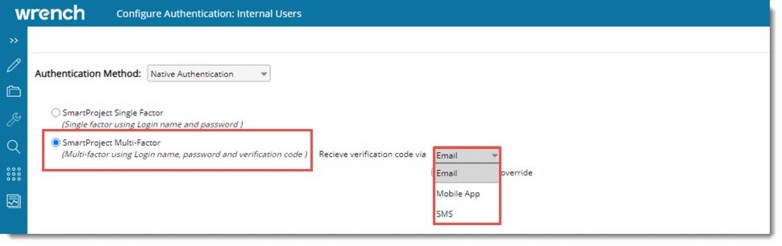
If 'SMS' is selected as the method to receive the authentication code when the user log in the following authentication window is displayed.
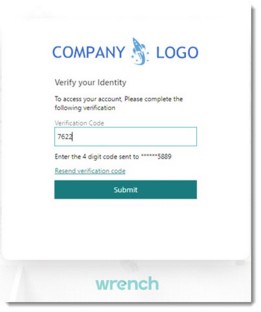
If the verification code entered is valid, the user is granted permission to sign in to SmartProject.