A task is an assigned piece of work often to be finished within a certain time. Effective task management involves managing all aspects of a task, including its status, priority, time, human and financial resources. All the aspects of a task can be defined in the task properties window. This includes Task Name, Task Genealogy, Document genealogy, Approval Requirement description, Document Number, Sheet Number, Client document number and Vendor document number. Entering tasks in the order in which it will be executed helps in easier monitoring of the tasks.
Tasks in Wrench are grouped under different Task genealogies. Tasks with common features can be grouped in the same genealogy. Grouping tasks under genealogies helps in easier handling of tasks.
Adding a task creates a new task in the WBS. When WBS is a hierarchical structure, depending on the level at which the task is created, tasks are broadly categorised as “WBS Level Tasks” and “Tasks”. WBS Levels are created at the different levels of a WBS and Tasks are created under the WBS Level. Users with edit WBS permission can create new WBS Levels in WBS. Those resources assigned to WBS Level with “Manage” permission may create WBS Levels/tasks under such WBS Levels.
NOTE: Tasks are created under the WBS Level. Resources assigned to WBS Level with �Manage� permission may create WBS Levels/tasks under such WBS Levels.
Creating a task
A task can be added from the smart folder handling tasks. Also a task can be created from the WBS. Tasks can be created from WBS Level & Task Layout, Task Layout and Combined Layout.
When a task is created in WBS Level & Task Layout all the WBS Levels created will be available in this view. A task can be created in the following ways.
- Select a WBS Level or Summary Task and create a task under this. The WBS Code of the selected Summary will be assigned to the task’s “Parent WBS Code”.
- Also while creating a task you can assign a Parent WBS Code. The task will be added under the selected Parent WBS Code.
All the procedures for creating the WBS Level is applicable for creating a Tasks. Only difference is that the task once created, is displayed under the parent task.
 To create a task from WBS
- In the WBS window select the view as Task Layout. If a Task has to be created under any WBS Level (Summary Task), select the view as WBS Level & Task Layout.
- In the tool bar click WBS Level/Task>>Add>>Task.
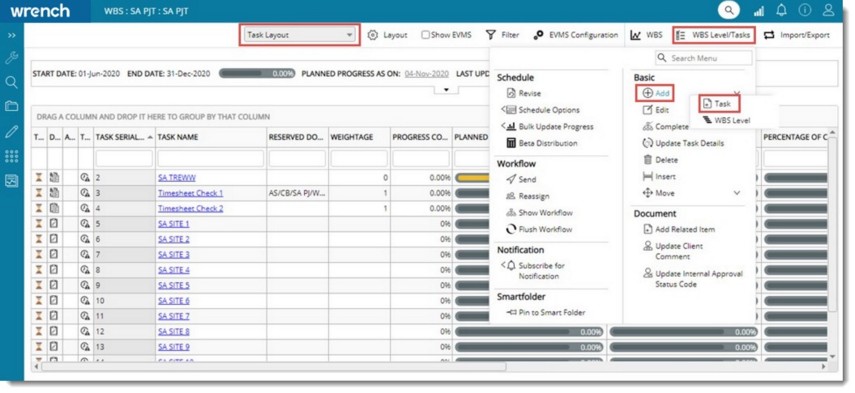
Figure: Creating a task
Task Properties window is displayed. For entering values in the task properties window refer Entering Task Properties.
In the WBS Level & Task Layout you can select a WBS Level and then click WBS Level/Tasks>>Add>>Task to create a task. A task can also be created from the Combined Layout.
To create a task from smart folder
- Click a smart folder under which you want to create this task. Ensure that you select a smart folder meant for handling tasks.
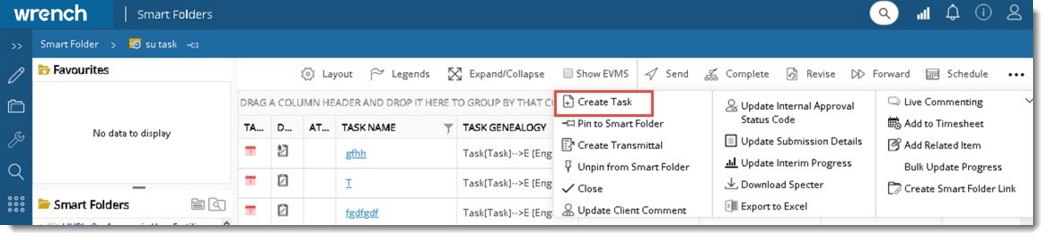
- In the tab strip click Create Task.
Task Details window is displayed with the Properties page opened by default.
NOTE: The properties displayed in the window can be configured from Task Genalogy>>UI Customization window in WRENCH ENT server.
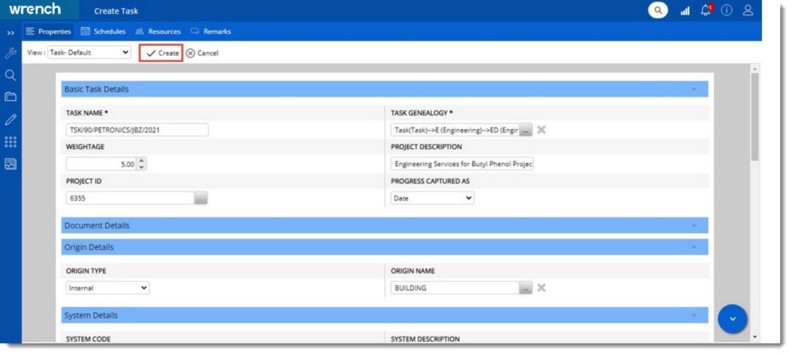
Figure: Entering task properties
- Enter values for different properties in the task properties window.
- User the arrow or menu to scroll up and down the page. On clicking the down arrow the page scrolls down and the menu is displayed.
- In the menu select directly the section of the task properties that you want to navigate to.
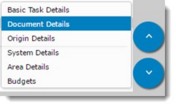
Figure: Scrolling up and down the page
Entering task properties
Task properties are grouped under different panes. Enter values the following task properties displayed in the pane.
Basic Task Details
Basic task properties are entered here.
|
#
|
Property
|
Description
|
|
1
|
Task Name*
|
Enter a task name.
|
|
2
|
Task Genealogy*
|
Click the browse button to select a task genealogy.
|
|
3
|
Parent WBS Level Code
|
Click the browse button to assign value for this field. This property is applicable for leaf level Tasks and summary tasks.
|
|
4
|
Weightage
|
Enter a weightage. Weightage is the contribution the Task/WBS level will make on its completion to its parent level.
|
|
5
|
Restrict Weightage in child WBS Level
|
This setting is applicable while creating a WBS Level. Suppose there are 4 child levels under a Parent WBS Level, and the user knows the weightage for only two levels. User enters the weightage for this two levels. Weightage for the remaining child levels will be assumed as 0. Contribution to Project of the levels with weightage assumed as zero will be calculated as zero. To avoid such situations, if this setting is enabled, user is restricted from entering known weightage values.
|
|
6
|
WBS Level Code
|
This is applicable only for WBS Level. This field is auto-created by the System.
|
|
7
|
Progress Captured As
|
Here you can define how the progress for this task is captured. Select Date, Percentage, Quantity or Hybrid from the list. This value is directly related to the rule set type assigned to the task. For construction task value Quantity is selected.
For tasks with Progress Captured As is selected as “Hybrid”, progress is calculated based on the total quantity or by date updated against the rule. Therefore, for those tasks where “Progress captured as” is selected as “Hybrid”, allow user to update value in the field “Budgeted Quantity”.
|
|
8
|
Task Revision
|
Current revision of the task is displayed here.
|
|
9
|
Task Status
|
Task status for the task is displayed here. By default Task status would be Unscheduled. Other task statuses that may be displayed are Scheduled, Work in Progress, Issued and Completed.
|
|
10
|
Task Priority
|
Different priorities are assigned to a task. Priorities that are assigned are Low, Medium and High.
|
|
11
|
Percentage of completion
|
System automatically updates the percentage of completion and this is displayed here.
|
|
12
|
Contribution to Project
|
Progress of this task will contribute to the progress of the package by a certain amount. The progress percentage that the package will achieve on completion of this task is entered here.
|
|
13
|
Budgeted Cost
|
Enter the estimated cost for the selected task .
|
|
14
|
Milestone Task
|
Tasks that marks completion of a major phase of project can be marked as "Milestone" Tasks so that the Task gets due attention when looking at WBS. Here you can define whether the task is a milestone task or a normal task.
|
|
15
|
Project ID*
|
The unique ID of the project is entered here.
|
|
16
|
Task Quantity
|
Enter total quantity of work in a package or activity.
|
|
17
|
Contribution towards package
|
Progress of a task will contribute to the progress of the package by a certain amount. Enter The progress percentage that the package will achieve on completion of this task.
|
|
18
|
Schedule Status
|
Status of the task, whether task is in scheduled status or un-scheduled status is displayed here.
If any of the child task is scheduled, summary get scheduled status. If any of the child task is Work In Progress, summary task will also be work in progress. For Task Completion all the Child tasks has to be completed for the completion of the summary task.
|
|
19
|
Alpha
|
Alpha value is the value entered manually for the purpose of beta distribution.
|
|
20
|
Beta
|
Beta value is the value entered manually for the purpose of beta distribution.
|
|
21
|
Interval
|
The interval over which the distribution would be done.
|
|
22
|
Task UOM
|
Task UOM denotes unit of the quantity of work that is being handled in the leaf or deliverable or activity level. This value defined in UOM master is displayed here.
|
|
23
|
Cumulated Quantity
|
Cumulated quantity is the total achieved quantity with respect to a task.
|
|
24
|
Progress Contribution Towards
|
Task can contribute progress to Planned, Actual or both Planned and Actual at the same time. By default ‘Planned and Actual’ is selected. User can change selection.
Planned: If value “Planned” is selected, then the task will have contribution towards planned progress only. Meaning, the budgeted duration of this task is taken up for calculating the planned progress.
Actual: If value “Actual” is selected then the task has contribution towards actual progress only.
Planned and Actual: This is selected by default. If value “Planned and Actual” is selected, then the task has contribution to both planned progress as well as actual progress. This is mainly meant for the engineering and procurement tasks.
|
|
25
|
Restrict weightage in child WBS Levels
|
Select between Yes and No.
If selected “Yes”, then weightage cannot be assigned to the child WBS Levels.
If selected “No”, then weightage can be assigned to the child WBS Levels.
This property is only applicable for WBS Levels.
|
|
26
|
Task Identifier
|
Users export the list of tasks to the MS Excel template in which rules are defined against each task. When imported, the task serial number is used to locate the tasks in WBS to which the rules are to be added. This process has a potential problem. After exporting the tasks to the template, users may add or remove tasks in the WBS. As a result of this the serial number changes, and when tasks are imported from the excel template, the rules get assigned to different or incorrect tasks.
The property Task Identifier generated when a task is created, provides a solution to this problem. Unlike the serial number, the Task Identifier does not change, and this helps in identifying the correct task during task bulk import.
When tasks are updated in bulk using Excel, updating is permitted only if the Task Identifier of the task in SmartProject is the same as that in the excel file. Or else the operation is restricted, and a warning message, is displayed.
|
Document Details
Details related to the document are available here. Different document properties displayed here are mentioned in the following table.
|
#
|
Property
|
Description
|
|
1
|
Document Number
|
Click the browse button to generate a document number from the document numbering template.
The document number defined here is preserved by the system. Once a document number is preserved the same document number is assigned to documents attached to the main task.
|
|
2
|
Document Task
|
If the selected task is a document task, it is specified here. Document tasks are defined for governing the process of creation and release of design documents (Such Tasks can be flagged as "Document task".
|
|
3
|
Sheet Number
|
Enter a sheet number.
|
|
4
|
Client Document Number
|
Enter a client document number. This is the document number specified by the client.
|
|
5
|
Vendor Document Number
|
Enter a vendor document number. This is the document number as specified by the Vendor.
|
|
6
|
Approval Requirement Description
|
Approval Requirement Code, the level of approval or purpose (for information, for approval, for review etc) for which the Task is being submitted to the client is displayed here. Click the browse button to select an approval requirement code from a list.
|
Origin Details
Details on the origin of the document are displayed here. The origin details displayed here are mentioned in the following table.
|
#
|
Property
|
Description
|
|
1
|
Origin Type
|
The origin of the task is entered here. The origin types available are "Internal", "Customer", "Vendor" etc. The purpose of this data is to define the source of the document that will be attached to the Task.
|
|
2
|
Origin Name
|
Origin Name corresponding to Origin Type is entered here.
|
System Details
Details of the system assigned to the task are displayed here. Different system properties displayed here are mentioned in the following table.
|
#
|
Property
|
Description
|
|
1
|
System Code
|
The material (part) group code. This defines the group of deliverable equipment or component that is assigned to the project. Click the browse button to select a code from the list.
|
|
2
|
System Description
|
The description of the system is displayed here based on the selected code.
|
Area Details
Details of the area assigned to the task are displayed here. Area details mentioned in the following table are displayed here.
|
#
|
Property
|
Description
|
|
1
|
Area Code
|
An Area code for the particular Task is selected from the list of Project Areas specified ( if any).
|
|
2
|
Area Description
|
Area Description corresponding to the area selected is displayed here.
|
Approval Status Code Details
Approval Status code details mentioned in the following table is displayed here.
|
#
|
Property
|
Description
|
|
1
|
Approval Status Code (Internal)
|
Approval Status Code used for internal purpose by the organization is displayed here.
|
|
2
|
Approval Status Code (Client)
|
Approval Status Code of the client is displayed here.
|
|
3
|
Approval Status Description
|
Description of the approval status code is displayed here.
|
|
4
|
Received Back On
|
Date on which the document was received after client response is displayed here.
|
|
5
|
Revision Required
|
In case the document requires revision, it is displayed here.
|
Submission Details
For document with vendor origin submission details has to be updated. Submission Details that has to be updated are displayed here.
Custom Details
Custom Properties defined for the task are displayed here.
Budgets
Entire information about budget mentioned in the following table is captured and displayed here.
|
#
|
Property
|
Description
|
|
1
|
Budgeted Cost
|
Estimated cost to complete the task in the currency defined at project level. Value is entered by user.
|
|
2
|
Budgeted Duration
|
Estimated time in hours required to complete the task. Value is entered by user.
|
|
3
|
Budgeted Quantity
|
This is the estimated quantity and is entered by the user.
|
|
4
|
Actual Cost
|
Actual cost for completing the task. This is entered by user. For WBS Levels this is total of all sub tasks.
|
|
5
|
Actual Duration
|
Actual duration for completing the task. This is entered by the user or is captured from the time sheet entry for the task. For WBS Levels this is total of all sub tasks.
|
|
6
|
Actual Quantity
|
Value for this field is entered by user or is captured from Rule of Credit for quantity. For WBS Levels this is total of all sub tasks.
|
|
7
|
Forecast Cost
|
Forecasted cost required to complete the task. This is entered by the user.
|
|
8
|
Forecast Duration
|
Forecasted duration required to complete the task. This is entered by the user.
|
|
9
|
Forecast Quantity
|
Forecasted quantity. This is entered by the user.
|
|
10
|
Task UOM
|
Unit of Measurement for the task. Value is selected by the user.
|
- Click Create to complete creation of the task.
- Click OK to save the task.
After creating the task, you can enter value for different properties in the task, add resources and assign a workflow. By clicking different buttons in the button strip you can open different sections where you can enter task properties. For more information on entering task properties refer Working from Task Details window. Once all the task properties are entered you can schedule the task.
NOTE: Activities like assigning resources, attaching documents, correspondences and assigning workflows are usually carried out after scheduling the task.
Entering schedule details
Schedule details are different dates that is assigned to a task. Basic schedules dates of the task like start and Finish date is entered here.
NOTE: Option Edit Schedule Dates will be selected by default.
To enter schedule details
- In the Create Task window click Schedules tab.
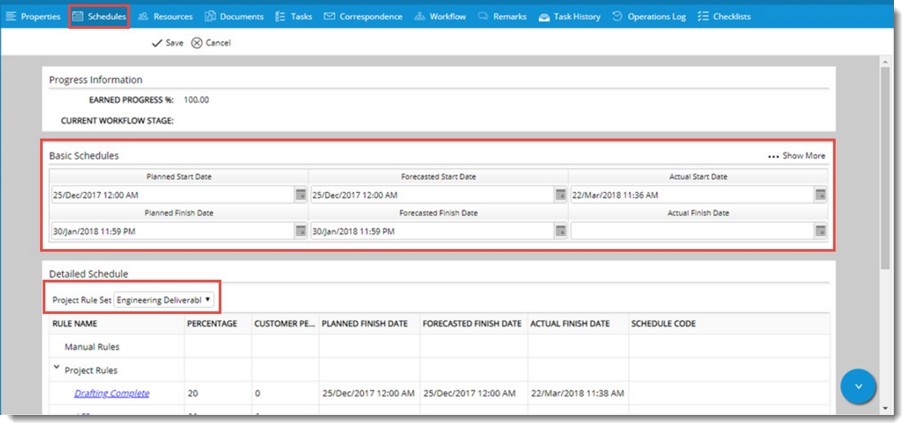
Figure: Entering schedule details
- Enter Basic Schedule details.
The schedule details that has to be entered are mentioned in the following table.
|
#
|
Property
|
Description
|
|
1
|
Planned Start Date and Planned Finish Date
|
Enter a planned start date and planned finish date for the task.
|
|
2
|
Forecasted Start Date and Forecasted Finish Date
|
Once an approximate duration of a task is estimated, a forecasted start date and forecasted end date is specified. By default system assigns current date as the schedule start and schedule end date. The forecasted start and forecasted end date is entered accordingly. The reports submitted to the client are based on the forecasted date. On scheduling the task, these dates are freezed and are only editable when the task is revised. Forecasted start date should be greater than the project start and Forecasted end date should always be less than the project end date.
|
|
3
|
Actual Start Date
|
System automatically updates this field when the Task is actually initiated. You can also manually update this date.
|
|
4
|
Actual Finish Date
|
System automatically updates this field when the Task is actually completed. You can also manually update this date.
|
In the Detailed Schedule section Rule Of Credit details can be entered. Project Rule Sets assigned to a project is available here. A rule can be selected from the drop-down list and the selected rule details are displayed here.
For more information on this see Working from Task Details window>>Schedules.
After entering schedule date, enter the task resources.
Adding task resources
Resources are specifically the people who are allocated to the respective project or to the particular work element within the project, and whose time can be allocated accordingly. Identifying and assigning proper resources for a task is very important. The overall progress of a task depends on the effort of the resources assigned to the task. WRENCH classifies the resources into two.
- Task Resources: Task resources are resources readily available for a task selected from various departments in the organization. A task duration can be defined for each resource. The total of the task duration of each resource is displayed as budgeted duration.
- Privileged Task Resources: Privileged Task resources are those with "Edit WBS permission." Privileged Task access resources are assigned while creating a new project. Only the Privileged task access resources are able to edit the WBS.
Resources for the particular Task will be assigned here. If Privileged Task Access Resources are defined, only those resources will be able to edit the particular Task.
You can add task resources and privileged task view resources to the task. You can also remove the resources from the task. Once you schedule a task and assign workflow, the workflow resources will be assigned to the task.
NOTE: If Privileged Task resources are assigned for a task, only those resources are able to edit that particular task. Else all those resources who have " Edit WBS" permission in the Project and " Manage" permission in WBS module can edit tasks in that WBS.
To add task resources
- In the task properties window click Resources .
- In the resources window click Edit.
- In the Task Resources grid click Add.
Figure: Task Resources tab
Search User window is displayed.
- Search and select the users.
List of selected users are displayed in the grid. On clicking a user name task resource details window is displayed. This window will contain details on Role, Contribution to Project and Actual Duration.
NOTE: The procedure for adding task view resources is similar to the procedure for adding task resources and hence is not mentioned separately.
- After adding resources, if you have any remarks or comments enter them under the Remarks tab.
- Click Create to complete the creation of the task.
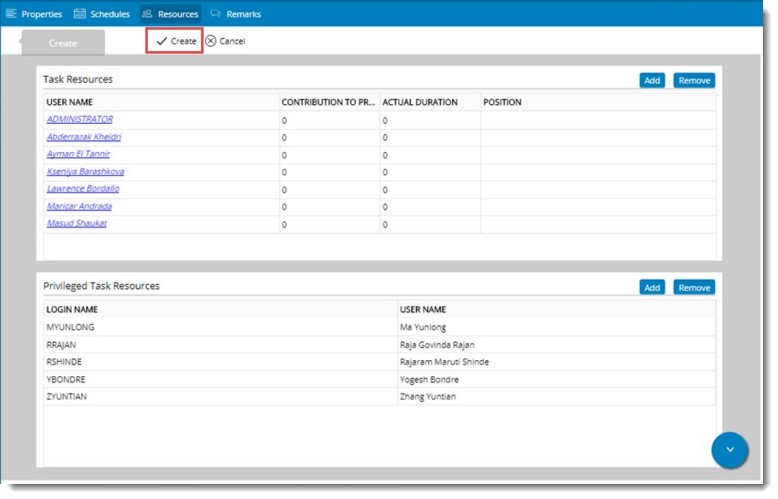
Figure: Creating the task
On clicking Create, Task Details window is displayed. For more information on elements in the task details window see Working from Task Details window.
Resource Booking
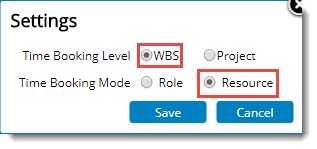
Like in project, in the WBS also, time can be booked against a role/ resource. This option will be available only if in the Project>>Resource>>Resource Booking>>Settings, Time Booking Level is selected as WBS.
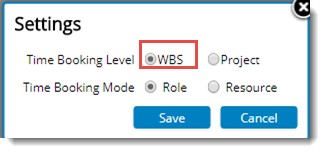
Figure: Time Booking Level
Booking can be made against a Role or Resource. This again depends on the selection made against Time Booking Mode.
Resource based booking
In projects where accurate planning is required, time planning is performed at the user level. Time that each user is expected to spent can be booked for specific time periods, which can be compared against the actual time spent (captured in Timesheet).
To make a resource based booking
- In the Project, Resource Booking tab, Settings window, select the time booking mode as Resource and Time Booking Level as WBS and click Save button.
- In the WBS open the task and select the Resources tab.
- Click Edit.
On clicking Edit, options for managing resource booking is displayed in Resource Booking.
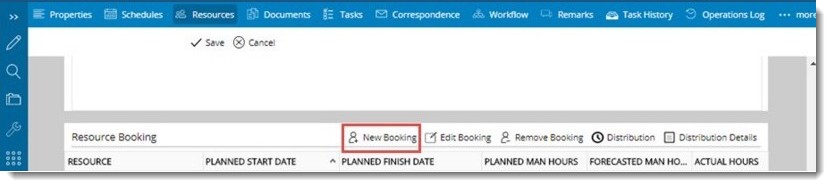
Figure: New Booking
- In the options bar click New Booking. New Booking window is displayed.
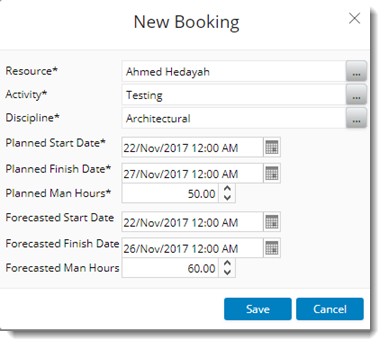
Figure: New Booking window
- In the New Booking window enter values for the fields described in the following table.
|
#
|
Field
|
Description
|
|
1
|
Resource
|
Select the user against whom a time booking is to be made. Click the browse button to select a user or resource from the Search User window.
|
|
2
|
Activity
|
Select the activity against which time booking is to be made. Click the browse button to select the activity from activity search window.
|
|
3
|
Discipline
|
Select a discipline. Click the browse button to select a discipline from a pre-defined list.
|
|
4
|
Planned Start Date
|
Select the planned start date from a date picker.
|
|
5
|
Planned Finish Date
|
Select the planned finish date from a date picker.
|
|
6
|
Planned Man Hours
|
Enter planned hours for the resource.
|
|
7
|
Forecasted Start Date
|
Select the forecasted start date from a date picker.
|
|
8
|
Forecasted Finish Date
|
Select the forecasted finish date from a date picker.
|
|
9
|
Forecasted Man Hours
|
Enter forecasted man hours for the resource.
|
- After entering the values click Save.
A message Booking saved successfully is displayed.
New booking created is displayed in grid.

Role based booking
Time required for each role is defined at the project level and the actual time spent can be captured using the timesheet. Though booking time against each user may be accurate, in large projects this is not practical. Hence planning at the role level makes it easier with appreciable level of accuracy.
To make a role based booking
- In the Project, Resource Booking tab, Settings window, select the time booking mode as Resource and Time Booking Level as WBS and click Save button.

Figure: Selecting booking mode
- Click Save.
- After selecting the booking mode, in the tool bar click New Booking.
New Booking window is displayed.
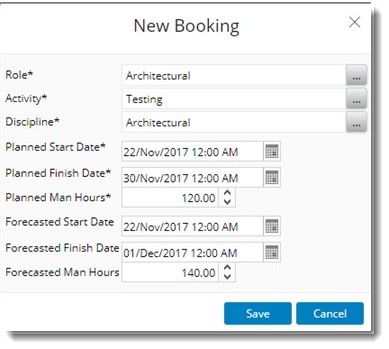
Figure: New Booking window
- In the New Booking window enter values for the fields described in the following table.
|
#
|
Field
|
Description
|
|
1
|
Role
|
Select the role against which a time booking is to be made. Click the browse button to select a role from the User Groups search window.
|
|
2
|
Activity
|
Select the activity against which time booking is to be made. Click the browse button to select the activity from activity search window.
|
|
3
|
Discipline
|
Select a discipline. Click the browse button to select a discipline from a pre-defined list.
|
|
4
|
Planned Start Date
|
Select the planned start date from a date picker.
|
|
5
|
Planned Finish Date
|
Select the planned finish date from a date picker.
|
|
6
|
Planned Man Hours
|
Enter planned hours for the role.
|
|
7
|
Forecasted Start Date
|
Select the forecasted start date from a date picker.
|
|
8
|
Forecasted Finish Date
|
Select the forecasted finish date from a date picker.
|
|
9
|
Forecasted Man Hours
|
Enter forecasted man hours for the role.
|
- After entering the values click Save.
A message Booking saved successfully is displayed.
New booking created is displayed in grid.
Distributing a time booking
Planned person hours or time booking specified against a role or resource can be distributed across the defined time interval. This can be done either manually or automatically.
To distribute time booking
- In the resource booking window select the time booking that you want to distribute.
- In the tool bar click Distribution.
Distribute Time Booking window is displayed. Time Booking details is displayed in this window. In addition to the time booking details entered, the following fields are also available.
Estimate at Completion: It is the forecasted time.
Estimate to Complete: It is the estimate to complete the remaining work.
Actual Hours: This field is calculated based on the entry made in Time Sheet.
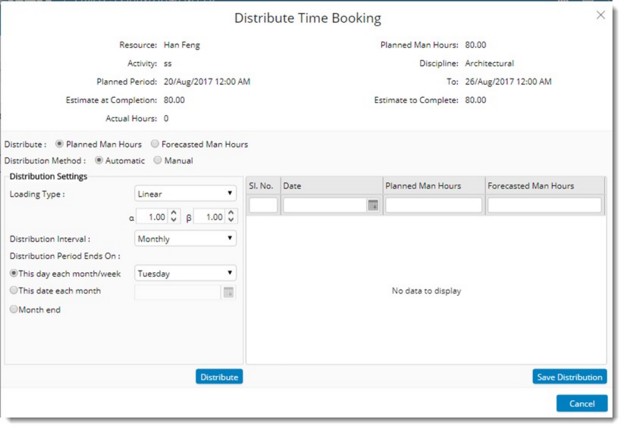
Figure: Distribute Time Booking window
Planned Man Hours or Forecasted Man Hours can be distributed. The distribution can be carried out automatically or manually. Different ways of distributing time booking is described in Project>>Resources>>Resource Booking>>Distributing time booking. Click the link for more details.
In addition to options for creating a resource booking and distributing the booking, following options are available in the options bar.

Figure: Resource Booking options
Edit Booking: Click this option after selecting a time booking, if some changes are to be made to the time booking. On clicking this option Edit Booking window is displayed. Edit values in this window and save changes.
Remove Booking: Click this option after selecting a time booking to remove a created time booking. On clicking this option a warning message is displayed. Click OK to remove the booking, click Cancel to discard the operation.
Distribution Details: Click this option to view details of a time booking. On clicking this option Distribution Hours window is displayed.
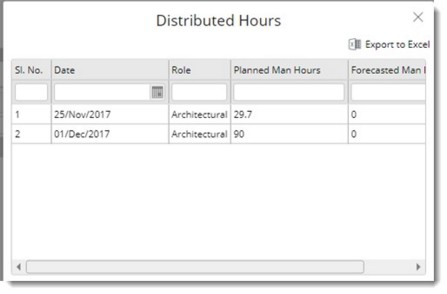
Figure: Distributed Hours window
Here details of time distributed is displayed. Click Export to Excel to export the details to an MS Excel file.
Scheduling a task
After entering the mandatory task properties the next step is to schedule the task and start the workflow. Scheduling a task is freezing the schedule dates of the task. A proper scheduling of the tasks is required for the timely completion of a project. Once a task is scheduled, the project manager monitors the task to ensure that the activities are carried out as per the schedule defined.
To schedule a task
- In the tab strip click Schedule.
The selected task is scheduled successfully. The date on which the task is scheduled as assigned as the Start date.
Once the task is scheduled the next step is to start the workflow.
Starting the workflow
Starting the workflow is the process of sending the work to the concerned resources. The work is send through a workflow. You can start a workflow either from the Workflow option in the Task Details window or you can select a task from the grid and using the Send button.
To start a workflow from the grid
- Select the task from the grid.
- In the tab strip click Send.
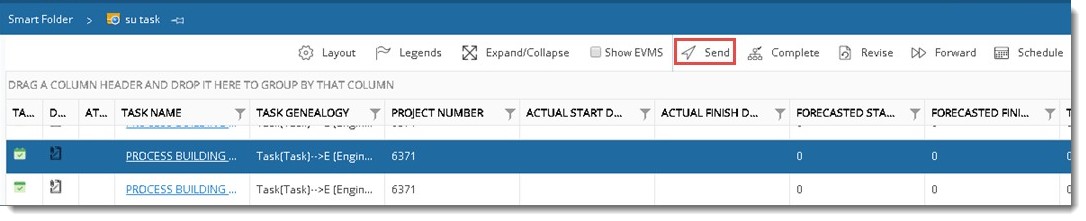
Figure: Starting workflow for the task
If a workflow is not assigned a warning message is displayed saying there is no active workflow for the task.
- In the message box click OK to assign workflow to the task.
- On clicking OK, Workflow window is displayed. Here you can assign a workflow to the task and start the workflow assigned to the task.
For more information on entering values for different task properties refer Working from task details window.
For more information on assigning a workflow and starting the workflow refer Working from document details window>>Workflow.
For more information on sending tasks through workflow refer Sending documents and tasks through workflow.
The task is successfully started and send to the next stage of the workflow.

