Comment details can be exported or imported using an MS Excel template. For this WRENCH CRS properties are to be mapped with columns in the MS Excel template. This mapping helps the system to identify the excel columns from where data is to be extracted and updated in the corresponding WRENCH property as well as export back to the Excel template.
This mapping is carried out from Project Properties window.
 To map template columns
- On the Project Properties window click More and in the menu click CRS Mapping.
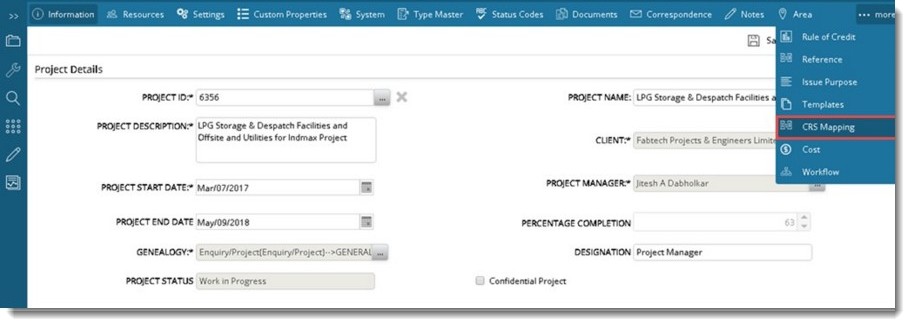
Figure: Opening CRS Template
CRS Mapping Template window is displayed.

Figure: Adding a template
- On the window click Add.
Template Mapping window is displayed.
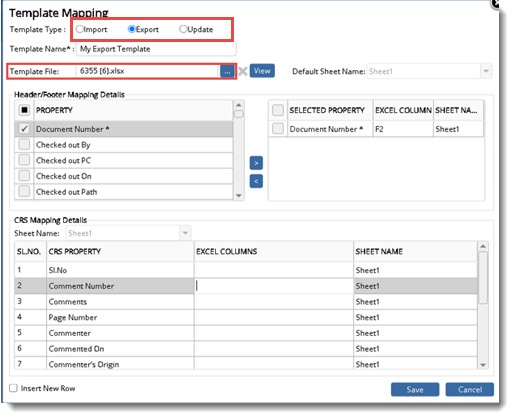
Figure: Configuring the mapping template
- Select the radio button next to a Template Type. Options available are Import, Export and Update. For mapping values to Import and Export template, procedures are the same. On the CRS Template Mapping window, if type selected is Export, in the template mapping window option to browse a template file is available.
- Click the browse button next to the field Template File to select a template file from the location where it is stored. Once a template file is selected, options to remove the file and view the file will be displayed. Enter mapping values and save the template.
- Enter a template name.
Insert New Row: If the checkbox next to this option is selected, then for every row of ‘CRS Mapping Details’ a new row is created in excel.
Next step is to select the document properties that are to be mapped and define a location for the mapped values in Excel sheet.
- Select the checkbox next to properties that are listed under Header/Footer Mapping Details.
- After selecting the required properties click the arrow pointing forward. Selected properties will now be available under Selected Columns.
- For each property enter the location where the values should be mapped in Excel sheet.
Next step is to enter the location where values for CRS properties should be displayed.
- Corresponding to the CRS Properties, enter the location where values are to be mapped in Excel template.
- Click Save to store values.
Created templates are displayed in the grid.

Figure: Created templates
 To import CRS
- In the Comments Response Sheet window click Import.
CRS Import Wizard is displayed.
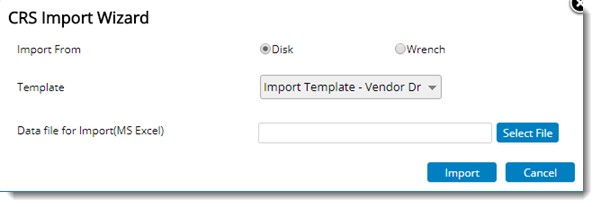
Figure: CRS Import Wizard
CRS data can be imported from files stored in the disk or from files in WRENCH. In some cases user adds the CRS file received from the client as a reference document inside the main document. If user wants to import data from a document already available in the system, then user may select the option My Wrench. MS Excel files containing CRS data, attached as reference documents can be selected.
 To import data from excel file saved locally
- Select the radio button next to From disk.
- On the drop-down list, templates that contains details for mapping CRS file data will be available. Select the template from the list.
- Next step is to select the Excel file containing data. Click Select File.
- File selection window is displayed. Select the excel file where CRS details are saved.
- After selecting the file click Import.
If the data is successfully imported, Imported Successfully message is displayed. Mapped CRS details will be displayed in the grid as shown in the following figure.
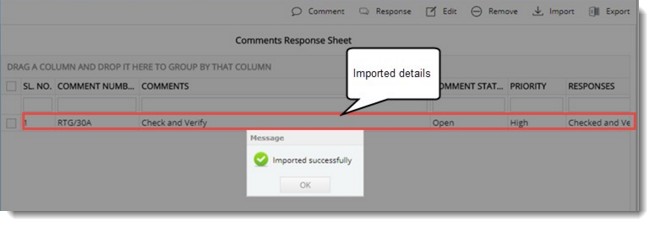
Figure: Imported CRS data
 To import data from attached data file
- On the CRS Import Wizard window click the radio button next to From Wrench.
- Select a template from the drop-down list.
- Click Select File
Document Attachments window is displayed.
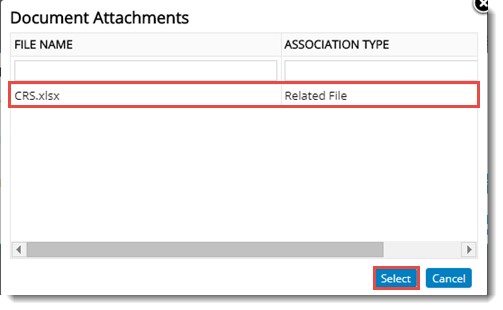
Figure: Document Attachments window
- Select the file from the window.
- Click Import button.
If the data is successfully imported, Imported Successfully message is displayed. Mapped CRS details will be displayed in the grid.
Exporting CRS Data
CRS values can be exported to a file saved in the disk or an associated file (excel file) of the document. Select Disk to export the values to an excel file stored in the system. In some cases user adds the CRS template received from the client as a reference document inside the main document. If user want to export the data to an excel file already available in the system, then the option Wrench is selected.
To export CRS data
- On the CRS window tool bar click Export.
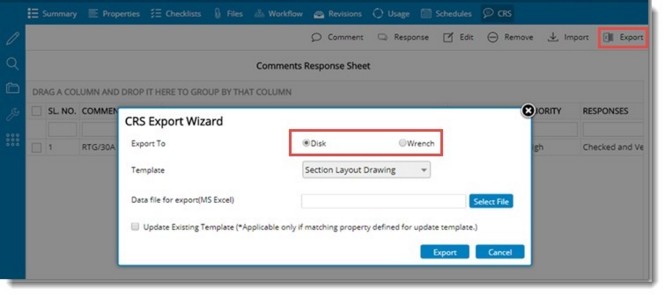
Figure: CRS Export Wizard
CRS Export Wizard is displayed. On the wizard options to export to Disk and WRENCH are available.
 To export to disk
- On the CRS Export Wizard select the radio button next to Disk.
- Select the template from the drop-down list.
- Click Select File to choose the data file stored locally.
Update Existing Template: This option is applicable only if matching property is defined for update template
- Click Export.
Data is exported to Excel sheet.
 To export to WRENCH
- On the CRS Export Wizard select the radio button next to Wrench.
- Select the template from the drop-down list.
- Select the button Select File.
Document Attachments window is displayed.
- On the window select the file.
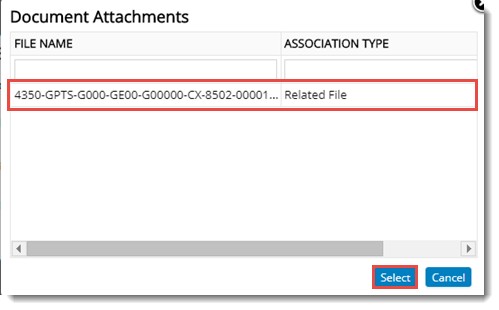
Figure: Selecting file
- Click Select.
Comment Resolution Sheet data is exported successfully to the selected associated document.


 To import data from excel file saved locally
 To import data from attached data file