Customer details primarily associated with work orders are managed here. Along with basic details such as name, address etc., configuring authentication and mail server configuration is managed from here.
To register a new customer
- On the Resources window click Customers.

Figure: Registering a new customer
- On the toolbar click Create.
Customer Details window is displayed.
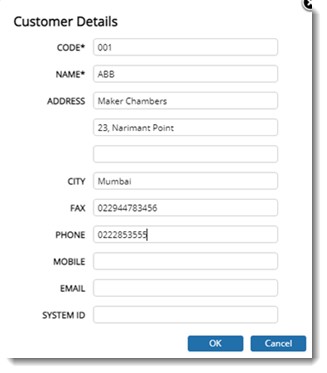
Figure: Customer Details window
- Enter values for the required customer details. Those which are marked with an asterisk (*) are mandatory items and are to be specified before the new customer details can be saved. To participate in WrenchXchange, the System ID of the participating SmartProject are to be registered with each other. The System ID can be associated with the corresponding origin.
- Click OK to register the new customer.
Configuring email configuration for customers
Email settings can be configured against a particular Customer, Vendor or Other Units in SmartProject and for internal users in Server config. Emails settings for Customers can be configured using SMTP and Oauth.
 To configure email settings for customers using SMTP
- On the customer management window, select a customer and On the tool bar click Mail Server Configuration.
Mail Settings window is displayed.
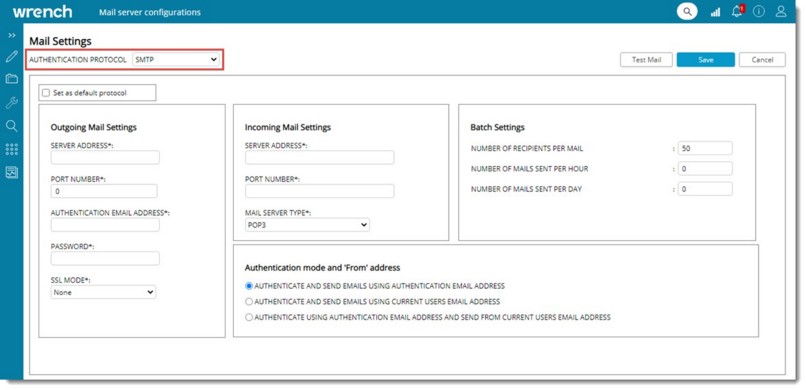
Figure: Mail Settings window
- On the window enter value for the following fields.
|
#
|
Property
|
Description
|
|
1
|
AUTHENTICATION PROTOCOL
|
Select the authentication protocol from a drop-down list. Options available are SMTP and OAUTH. Value SMTP is selected by default.
|
|
2
|
Set as default protocol
|
Select the checkbox next to this option, to set the displayed protocol as default protocol.
|
|
Outgoing Mail Settings
|
|
1
|
SENDER ADDRESS
|
Enter the outgoing mail server.
|
|
2
|
PORT NUMBER
|
Enter the port number of the outgoing mail.
|
|
3
|
AUTHENTICATION EMAIL ADDRESS
|
Enter the authentication mail id.
|
|
4
|
PASSWORD
|
Enter the password of the Organizational Mail ID.
|
|
5
|
SSL MODE
|
Select the SSL mode from a drop-down list.
|
|
Income Mail Settings
|
|
1
|
SERVER ADDRESS
|
Enter the incoming mail server.
|
|
2
|
PORT NUMBER
|
Enter the port number of the incoming mail.
|
|
3
|
MAIL SERVER TYPE
|
Select a mail server type from a drop-down list.
|
|
Batch Settings
|
|
1
|
NUMBER OF RECIPIENTS PER MAIL
|
Specify the number of recipients. Default value for this property is 50.
|
|
2
|
NUMBER OF MAILS SENT PER HOUR
|
Enter the number of mails that is to be sent per hour.
|
|
3
|
NUMBER OF MAILS SENT PER DAY
|
Enter the number of mails that is to be sent per day.
|
|
Authentication mode and from address
|
|
1
|
Authenticate and Send emails using authentication email address
|
If the radio button next to this option is selected, emails are authenticated and send using authentication email address. This option is selected by default.
|
|
2
|
Authenticate and Send emails using current USERS EMAIL address
|
If the radio button next to this option is selected, emails are authenticated and send using current users email address.
|
|
3
|
authenticate using authentication email address and send from current user email address.
|
If the radio button next to this option is selected, emails are authenticated using email authentication address and send from current user email address.
|
- After entering the values click Test mail to generate a test mail. Test Mail window is displayed.
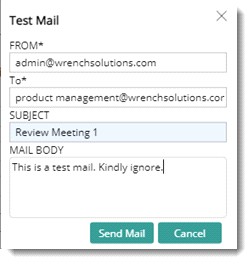
Figure: Test Mail window
- Enter from address of the test mail and address of the recipient.
- Enter a subject and mail body.
- Click Send Mail to send the mail. Click Cancel to cancel sending test mail.
 To configure email settings for customers using OAUTH
- On the Mail Server Configuration window select the authentication protocol as Oauth.
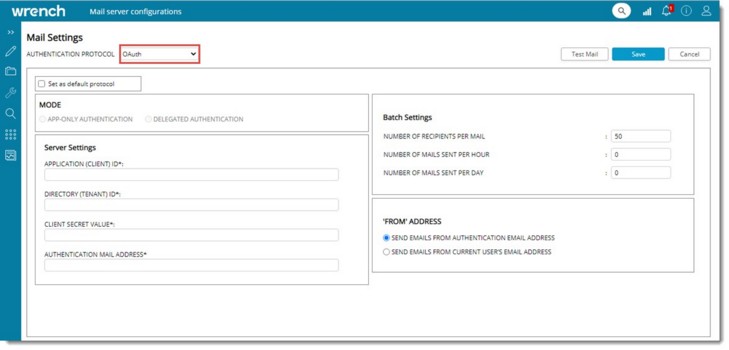
Figure: Oauth configurations window
- Since delegated authentication is used for correspondence select the MODE as DELEGATED AUTHENTICATION.
- Enter values for the properties mentioned in the following table.
|
#
|
Property
|
Description
|
|
1
|
Set as default protocol
|
Select the checkbox next to this option, to set the displayed protocol as default protocol.
|
|
Server Settings
|
|
1
|
REPLY URL
|
This is the URL to which system is redirected after successful authentication. This field is filled in automatically.
|
|
2
|
LOGIN URL
|
Enter the login page to which system is directed to for authentication.
|
|
3
|
APPLICATION (CLIENT) ID
|
Enter application client id.
|
|
4
|
APPLICATION (TENANT) ID
|
Enter application tenant id.
|
|
5
|
CLIENT SECRET VALUE
|
Enter client secret value.
|
|
6
|
AUTHENTICATION MAIL ADDRESS
|
Enter authentication mail address.
|
|
Batch Settings
|
|
1
|
NUMBER OF RECIPIENTS PER MAIL
|
Specify the number of recipients. Default value for this property is 50.
|
|
2
|
NUMBER OF MAILS SENT PER HOUR
|
Enter the number of mails that is to be sent per hour.
|
|
3
|
NUMBER OF MAILS SENT PER DAY
|
Enter the number of mails that is to be sent per day.
|
|
FROM ADDRESS
|
|
1
|
Send emails FROM authentication email address
|
If the radio button next to this option is selected, emails are send using authentication email address. This option is selected by default.
|
|
2
|
Send emails FROM current USERS EMAIL address
|
If the radio button next to this option is selected, emails are authenticated and send using current users email address.
|
- After entering the values click Test mail to generate a test mail. Test Mail window is displayed.
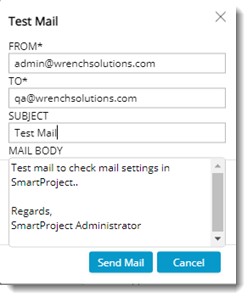
Figure: Test Mail window
- Enter from address of the test mail and address of the recipient.
- Enter a subject and mail body.
- Click Send Mail to send the mail. Click Cancel to cancel sending test mail.
Configuring authentication for online storage
When users check out documents in SmartProject, it is downloaded to the desktop. This document is edited using the corresponding native application. Since SmartProject cannot remember the location of the checked-out document, to check in the document, the user must select the file from the disk. For this user must remember the location where the file has been checked out. Also, there is a high possibility of the user selecting the wrong file for check-in.
Now since online editors like Office365 is available, documents are checked out the file to a cloud location so that SmartProject can remember the location where the document is checked out to. The document can be checked in without the user having to select the file. This is especially convenient when many files are to be edited for making small changes. Or else the user will have to remember the check-out location of each file.
If the document is an MS Office document, then the file is opened in the corresponding MS Office application in a new browser tab so that the user may edit it online. Or else the file location where it is checked out is displayed. The checkout location is displayed only, if necessary, configurations are made in SmartProject.
 To configure authentication
- On the Customer Management window select a customer.
- Click the option Configure Authentication for Online Storage.
The Online Storage Settings window is displayed.
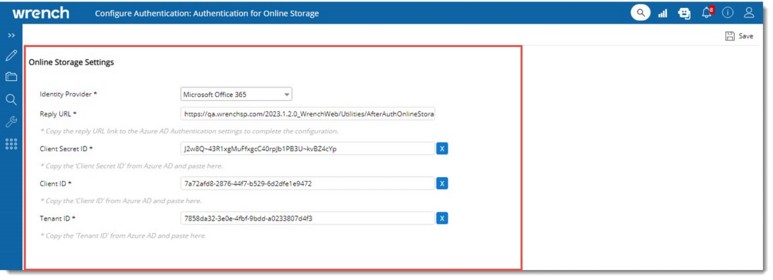
Figure: Configuring authentication for online storage
- Enter values for different properties mentioned in the following table.
|
#
|
Item
|
Description
|
|
1
|
Identity provider
|
Since currently SmartProject only supports Office365 it is displayed.
|
|
2
|
Reply URL
|
Specify the location where the application expects to receive the online storage token. To complete the configuration, copy the Reply URL link to the Azure AD Authentication settings.
|
|
3
|
Client Secret ID
|
Copy the Client Secret ID from Azure AD and paste it into this field. This client's secret ID is required for uploading and downloading the document.
|
|
4
|
Client ID
|
Client ID is generated when the application is created in Azure AD and, it is different for every application created in Azure. Copy the Client ID from the Azure AD and paste it into this field.
|
|
5
|
Tenant ID
|
A Tenant ID is a unique identifier that is based on the organization's domain name and the tenant ID remains the same while creating an APP at Azure AD. The tenant ID is required to identify the tenants and the app created by the tenants in Azure AD. Copy and paste the unique tenant ID from the azure AD to the online storage settings.
NOTE: Organization ID has been called Tenant ID in Azure.
|
- After entering the details click Save to store changes.
The same configuration can be carried out for Customers, Vendors, and Other Units also.
Configuring authentication for vendors
In a typical work day user may use multiple websites and applications to get their work done. This means that they may have to remember multiple login credentials which may be difficult for them. To tackle this issue single sign-on facility can be specifically configured for Customer.
 To configure authentication for customers
- On the customer management window select a customer.
- On the tool bar click Configure Authentication.
Configure Authentication window is displayed.
Procedure for configuring authentication is similar to that in Vendors. For more information see Vendor Management>>Configuring authentication for Vendors.


 To configure email settings for customers using SMTP
 To configure email settings for customers using OAUTH
 To configure authentication for customers