Resources are specifically the people who are allocated to the respective project or to the particular work element within the project, and whose time can be allocated accordingly. Identifying and assigning proper resources for a task is very important. The overall progress of a task depends on the effort of the resources assigned to the task. WRENCH classifies the resources into two.
- Task Resources: Task resources are resources readily available for a task selected from various departments in the organization. A task duration can be defined for each resource. The total of the task duration of each resource is displayed as budgeted duration.
- Privileged Task Resources: Privileged Task resources are those with "Edit WBS permission." Privileged Task access resources are assigned while creating a new project. Only the Privileged task access resources can edit the WBS.
Resources for the particular Task will be assigned here. If Privileged Task Access Resources are defined, only those resources will be able to edit the particular Task.
Adding and removing resources
You can add task resources and privileged task view resources to the task. You can also remove the resources from the task. Once you schedule a task and assign workflow, the workflow resources will be assigned to the task.
NOTE: If Privileged Task resources are assigned for a task, only those resources are able to edit that particular task. Else all those resources who have " Edit WBS" permission in the Project and " Manage" permission in WBS module can edit tasks in that WBS.
 To add task resources
- On the task properties window click Resources.
- On the resources window click Edit.
- On the Task Resources grid click Add.

Figure: Task Resources tab
Search User window is displayed.
- Search and select the users.
List of selected users are displayed in the grid.
NOTE: The procedure for adding task view resources is similar to the procedure for adding task resources and hence is not mentioned separately.
 To remove task resources
- Select the resources you want to remove from the list.
- Click Remove button.
Selected resources are removed from the list.
NOTE: Follow the procedure for adding task resources to add privileged task resources also.
Resource Booking
Resource Booking can be carried out from WBS also. This option will be available only if in the Project>>Resource>>Resource Booking>>Settings, Time Booking Level is selected as WBS or Both
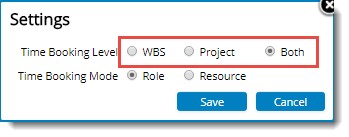
Figure: Time Booking Level
Booking can be made against a Role or Resource. This again depends on the selection made against Time Booking Mode.
In projects where accurate planning is required, time planning is performed at the user level. Time each user is expected to spent can be booked for specific time periods, which can be compared against the actual time spent (captured in Timesheet).
 To make a resource based booking
- On the Project, Resource Booking tab, Settings window, select the time booking mode as Resource and Time Booking Level as WBS and click Save button.
- On the WBS open the task and select the Resources tab.
- Click Edit.
On clicking Edit, options for managing resource booking is displayed in Resource Booking.

Figure: New Booking
- On the options bar click New Booking. New Booking window is displayed.
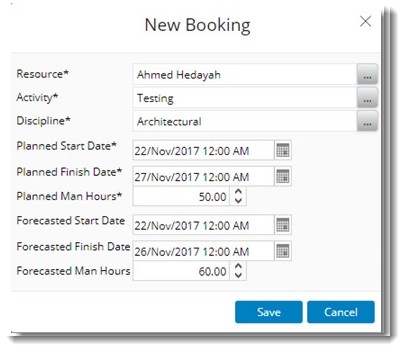
Figure: New Booking window
- On the New Booking window enter values for the different properties.
- After entering the values click Save.
A message Booking saved successfully is displayed.
New booking created is displayed in grid.

Time required for each role is defined at the project level and the actual time spent can be captured using the timesheet. Though booking time against each user may be accurate, in large projects this is not practical. Hence planning at the role level makes it easier with appreciable level of accuracy.
 To make a role based booking
- On the Project, Resource Booking tab, Settings window, select the time booking mode as Resource and Time Booking Level as WBS and click Save button.
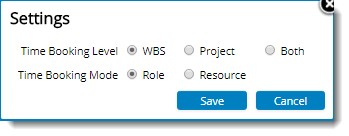
Figure: Selecting booking mode
- Click Save.
- After selecting the booking mode, On the tool bar click New Booking.
New Booking window is displayed.
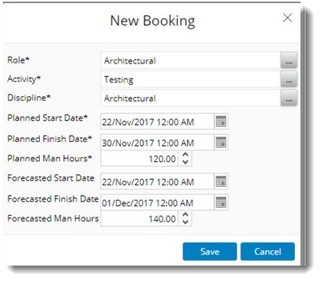
Figure: New Booking window
- On the New Booking window enter values for different properties.
- After entering the values click Save.
A message Booking saved successfully is displayed.
New booking created is displayed in grid.
Distributing time booking
Planned person hours or time booking specified against a role or resource can be distributed across the defined time interval. This can be done either manually or automatically.
 To distribute time booking
- On the resource booking window select the time booking that you want to distribute.
- On the tool bar click Distribution.
Distribute Time Booking window is displayed. Time Booking details is displayed in this window. In addition to the time booking details entered, the following fields are also available.
- Estimate at Completion: It is the forecasted time.
- Estimate to Complete: It is the estimate to complete the remaining work.
- Actual Hours: This field is calculated based on the entry made in Time Sheet.
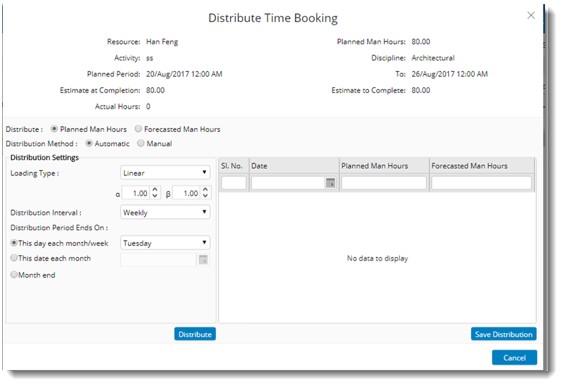
Figure: Distribute Time Booking window
Planned Man Hours or Forecasted Man Hours can be distributed. The distribution can be carried out automatically or manually.
In addition to options for creating a resource booking and distributing the booking, following options are available in the options bar.

Figure: Resource Booking options
Edit Booking: Click this option after selecting a time booking, if some changes are to be made to the time booking. On clicking this option Edit Booking window is displayed. Edit values in this window and save changes.
Remove Booking: Click this option after selecting a time booking to remove a created time booking. On clicking this option a warning message is displayed. Click OK to remove the booking, click Cancel to discard the operation.
Distribution Details: Click this option to view details of a time booking. On clicking this option Distribution Hours window is displayed.
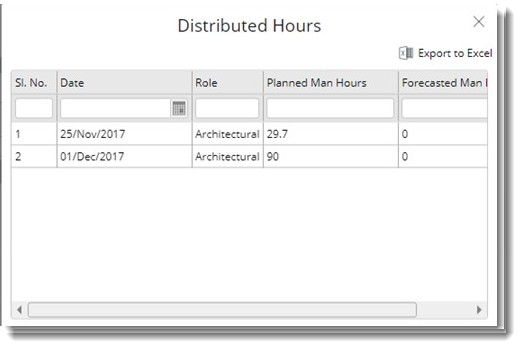
Figure: Distributed Hours window
Here details of time distributed is displayed. Click Export to Excel to export the details to an MS Excel file.


 To make a resource based booking