Some of the engineering deliverables may be independent assemblies. Those are identified separately as Systems in Wrench ENT so that tasks associated with those systems could be managed more efficiently. The systems can either be procured or manufactured. List of such deliverables can be maintained using this facility.
On clicking the Systems tab, systems added to this project is displayed.

 To add a system
- On the Systems window tool bar click Add.
Add System window is displayed. Different properties in the system details window is described in the following table.

Figure: Entering System Details
|
#
|
Property
|
Description
|
|
1
|
System Code
|
System Code is the unique identifier for a system. Click the browse button to select a system code.
|
|
2
|
System Description
|
When a system code is selected, corresponding system description is displayed here.
|
|
3
|
System Identifier
|
Enter the system identifier.
|
|
4
|
Quantity
|
System is measured in terms of quantity. Enter a quantity here.
|
|
5
|
UOM
|
Enter the unit of measure.
|
- After entering the details click OK to save the values entered. System created is displayed in the grid below the window.
Workflow Team
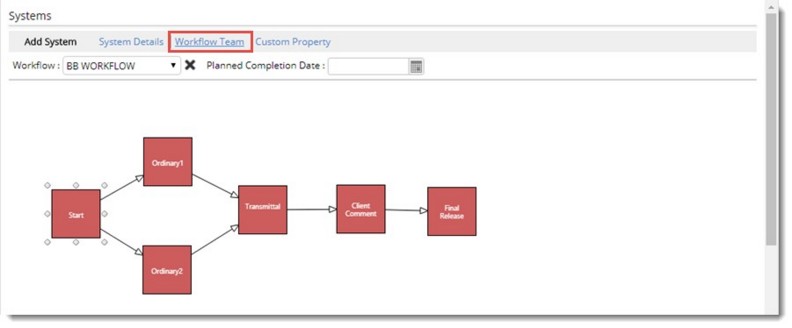
A workflow can be assigned to a system or package and the progress of the package can be monitored independently. If a package with a workflow is assigned to a task with a workflow, then the system returns a message, whether the package workflow has to be assigned to the task. You can assign the package workflow to the task or retain the same workflow for the task. If the workflow for the task is already started, then any warning messages are not displayed.
 To assign a workflow to the system
- On the System Details window select the Workflow Team tab.

Figure: Workflow details window
- On the workflow team window, select a workflow from the drop-down list.
- Once the workflow is selected click OK to save the workflow and continue.
Vendor List
You can define a vendor corresponding to a system. Once user creates a system, in the System Details window click Apply to save changes. Now the Add button in the Vendor List window is enabled.
 To add vendors
- On the System Details window click Vendor List tab.
If there are vendors added to the system, Vendor Code and Vendor Description of the vendor is displayed in the Vendor List window.
- On the Vendor List window click Add.

Figure: Adding Vendors
Search Vendor window is displayed.
- Select a vendor and click OK to continue.
Selected vendor is displayed in the vendor list window.
System Resources
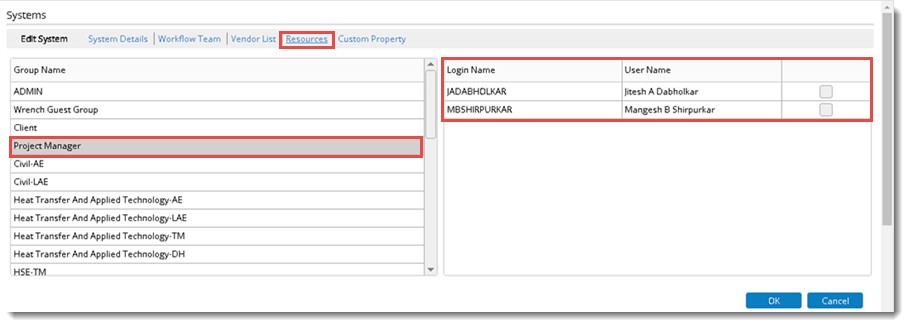
You can assign a set of resources to a system. All the project groups and resources are listed here. A user or user group is selected for a system and the selected user or user group will be responsible for handling the system.
 To assign resources
- On the System Details window click Resources tab.

Figure: Assigning system resources
List of User Groups are displayed. When a user group is selected users under the group are displayed.
- Select the check box next to the user whom you want to add to the system.
- Click OK to continue.
NOTE: When resources are added or removed from an area or system the changes are to be incorporated to the corresponding workflow. Clicking Refresh workflow the changes are updated to the workflow.
Custom Properties
Any other additional information related to the system are handled using custom properties. Custom characteristics are created in Wrench master and these properties are displayed in the window.
Removing a system
A system which is no longer in use can be removed.
 To remove a system
- On the grid select the system you want to delete.
- On the tool bar click Remove .
A warning message is displayed.
- Click Yes to continue with removal of the system.
Viewing System Properties
This option helps in viewing entire details of a system.
 To view system properties
- On the grid select the system for which you want to view the details.
- On the tool bar click Properties.

Figure: Viewing system properties
System Details window is displayed with the properties displayed in the window.
- You can edit the system details and once editing is over click OK to save changes.


 To assign a workflow to the system