|
In several industry scenarios, there may be times when certain authorized individuals need to sign documents with a digital signature. A popular platform that is used for marking a digital signature is DocuSign. Digital Signatures can be inserted into documents in SmartProject by establishing an integration gateway with DocuSign.
Signing a document is entirely handled by DocuSign. A document from SmartProject needs to be uploaded to DocuSign for signature The user who is supposed to sign is notified. The user can log in to DocuSign and perform the signing operation. Once signed, the document is taken back to SmartProject and attached as the specter file (as the signed copy is always a PDF).
Sending documents for signature
A single document can be sent for signing digitally.
To send documents for signature
1.On the smart folder grid select the document.
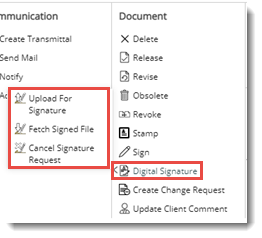
2.On the options menu place the mouse pointer over the option Digital Signature.
3.On the menu displayed click Upload for Signature.
File Selection and Recipients window is displayed.
.png)
Figure: File selection and recipients window
Different types of files that can be selected are listed below the heading File Selection. Different options available are Main Document, Specter File, and Consolidated Comment.
If the main file of the document is a signable document (supported by DocuSign), the option Main Document is enabled and selected by default. Other options are disabled.
If the document has a default specter attached, the option Specter file is enabled. If there are multiple specter files attached, only the default specter can be used for signing. If the document has consolidated comments, the option Consolidated Comments is enabled.
On selecting any of these options if there are multiple supported files, under a specific file type, then they are listed in the grid below. Or else this grid is not displayed.
After selecting the file type next step is to select the recipients for signing the document from the Signatory Details section.
1.Enter a Subject.
2.Enter the recipients for signing the document.
Different options for inserting the signature are available.
If the radio button next to the option, All recipients required to sign are selected, and all recipients in the recipient list are required to sign the document. If the radio button next to the option Any recipient can sign is selected, anyone in the recipient list can sign the document digitally. If the radio button next to the option Sequenced Signing is selected, the documents are to be signed in a sequence. The sequence will be in the order in which the recipients are specified.
3.After specifying all the mandatory details click Upload.
A window to log in to DocuSign is displayed.
4.Enter the login credentials. After successful authentication, documents are sent to the recipients selected in the signatory details and a message Document is submitted for signature. You will be notified when done is displayed.
.png)
Fetching the signed file
Once the documents are signed, they can be fetched.
To fetch the documents after signing
1.On the menu click Fetch Signed File. The Fetch Document window is displayed.
.png)
Figure: Fetch Document window
On the window details of the document sent for signing are displayed. The list of users to whom the document was sent for signing and the signing status of each user is displayed on the window.
2.Click the button Fetch Document.
If the status of the document is Work in Progress, then on clicking the fetch document button, a warning message Document Signing yet to be completed. Are you sure you want to fetch the document? is displayed.
.png)
3.Click Yes to fetch the document, and No to cancel the operation.
If the document is fetched successfully, the file that was uploaded for signing is replaced with the fetched file and a message Document fetched successfully is displayed.
Import Signed Document as: The signed document can be imported as Main Document, Specter, or Consolidated Comment. The required option can be selected from a drop-down list.
Cancelling sign request
A sign request can be cancelled.
To cancel the sign request
1.On the options menu click Cancel Signature Request.
If the selected document is already fetched, or the signature operation is cancelled a warning message is displayed. Or else the Cancel Sign Request window is displayed.
.png)
Figure: Cancel Sign Request window
1.On the window click Cancel Sign Request to cancel the request.
Viewing the signature status of documents
As a user may need to know the signature status of all the documents that are sent for signing, a provision to view the signature status is provided.
To view the signature status
1.On the Utilities menu click Digital Signature Queue.
.png)
The signing Status window is displayed.
2. Requests created by the current user will be shown in this window.
.png)
On the window, documents that are sent for signing will be listed with the status as Work in Progress. The status is displayed in the column Signing status. Similarly, documents that have completed the signing process or that have been canceled will be listed with their respective statuses.
If the checkbox next to the option Show Fetched Requests is selected, the list of documents with status Fetched is displayed. If the checkbox next to the option Show other user's requests is selected, the request made by another user is displayed. This facility is only available for Admin group users.
Export to Excel: Click this option to export the signature details displayed on the window to an MS Excel file.
On clicking the hyperlink See Details, the Signatory Details window is displayed. From this window, it is possible to fetch a signed document and cancel a sign request.
|