|
While sending of objects are to be carried out in the absence of a pre-defined work flow the manual sending operation or an unguided workflow is used. Here a set of users to whom the objects are to be sent are defined.
To send through a manual workflow
NOTE: Assume that document you want send do not have a workflow assigned to it.
1.Click Send.
A warning message alerting the user on the absence of active workflow is displayed.
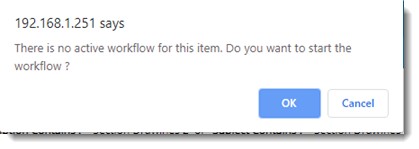
2.On the message box click OK to start the workflow.
Assign Workflow window is displayed.
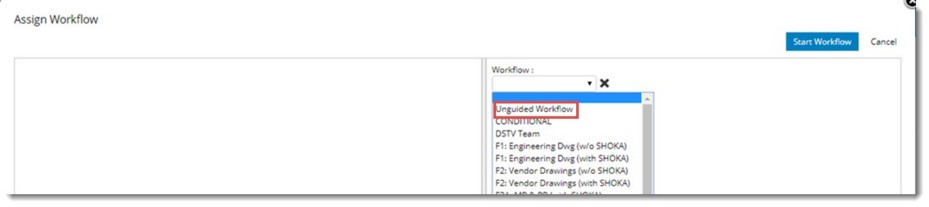
Figure: Selecting Unguided Workflow
3.On the window select the workflow as Unguided Workflow.
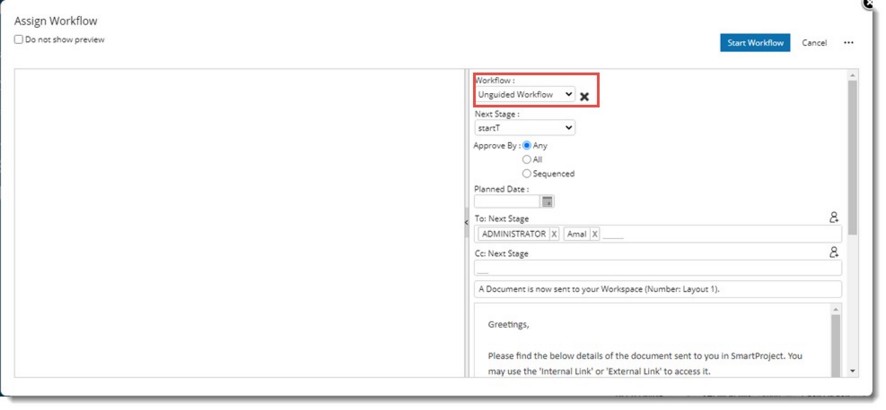
Figure: Unguided workflow
3.Select the Next Stage. Workflow stages defined in the Workflow Masters will be listed in the drop-down list next to this option. This is not mandatory.
4.Click the add resource icon to select the stage resources. Search User window is displayed. Search and select the users from this window.
5.After selecting the next stage and adding stage resources click the button Start Workflow.
Item Sent Successfully message is displayed.
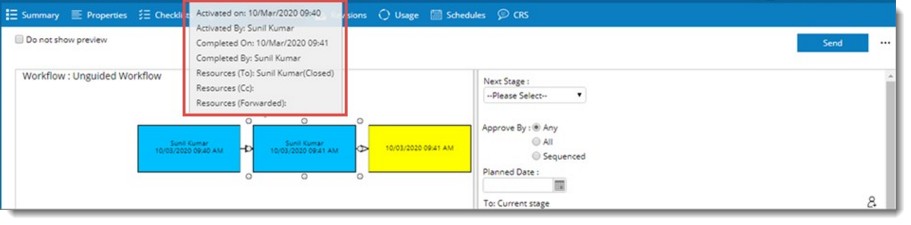
When the recipient opens the document and view the workflow the following window is displayed. Each send operation in the unguided workflow will be represented as a rectangular box as shown in the following figure.
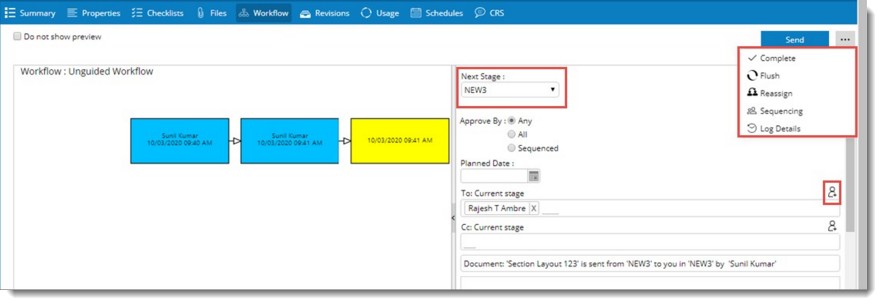
Figure: Send window
For the completed stage, date on which the item is send will be listed followed by the username of the sender of that box. For the current stage, the date on which the item is received in the current stage will be listed and no information of the user will be listed in the box.
Details of the stage can be viewed by clicking on the required box. An overlay will be displayed as shown in the following figure.
Based on the workflow operations carried out, the following information will be displayed in the overlay.
Activated On: Date on which the stage is activated (consider the logged in users time zone).
Activated By: Name of the user who activated the stage.
Completed On: Date on which the stage is closed (consider the logged in users time zone).
Completed By: Name of the user who closed the stage.
Resources (To): User names of the resources in the To field. Status of the workflow log will be displayed in the brackets (open, closed, force closed).
Resources (Cc): User names of the resources in the CC field. Will not be displayed if there are no CC users.
Resources (Forwarded): User names of the resources to which the item is Forwarded. This will be displayed only if there are forwarded users.
1.Click add resources. button to select the recipients from the user list.
2.Define an approval method.
•If the radio button next to Any is selected, any user among the recipients can approve the document.
•If the radio button next to All is selected, all the users in the recipient list can approve the document.
•If the radio button next to Sequence is selected, approval can be carried out only based on the sequence defined.
3.Click More>>Sequencing to define a sequence for completing the work.
4.Sequencing window is displayed. Here you can set the Sequence and Planned dates for each user in the next stage.
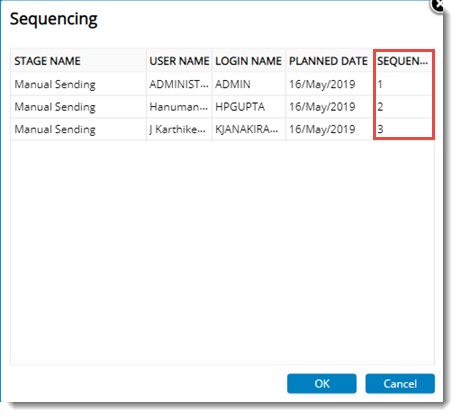
Figure: Defining sequencing
NOTE: The sequence of the existing user cannot be updated if the sequence is locked in the workflow.
5.Enter a Title and content for the message.
6.Click Send to send the document to the recipients.
Viewing sending details
Details of the sending operations are displayed in the Log Details window.
To view sending details
1.On the Workflow window click Log Details.
Log Details window is displayed.
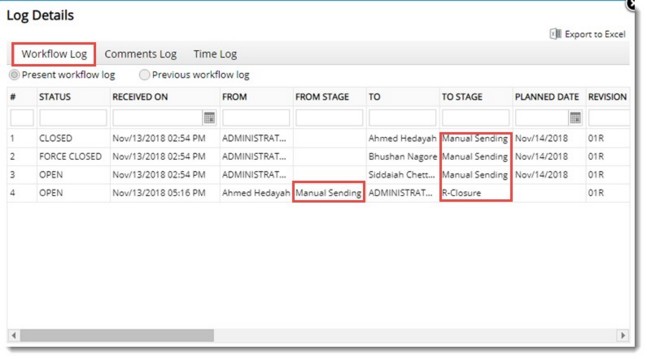
Figure: Log Details window-Workflow Log
2.Click the Workflow Log tab.
Details of the sending operation will be displayed here. Information on Sender, Receiver, From Stage and To Stage is displayed here. While sending if the next stage is selected, the selected stage name will be displayed in the column TO STAGE. If a next stage is not selected, in the column Manual Sending will be displayed.
On clicking the tab Comment Log, details of the comments will be displayed.

Figure: Comments Log window
On clicking the tab Time Log, time taken for sending from one stage to another stage is displayed.
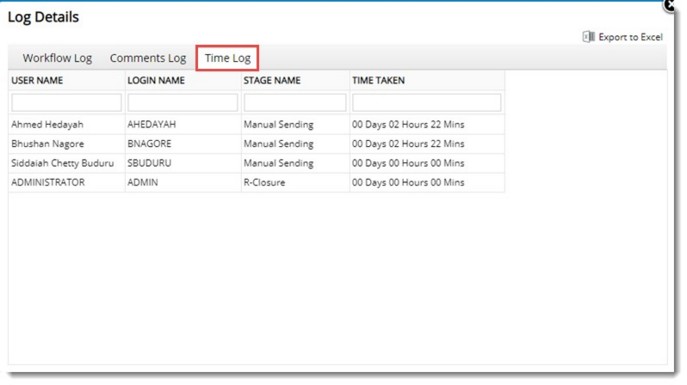
Figure: Time Log window
|