Wrench provides the facility to add single, correspondence documents to wrench. This topic deals with the addition of single documents. The main topics discussed in this section can be accessed using this navigation table.
Prerequisites
Only a user who has been assigned "Add Right" in the specific Document genealogy can carry out this operation. User or User Group Security can be assigned at the Control Panel>>Security Center. For more information on assigning security right refer Control Panel>>Settings>>Security Center in the Administrator's manual.
NOTE: Documents can be added under the leaf-level genealogy
Opening the document addition window
For adding and registering documents in Wrench, the first step is to open the document addition window.
 To open the document addition window
- In the global menu click Create>>Document

Figure: Opening the document window
NOTE: In this case the document is added to the smart folder My Documents
Or
- Select a Smart Folder
- Click Add Document > Single
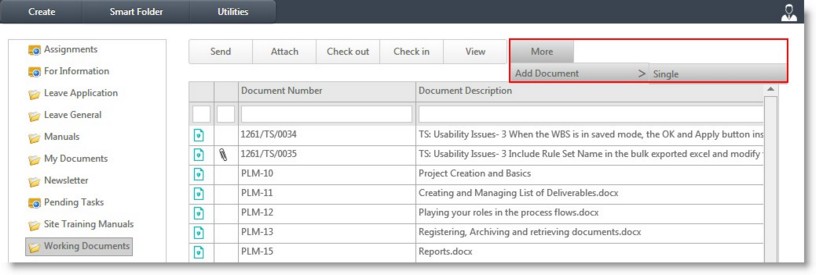
Figure: Adding documents from Smart Folder
- File and genealogy selection pane of the document addition window is displayed
Understanding the document addition window
For ease of use document addition window is divided into different panes. Different operations like selecting a file, assigning a genealogy, assigning document properties and additional operations can be carried out from different panes in the document addition window. The panes are displayed one after the other. The elements that has to be displayed in the pane can be configured and saved from the Masters. Different panes in the document addition window are displayed in the following figure.
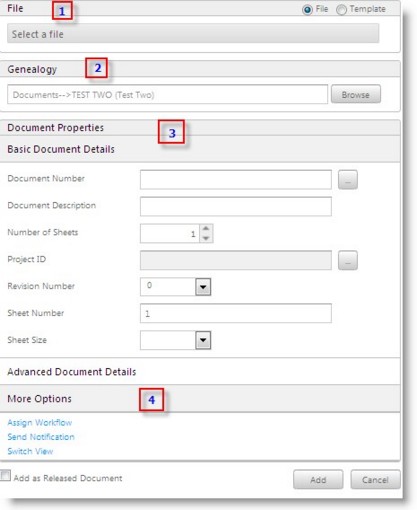
Figure: Document addition window
Different panes in document addition window are briefly explained in the following section.
- File: Files that has to be added or uploaded to Wrench can be selected here.
- Genealogy: A genealogy or folder can be selected under which the document can be saved.
- Document properties: Basic and Advanced properties can be assigned to the document here
- More options: Additional options like assigning workflows, sending notifications and changing views can be carried out from here.
Normally for adding a document to Wrench, the following steps have to be carried out.
Selecting Files
Files that have to be added to Wrench is selected from the File pane. You can add files or templates as a document in Wrench.
 To select a file
- In the File pane click the radio button next to File
- Click in the field Select a file

Figure: Selecting a File
File Upload window is displayed
- Select the file that you want to add to Wrench and click Open
You have successfully selected a file and the file is displayed in the File pane.

Figure: Selected file displayed
 To select a template
- Select the radio button next to Templates
- Click in the field Select Template

Figure: Selecting a template
Document Template window is displayed
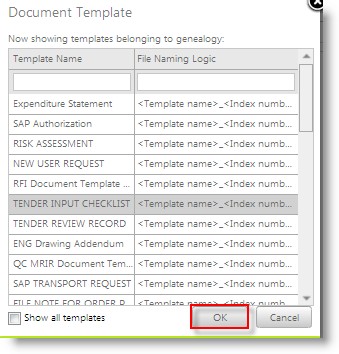
Figure: Document Template window
- Select a template and click OK to confirm selection
Selected Template is displayed in the pane

Selecting Genealogy
In Wrench files are usually stored under a specific folder or genealogy. Hence you have to choose a genealogy under which the selected files will be added.
 To select a genealogy
- In the Genealogy pane click Browse button next to Select Genealogy

Document Genealogy selection window is displayed
- Select the genealogy under which you want to store the document
- Click OK to confirm selection
Once the genealogy is assigned the Document Properties pane slides in. Document properties pane constitute of Basic Details and Advanced Details pane. Basic Details pane and Advanced Details pane will appear collapsed. Click on the main to expand the pane.
Assigning Document Properties
Next step is to assign document properties. A document is identified by various properties assigned to the document. Properties are classified to Basic and Advanced document details.
NOTE: The properties displayed under basic and advanced details are the properties defined in the UI customization window.
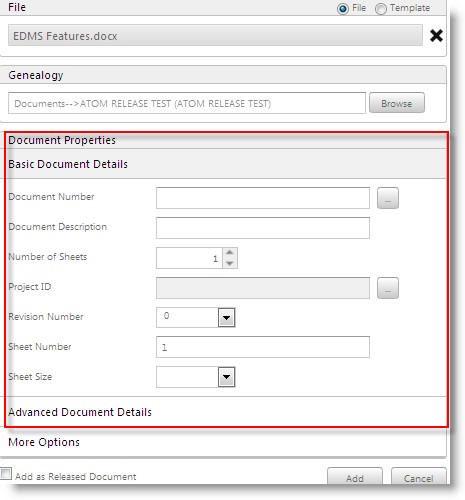
 Basic document details
Basic document details are basic document properties like document number and description that are assigned to a document. Usually the following properties are grouped under the basic document details .
|
Sl.No.
|
Item
|
Description
|
|
1
|
Document Number
|
Document number is the unique identifier for the document that is being added to Wrench. A document number can be entered manually or generated automatically using a numbering template. For more information on automatic number generation refer Automatic Number generation.
|
|
2
|
Document Description
|
Enter a short description for the document that is being added. This is provided for the purpose of identification
|
|
3
|
Number of Sheets
|
Total number of sheets in the document which is being added to Wrench can be entered here
|
|
4
|
Project ID
|
In case the document is related to a project, you can select a project. Click the browse button to select a project from the project search window
|
|
5
|
Revision Number
|
Revision numbers are maintained to indicate the number of times a document is revised or edited after its release. The revision numbering sequence maintained by different organization varies. It can be common across the organization or even can be project specific.
Select the revision number from a drop-down list.
|
|
6
|
Sheet Number
|
A number can be entered for each sheet in the document. The value you enter for sheet number should not exceed the number of sheets you have specified
|
|
7
|
Sheet Size
|
A size can be specified for the sheets in the document. The size depends on the type of sheets your organization is using.
|
Automatic Number generation
A document number can be generated automatically based on pre-defined numbering templates.
 To generate numbers automatically
- In the Basic Document Details pane click the browse button next to Document Number
Number Template window is displayed
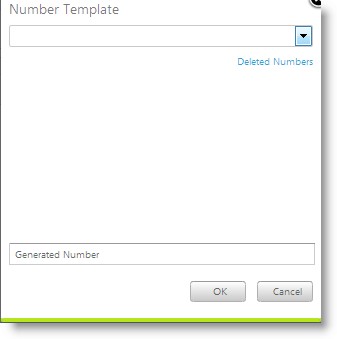
Figure: Number Template window
- Click the down-arrow to select a numbering template from a drop-down list
The blocks in the numbering template are displayed
- Enter values for the blocks. Preview of the generated number is displayed
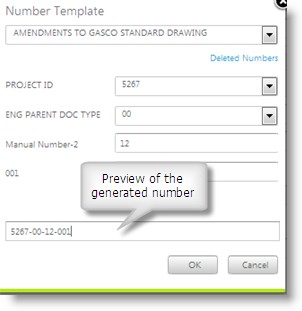
Figure: Generating Number
- Click OK to continue
NOTE: Click the hyperlink Deleted Numbers, if you want use the deleted numbers as the document number
 Advance Document Details
Additional document properties are grouped under the advance document details. These properties are discussed in the following table.
|
Sl.No.
|
Item
|
Description
|
|
1
|
End of Life
|
You can specify an End of Life period for the document. Once the document reaches the end of life period the document is made obsolete automatically.
|
|
2
|
Life Cycle Status / Issue Purpose
|
A Document after its release will go through an entire life cycle where it is referenced by customer, vendors according to engineering process followed by different industrial verticals. A Released Document will have its revision updated for every revision imbibed by it. This helps the Wrench Users to pinpoint on what phase of the life cycle the Document is at any given time.
|
|
3
|
User Revision Number
|
User revision is used mainly to manage the client revision number.
|
|
4
|
Client Document Number
|
Enter the client document number
|
|
5
|
Vendor Document Number
|
Enter the vendor document number
|
|
6
|
Origin Type
|
Select the type of origin for the document from a drop-down list.
|
|
7
|
Origin Name
|
Select the origin name. Click the browse button to select an origin name from a list.
|
More options
In addition to the options mentioned in the preceding sections, more options related to document addition is available. The following options are available under More Options.

Figure: More Options
Assign Workflow
Send Notifications
Switch View
These options are discussed in detail in the following sections
Assigning workflow to the documents
The documents in Wrench can flow through different stages before it is released. This flow of the documents through different stages before the work is completed is called workflow. The workflow can be defined stages as in guided workflow or without any definition like in unguided workflow. Guided workflows are used in case of engineering documents as the sequence of work and the stages in which the document will pass is predefined. In the cases like correspondence the sequence of the stages and the persons required are not clearly know, in this case unguided workflows are used. Resources are defined for each stage in a workflow and this workflow is assigned to a document. You can assign an unguided or guided workflow to the document. Guided workflows have pre-defined stages and are readily available, while unguided workflows are created instantaneously.
 To assign guided workflows
- In the More Options pane click the hyperlink Assign Workflow
Workflow window is displayed
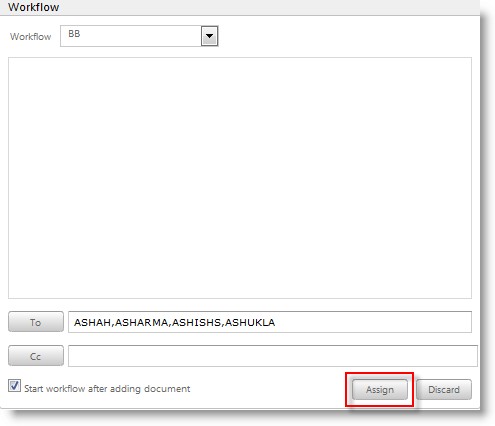
Figure: Workflow window
- Select the workflow from a drop-down list
The selected workflow is displayed in the preview area
 To assign To.. resources to the workflow
- Select the workflow stage
- Click To..button to assign resources to the workflow stage
- User List window is displayed. You can select resources from the list
Selected users are displayed here.
 To assign Cc resources
- Select the workflow stage
- Click Cc..button to assign Cc resources to the stage
- User List window is displayed. You can select resources from the list
Selected users are displayed here
Start workflow after adding document: A document added, before its final approval and release, go through various processes in the organization. A work flow is created defining these processes and this work flow is assigned to the document. On selecting the check box against Start work flow after adding the document, once the document is successfully added the work flow is started.
 To assign unguided workflow
- In the Workflow window, click the down-arrow next to Workflow
- In the drop-down list select Unguided workflow
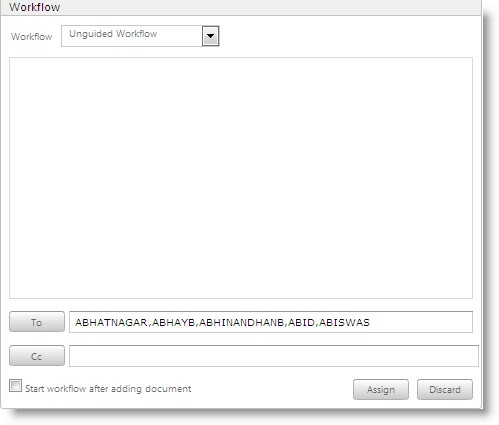
Figure: Selecting Unguided workflow
- Click To..button to select the recipients
User selection window is displayed
- Select the users and click OK
- In the workflow window, click Assign button to confirm the selection of workflow
Sending Notifications
Notifications are automatically generated mails notifying the occurrence of an event. The notifications can happen on events like documents getting added, documents getting revised, documents getting routed to another stage and on delays. Mails can be sent to selected users notifying the addition of a document.
 To configure notifications
- In the More Options pane click Send Notifications
Notification window is displayed
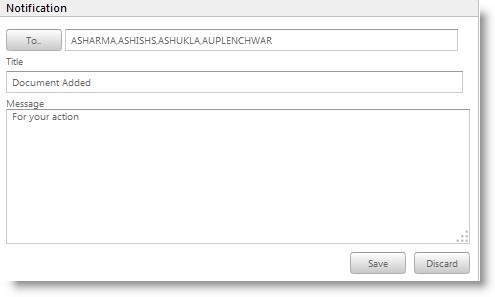
Figure: Notifications window
- Click To..to select the recipients for the notification
User List window is displayed
- Select the check box next to the users whom you want to add to the recipient list
- Enter a title or subject for the notification
- Enter the message that has to be included in the notification
- Click Save to store changes and continue
Switching Views
Different views can be configured for the document addition in the Masters. These views can be selected from here depending upon your requirement.
 To select a different view
- In the More Options pane click Switch View
Switch View window is displayed. A list of pre-defined views are displayed here
- Choose the view you need from the list
- Click Select button to confirm view selection
Once all these properties are defined for a document click Add button to upload the document to Wrench.
NOTE: Click the check box next to Add as Released if you want to release the document simultaneously with document addition.
Dragging a document to the smart folder
A document can be dragged to a smart folder, attributes can be assigned to the document and the document is saved.
 To drag a document to the smart folder
- Select the smart folder to which you want to add the document
- Select the document and pressing the left mouse key gradually drag the document to the drop zone that is displayed
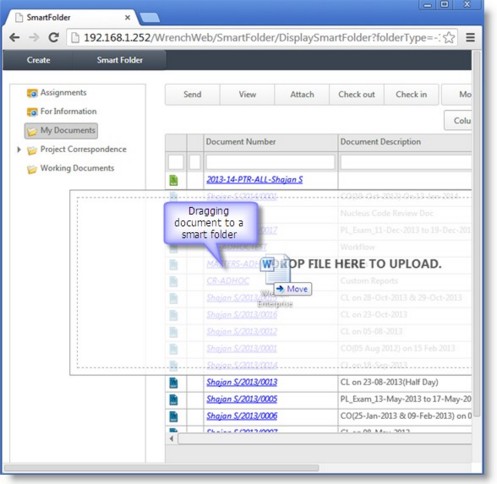
Figure: Dragging document to a folder
- Release the mouse button. A message box is displayed.
- In the message box click Add button
The document is successfully dropped into the folder


 To open the document addition window


 To assign To.. resources to the workflow
 To drag a document to the smart folder