Resources are specifically the people who may be allocated to the respective project and whose time is allocated accordingly. Identifying and deploying the correct project resources is a crucial factor that decides the timely and successful completion of a project.
All the resources who are part of the project are assigned here. There are two types of resources; Work Resources and View Resources. In addition to this time required for each role or resource in a project can be booked along the execution timeline of the project, so that resources of the required role are available when required. To understand more about managing resources and resource booking refer the following navigation table.
Work Resources
In Work Resources the total list of resources that are assigned or working in the project for various roles are specified. Resources from this pool with various roles are assigned to the tasks specified in the WBS (Work Breakdown Structure). The name of the user who created the project and name of project manager is automatically included in the project resources grid.
Users assigned here are permitted to carry out the following operations.
- Edit Project
- Edit WBS
- Manage Time Logs
NOTE: These options will be selected by default for the creator of the project and the user assigned as project manager. If a project is saved without selecting this option for at least one user, a warning message is displayed.
In the menu bar once you click the Resources tab, the following window is displayed.

Figure: Manage resources window
Different properties in this field is mentioned in the following table.
|
#
|
Property
|
Description
|
|
1
|
User Name
|
User name of the resource.
|
|
2
|
Login Name
|
Login name of the resource.
|
|
3
|
Position
|
Position or designation of the user in this project.
|
|
4
|
Edit Project
|
Select the checkbox to permit the user to edit or modify the project details. If the checkbox under the column header Edit Project is selected all the resources are granted the permission to edit the project.
|
|
5
|
Edit WBS
|
Select the checkbox to permit the user to edit or modify the WBS for this project. If the checkbox under the column header Edit WBS is selected all the resources are granted the permission to edit the WBS.
|
|
6
|
Allow Timelogs
|
Select the checkbox to allow the user to enter time logs for this project. Select the checkbox under the column Allow Timelogs to permit all users to enter time logs.
|
|
7
|
Calendar
|
Click the browse button to select an organizational calendar.
|
In the resources window you can add resources, remove existing resources and refresh the workflow.
 To add resources
- In the resources window tool bar click Add User.

Search User window is displayed.
- Search and select single or multiple users.
- Click OK to add the selected users as project resources.
A message "Users added successfully. Click on Refresh Workflow to update changes in project workflows" is displayed.
- Click Refresh Workflow.
A message Entire Workflow resources of the Project will be updated. Do you want to continue ? is displayed.
- Click OK to continue. Click Cancel to abort refreshing of workflow.
Added users are displayed in the resources window.
 To remove users
- Select single or multiple resources that you want to remove.
- In the toolbar click Remove User.
A message "Do you want to delete the user from the project?" is displayed.
- Click No to cancel the operation.
- Click Yes to remove the resources.
Once the resource is removed the following message is displayed.
"Do you want to refresh the workflows? "
- Click Yes to refresh the workflow.
- Click No to remove the resource without refreshing the workflow.
Refresh workflow
Clicking this button will refresh the entire workflows for the project. If any resources are added or removed this change will take effect in workflow of the object after refreshing.
NOTE: Resources removed from the project resources tab are not removed from the workflows automatically. The Refresh Work flow option is applicable only for those Projects that are in 'Work-In-Progress' status.
Roles
Project resources may participate in a project under multiple roles. Using this facility you can assign the roles a user will play in the project. For Example: In engineering projects, one resource may work as both design engineer as well as document controller. Typically, roles are user groups. Using the “roles” facility, a user can be assigned to multiple groups in a project.
 To assign roles
- Select a user from the list and in the tool bar click More>>Roles.
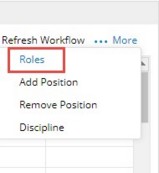
User Roles window is displayed. All the groups assigned to the user is displayed.
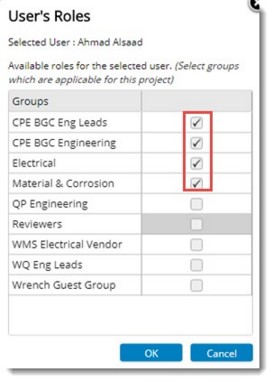
Figure: User Roles window
- Select the checkbox next to the roles user will be playing in this project.
- Click OK to continue.
This facility helps you to select the roles a user will play in this project and to assign ‘Budgeted Duration (hours)’ against a role.
Position
This facility is used to assign a ‘Project Position’ to the project resource. We have a ‘Project position master’ where we can enter the type of position a user may be assigned in a project is entered in the Project Position master and it is from this master data the position is assigned to the users.
NOTE: Only one position can be assigned for a resource.
 To add a position
- Select the user from the grid.
- In the tool bar click More>>Add Position.
Project Positions window is displayed. Here list of positions defined in the masters is displayed.
- Select a Position from the list.
- Click OK to continue.
To remove a position
- Select the user from the grid.
- In the tool bar click More>>Remove Position.
Position is removed.
Discipline
Multiple disciplines can be defined for a specific resource in the list of project resources. In the typical engineering scenario, a resource can have multiple disciplines for a particular Project.
For Example: In certain projects, a draftsman could be part of various disciplines such as Mechanical, Civil etc. By default, a user will belong to the primary discipline defined in the user master. The secondary disciplines applicable for the Project are specified here. By specifying multiple disciplines for Project resources, WRENCH helps to effectively categorize and make an accurate assessment of the cost according to the specified discipline.
 To add a discipline
- In project resource window select a resource.
- In the toolbar click More>>Discipline.
Project Discipline window is displayed and the discipline of the user is listed here.
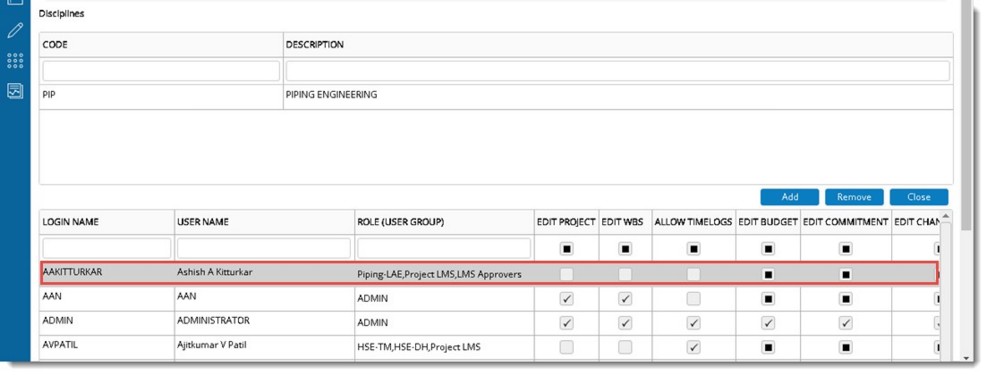
Figure: Adding Discipline
- Click Add button if you want to add additional disciplines.
- Click Remove button if you want to remove one of the multiple disciplines assigned to the resource.
View resources
Editing of a project is usually governed by security rights and only users with adequate rights can edit a project. Viewing of project details is also controlled by security rights. It is possible to define a set of users who will be able to view the project. These users need not be a part of project resource team.
NOTE: Users with View rights in the genealogy only will be able to view the project details.

Figure: View Resources
 To add and remove view resources
- In the project properties window click View Resources tab.
- Click Add User button.
Search User window is displayed.
- Search and select users from a pre-defined user list.
- Click OK to continue.
- To remove a resource, select a resource you want to remove and in the tool bar click Remove User.
Allow All Users: Select this option if project documents are to be made available for viewing to all view resources irrespective of the security rights.
- Click Save to store changes.
Resource booking
Time required for each role or resource in a project can be booked along the execution timeline of the project, so that resources of the required role are available when required. Role based and Resource based time booking mode is available. Required time booking mode can be selected here.
Resource based time booking
In projects where accurate planning is required, time planning is performed at the user level. Time that each user is expected to spent can be booked for specific time periods, which can be compared against the actual time spent (captured in Timesheet).
 To make a resource based booking
- In the Resource Booking window tool bar click Settings.
- Settings window is displayed. Here select the time booking mode as Resource and Time Booking Level as Project.
NOTE: Option WBS can be selected if time booking is to be made from WBS. If the option Both is selected, resource booking can be done in the Project Level first and then booking can be created in WBS also . In the WBS Booking can be done only for the resources or roles booked at project level.
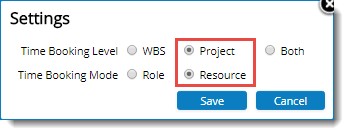
Figure: Selecting booking mode
- Click Save.
NOTE: In case you are trying to change the time booking mode from one defined earlier, a warning message is displayed.
- After selecting the booking mode, in the tool bar click New Booking.
New Booking window is displayed.
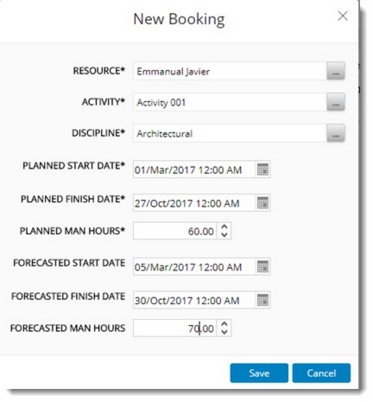
Figure: New Booking window
- In the New Booking window enter values for the fields described in the following table.
|
#
|
Field
|
Description
|
|
1
|
Resource
|
Select the user against whom a time booking is to be made. Click the browse button to select a user or resource from the Search User window.
|
|
2
|
Activity
|
Select the activity against which time booking is to be made. Click the browse button to select the activity from activity search window.
|
|
3
|
Discipline
|
Select a discipline. Click the browse button to select a discipline from a pre-defined list.
|
|
4
|
Planned Start Date
|
Select the planned start date from a date picker.
|
|
5
|
Planned Finish Date
|
Select the planned finish date from a date picker.
|
|
6
|
Planned Man Hours
|
Enter planned hours for the resource.
|
|
7
|
Forecasted Start Date
|
Select the forecasted start date from a date picker.
|
|
8
|
Forecasted Finish Date
|
Select the forecasted finish date from a date picker.
|
|
9
|
Forecasted Man Hours
|
Enter forecasted man hours for the resource.
|
- After entering the values click Save.
A message Booking saved successfully is displayed.
New booking created is displayed in grid.

Figure: New booking
Role based time booking
Time required for each role is defined at the project level and the actual time spent can be captured using the timesheet. Though booking time against each user may be accurate, in large projects this is not practical. Hence planning at the role level makes it easier with appreciable level of accuracy.
 To make a role based booking
- In the Resource Booking window tool bar click Settings.
- Settings window is displayed. Here select the time booking mode as Role.
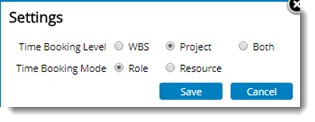
Figure: Selecting booking mode
- Click Save.
NOTE: In case you are trying to change the time booking mode from one defined earlier, a warning message is displayed.
- After selecting the booking mode, in the tool bar click New Booking.
New Booking window is displayed.
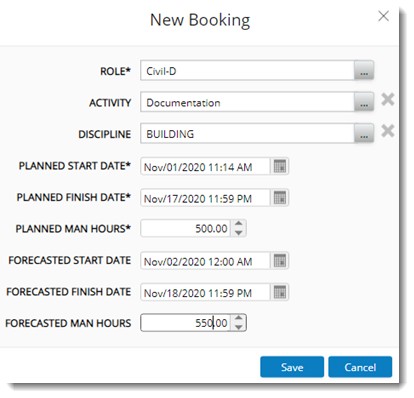
Figure: New Booking window
- In the New Booking window enter values for the fields described in the following table.
|
#
|
Field
|
Description
|
|
1
|
Role
|
Select the role against which a time booking is to be made. Click the browse button to select a role from the User Groups search window.
|
|
2
|
Activity
|
Select the activity against which time booking is to be made. Click the browse button to select the activity from activity search window.
|
|
3
|
Discipline
|
Select a discipline. Click the browse button to select a discipline from a pre-defined list.
|
|
4
|
Planned Start Date
|
Select the planned start date from a date picker.
|
|
5
|
Planned Finish Date
|
Select the planned finish date from a date picker.
|
|
6
|
Planned Man Hours
|
Enter planned hours for the role.
|
|
7
|
Forecasted Start Date
|
Select the forecasted start date from a date picker.
|
|
8
|
Forecasted Finish Date
|
Select the forecasted finish date from a date picker.
|
|
9
|
Forecasted Man Hours
|
Enter forecasted man hours for the role.
|
- After entering the values click Save.
A message Booking saved successfully is displayed.
New booking created is displayed in grid.
Distributing time booking
Planned person hours or time booking specified against a role or resource can be distributed across the defined time interval. This can be done either manually or automatically.
 To distribute time booking
- In the resource booking window select the time booking that you want to distribute.
- In the tool bar click Distribution.
Distribute Time Booking window is displayed. Time Booking details is displayed in this window. In addition to the time booking details entered, the following fields are also available.
Estimate at Completion: It is the forecasted cost.
Estimate to Complete: It is the estimate to complete the remaining work.
Actual Hours: This field is calculated based on the entry made in Time Sheet.
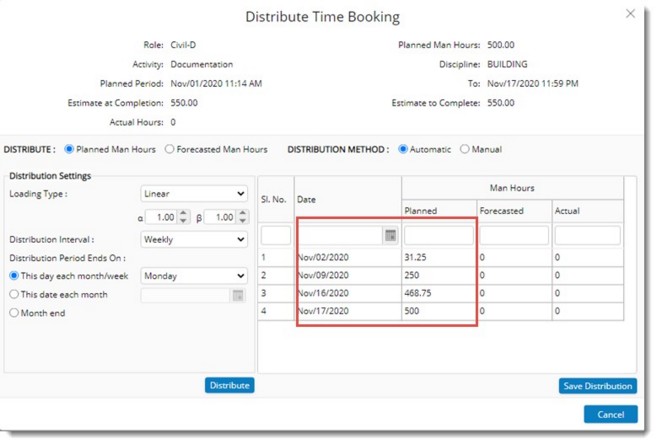
Figure: Distribute Time Booking window
Planned Man Hours or Forecasted Man Hours can be distributed. The distribution can be carried out automatically or manually. Different ways of distributing time booking is described in the following sections.
Distributing planned man hours automatically
Distribution of planned man hours automatically is based on beta distribution technique. When Planned Man Hours option is selected, Forecasted dates are disabled.
 To distribute planned man hours automatically
- In the Distribute Time Booking window options Planned Man Hours and Automatic are selected by default.
- Select a Loading Type. This is the beta distribution type. Options available are Linear, Front Loading and Back Loading. Based on the Loading Type selected, default Alpha and Beta value changes.
- Select a Distribution Time Interval. Options available are Monthly or Weekly.
- Select a value for the Distribution Period Ends On. Options available are This Day each month/week, This date each month and Month End.
NOTE: If distribution time selected is Weekly, distribution period options This date each month and Monthly are not applicable.
- After entering the values click Distribute.
Planned Man Hours is distributed as shown in the following figure.
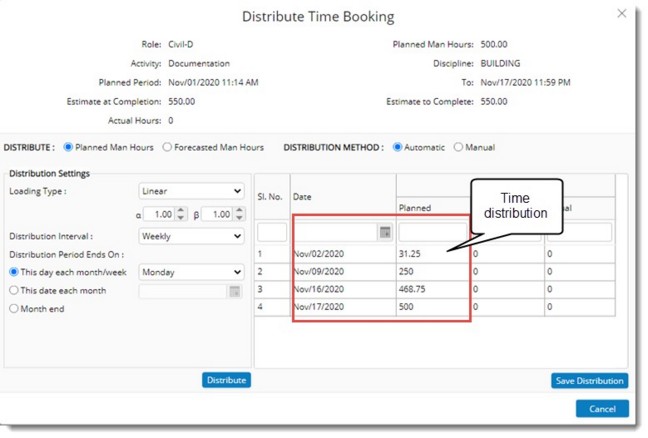
Figure: Distribution of Planned Man Hours
- Click Save Distribution to save the details.
 To distribute planned man hours manually
- In the Distribute Time Booking window click the radio button next to the distribution option Manual.
On selecting Manual, option for Beta Distribution is disabled or hidden.
- Select a Distribution Interval. Options available are Weekly and Monthly.
- Select value for Distribution Period Ends On. Options available are This Day each month/week, This date each month and Month End.
NOTE: If distribution time selected is Weekly, distribution period options This date each month and Monthly are not applicable.
- After entering the values click Distribute.
A message Distributed successfully. Please save the distributed hours is displayed.
Only the distribution table is created as shown in the following figure. Hours is distributed manually by the user.
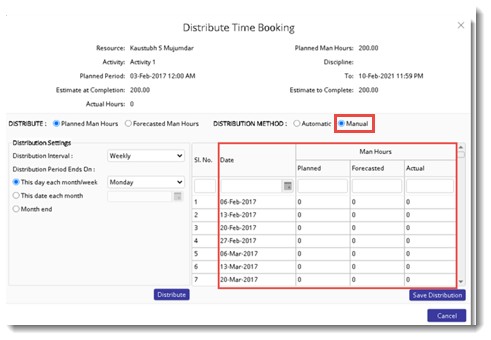
Figure: Manually distributing planned man hours
- Click Save Distribution to save the details.
NOTE: In case if user has distributed a booking by automatic distribution and switches to Manual, then the same distribution will be available in manual option and user may edit and Save the distribution. Similarly when user switches from Manual to Automatic, the manual distribution values will appear in the Automatic distribution UI and user can re-distribute the values using beta distribution again.
 To distribute Forecasted Man Hours automatically
- In the Distribute Time Booking window click the radio button next to Automatic and Forecasted Man Hours.
- On selecting the radio button next to Forecasted Man Hours, Forecasted Start Date, Forecasted End Dates and Forecasted Man Hours is displayed.
- Select a Loading Type. This is the beta distribution type. Options available are Linear, Front Loading and Back Loading. Based on the Loading Type selected, default Alpha and Beta value changes.
- Select a Distribution Time Interval. Options available are Monthly or Weekly.
- Select a value for the Distribution Period Ends On. Options available are This Day each month/week, This date each month and Month End.
NOTE: If distribution time selected is Weekly, distribution period options This date each month and Monthly are not applicable.
- After entering the values click Distribute.
- Forecasted Man Hours is distributed as shown in the following figure. Click Save Distribution to store changes.
NOTE: Forecasted Man Hours is distributed only if Actual Hours are captured. Actual hours are captured based on the entry in the time sheet. In the time log entry if the values for Project ID, Activity and Role matches corresponding values entered while making a time booking.
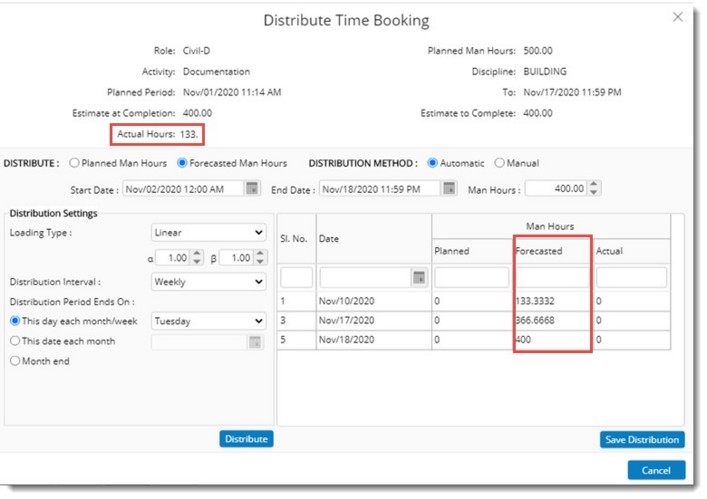
Capturing Actuals
Utilization of actual time is captured using timesheet module in WRENCH. Since a user may have multiple Roles assigned, it is necessary to know specific Role against which user has entered the actual time sheet. Hence in the time sheet entry window time logs can be entered against the role of the user in the project. Facility to select role of a user is available.
Importing / Exporting time bookings
Time booking can be imported to a project and time booking details can be exported from a project. For importing and exporting a Ms Excel template is used as the medium. For importing Time booking first an excel template is generated. Values are entered in the template and save. From the Resource booking window, details in the template is imported.
Import template can be generated for Role or Resource based booking. Template is generated based on the selection made in settings.
Generating an import template
An import template is generated from the Resource booking window in the Project.
 To generate import template
- In the Project Resources tab click Resource Booking.
- In the options bar click Import/Export Booking.
- In the pop-up menu click Generate Template.

Figure: Generating Import template
- A template similar to the one displayed in the following figure is generated if time booking mode is selected as Resource. Enter values for the columns in the template.
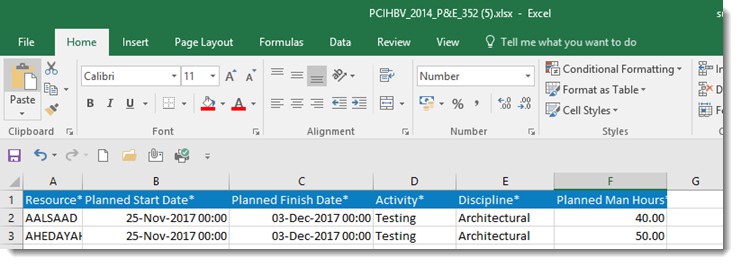
Figure: Import template for Resource based booking
- A template similar to the one displayed in the following figure is generated if time booking mode is selected as Role. Enter values for the columns in the template.

Figure: Import template for Role based booking
- Save the template.
After saving the template, booking values can be imported.
Importing time booking
Time booking entered in the import template generated can be imported to project.
 To import time bookings
- In the Project Resources tab click Resource Booking.
- In the options bar click Import/Export Booking.
- In the pop-up menu click Import.

Figure: Importing time booking
File Selection window is displayed.
- Select the template from the location where it is saved.
Values are imported as shown in the following figure.

Figure: Imported Values
Exporting time bookings
Time bookings can be exported to an MS Excel template.
 To export time bookings
- In the Project Resources tab click Resource Booking.
- In the options bar click Import/Export Booking.
- In the pop-up menu click Export.
Resource booking details are exported to an MS Excel template. Values in the excel file can be edited and these values can be updated back to the system.
Updating time booking
Time bookings updated in the excel template can be updated in the project also.
 To update time booking
- In the Project Resources tab click Resource Booking.
- In the options bar click Import/Export Booking.
- In the pop-up menu click Update.
Time booking values in the resource booking tab is updated with the values in Excel template.
Bulk Operation Log
A log of Import/Update operations carried out can be viewed.
 To view log
- In the Project Resources tab click Resource Booking.
- In the options bar click Import/Export Booking.
- In the pop-up menu click Bulk Operation Log.
Bulk Operation Log window is displayed.
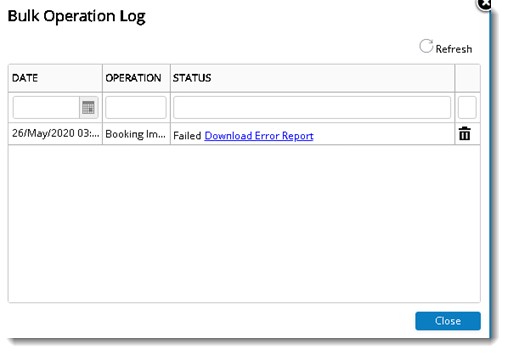
Figure: Bulk Operation Log window
Log of import and update operations carried out is displayed here.
Adding external resources
In some Projects, there may be external users (Non-Wrench users) who are to be notified for a set of documents while releasing transmittal/correspondence etc. Entering each email id separately is very difficult as for some transmittals the Cc recipients will go up to 100. Hence a provision to define email address based distribution list is provided in WRENCH.
To add external resources
- In the Project Properties window click the Resources tab.
- Select the tab External Resources.

Figure: Adding External Resources
- In the External Resources window click Add.
Add External Resource window is displayed.
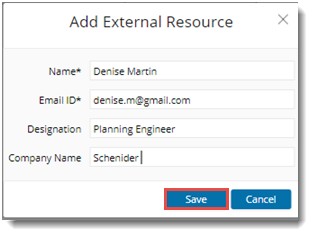
Figure: Add External Resource window
- Enter a Name and Email ID. These fields are mandatory.
- Enter Designation and Company Name. These fields are optional.
- Click Save to continue.
Added resources are displayed in the grid.
It is possible to remove the added external resources and edit the external resource properties.
After selecting an external resource information, click Properties to change the entered information, click Remove to delete the information

Figure: Editing/Removing external resources
Notifying Project Resource management
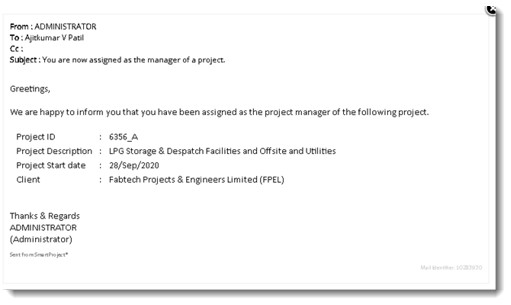
Notifications are sent to resources when they are added to an existing project, to a project using ‘Create From’ option, and when removed from projects. Also, a resource who is added as a Project Manager will also be notified.
When work resources from an existing project is added to another project which is created using the option ‘Create From, added work resources will receive an internal and external notification informing they are assigned to a project. The format of the notification is as shown in the following figure. When multiple resources are present, a single notification is sent to the resources.
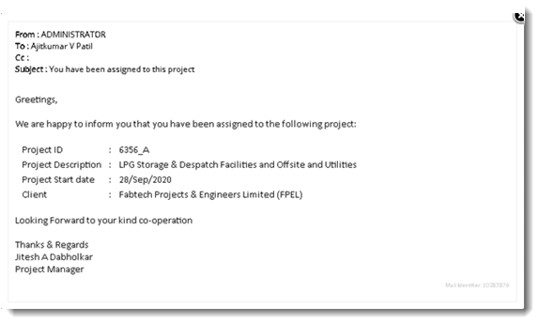
When a new project is created from an existing project using the option Bulk Import>>Import From Template and if the work resources’ column is selected as YES from the excel drop down, then on creating new project, the work resources will receive notifications. The format of the notification will be as shown in the above figure.
When resources are removed from a Project, notification is sent to the removed user. When multiple resources are removed, the work resources will receive individual notification about the removal.
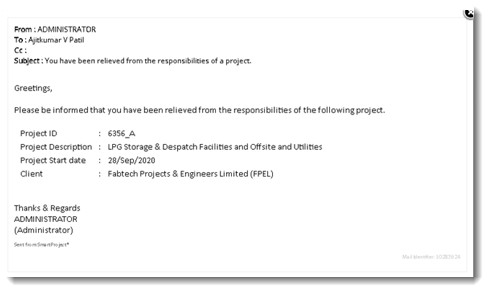
When a user is added as a Project manager, the added user receives a notification informing the same.


 To add and remove view resources
 To make a resource based booking
 To distribute planned man hours automatically
 To distribute planned man hours manually
 To distribute Forecasted Man Hours automatically


