Correspondences can include mail, fax or documents. Correspondences can be added by dragging it to the system if those are available in MS Outlook in the client PC. Otherwise it can be added like a document addition.
All these correspondences are handled through the correspondence tab. Wrench provides facility for automated handling of the correspondence documents. Automated handling involves storage and retrieval of project related correspondences. Fetch mail facility serves as a mechanism for automated storage and retrieval of project related correspondences. The correspondence Documents can neither be edited nor released through a work flow with a transmittal stage.
Adding correspondence
Single or Multiple correspondence can be added either by dragging the documents to drop-zone or by clicking the Add Files button in the drop-zone.
 To drag-drop correspondences
- Select the files that you want to add as a correspondence.
- Drag the files to the drop-zone and release the mouse button.
Depending on the number of files selected, single or multiple document addition window is displayed.
- Enter the document properties and add the files as correspondence to Wrench.
For more information on adding single and multiple documents see Adding single and multiple documents.
 To add files
- In the drop-zone click Add Files button.
File selection window is displayed.
- Select the files that you want to add as correspondence and click OK.
Depending on the number of documents selected, single or multiple document addition window is displayed.
- Enter the document properties and add the files as correspondence documents to Wrench.
Operations in the correspondence window
In the correspondence window tool bar options to carry out various operations are available. These options are explained in the following section.

Figure: Correspondence window
Refer Existing: Click this option to refer a correspondence already saved in WRENCH to this project. On clicking Refer Existing, document search window is displayed. Carry out a search operation and select the correspondences that you want to refer in this project. For more information on carrying out a search operation refer Search and find objects.
Download: Click this option after selecting a correspondence to view the selected correspondence.
View: Click this option view the details related to a correspondence. Select the correspondence that you want to view and in the tool bar click View.
Add Reply: Click this option to add a reply to a correspondence. Add Document window is displayed. Enter values for fields in the window and add the reply.
Detach: Click this option to remove a correspondence from the project.
Fetching mails
WRENCH users receive lot of external correspondences sent to them through external providers like MS Outlook etc. Project resources can read these mails as WRENCH correspondence. Further using this facility, user can send the reply to these correspondences from WRENCH. On clicking More button, options to configure project mails and fetch mails between a specific period is available.
 To configure project mails
- In the Project Properties window click Correspondence.
- Click the More button and in the menu, click Configure Mail.

Figure: Opening Configure Mail window
Configure Project Mails window is displayed.
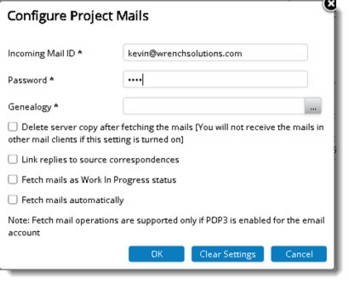
Figure: Configure Project Mails window
In the window, enter value for different fields and define correspondence settings. Fields and settings in the window are described in the following table.
|
#
|
Property/Setting
|
Description
|
|
1
|
Incoming email ID
|
The email address exclusively assigned to the project. This cannot be used in another project as this is used to identify the project when receiving emails.
|
|
2
|
Password
|
The password to authenticate the specified email address.
|
|
3
|
Genealogy
|
Click the browse button to select genealogy under which the incoming correspondences are to be added. It is important for this genealogy to have a numbering template, using which numbers can be automatically generated. Or else receiving of mails will fail.
|
|
4
|
Delete server copy after fetching mails
|
On selecting this option, copy of email is removed from server after adding to WRENCH. Also you will not receive mails from other mail clients.
|
|
5
|
Link replies to source correspondences
|
On selecting this option replies to correspondence for this project will be linked to the source correspondence.
|
|
6
|
Fetch emails Automatically
|
On selecting this option, scheduled automatic download of emails is enabled. If a project is configured for automatic email downloads, WRENCH scheduler connect to such email servers using the specified credentials and download incoming emails.
Only emails received from users other than WRENCH users are added to WRENCH.
|
Once the configuration is complete, mails can be fetched.
To fetch mails
- In the project properties window click More>>Fetch Mails.

Fetch Mail box is displayed.
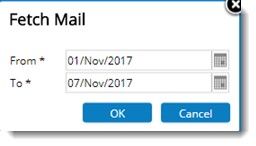
- Enter a start date and end date. Mails between these dates will be fetched.
- Click OK.
Mails are fetched and is displayed in the correspondence window.
Configuring ageing days
Ageing days can be set for a correspondence.
 To set ageing days
- In the Project Details window click Correspondence.
- In the options bar click Configure Ageing Days.

Figure: Configuring ageing days
Ageing Days Settings window is displayed.
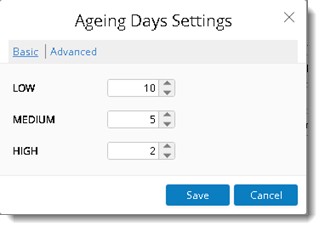
Figure: Ageing Days Settings window
In the window two tabs Basic and Advanced will be available. Basic tab is selected by default. Here priorities HIGH, MEDIUM and LOW will be available.
- Enter number of days by moving the arrow.
- Click Save to store changes.
To configure advanced settings
- Click the advanced settings tab.
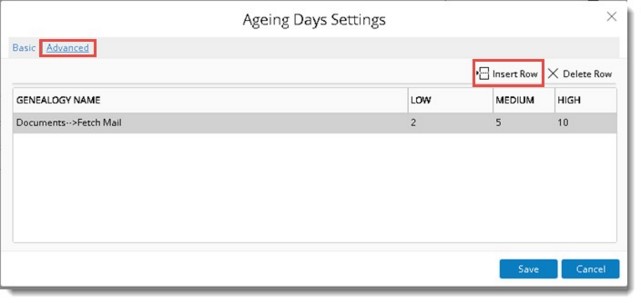
Here ageing days priority can be set for single or multiple genealogies.
- Click Insert Row to make a new entry.
A row with option to select a genealogy and set ageing days is inserted.
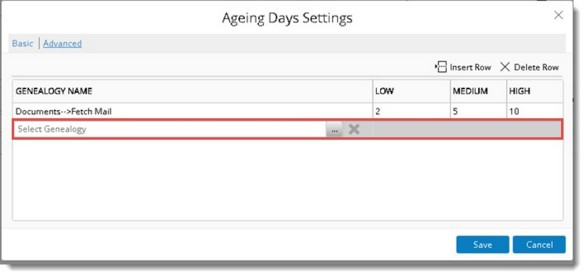
- Click the browse button to select a genealogy from the Document Genealogy window.
- Select a genealogy and set a value for ageing days for different priorities.
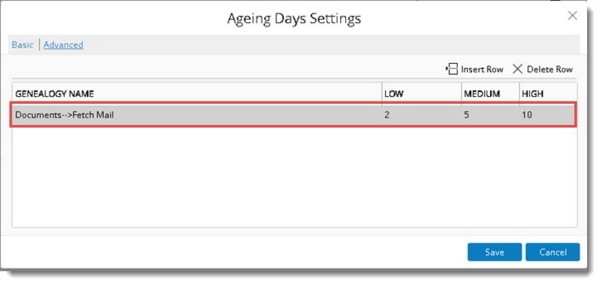
- Click Save to store changes.
Based on the number of days set “Expected Receive Back date” is automatically filled while creating correspondence when “Reply required” option is checked.
If in a genealogy ageing day for high priority is set as 1, and in project basic settings ageing day for high priority is set as 2, and in Project advanced setting ageing day for high priority is set as 3, then ageing day for the correspondence will be taken as 3 i.e. Ageing day set in project advanced setting is taken and expected Receive Back Date is calculated and filled automatically based on this.
Creating distribution lists
Though project resource and external resource can be handled in the correspondence module, there are scenarios where the user group (distribution list) needs to be created at project level and user level for correspondence which consists of the frequently used resources (Internal and external resources). Hence facility to create distribution list for correspondence is available at project level and user level.
To open distribution list window
- In the Project Properties window click the Correspondence tab.

Figure: Opening distribution list window
- Click More and in the menu click Distribution List.
On clicking this option, Distribution List window is displayed.

Project ID and description of the selected project is displayed here. All the Distribution List created for the Project is also displayed here.
Users with Edit project permission can add new distribution list to the project.
 To add new distribution list
- In the Distribution List window click Add.
Distribution List Details window is displayed. In the window two hyperlink tabs Distribution List and External Resources are available. By default, tab Distribution List is selected.

Figure: Distribution List window
- Click the browse button to select a Distribution Code.
Distribution List window is displayed. In the window, distribution codes defined in the master is listed.
- Select a code from the list. Selected code and its description are displayed.
Next step is to add users or user groups to the list.
 To add users
- In the window click Add User.
Search User window is displayed.
NOTE: In the window the setting Filter resources based on Project is selected by default and the setting is disabled.
- Search and select required resources from the list and click OK.
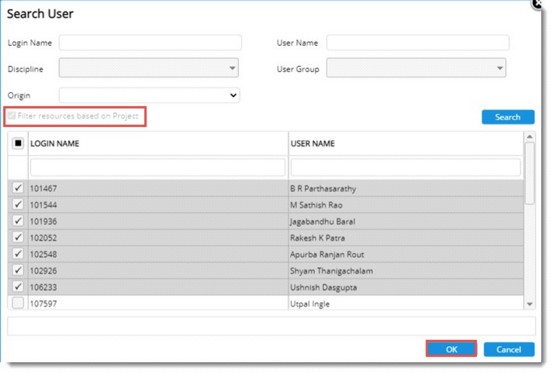
Figure: Searching and selecting users
Selected users are displayed in the distribution list details window grid.
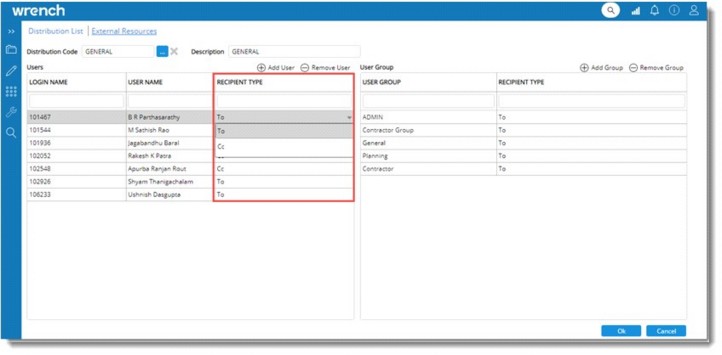
Figure: Assigning recipient type
A recipient type can be assigned to selected users.
- Select a RECIPIENT TYPE from a drop-down list. Options available are To and Cc. By default, the recipient type is To.
 To select groups
- In the window click Add Group.
User Groups window is displayed.
- In the window select the groups and click OK.
Selected groups are displayed in the grid.
After creating a distribution list, external resources can be added.
 To add external resources
- Select the tab External Resources.

Figure: Adding External Resources
- In the external resources window click Add User.
Search User window is displayed.
- In the window, search and select users.
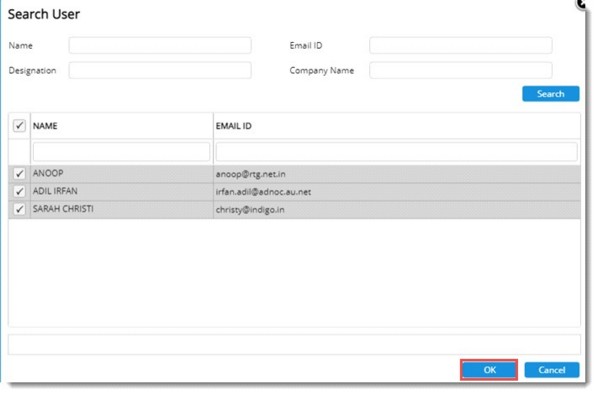
Figure: Search User window
- Click OK to assign the selected external resources to the distribution list.
Selected resources are displayed in the grid. Name, Email Id, Designation and Company Name of the selected resources are displayed in the grid. By default, recipient type assigned to the external resources is To. This can be changed to Cc.
- After creating distribution list and assigning external resources click OK to save changes.
For information on creating an address list see Personal Settings>>Correspondence>>Creating an address list.
For information on adding resources to an address list see Personal Settings>>Correspondence>>Adding resources to an address list.


