"Files" group shows details about other documents that has relationship with the selected document. A document may have two types of relationships with another document. "Association" is one kind of relationship, which is built and maintained manually after the document is added to WRENCH Enterprise. The types of association are further organized in to the following categories.
Specters
Related Files
Reference Documents
Comments
Client Comments
Markup
Squad Check Comments
NOTE: File types that are only used by a user is displayed here. File types are configured from the Administrative Settings section.
Adding different types of files or attachments
In the files group of the document details window, different types of files can be added. For adding a file type you have to select the respective file type.
To select a file type
- In the document details window tab strip click Files.
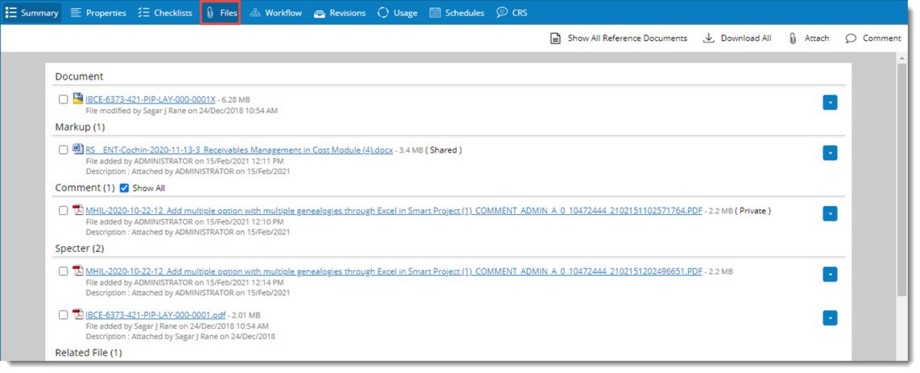
Figure: Selecting attachment types
Different attachment types and number of attachments under each attachment type are displayed here. Following options are available in this window.
Show All Reference Documents: On clicking this option Reference Documents window is displayed. In the window reference documents attached to the main document is displayed. Reference documents can be downloaded and viewed from this window.
Download All: On clicking this option entire attachments are downloaded. Files are compressed to a ZIP file and the ZIP file is automatically downloaded. Unzip the compressed files and extract the documents.
Comment: Commenting, Review of Comments and Consolidation of Comments can be carried out from here. On clicking this option a menu that contains different commenting options is displayed. For more information on commenting options see Adding and consolidating interdepartmental review comments.
You can carry out different operations with an attachment and these are explained in the following sections. In addition adding different types of attachments are explained in the following sections.
Adding Specters
Adding Related Files
Adding Reference Documents
Adding Comment files
Adding and consolidating interdepartmental review comments
Adding Client Comments
Adding Markup
Adding Squad Check Comments
Adding Specters
Specter or shadow files are the PDF files which are stored with the native files. These are stored so that while sending transmittals only the specter files are sent. Also it can be defined that users can only view the specter files and not the native files, so editing and copying is not possible.
Specter is a non-editable version of the original Document. (For Example: Adobe PDF.) For security and protection of the original, a non-editable version of the original Document can be created , which will be referred for all downstream operations. This prevents the original being modified in any context as the original is never distributed.
You can add attachments, specter files, comments or markups to existing and also to previous revisions of a document. This facility enables the user to identify the Comments/Attachments of a particular revision at a later point of time.
 To add specter files
- In the options bar click Attach.
- In the attachments type menu click Specter.
Specter File selection window is displayed.
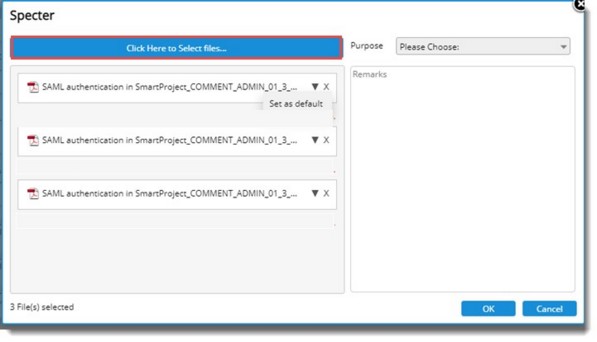
Figure: Adding Specter
- Click the field Click Here to Select files and choose single or multiple files.
- Select the purpose of attachment from a drop-down list.
NOTE: In the Specter addition window, next to the specter file attached, a pull-down menu is available. In the menu on clicking Set as Default, the specter file is set as default. If there are multiple specter files only one file can be set as default specter file. In the Summary tab and the Files tab, next to specter files marked as default, a text Default is displayed.
- Enter your Remarks.
- Click OK to save changes and continue.
Once the specter file is attached successfully, the attachment is displayed as shown in the following figure.
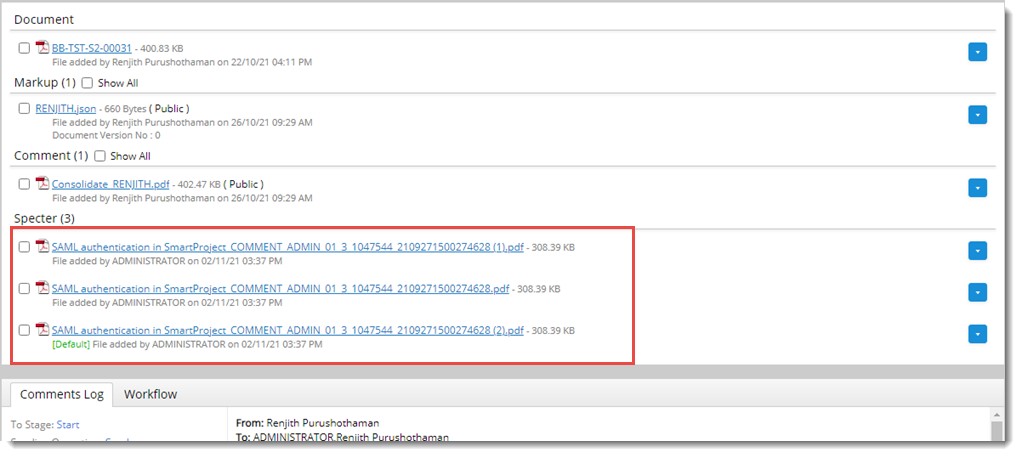
Figure: Attaching Specter file
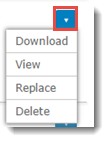
Attached specter file can be downloaded to an external location, replaced and deleted. Click the respective items in the menu to carry out these operations.

View: Click this to view the specter file attached to the document,
Download: Click this to icon to save the specter file to a specific location.
Replace: Click this to replace the selected specter file with another file.
Delete: Click this to remove the attached specter file. A confirmation message "Do you want to delete the selected file" is displayed. Click OK to continue.
NOTE: When there is only one specter, user may remove it, even though it is default. When there are two specters (PDF), when one of the specter is removed, the other one will be automatically set as default.
if the document is in Issued status, user is restricted from replacing, attaching or removing specter files, irrespective of the fact that user have Edit Transmittal Released permission.
When a user tries to attach, replace, delete a specter and if the main document is in issued status, the following warning message is displayed.

Adding related files
Related Files are documents which are referred to the original document.
For Example, "Assembling Instructions" is a related file to an "Assembly Drawing". In another context, "Organization Chart" is a related file to "Leave Application procedure" document.
 To add related files
- Click Attach.
- In the attachments type menu click Related Files.
Related file selection window is displayed.
- Click the field Click Here to Select files and choose single or multiple files.
- Select the purpose of attachment from a drop-down list.
- Enter your Remarks.
- Click OK to save changes and continue.
Attached related file can be downloaded to an external location. Related files can also be replaced and deleted. Click the respective items in the menu to carry out these operations.
View: Click this to view the specter file attached to the document,
Download: Click icon to save the related file to a specific location.
Replace: Click this icon to replace the related file with another file.
Delete: Click this icon to remove the selected file.
Adding reference documents
References which are attached to the document are displayed here. A new document (with all properties such as a genealogy ,document number, title, etc.) or an existing document in Wrench can be added as a reference document.
During the life cycle of a document, different wrench documents are referred for developing the document. Such links to other WRENCH documents can be preserved along with the document as “Reference documents”. Documents registered in WRENCH or a new document can be added as reference documents.
 To add reference documents
- Click Attach.
- In the attachments type menu click Reference Document.
A pop-up menu is displayed.

Figure: Adding reference documents
- In the menu the following options are available.
- From Disk: On clicking this option Add Single Document window is displayed. For more information on adding a single document refer Adding a Single Document.
- From Disk (Multiple): On clicking this option Add Multiple Document window is displayed. For more information on adding multiple documents refer Adding Multiple Documents.
- From Wrench: Click this option to add document stored in SmartProject.
To add reference documents from Wrench
- In the menu click From Wrench.
Advanced Document Search window is displayed.
- Search and retrieve the reference document
- Select single or multiple documents and click Attach.
Reference documents attached to the main document can be removed and details related to the attached document can be viewed by clicking the respective items in the menu.
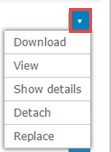
View: Click this to view the specter file attached to the document,
Download: Click icon to save the related file to a specific location.
Show Details: Click this to view the details related to the reference document.
Detach: Click this to detach the reference document from the main document.
Replace: Click this to replace the document.
If there is a change in the version or revision of a Reference document, a message is displayed under the Reference document under the file tab as shown in the following figure.

On clicking View Latest, latest revision of the reference document is displayed. On clicking the hyperlink ‘Get latest’, the current file gets replaced by latest Revision.
Adding comments
Comments files are the files which are used by internal checkers. A comment file can be attached in the comments tab. In the case of interdepartmental reviews, review comments by different users can be attached to the document and the comments can be consolidated to a single document. The consolidated comment document can be opened for reviewing and the reviewed document is attached to the main document as comment.
For Example: In the event of requirement of a change on the original design drawing, a document change request can be created for the original Document. The changes required are entered in a comment file and it is attached to the change request.
 To add comments
- Click Attachments.
- In the attachments type menu click Comment.
Comment addition window is displayed.
- Click the area with the text Click Here to Select Files.
- Select single or multiple files from the File Selection window and click Open.
Selected file will be displayed in the Create window.
- Select a comment type from the drop-down list.
- Click OK to save the comment file and continue.
Attached comment files can be downloaded to an external location. The files can also be replaced and deleted. Click the following menu items to carryout these operations.

View: Click this to view the specter file attached to the document,
Download : Click this to download the comment file to a specific location.
Replace : Click this to replace the comment file with another file.
Delete: Click this to delete the comment file.
Adding and consolidating interdepartmental review comments
When a drawing or document undergoes interdepartmental review, each reviewer opens the document and marks their comment on the document. For each reviewer a different document is generated automatically while opening the document for commenting. The reviewer then attaches this commented document to the main document. If five reviewers open the document for commenting five separate comment documents are created. Each of the document is attached to the main document by the reviewer as Attachments. The different comments files can be consolidated to a single document. This consolidated comment document can be further reviewed and the reviewed document can be attached to the main document.
The following operations is available in the comments window of the Attachments tab. Using these options, you can attach comments, consolidate client comments, review consolidated comment documents.
 Open for Commenting
This option is for opening the main file or attaching specter and commenting on it.
 To open a file for commenting
- Click the smart folder in which the document is stored.
List of documents is displayed.
- Select the document that you want to open for commenting and double-click.
Document Details window is displayed.
- In the tab strip click Open for Commenting.

You can also open the document for commenting by clicking Files>>Comment>>Open For Commenting from the document details window.

Once you click this option system checks for an auto attached specter file. If the file exists it is opened for commenting. If auto attached specter file is not present, system checks whether the main document is PDF. If so, the file is opened for commenting. If the main document is not a PDF file, system searches for manually attached specter files. If manually attached specter file is found it is opened for commenting. If multiple file exists, the following window is displayed.
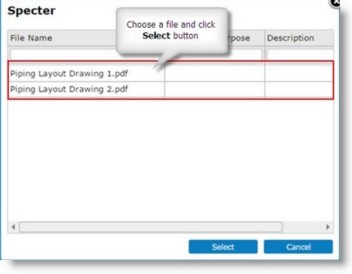
Figure: Opening documents for commenting
- Select the document that you want to open for commenting and click Open.
- In the document enter your comments and save the document.
 Attach Comments
This option is for attaching comment file stored in the local system to the server. Comments can be attached from the Attachments tab in the document details window and smart folder.
 To attach comments
- Select the document to which you want to attach comment.
- Click Attach>>Comment.
Comment dialog box is displayed.
- Click the field Select a file.
- Open File window is displayed. Select the comment file from the location where it was saved.
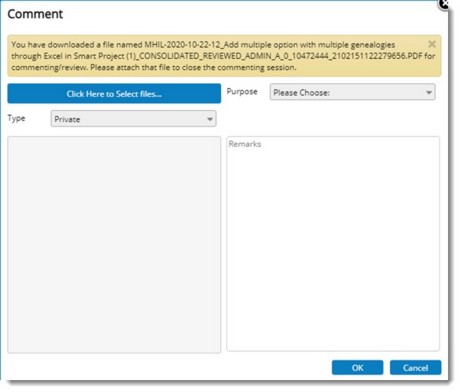
Figure: Attaching Comments
- Enter the purpose of attaching the document in the Purpose of attachment field.
- You can also select the purpose of attaching the document from a drop-down list.
- Click the down arrow next to Purpose of attachment to choose a purpose from the drop-down list.
- Enter your Remarks. This is not mandatory.
- Click OK to continue.
Your comment file is attached successfully.
Commenting on the following types of attachments will get attached as markups of the respective document.
- Client Comment
- Squad check comment
- Reference document
On saving, comments made on the attachment types specified above will be saved as markups under the main document.
 Consolidate Comments
Comments entered by different reviewers in the attachment have to be consolidated to one single comment file. Consolidate Comments option helps you in carrying out comment consolidation.
 To consolidate comment file
- Click Comment>>Consolidate Comment.
Consolidate Comment window is displayed. Here details of comment files attached by different reviewers are displayed.
- Select the check box next to the files that has to be included for consolidating.
- Click Preview to view the consolidated file.
- Click Attach Consolidate to attach the consolidated comment file to the document.
- Click the Cancel button if you want to discard the consolidation operation.
If the operation is successful, the following message is displayed.
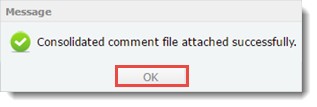
- Click OK to continue
A single consolidated comment file is created as shown in the following figure. This file will contain comments marked by different users consolidated.
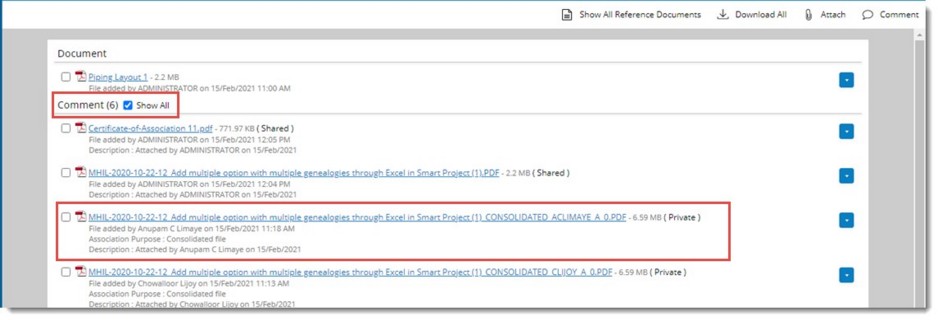
Figure: Consolidated comment file creation
 Open for Review
The consolidated comment file can be opened for commenting. Consolidated Comment file can be opened for review from Attachments tab in the document details window and from the smart folders menu.
 To open for review
- Click Comment>>Open for Review.
The consolidated file is opened for Review.
NOTE: The file opened for review will have the tag CONSOLIDATED_REVIEWED for the purpose of identifying the review file.
- After reviewing the consolidated comment file, the file is saved.
 Attach Review
The saved review file can be attached to the document.
 To attach review file
- Click Comment>>Attach Review.
Comment dialog box is displayed.
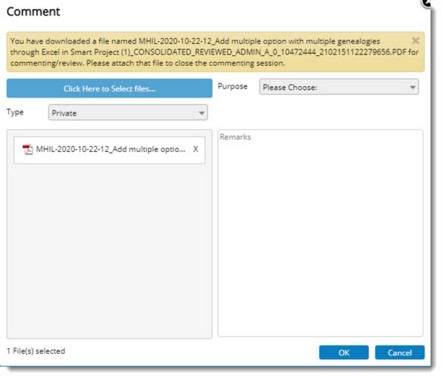
Figure: Reviewing consolidated file
- Click Select a File, to choose the reviewed consolidated file.
- Enter the review purpose or select the review purpose from a drop-down list that would contain a list of pre-defined review purposes.
- Click OK to continue.
Comment files, consolidated comment files and reviewed consolidated file would be listed under the comments sections in the attachments tab.
Adding client comments
Client comments reflect the client's remarks on various operations. Usually the client comments are attached to the documents.
 To add client comments
- Click Attach.
- In the attachments type menu click Client Comments.
You can attach Client Comments from disk or from Wrench.
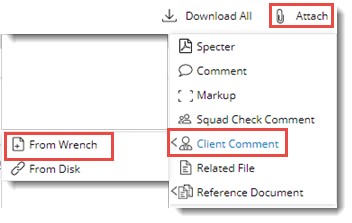
To attach client comment from Wrench
- Click From Wrench.
Document Search window is displayed.
- Search and select the client comment file.
To attach client comment from disk
- Click From Disk.
Document Addition window is displayed with basic document details filled in. For more information on adding a document refer Adding a Single Document.
- Select the comment file and save changes.
You can carry out the following operations on an attached comment file.
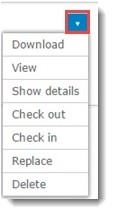
Download: Click this to download the client comment file to a specific location.
View: Click this icon to view the attached client comment file.
Show Details: Click this icon to view the details of the attached client comments.
Check Out: Click this icon to check out the comment file for editing.
Check In: Click this icon to check in the comment file after editing.
Replace: Click this icon to replace the existing comment file with another file.
Delete: Click this icon to remove the comment file from the document.
NOTE: Multiple files can be selected and client comment can be attached.
Adding Markups
Markup is a means of highlighting a required change on a drawing/document. When a drawing is in the final stages of a design, the drawings are published for review. Corrections and comments are received electronically through markups. You can re-publish your drawings based on these comments. Doing all this electronically shortens review cycles, and results in a more efficient design process. The default document viewer used with Wrench Enterprise has a native facility to create markups. It means you can create comments without editing the original file. These are also similar to comments. The difference is, comments are mostly textual whereas markups are mostly graphical.
Markups are allowed on the following types of attachments. Such markups created are listed under the main document, since these attachments are parts of the main document itself.
- Specter
- Related File
Whereas commenting on the following types of attachments will get attached as markups of the respective document.
- Client Comment
- Squad check comment
- Reference document
On saving, comments made on the attachment types specified above will be saved as markups under the main document.
NOTE: To understand how to create a markup it is recommended to refer the Autovue user manual.
 To add markup
- Click Attach.
- In the attachments type menu click Markup.
Markup Addition window is displayed.
- Click the area with the text Click Here to Select files.
- Select single or multiple files from the File Selection window and click Open.
The selected markup is displayed in the Create window.
- Select a comment type from a drop-down list.
- Click OK to save changes and continue.
Adding Squad Check Comments
Process of circulating the document for the comments of respective disciplines is referred as Inter-Disciplinary Commenting or Squad Check.
 To add squad check comments
- Click Attach.
- In the attachments type menu click Squad Check Comments.
Document Addition window is displayed with basic document details filled in. For more information on adding a document refer Adding a Single Document.
- Select the Squad Check Comment file and complete the document addition procedure.
You can carry out the following operations on an attached squad check comment file.
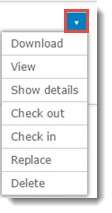
Download: Click this icon to download the client comment file to a specific location.
View: Click this icon to open the attached squad check comment and view it.
Show Details: Click this to view the details of the attached client comments.
Check Out: Click this icon to check out the comment file for editing.
Check In: Click this icon to check in the comment file after editing.
Replace: Click this icon to replace the existing comment file with another file.
Delete: Click this icon to remove the comment file from the document.
Security handling while managing attachments
The following section briefs the way in which security is handled while managing attachments.
- Attachments added by a user can be removed or modified only by the creator of the attachment or by the admin group users having replace/remove attachment right in the genealogy.
- Even if the users (other than the creator and the admin group users) have replace/remove permission for the attachments in that genealogy, they will not be permitted to remove/modify the attachments added by other users
- When the user other than creator/admin group users tries to remove/replace the comment/related file/markup a validation message “Only creator and administrators having remove/replace permission can modify the <<attachment type>>” is displayed.
- Specter files can be deleted by those who have permissions regardless of who created it. The auto created specters are created under the name of admin. These also can be deleted by others with adequate permissions.


