A Project User with ‘Create Tender’ permission can create a Tender in Smart Project.
 To create a tender
- In the Tender Details window select a Project.
- In the Tender Details window toolbar click Create.

Figure: Tender Details window
Tender Information window is displayed. A Reference Number will be generated automatically.
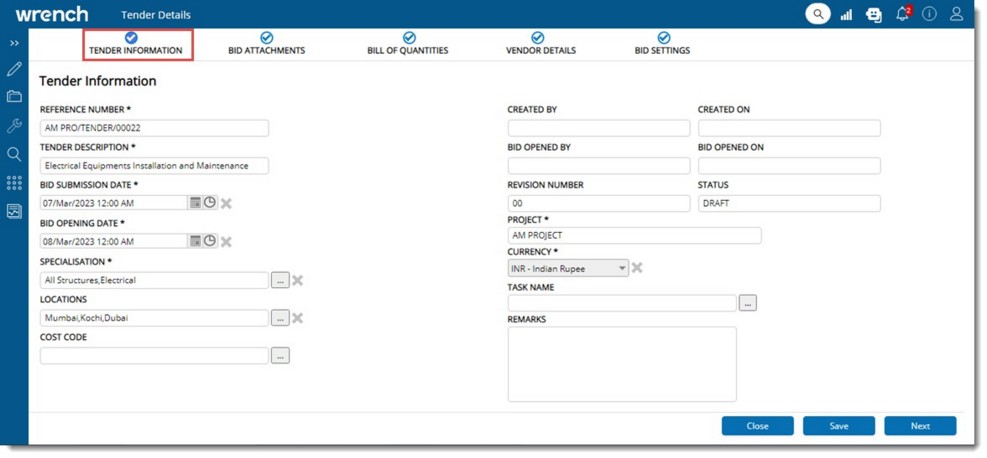
Figure: Tender information Details window
- Enter the details mentioned in the following table.
|
#
|
Property
|
Description
|
|
1
|
TENDER DESCRIPTION
|
Enter a description for the tender
|
|
2
|
BID SUBMISSION DATE
|
Bid submission date is the date until which vendors can submit the bids. While creating a tender, this will be blank by default. The Bid submission date cannot be less than current date. Enter a Bid Submission Date.
|
|
3
|
BID OPENING DATE
|
Bid opening date is the date on which the vendor bids can be opened and Compared. Bid opening date should be always greater than Bid submission date. The bid opening date can be entered only after entering the Bid submission date. This filed will blank by default. Enter a Bid Opening Date.
|
|
4
|
SPECIALISATION
|
Specialisations can be assigned to a tender. This will help to shortlist the vendors who has the specified specialisations.
- Click browse button to select a specialisation.
List of specialisations in the selected project is displayed.
- Select Single or multiple specialisations.
|
|
5
|
LOCATIONS
|
Locations can be assigned to a tender. This will help to shortlist the vendors who operate at the specified locations.
- Click the browse button to select a Location.
|
|
6
|
COST CODE
|
The cost code when assigned to a tender will help inherit it to the POs when issued for items in the tender.
- Click the browse button to select a Cost Code. All available leaf level cost codes in the project will be displayed hierarchically.
- Select a Cost Code from the list.
|
|
7
|
TASK NAME
|
Tender can also be assigned to a task in the WBS. This can be used to quickly display attached tenders when looking through the WBS.
To select a task
- Click the browse button.
Task Search window is displayed.
- Select a leaf level task
|
|
8
|
STATUS
|
Status of the tender keep on changing from its creation to finalization. Different tender statuses will be displayed here.
|
After entering the details click Save to store changes. Entered details are saved and the status of the tender changes to DRAFT.
Adding attachments to the tender
After entering tender basic details, next step is to add attachments to the tender. A tender will have volumes of documents such as contractual agreements, supporting engineering specifications, datasheets, etc. such documents can be attached to the tender as attachments.
 To add attachments
- Click Next to move to BID ATTACHMENTS tab.
Tender Attachments window is displayed.

Figure: Tender Attachments window
- in the window click Attach. A pop-up menu is displayed.
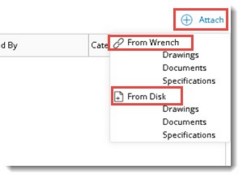
In the menu, options to attach files from Wrench and Disk will be available.
- Select the required option and add the attachments. Added attachments will be displayed in the grid.

Figure: Added Bid Attachments
If documents are attached from Wrench, document number and attachment description is displayed in the grid. Options to download the attachment and remove the attachment are available here.
After entering attachments, bill of quantities can be attached to the tender.
NOTE: Attachments can be added, or removed when the tender is in ‘Draft’, ‘Created’ or in ‘Revised’ statuses only. Those with ‘Create’ permission on tender may perform this when the tender is in ‘Draft’ status and those with ‘Edit’ permission can perform this when tender is in ‘Created’ or in ‘Revised’ statuses.
Attaching Bill of Quantities
Bill of quantities is the estimation of various items as required for the Project. Tenders are created against the items found in the BOQ. Project will have an engineering BOQ, which will be a very accurate estimation of quantity of various items required for the project. Items from the project BOQ can be added to the tender.
 To attach bill of quantities
- In the Tender Attachments window click Next.
- Bill of Quantities window is displayed. In the window click Add.
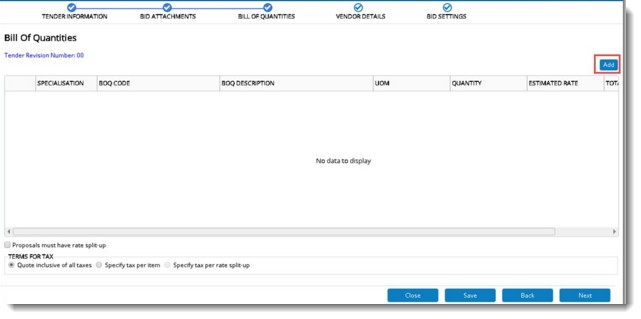
Figure: Bill of Quantities Details window
Search BOQ window is displayed. BOQ's created for the Project will be listed here.
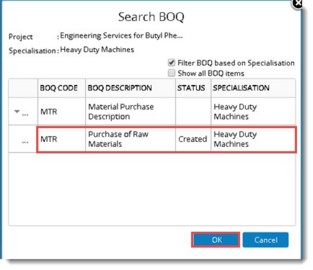
Figure: Search BOQ window
- Select a BOQ from the list and click OK.
Tender BOQ details modified successfully message is displayed. Added BOQ's are displayed in the window.
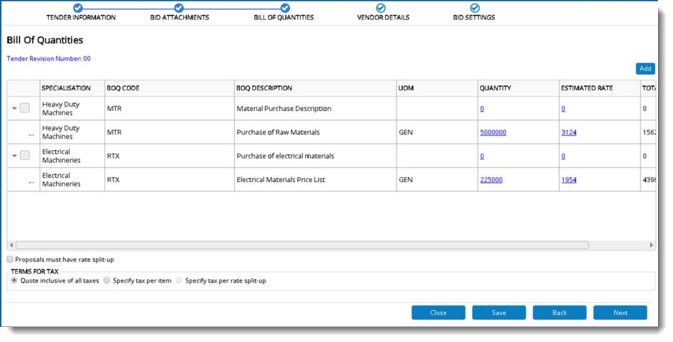
Figure: Bill of Quantity Details
Value for ESTIMATED RATE will have hyperlinks if the BOQ item has a rate split-up. Clicking on the hyperlink will display the rate split-up of the item as in BOQ which is illustrated in the following figure.
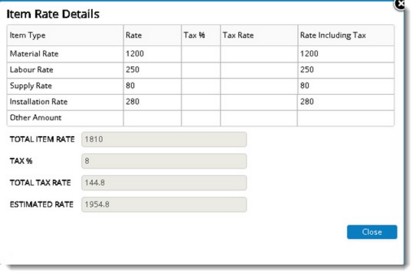
Figure: Item Rate Details window
The column ‘Quantity’ will be a hyperlink if area wise quantity split-up is available in the project BOQ. User may click on this hyperlink to view the area wise quantity split-up of the selected item as illustrated in following figure.
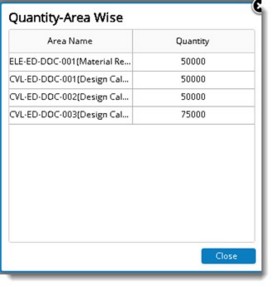
Figure: Area Wise Quantity window
The following settings are available in the BOQ details window.
Proposal must have rate split up: Select the checkbox next to this option if rate split-up for BOQ Line items is required in Selected Tender.
TERMS FOR TAX: Specify Tax details for BOQ Line items by selecting the radio button next to a term.
After adding BOQ to the tender next step is to add Vendors.
Adding Vendors
Vendors can be added to the tender. Only Vendors added here will be able to participate in tendering activities.
 To add vendors
- In the Bill of Quantities window click Next.
Vendor Details window is displayed.
- In the window click Add.
Search Vendor window is displayed.
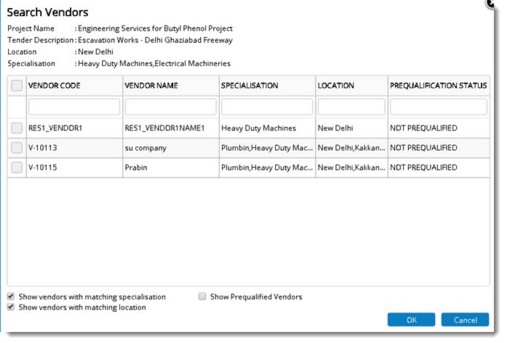
Figure: Search Vendors window
- Select the checkbox next to the Vendor you want to select and click OK. Selected Vendor will be displayed in the Vendor Details window.
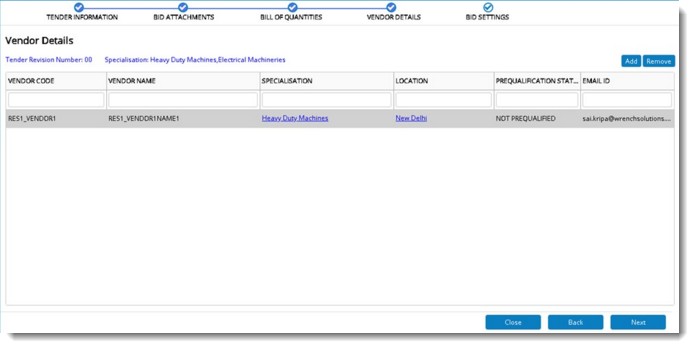
Figure: Details of added vendor
To remove a vendor
- Select the vendor that is to be removed.
- Click the Remove button.
An alert message Do you want to remove the selected vendors is displayed.
After entering Vendor details next step is to define bid settings.
Defining Bid Settings
Project settings define in from the tender details is inherited to the Bid settings. These settings can be modified.
 To define bid settings
- In the Vendor Details window after adding required vendors click Next.
BID Settings window is displayed. Setting are arranged under two tabs, General Settings and Notification Settings.
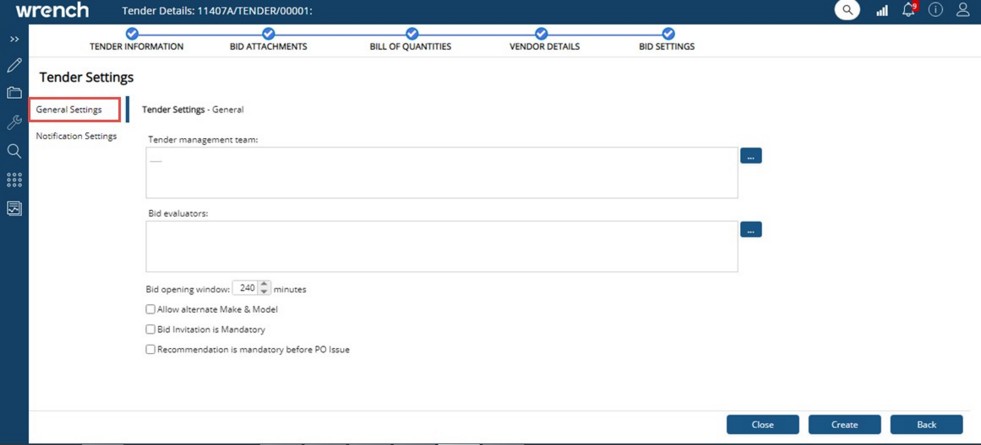
Figure: Bid Settings window
General Settings
General Settings tab is selected by default. The following settings are available under this tab.
|
#
|
Property
|
Description
|
|
1
|
Tender management team
|
In some cases, there may be high value tenders that is handled by limited number of resources. In such cases only the users specified in the tender management team should be able to view/ edit these tenders. As a solution to
this in the BID SETTINGS window an option to specify the tender management team is provided. Tender creators can specify the users who will be able to edit the details of the tender.
To specify a tender management team
- On the window click the browse button corresponding to the property Tender management team.
Search User window is displayed.
- Select the required users from the window. The selected users are displayed in the box.
After entering all the details when the user click on the Create button or details are saved after editing the tender, or saving details after editing a tender in created status, if a tender management team is specified and if the Creator is not a part of the team, the following message is displayed.

- Click YES to save the tender details and NO to discard the entered information.
|
|
2
|
Bid Evaluators
|
In some scenarios there may be a specific set people know as Bid Evaluators who are assigned with the task of opening a tender. In such scenarios it is ensured that the tenders are opened with the consent of all the bid evaluators. Users with Assign bid evaluators right can specify the Bid Evaluators.
To assign bid evaluators
- On the window click the browse button corresponding to the property Bid Evaluators.
Search User window is displayed.
NOTE: On clicking the browse button if the current user does not have “Assign bid evaluators” in the project genealogy a warning message is displayed.
- Select the required users from the window. The selected users are displayed in the box.
|
|
3
|
Allow alternate Make & Model
|
In certain projects, vendors are allowed to offer alternate make and model of items different from what is specified in the bid documents. This setting can be used to allow or disallow this. This option is not selected by default.
|
|
4
|
Bid Invitation is Mandatory
|
In Projects which strictly adhere to procedures, vendors are first invited to tenders and such vendors are to accept tender invitation. Only such vendors will be allowed to submit tenders. On selecting the checkbox next to this setting, tender invitation and acceptance prior to tender submission is made mandatory.
|
|
5
|
Recommendation is mandatory before PO issue
|
Recommendation letter is usually sent to the client when a PMC is appointed to shortlist the vendors. If the setting is enabled , PO can be issued only to those vendors which are marked as recommended.
|
Notification Settings
Different settings related to notification sent on carrying out tender related operations can be defined here.
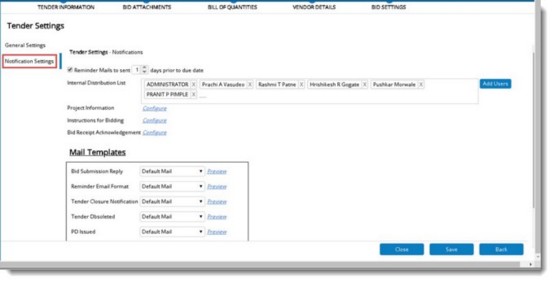
Figure: Notification Settings
|
#
|
Property
|
Description
|
|
1
|
Reminder Mails to sent <<days>> prior to due date
|
Enter the number of days before the due date, when reminder mails are to be sent automatically to invitee's for submitting tenders.
|
|
2
|
Internal distribution list
|
In certain scenarios, notification are to be sent to subject matter experts in addition to people involved in the tender. The list of such resources can be specified here. Type in the user names and select from the list of matching users displayed.
|
|
3
|
Project Information
|
Certain organizations include a write-up about the project in the tender.
To create write-up
- Click on the ‘Configure’ option next to the ‘Project Information’.
A text formatting window displayed,
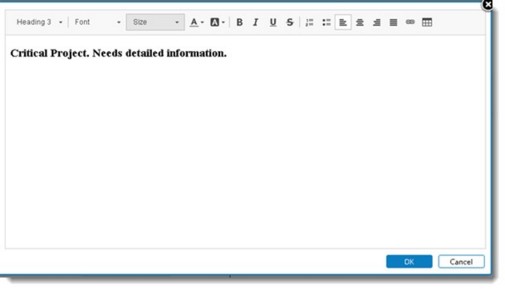
- Enter the required text and format the text.
On clicking ‘Configure’, if there are any formatted text already saved, it will be displayed in the window. This can later be inserted into a mail template as well.
|
|
4
|
Instructions for Bidding
|
The instructions to vendors for submitting necessary information along with their submission is an essential part of tender documents.
To create instruction for vendors
- Click the link ‘Configure’ next to Instructions for Bidding.
A text formatting window displayed.
- Enter the required text and format the text.
When clicking on ‘Configure’, if there are any formatted text already saved, it will be displayed in the window. This can later be inserted into a mail template as well.
|
|
5
|
Bid Receipt Acknowledgement
|
Bid acceptance note is different in each project. This is possibly due to non standardization. Here user can prepare the required writeup and put it into a template and link it with the ‘build receipt’ event using a text formatting window which is displayed on clicking the option Configure.
|
|
6
|
Mail Templates
|
Distinct email templates can be assigned to each notification. The list of all available tender notifications will be listed under ‘Mail templates’ option. By default, the ‘System Default Template’ will be linked to all of them. If templates are configured for Tendering module, they can be selected from the drop-down list next to a notification type.
Templates selected here are meant for notification to default assignees or vendors; Internal users will receive only system default mail.
|
After defining the setting click Save to store changes.
NOTE: For user with ‘Edit’ permission, Tender Information, Vendors Details and Bid Settings tabs in tender can be modified when the tender is in one of the following statuses; ‘Draft’/’Created’/’Revised’/’Invites sent’ / ’Published’ /’Republished’/’Bid Evaluation.
The following table illustrates different tender detail tabs and statuses against which the information can be saved. Save button is displayed only for the combinations displayed as ‘Yes’ in table. Also, save operation is enabled while clicking on Back/Next buttons from the Respective tab only for the combinations displayed as ‘Yes’ in table.
|
|
Tender Information
|
Attachments
|
BOQ
|
Vendors
|
Settings
|
|
Draft
|
YES
|
YES
|
YES
|
YES
|
YES
|
|
Created
|
YES
|
YES
|
YES
|
YES
|
YES
|
|
Invites Sent
|
YES
|
YES
|
YES
|
YES
|
YES
|
|
Published
|
YES
|
NO
|
NO
|
YES
|
YES
|
|
Revised
|
YES
|
YES
|
YES
|
YES
|
YES
|
|
Re-Published
|
YES
|
NO
|
NO
|
YES
|
YES
|
|
Closed
|
YES
|
NO
|
NO
|
YES
|
YES
|
|
Bid Evaluation
|
YES
|
NO
|
NO
|
YES
|
YES
|
|
Recommended
|
NO
|
NO
|
NO
|
NO
|
NO
|
|
Part PO Issued
|
NO
|
NO
|
NO
|
NO
|
NO
|
|
PO Issued
|
NO
|
NO
|
NO
|
NO
|
NO
|

