User of Vendor origin can carry out different operations from the Vendor details window. Vendor origin users will not be able to access the Project tender details from the Project module. Tender details window for vendors can be opened from the global menu.
 To open tender details window
- In the global menu click Tenders.
Published Tenders window is displayed.

Figure: Published Tenders window
In the window active tenders i.e. tenders for which bid submission date is not over, published to the logged in vendor by default are displayed here. Details like tender reference number, tender description, related project, vendor status etc are displayed in the grid.
Filtering tenders
Tenders can be filtered based on the status of the tender.
 To filter tenders based on status
- Click the down arrow next to the option Show Tenders in this status.
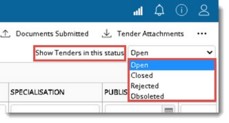
- Different statuses will be displayed in the drop-down list. Select the status based on which the tender is to be filtered.
Tenders are displayed in the grid based on the selected status.
NOTE: If the Rejected /Closed/Obsolete tenders are selected, user will not be able to perform any operations. All the operation menus will be disabled.
Responding to a tender
Once the tender is published vendor user can accept or reject the tender before submitting the same.
 To accept a tender
- Select the tender that is to be accepted.
- In the tool bar click Tender Response and in the menu displayed click Accept.
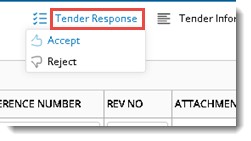
A message Do you wish to accept the selected tender is displayed.
- Click YES to continue, NO to discard the operation.
On clicking YES, a message Tender invite accepted successfully is displayed. Status changes to Invitation Accepted.
NOTE: Vendor status will remain as ‘Published/Republished’ if the user has accepted the tender after Publishing/republishing. If the user accepts the tender before publishing/republishing Vendor status will be ‘’Invitation accepted’.
 To reject a tender
- Select the tender that is to be rejected.
- In the tool bar click Tender Response and in the menu displayed click Reject.
The following message is displayed.

- On clicking Yes, a message Tender Rejected successfully is displayed and status of the tender changes to Rejected.
- On clicking No, the operation is aborted.
Responding to a tender from invitation mail
A user can respond to a tender from the mail, inviting the user to participate in tender evaluation process. The format of the invitation mail is shown in the following figure.
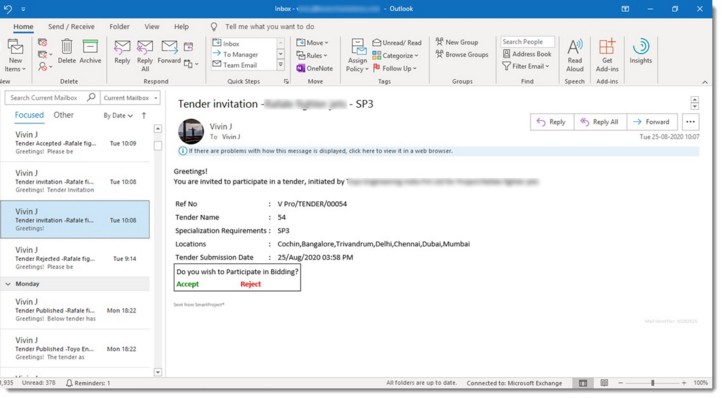
Figure: Tender Invitation mail
In the mail content, option to Accept or Reject the tender is available. For more information on accepting or rejecting a mail refer Responding to a tender invitation.
Viewing tender information
Tender details both advanced and basic can be viewed.
 To view tender details
- Select a tender and in the tool bar click Tender Information.
Tender Details window is displayed.
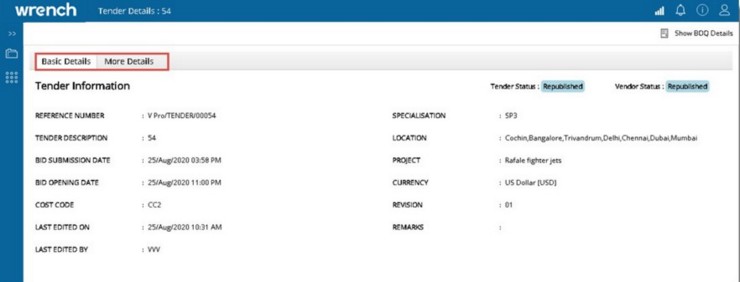
Figure: Tender Details window
In the window information is grouped under two tabs, Basic Details and More Details. Basic Details tab is selected by default. Here important tender information like Reference Number, Tender Status, Description, Bid Submission and Opening Date, Specialisation and Location are displayed.
On clicking More Details tab, the following window is displayed. Here additional information of the tender like Instructions for Bidding and Project Information is displayed.
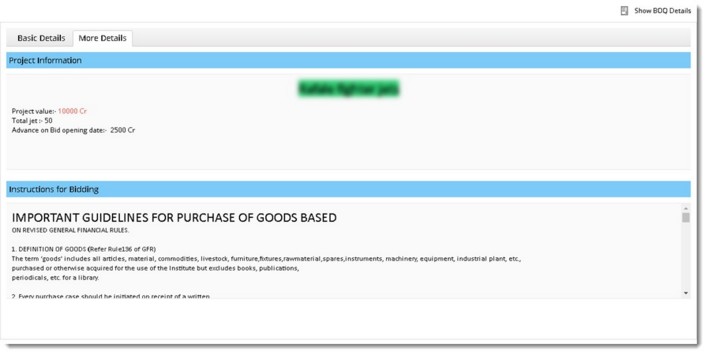
Figure: More Details window
Viewing BOQ Details
Provision to view BOQ details and enter bids is provided in this window.
 To open BOQ details window
- In the Tender Details window click Show BOQ Details.
BOQ Details window is displayed.
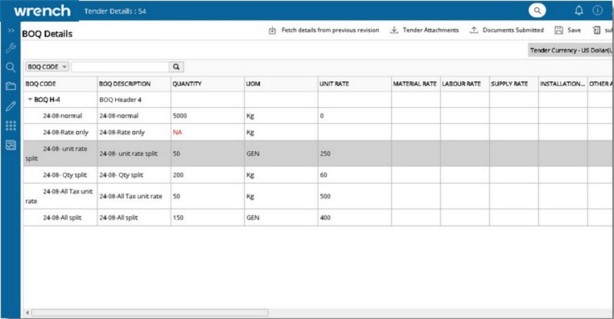
Figure: BOQ Details window
Tender BOQ of the latest published revision in the hierarchical structure is displayed here. The following information is displayed in the grid.
|
#
|
Property
|
Description
|
|
1
|
Tender Currency
|
Currency specified in the tender is displayed here.
|
|
2
|
BOQ Code
|
BOQ Code of the item is displayed here.
|
|
3
|
Description
|
BOQ Code of the header is displayed here.
|
|
4
|
Quantity
|
Quantity of the item is displayed here.
|
|
5
|
UOM
|
UOM of the item is displayed here
|
|
6
|
Unit Rate
|
Enter Unit Rate. Unit rate is the total rate without tax. Rate can be entered against each BOQ line item. If any item is a rate only item, then the ‘quantity’ of the same will be marked as ‘NA’ in red colour.
|
|
7
|
Total Amount
|
Total amount is displayed here. For Rate only Items, field total amount will be non-editable and blank. For items with rate and quantity, Total Amount= Estimated Rate*Quantity.
|
|
8
|
Make
|
Make of the BOQ Line item is displayed here.
|
|
9
|
Model
|
Model of the BOQ Line item is displayed here.
NOTE: Vendors may not be able to supply the exact make and model of the items which are specified in the tender. If the setting ‘Allow alternate make and model’ is enabled, vendors can specify a different make and model for the items published.
|
|
10
|
Image
|
A hyperlink to preview BOQ images is displayed here. Hyperlink will be available only if at least one Image is available against BOQ Line Item. Clicking on View Image hyperlink, preview of the image is opened.
|
NOTE: Apart from columns in the basic layout, additional columns (rate related) may appear in the BOQ Grid. These columns are based on the BOQ settings chosen while publishing the tender.
After entering the details click Save. Tender Information Saved Successfully message is displayed. The item rates are saved against each tender revision so that it can later be compared by the internal team when required.
Fetching details from previous revisions
Once the tender is republished, the BOQ Items will be replaced with the line items in latest revision and any rate details saved by the User in the previous revision will not be retained in the window.
 To fetch details from previous
- In the Tender Details window select a tender and in the options bar click Fetch details from previous revisions.
- Details saved or submitted by the user in items common in both revisions will be retrieved so that user need not specify these again. User may modify these details if required. For items which are added newly to the latest revision, the rate/make/model details will be blank. The rates fetched from previous revision will be available in the grid.
- Once the fetch operation is completed a message Previous revision details fetched successfully is displayed. After fetching rates from previous revision save the same.
Downloading tender attachments and vendor attachments
Different tender attachments added against the tender while publishing can be downloaded for viewing. In the Tender attachment window, the vendor user will only able to access the published version of attachments.

Figure: Downloading attachments
 To download tender attachments
- In the Tender Details window, click Tender Attachments.
Tender Attachments window is displayed. In the window documents attached to the tender are listed.
- Select the checkbox next to the attachment that is to be downloaded and click Download.
Selected document is downloaded. If multiple documents are selected the files are downloaded as a zip file.
 To view documents submitted
- In the Tender Details window, click Documents Submitted.
Vendor Attachments window is displayed.
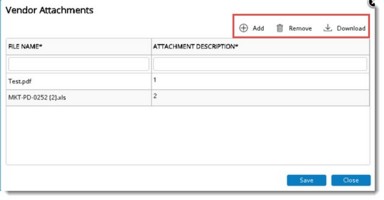
Figure: Vendor Attachments window
Attachments are listed in the window. Options to Add, Remove and Download the attachments will be available
Submitting the tender
After filling all the required information, attachments etc. and saving the tender, user may submit the tender for Evaluation.
 To submit the tender for evaluation
- Select the tender that is to be submitted and in click Submit.

Figure: Submitting tender for evaluation
A message Do you want to submit the tender is displayed.
- Click Yes to submit the tender. If the submission processes is completed successfully a message Tender submitted successfully.

Importing/Exporting BOQ Details in bulk
Vendors create tenders and then publish the tender. When the vendors select the tender and open the BOQ details, option to Import using excel template is available.
 To export BOQ details
- In the BOQ Details window click Import/Export.

Figure: Importing/Exporting BOQ Details
- In the menu click Export.
BOQ Details are exported to an MS Excel template as displayed in the following figure.
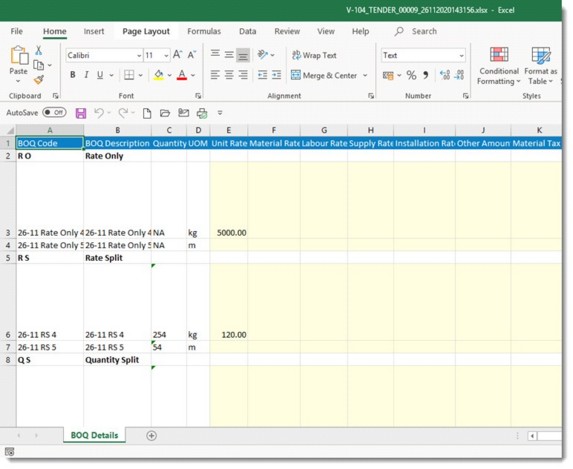
Figure: Exported BOQ Details
After editing the values and saving the file, edited details can be imported to system.
 To import BOQ details
- In the Import/Export menu click Import.
- File selection window is displayed. Select the file containing the edited details.
Updated details are imported to the BOQ.


 To filter tenders based on status
 To fetch details from previous
 To download tender attachments
 To submit the tender for evaluation