Projects are generally complex with thousands of tasks, dozens of deliverables, multitude of software tools (ERP's, Primavera, MS Project, 3D Modelling, Excel), Locations (sites, time zones and countries) or number of players (project team members, client, consultant, project management organizations, contractors and suppliers).
Project deliverables are often split into multiple areas for easier delegation or sub-contracting. By segregating a project to different areas the process of monitoring the project progress is simplified and also helps in resource optimization.
In addition areas defined in a different project can be imported and reused for the current project.
The following table will help you to navigate to different Area related operation which is explained in the following sections.
Navigation Table
Adding areas to your project
Workflow resources can be assigned and filtered for a specific task based on resources previously assigned in Area, System and Project if the area or system is assigned for the task. The system provides users the facility to assign resources for a Project area.
 To add an area to your project
- In the Project Properties window click Area tab.
- In the tool bar click Add button and in the menu click Area. Project Area window is displayed.

Figure: Adding Areas
- Click Area Details tab. (Usually this is selected by default.)
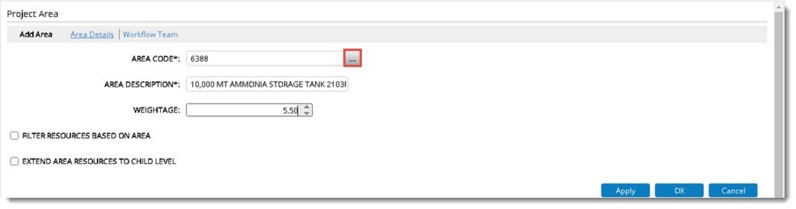
Figure: Project Area
- Click the browse button to select an Area Code.
Area selection window is displayed.
- Select an Area from the list. Corresponding Area Description is displayed.
Filter resources based on area: If the checkbox next to this option is selected projects sources is filtered based on the Area selected for the project.
Extend Area Resources to child level: An area can have sub-areas under it. On selecting this option, resources assigned to parent area is extended to child level or sub-areas.
- Click the Workflow Team tab to assign a Workflow for an Area.
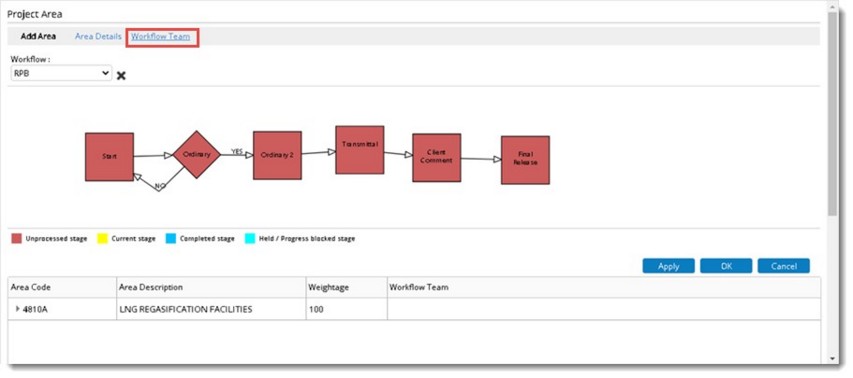
Figure: Selecting Workflow
- Click OK to save the workflow.
- Click the Resources tab and select the required users/resources for a specific Project area from the available list of user groups.
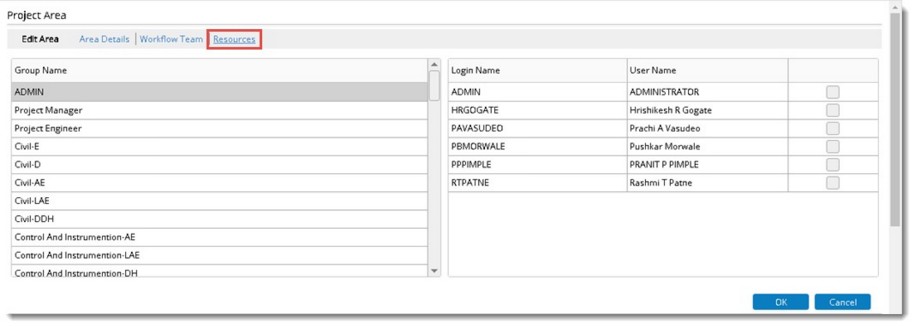
Figure: Selecting Area Resources
- Click OK to continue.
You have successfully created an Area.
Adding sub-areas to your project
Areas defined for a project can be further divided to sub areas. This makes the project progress monitoring process easier.
To add sub-areas
- Select the area defined for the project and click ‘Add’>>’Sub Area’.
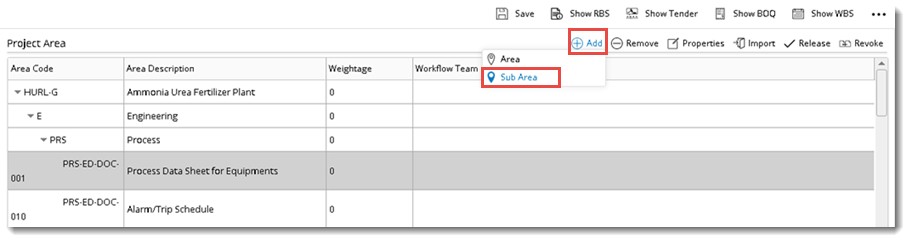
Figure: Adding Sub-Area
Project Area window is displayed.
- Enter values for sub-area. For more information on entering values refer the section Adding areas for your project.
Sub-areas will be displayed under the main area.
Importing areas from another project
Areas defined for a different project can be reused, if the properties match the current project. Areas can be imported from another project.
To import areas from Projects
- In the Project Properties window select Area tab.
- In the Project Area window tool bar click Import. A menu is displayed.

Figure: Area Import Menu
Project Area window is displayed.

Figure: Import Area window
- Click the browse button to select a project.
- Project Search window is displayed. Select a project from the Project Search window.
Areas defined for the selected project are displayed in the grid.

Figure: Importing selected areas
- Select an Area to import and click Import to start the import procedure.
Entire Areas defined for the selected project will be imported to your current project.
Import Area Resources: When areas are imported from a project if this option is selected, then Area Resources from the source project will be imported to the target project. While importing the Area resources from a project, and if the same resources are not available as project resources in the target Project, then such resources will not to be imported.
Bulk Import of Areas
Areas can be imported in bulk using an MS Excel template. An excel template is generated, area details are updated in excel file and the updated file details is imported to system.
To generate a template
- In the Project Area window click Import.
- In the menu click Generate Template.
An excel template is generated and the generated template is downloaded.
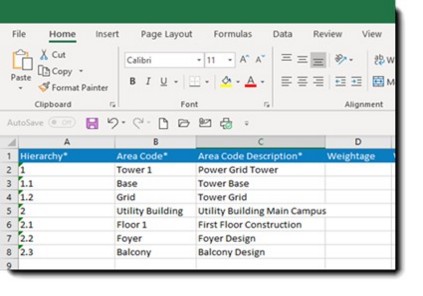
Figure: Generated Import Template
- Enter values for different Area Properties and save the excel file.
To Import area details to system
- In the Import/Export menu click Import from Excel.
Bulk Import Wizard window is displayed.
- In the window click Choose File.
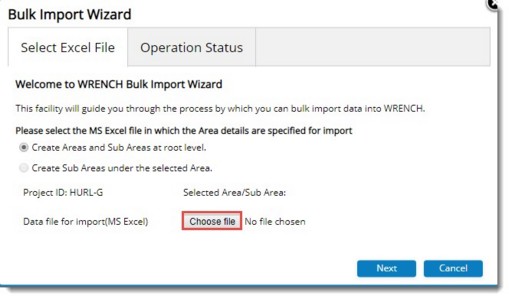
Figure: Bulk Import Wizard
- File selection window is displayed. Select the saved excel file with area details and click Next.
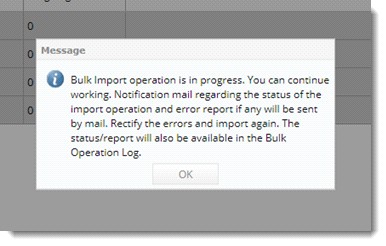
- Bulk Import Operation Status window is displayed. Click Finish to complete the import operation.
Imported Area details will be displayed in the grid once the processing is over.
To view log of import operations
- In the Import menu click Bulk Operation Log.
Bulk Operation Log window is displayed.
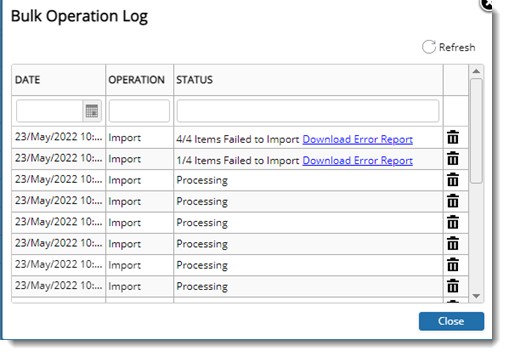
Figure: Bulk Operation Log window
In the window date of operation and status of the operation is displayed.
On importing the template generated from Import menu in Area window, if import operation fails, in the bulk operations log window a hyperlink, ‘Download Error Report’ is displayed. On clicking the hyperlink, an error report is generated in an excel file. If there are any errors, details can be imported after correcting the errors. If the bulk import operation fails, in the notification mail sent after completing Bulk Import operation, a excel file indicating the reason for failure is attached.
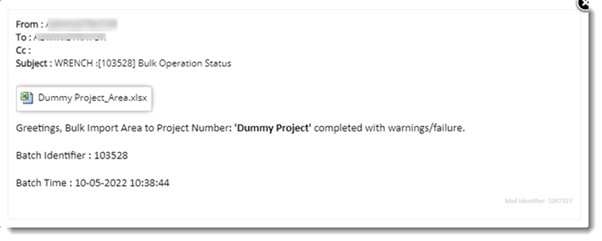
Figure: Notification mail
On opening the attached excel file, reason for failure of the operation is displayed in the column Error/Warning Message.
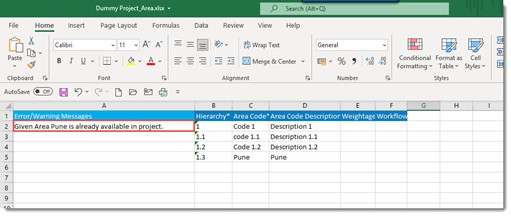
Figure: Import details file
Bulk Export of Areas
There are certain sites where the project areas need to be exported to an excel file and maintained as a reference document.
To export area details
- Select the areas that are to be exported.
- In the Import/Export menu click Export to Excel.
A message Selected areas are exported successfully is displayed.
Export file is downloaded and opened as shown in the following figure.
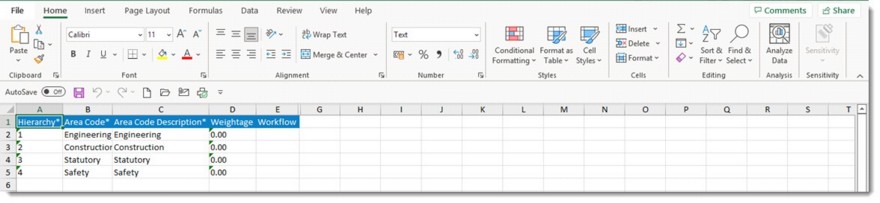
Figure: Exported Area Details
Updating area details
After exporting the area details to an excel file, details can be edited and edited details can be updated in the Project.
To update area details
- In the menu click Update From Excel.
File Selection window is displayed.
- Select the updated export file and click Open. The following message is displayed.
- Click OK to continue.
Status of the operation can be viewed from Bulk Operations Log.
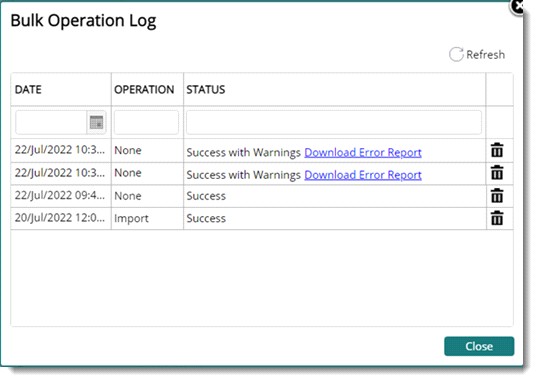
Figure: Bulk Operations Log
Area resource handling
A project will have set of resources called project Resource Pool. Resources can be assigned to an area from the project pool (normally project teams are split into multiple sub teams according to areas). An area can be specified in a task. User or User groups is also specified in the workflow stages assigned to a task.
While scheduling a task, Wrench will filter and allocate the task resources in the workflow stages. If the check box Filter task resources based on Area is selected and if this area is added to a particular task, then later on, the resources available in the Project area can be used as a filter for assigning resources for the various work flow stages of the specific task in addition to the Project resources. In other words, common resources belonging to Project and Area will be taken as work flow resources.
When resources are added or removed from an area or system the changes are to be incorporated to the corresponding workflow. Clicking refresh workflow the changes are updated to the workflow.
Releasing and Revoking areas
Once the areas are defined for your project, the areas can be released. We can assign weightages to areas and its sub-areas so that the progress can be rolled up to the main area and to the whole project. The areas need to be released so that they can be used in the deliverables, this is to ensure the weightages provided in the areas of same level are summed up to 100, and then only the progress of the project will be calculated correctly.

To release the area
- Select the area that you want to release.
- In the tool bar click Release.
Released successfully message is displayed.
NOTE: An Area can be released only if sum of weightage is 100.
To revoke areas
- Select the released area.
- In the tool bar click Revoke.
Revoked Successfully window is displayed.

