A document controller receives multiple transmittals from Consultant, Vendors, and internal documents for record every day. These documents have to be uploaded into WRENCH. Currently user has to select the first batch of documents, wait for the upload to complete, enter the metadata and then complete the operation. Once the first batch is complete user will do the same process for the next batch of documents. This is a time consuming process.
Major time consumed in the above process is for uploading the physical documents. This may take more time depending on the size of the files. To make this process easy, a facility to upload the files in bulk, independent of the bulk add function is required. Using this facility user can keep uploading documents in the background and continue working in the system at the same time. After uploading the documents can be registered in WRENCH.
 To bulk upload documents
- In the global menu click Create>>Document>>File Uploader.
File Uploader window is displayed.

Figure: File Uploader window
- In the window click Add Files.
File Selection window is displayed.
- Select the files that has to be uploaded and click Open.
Selected files are uploaded to the system. When the upload is in progress you can continue to work. In the column Error/Warning details or reason for the failure of file uploading is displayed.
Show files added by others: At times, when the person who has uploaded a file is unavailable, it may require administrators to register files. Hence an option “Show files added by others” is required for administrators. If the check box next to this option is selected, files uploaded by other users are also displayed.
Show registered files also: Usually files registered are not displayed in the upload manager. When this option is selected, system will display all registered files first, followed by the unregistered ones . The list will be displayed in multiple pages depending on the number of rows available. When this option is unchecked, all registered files will be removed from the list and the remaining will be displayed in a single page.
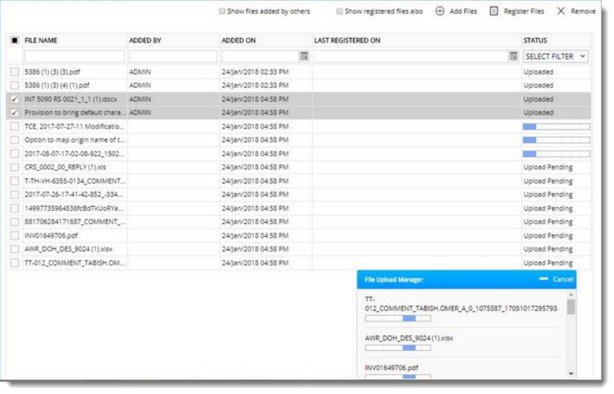
Figure: Upload in progress
After the files are uploaded, next step is to register the files in WRENCH.
- In the window click Operations. Different options to register files is displayed.

Figure: Registering Files
In the pop-up menu displayed, the following options are available.
The following operations can be carried out from the menu.
- Create Documents
- Replace Documents
- Templates For
- For Creating documents
- For Replacing current revision documents
- For Replacing old revision documents
- For Adding attachments
- Manage Templates
- Import Template
These options are explained in the following sections.
Creating Documents
Using this option, a selected document can be added to SmartProject
 To add files to SmartProject
- Select single or multiple files.
- In the menu click Create Document.
Add to Wrench window is displayed.
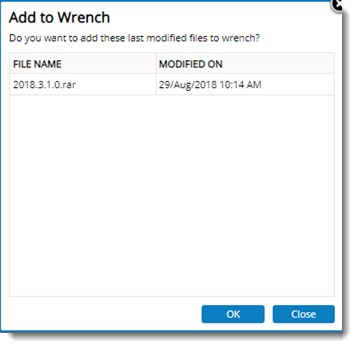
Figure: Add to Wrench window
- Click OK to add the files to WRENCH.
For a single document WRENCH Single Document Addition window and for multiple documents, Multiple Document Addition window is displayed.
- Add the document to WRENCH using single or multiple document addition window.
Replacing Documents
Using this option files of existing documents can be replaced. On clicking this option after selecting the documents, the Bulk Upload Document window is displayed. For more information on working with bulk document upload window refer Bulk Update of Documents.
Creating Templates
Templates can be generated for creating documents, replacing documents, replacing old revisions of documents, adding attachments, and managing templates. On placing the mouse pointer over the option Templates For, a pop-up menu with different options is displayed.

Figure: Creating Templates
The option in this menu is explained in the following section.
For Creating Documents: Using this option template for adding documents to SmartProject can be generated and documents can be added using the template. On clicking, this option Download Template wizard is displayed. Here different options for generating an import template is available.
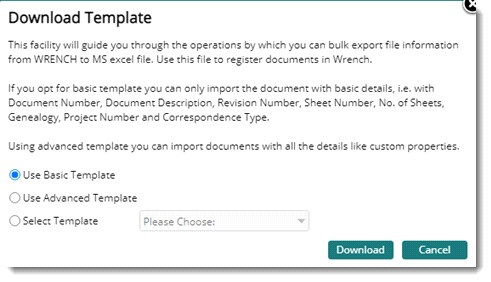
Figure: Downloading Template
For Replacing Documents: Using this option a template that can be used for replacing the documents can be generated.
For Replacing old revision documents: Using this option a template that can be used to replace old revisions of existing documents can be generated. On clicking this option, the following template is generated.

Figure: Template for replacing old revisions
In the template enter values for the following columns.
- Document Number: Specify the document number to which the file is to be replaced.
- Sheet Number: Specify the Sheet number of the document to which the file is to be replaced.
- Revision Number: Specify the revision number of the document to which the file is to be replaced.
- File Name: Specify the path of the selected file.
After entering values in different columns save the file.
For Adding attachments: Using this option an excel template for importing attachments against specified documents in SmartProject can be generated. The generated template is shown in the following figure.

Figure: Template for adding attachments
In the template enter values for the following columns.
- Main Document Number: Specify the document number to which the file is to be attached.
- Main Document Sheet Number: Specify the Sheet Number of the document to which the file is to be attached.
- Main Document Revision Number: Specify the Revision Number of the document to which the file is to be attached.
- Association Type: Specify the association of the file to the document. This can be selected from a drop-down list. Options available are Spector, Related file, Comments, and Client comments.
- File Name: The name of the selected file is displayed here.
After entering values in different columns save the file.
Manage Templates: Using this option custom template that can be used for the ‘Creating Document’ option can be generated. On clicking this option Document Templates-Import window is displayed.

Figure: Document Template for Import
There are no changes in the procedure for creating document import templates.
Importing Using Excel
Different option to import the values in generated excel template is available here. On placing the mouse pointer over this option, a pop-up menu is displayed.
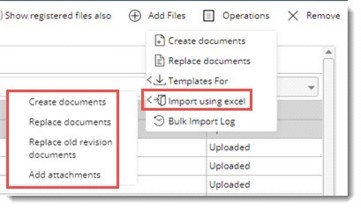
Figure: Importing using excel
Different options in the menu are described in the following section.
- Create Documents: Click this option to import the documents in bulk using the generated template. On clicking this option Bulk Import Wizard is displayed. The procedure for importing the files using the wizard is the same as before.
- Replace Documents: Click this option to replace the current revision of documents using the generated template. On clicking this option Bulk Import Wizard is displayed. The procedure for importing the files using the wizard is the same as before.
- Replace old revision of documents: Click this option to replace the old revision of documents f using the generated template. On clicking this option Bulk Import Wizard is displayed. The procedure for importing the files using the wizard is the same as before.
- Add attachments: Click this option to attachments to documents using the generated template.
Bulk Operations Log
The bulk operations provide the status of the import processes.
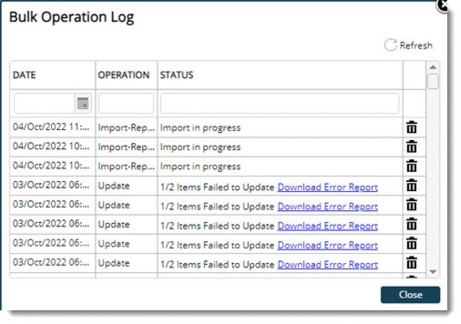
Figure: Bulk Operations log window


