Different configurations settings pertaining to different modules and utilities in SmartProject can be defined here.
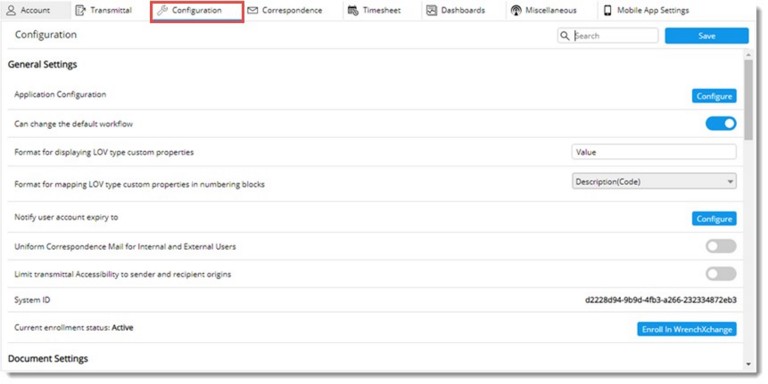
Figure: Configuration Settings window
Different settings that can be set here are mentioned in the following sections. Settings are grouped under the following headings:
General Settings
Document Settings
Security and Permissions
Meeting Settings
Views
Notification Settings
Refer the navigation template to access information on important configurations that can be set here.
Navigation Table
General Settings
Application Configuration
Different configurations that were set from web configuration is now available here. This option will available only for Admin login.
 To define different configurations
- In the Configuration window click the configure button next to Application Configuration.
Application Configuration window is displayed.
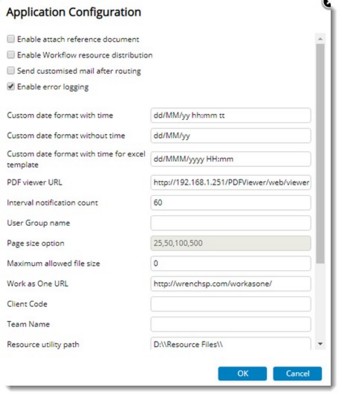
Figure: Application Configuration window
Here configuration related to different applications can be made. They are mentioned in the following table.
|
#
|
Setting
|
Description
|
|
1
|
Enable attach reference document
|
Select this option to enable reference document addition in document addition.
|
|
2
|
Show SSRS report viewer
|
Select this option to open SSRS report in report viewer
|
|
3
|
Enable Workflow resource distribution
|
Select this option to assign workflow resources for multiple documents.
|
|
4
|
Send Customized mail after routing
|
Select this option to include custom property in Send mail.
|
|
5
|
Enable Error logging
|
Select this option to enable logging of errors.
|
|
6
|
Custom date format with time
|
Specify the date format along with time. Date and time will be displayed based on the format defined.
|
|
7
|
Custom date format without time
|
Specify the date format without time. Date will be displayed based on the format defined.
|
|
8
|
Custom date format with time for excel template
|
Specify the date and time format that has to be displayed in excel template.
|
|
9
|
PDF Viewer URL
|
Specify the PDF viewer URL.
|
|
10
|
Interval notification count
|
Here you can set a value for calculating the interval at which the count for push notification is to be reset.
|
|
11
|
User Group Name
|
Specify the user groups for which My Settings is to be hidden.
|
|
12
|
Page size option
|
Values for Page size option will be set as 25, 50, 100, 500. These values are non-editable. When a new smart folder is created page size value will be 100. While upgrading if any smart folder have page size value that is not set here, page size option for folders will be assigned as 100.
|
|
13
|
Maximum allowed file size
|
Specify the maximum size of file that can be uploaded.
|
|
14
|
Work As One URL
|
Specify the URL to open Work As One Portal.
|
|
15
|
Client Code
|
Client Code for Work As One.
|
|
16
|
Team Name
|
Team Name for Work As One.
|
|
17
|
Resource Utility Path
|
Specify the folder of resource files.
|
|
18
|
WRENCH Web API URL
|
Display the WRENCH API URL.
|
|
19
|
SSRS server domain name
|
Domain Name of SSRS server.
|
|
20
|
SSRS server user name
|
User Name of SSRS server.
|
|
21
|
SSRS server password
|
Password of SSRS server.
|
|
22
|
SSRS server URL
|
Specify SSRS service URL.
|
Can change the default workflow: This setting helps to restrict changing of default workflow By default, this setting will be enabled. When the setting is disabled, users cannot change the default workflow assigned.
Format for mapping LOV custom properties: The format for mapping LOV custom properties defined in server configuration is displayed here.
Format for mapping LOV type custom properties in numbering block: Format for mapping LOV type custom property in numbering block can be specified here. Display format can be selected from a drop-down list.
Notifying user account expiry to
In smaller organisations, user administration is taken care by a single administrator. In such cases, only a single user is to be alerted. But in larger organisations, there may be group administrators who manage user accounts in specific groups. In such cases, the respective group administrator is to be notified.
To handle this scenario, a setting to notify group administrators or a specific user about login expiry is provided.
To notify user account expiry
- In the General Settings, click the Configure button next to Notify user account expiry to.
On clicking the configure button, the following window is displayed.
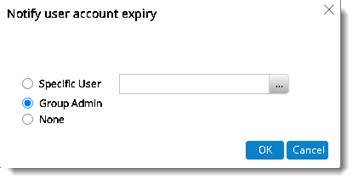
In the window the following options will be available.
Specific User: Select the radio button next to this option if expiry notification is to be send to a specific user. Click the browse button to select users from the User Search window. Selected users will be displayed in the window.
Group Admin: Select the radio button next to this option, if notification is to be send to the group administrator of a specific group.
None: If this option is selected, system will not send any notification regarding the expiry of user account.
- After selecting the required option click OK.
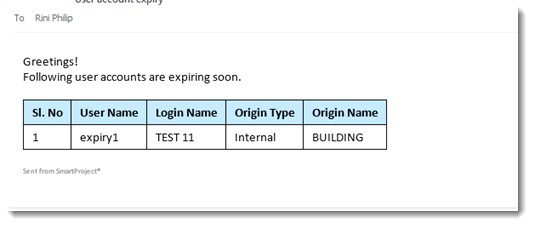
Once the configuration is done, seven days prior to the expiry of user accounts, the configured user (specified user account / the respective group administrator) will receive a notification about the expiry. If external emails are configured, the recipients will receive the notification via external emails as well.
Uniform Correspondence mail for internal and external users: If this option is enabled mails sent to internal and external users will be the same. Or else when correspondence mails are sent with attachments to internal and external users, internal users receive document links and external users receive document attachments with the correspondence mail.
Limit transmittal Accessibility to sender and recipient origins: If this option is enabled, transmittals sent and received by the user’s organization/origin will be only accessible to the user. Users in one origin will not be able to view or access transmittals sent between two different origins. If a user tries to view a transmittal from the smart folder or Usage Information tab in Document Details window, a warning message is displayed, and the operation is cancelled.
System ID: If an organization is not enrolled in WrenchXchange service, no values are displayed against the field System ID. A button generate will be available.
Enroll in WrenchXchange: This button is displayed only after System Id is generated. Once this button is displayed, an organization can be enrolled in WrenchXchange.
Enrolling an organisation in WrenchXchange
An organisation can be enrolled in WrenchXchange.
To enroll an organisation
- Click Enrol in WrenchXchange.
Wrench Connect service will send an OTP to the mail ID which is set as the organization mail ID.
A pop-up window is displayed for the system user
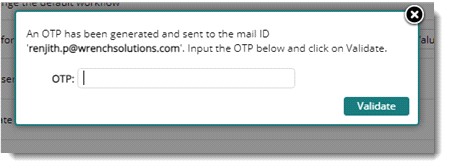
Figure: Validation window
- Enter the OTP received and click Validate.
After successful validation an approval request is send to the WrenchXchange administrator. Once an enrolment is successful, the administrator of the WrenchXchange will receive a notification. The notification will contain a link for approval or rejection.
To approve an enrollment
- Click the link.
WrenchXChange login window is displayed.
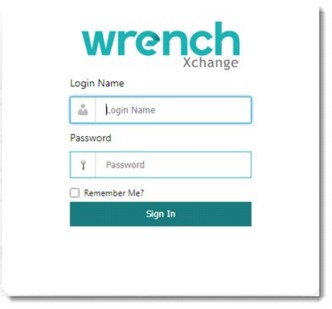
Figure: WrenchXchange login window
- Enter the login name and password and click Sign In.
WrenchXchange main window is displayed.

Figure: WrenchXchange main window
- Select the pending enrollment and click Approve. The request is approved, and the enrolled user is notified on the approval and the status changes to ‘Active’.
Terminating an active enrollment
Active enrollments can be terminated due to reasons such as expiry, termination of contract, abuse, failure to remit payments etc. Termination of enrolment is carried out by the administrator.
To terminate an account
- Select the account and click ‘Terminate’ to terminate the account.
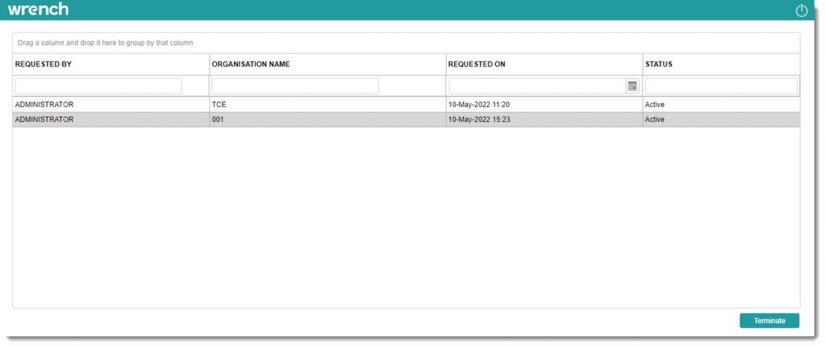
Figure: Terminating an account
An alert message Are you sure to Terminate the selected WrenchXchange Account is displayed.
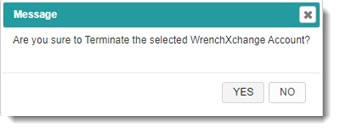
- Click Yes to terminate the account.
The terminated accounts can be reactivated using the ‘Activate’ option.
Document Settings
Accept past dates for 'Responded On' in CRS: If this setting is enabled, user can provide a past date in the Responded On field in CRS. If the setting is not selected, user is restricted from providing a past date in the Responded On field in CRS. If the setting is not selected, the value for the field Responded On in the Response Details window is auto-generated with current date and time.
Alert when Work In Progress RFI's are existing against documents (View/Download/Upload/Check In/Release Trasmittal.): If this option is enabled, when a user tries to view, download, upload or check in a document, or drawing with an RFI attached to it is open, an alert message is displayed. If any of the documents have an open RFI, then while creating a Release transmittal user is alerted.
Create PDF file when saving comments from Rasterex Viewer: If this setting is enabled, system will automatically create a new pdf file which contains all comments that are available in the RXML file and attach it as a comment file to the document in the current version.
Allow revision number duplication for documents: Once this option is enabled, revision number duplication for documents will be permitted. This will be applicable for project and non-project documents.
Apply parent document’s file naming conventions for client comments: Once this option is enabled, when user attempts to download a document, if the document is attached as a client comment to another (single) document, the file will be downloaded using the file naming conventions as specified against the main document.
If the selected document is not assigned to any document as a client comment OR if there are multiple documents to which the selected document is attached as client comment, the file will be downloaded using the file naming conventions (if any) specified against the selected document’s genealogy.
When there are no file naming conventions defined on the main document’s genealogy, default conventions of the main document are used to download the file.
Assign projects to file manager
Projects in WRENCH can be assigned to folders in the file manager so that it can be accessed by the project resources in each project. If there are folders which do not belong to any Projects, folders can be assigned without mentioning the project so that all users in the WRENCH can access the given ‘Project independent’ folder.
To assign projects to file manager
- In the Configuration window click the configure button next to Assign Projects To File Manager.
Configure Project Folders window is displayed.
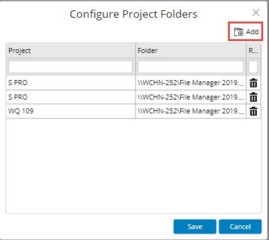
Figure: Configure Project Folders window
- In the window click Add.
A new row is inserted in the window.
- Click the new column. A browse button is displayed.
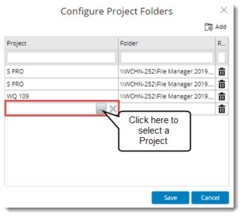
Figure: Selecting a Project
- Click the browse button. Projects window is displayed.
Select the Project from the list. Selected project will be displayed in the window.
To select folders to file manager
- In the Configure Project window click the new column inserted, below the heading Folder.
A browse button is displayed.
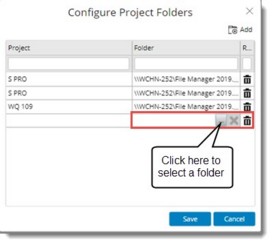
Figure: Assigning a folder to file manager
- On clicking the browse button Shared Folders window is displayed. Folders configured in server settings is displayed here.
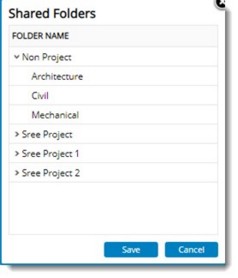
Figure: Shared Folders window
- Select the folder that is to be added to the file manager and click Save.
Selected folder is displayed in the Configure Project Folders window.
Automatically insert QR code on download: If this option is enabled, QR code is inserted while documents are copied out automatically.
Allow Live Commenting session closure without completing the workflow stage: If this setting is enabled, user is permitted to close the live commenting session without completing the workflow stage. By default, this setting is enabled.
If the sending rule is configured as Approve by All, and if the new setting is enabled, the creator or users with manage permission is permitted to close the session based on the workflow stage status of the resources.
When all the session invitees except session creator or user with manage permission attending the session has still not closed the document from their workspace, and creator or user with manage permission try to close the session, a message Do you wish to close the session? Yes/No is displayed.
If the user clicks ‘Yes’, the session is closed with comment file attached as existing. If the user clicks ‘No’, the operation is cancelled.
When the creator or user with manage permission try to close the session with more than one invitee pending to complete their session, and if the setting is enabled, a message Commenting session is pending with more than one user. Do you wish to close the session? is displayed.
When the creator or user with manage permission try to close the session with any invitee pending to complete the session, and if the setting is disabled, an alert message is displayed and the session closing operation is cancelled.
Automatic numbering for comments in CRS: In Comment Resolution Sheet (CRS) of document, comment number is a mandatory field, and user needs to manually enter the comment number for adding new comment to CRS. Some organisations follow a specific comment numbering pattern and others do not follow any numbering pattern for adding comments to a document. CRS number is generated automatically and format of the CRS number will be PROJECT_ID/CRS/SERIAL_NUMBER.
Auto numbering will be enabled only if the setting Automatic numbering for comments in CRS is enabled.
Block Duplication of Document Number: If this setting is enabled and duplicate document number exists, on clicking the Save button, list of duplicated document numbers is displayed. You can change the duplicate document number and try again.
Default Comment Type: Here a default comment type can be assigned at organizational level.
To assign default comment type
- Click the Configure button next the option.
Default Comment Type window is displayed. In the window option to specify default comment type for Comments and Markups is displayed.
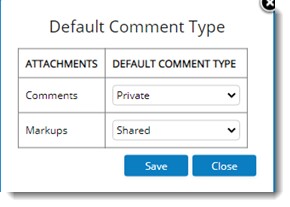
Figure: Default Comment Type
- Select the default comment type from a drop-down list. Options available are Shared, Public and Private.
- Click Save to store changes. A message default comment type details saved successfully is displayed.
Once saved, this will be the default comment type when creating comments and markups. However, user may override the comment type at the comment level.
Download attachments in single folder: If this option is enabled, a zip file which will contain all specter files in a single folder is created.
File name structure for consolidated comment file
Some Project sites prefer a file naming structure based on their naming conventions. Hence a provision to configure file name for consolidated comment files will be available in the Administrative Settings.
To configure a file naming structure
- In the Administrative Settings window, click Configuration.
- Click the option Configure Filename Structure for Consolidated Comment Files.
File Name Structure window is displayed.
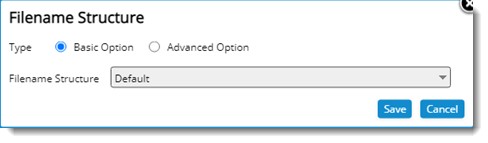
Figure: Filename Structure window
In the window, Basic Option and Advanced Option are available for generating filename structure. By default the type Basic Option is selectd.
- Select a File Name Structure from a drop-down list.
If a file name structure is already configured, it is displayed here. Or else value Default is displayed here.
- After selecting a file name structure, click OK to save the configuration.
When consolidating files from SmartProject, consolidated file will get attached in the filename logic defined here.
To define advance filename structure
- Click the radio button next to Advanced Option.
On clicking the radio button next to this option, Advanced Options are displayed.
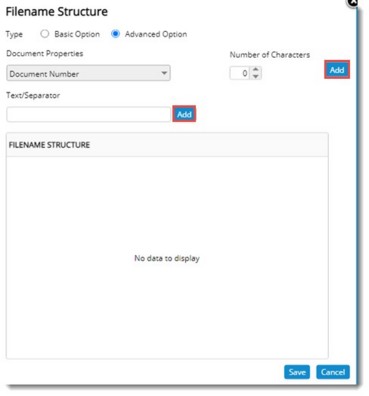
Figure: Advanced Options
- Select the Document Properties required for the file name structure from a drop-down list.
- Specify the number of characters. The document property mapped from the document is restricted to the number specified in the number of characters field.
- Click Add.
- Specify a text or separator if it is required in the file name structure and click Add.
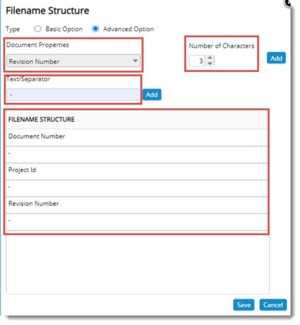
Figure: Generating advanced filename structure
The selected properties and separators are displayed in the grid.
- Click Save to store the defined file name structure.
When the user downloads the consolidated comment files, the system verifies the file name structure defined for downloading consolidated comment files, and based on the given configuration file name of the downloaded consolidated comment file is generated.
Configuring Live Review
Bluebeam, Rasterex or WRENCH Viewer can be configured as the collaboration model.
To configure live review
- In the Administrative Setting window, under Configuration click the configure button next to Configure Live Review.
Configure Live Review window is displayed.
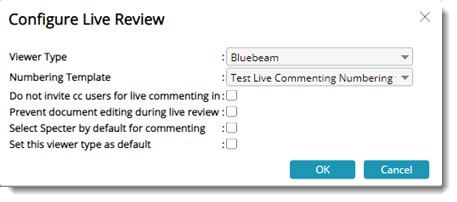
Figure: Configure Live Review window
- Select the Viewer Type from a drop-down list. Options available are Bluebeam, Rasterex and WRENCH Viewer.
- Select the Numbering Template from a drop-down list.
The following setting are also available.
Do not invite CC users for live commenting: If the checkbox next to this option is selected, CC users are restricted from getting invited as Invitees for a live Commenting session. This can be defined for Transmittal and Workflow stage.
Prevent Document Editing during Live Commenting: if the checkbox next to this option is selected, editing of document is prevented when a Live Commenting session is open. This option is enabled only for Rasterex or Wrench Viewer.
Select Specter by default for commenting: If the checkbox next to this option is selected, specter file is selected by default for commenting.
Set this viewer type as default: If the checkbox next to this option is selected, the selected viewer type is set as default viewer type for commenting.
- Click Save or Apply to save the settings.
Maximum number of specters allowed for a document version: The number of specter files added manually can be limited by providing a value here.
Project ID mandatory in change proposal: If this option is enabled, a change proposal can be raised only for documents or tasks related to a Project.
Configuring Report Generation From Documents
SSRS reports link can be configured from the Administrative Settings in SmartProject (ATOM).
To configure reports link
- Click the configure button next to Configure Report Generation from Documents.
Report Generation From Documents window is displayed.
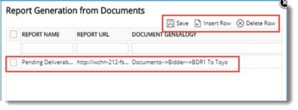
- Click Insert Row. A new row is inserted.
- Enter a Report Name and Report URL.
- Click the browse button to select a document genealogy.
- Click Save to store the changes.
Configured reports will be displayed in the navigation menu of the document details window.
Configuring stamp
Here there is a facility to upload the stamps that you will be using.
To upload stamps
- In the Configuration window click the configure button next to Configure Stamp.
Configure Stamp window is displayed.
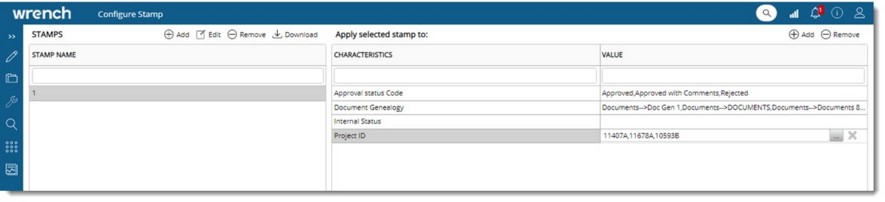
Figure: Configure Stamp window
In the section Stamps, configured stamps are displayed.
To create a stamp
- In the Stamps section Click Add.
New Stamps window is displayed.
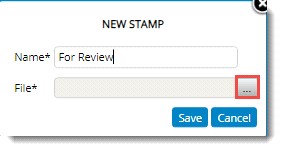
- In the window enter a name for the stamp.
- Click the browse button to select the stamp file.
- Click Save to create the stamp.
Created stamp is displayed in the Stamps section.
To remove a stamp
- Select the stamp that is to be removed.
- Click Remove. An alert message Do you want to remove the selected stamp is displayed.
- Click Yes to delete the stamp. Click No to discard the operation.
Stamps can be related to specific types or group of documents using specific documents or user properties.
To apply selected stamps to documents
- In Apply Selected Stamps to section click Add.
Filter Criteria window is displayed.
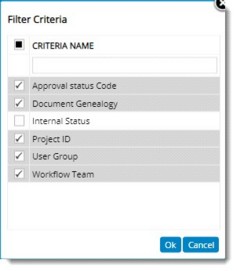
- Criteria names are displayed here. Select the checkbox next to the criteria name that is to be selected and click OK.
- Selected criteria names will be displayed in the window.
In the window select a value for each criteria. While stamping, the system will filter the stamps based on the filter criteria specified against the stamps.
Update submission details to documents on transmittal release by vendor: When a transmittal is released for a document of vendor origin, if this setting is enabled, external agency transmittal number and date needs to be captured to the documents details of the documents.
Viewer Settings
Default viewer is used to simplify the viewer configuration. For Example: There are multi-format file viewers commercially available in the market, which can be integrated with Wrench such as ‘Autodesk Forge’ and ‘Rasterex’. Customers may purchase such viewers and set it as ‘Default’. Once set as default, the individual file types can be assigned with ‘Default Viewer’ as the viewer. In case the user later decides to change the default viewer, the individual association of viewer with file type need not be updated, instead the default viewer is changed. A set of viewers will be available in the drop-down list.
When users attempt to view files, if there is an associated viewer, it is opened accordingly. If there are no associated viewer and if the user has ‘Copy’ permission, the file is downloaded. If there are no associated viewer and if the user does not have ‘Copy’ permission, an alert message “You do not have Copy out permissions” is displayed and the operation is aborted.
To set a default viewer
- In the Viewer Settings window, click the down arrow. List of viewers is displayed.
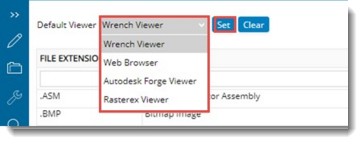
- Select the viewer from the list and click Set.
Default viewer set successfully message is displayed.
To associate file type with viewer
- In the Viewer Settings window click the browse button in the cell titled viewer.

Viewers window is displayed.
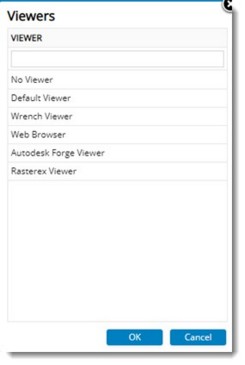
Figure: Viewers window
- Select a viewer from the list displayed in the window.
- In case you want to disassociate the file type from all the viewer select the option No Viewer.
To add new file types
- In the Viewer Settings window click Add.
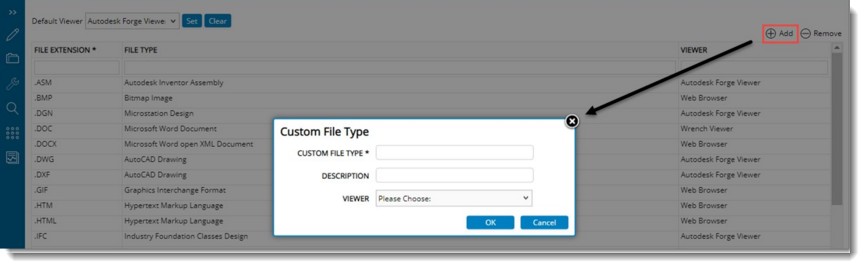
Figure: Adding new file types
- Custom File Type window is displayed. In the window enter values for the following fields.
CUSTOM FILE TYPE: Enter the extension for the file type here.
DESCRIPTION: Enter a description for the file type.
VIEWER: Select the viewer from a drop-down list.
- Click OK to save changes.
Security and Permissions
Allow only creators to remove/edit attachment: By default, this setting will be enabled. If this setting is enabled, the attachments can be removed or modified only by the creator of the attachment. Even if the users (other than the creator) having replace/remove permission for the attachments in that genealogy will not be permitted to remove/modify the attachments added by other users.
Configuring Authentication for internal and external users
SmartProject supports both Native Authentication and External Authentication. In the case of Native Authentication, option to authenticate using single factor and multi factor is available. In the case of External Authentication, option to authenticate using MS Office and OKTA is available.
Single Sign On in SmartProject provides centralized session and user authentication service in which one set of login credentials can be used to access multiple applications.
SSO is implemented using Security Assertion Markup Language (SAML) which is an open standard that allows identity providers (IdP) to pass authorization credentials to service providers (SP). What that means is that user can use one set of credentials to log into different websites i.e. Single Sign-On (SSO).
By implementing SSO in SmartProject, in addition to Native Sign-on, option to login to SmartProject using Office 365 credentials and Active Directory Services credentials will be available.
An option to configure what types of authentications are allowed is provided. Based on this, individual users many be allowed to use different types of authentication.
To configure native authentication
- Click the configure button next to Configure Internal Authentication. Configure Authentication: Internal Users window is displayed.
- Select the Authentication Method as Native Authentication.
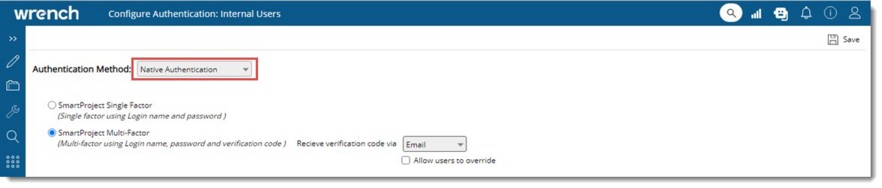
Figure: Configuring Native Authentication
The elements in the window are explained in the following table.
|
#
|
Item
|
Description
|
|
1
|
Native Authentication
|
This option is selected by default. This will help to select the native sign on mode for the user.
|
|
2
|
SmartProject Single Factor
|
If the checkbox next to this option is selected, single factor login using username and password is enabled.
|
|
3
|
SmartProject Multi Factor using
|
If the checkbox next to this option is selected, multi-factor authentication using login name, password and verification code is enabled. A drop-down list with multi factor options Email, Mobile App, SMS is enabled. By default, Email is selected.
|
|
4
|
Allow users to override
|
If the checkbox next to this option is not selected, users are restricted from changing the method of receiving verification code during login. Also the user is restricted from changing the verification code receiving method in personal settings. The following window is displayed if verification code authentication method selected is email.
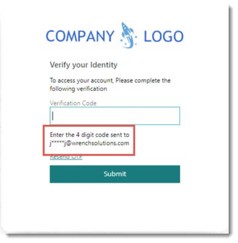
If the authentication method selected is mobile number, text displayed is Enter the 4 digit code sent to mobile app.
|
- After selecting the required options, click OK to save changes.
When saving user details, if ‘SmartProject Multi Factor’ is the only sign-in option and ‘email’ is the means of OTP or Microsoft Office 365 is the only sign-in mode selected with authentication attribute as Email address, all users should have a unique email address. Hence the email address must be specified and it must be unique.
Configuring External Authentication
Option to login to SmartProject using Office 365 or OKTA credentials and Active Directory Services credentials will be available.
A integration between SmartProject and Office 365 or Okta can be defined here.
To configure external authentication
- In the Configure Authentication: Internal Users window select Authentication Method as External Authentication.
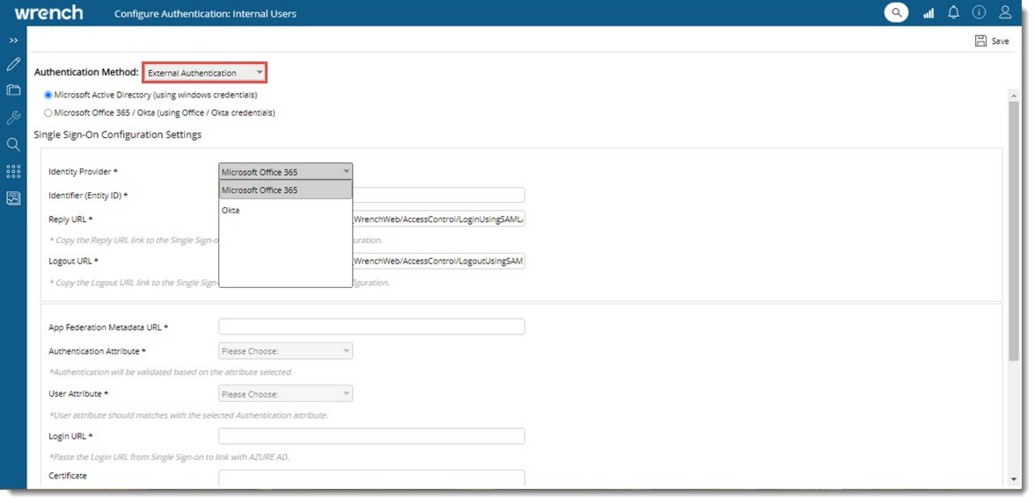
Figure: Configuring Single Sign On
Single Sign On Configuration Settings window is displayed. Configuration can be defined for Microsoft Active Directory and Microsoft Office/Okta.
- Enter values for the following fields.
Identify Provider: Select an Identity Provider from a drop-down list. Options available in the drop-down list are Microsoft Office 365 and Okta.
By default option Microsoft Office 365 is selected. If there are any saved configuration it is displayed in the window.
NOTE: When the Identity Provider is changed from the drop-down list, a warning message Do you wish to clear the existing configuration is displayed. On clicking Yes, existing configuration of the currently selected identity provider is removed, and the fields are cleared. On clicking No, existing configuration values are not cleared.
Identifier (Entity ID): This URL is unique and identifies the application. Copy-paste the same URL from Active Directory. Login URL from AD only contains the base URL path. Append the encrypted request using the reply URL and Identifier (Entity ID) while login.
Reply URL: This url specifies where the application expects to receive the SAML token. The reply URL is also referred to as the Assertion Consumer Service (ACS) URL.
Logout URL: This URL is used to send the Single Sign On Logout responses back to the application. This is mandatory if the selected identity provider is Microsoft Office 365. For Okta this URL is not mandatory.
App Federation MetaData URL: Specify this URL to allow user to access the metadata specific to the application.
Authentication Attribute: Specify the authentication attribute, which helps SmartProject to validate the user. Options Email ID and Login Name is available in the drop-down list. By default, Email Address is selected.
User Attribute: Specify the field name corresponding to the Authentication Attribute in the Federation MetaData XML retrieved using ‘App Federation MetaData URL. Once user pastes the metadata URL, corresponding attributes in the XML file will be listed in User Attribute drop down. User should select the right attribute relative to the authentication attribute.
Login URL: Specify the login URL. When a user opens this URL, the service provider redirects to Azure AD to authenticate and sign on the user. Azure AD uses the URL to start the application from Microsoft 365 or Azure AD My Apps.
Certificate: Enter the trust key to decrypt the response from Identity provider.
- After entering the values click Save to store changes.
Configuring Okta SAML Settings
To enable Okta single sign on configuration, user has to configure SAML setting in Okta administration page.
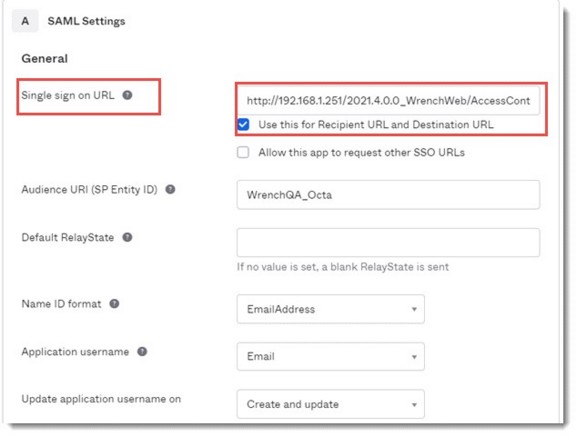
Figure: Configuring Okta SAML Settings
To Integrate SSO
Copy the Reply URL from Single Sign-on plug-in configuration in SmartProject and paste it to the SAML Setting fields in Create SAML Integration window.
- When the configuration is completed, SSO will generate the Login URL to link with Okta.
- Copy the Identity Provider Single Sign-On URL (i.e Login URL in SmartProject) , X.509 Certificate , Identity Provider Metadata URL (i.e App Federation Metadata URL in SmartProject) from SSO and paste it in the SmartProject Plug in.
- Save the SAML plug-in configuration to complete the configuration.
If the authentication mode is configured for Okta sign on, user will be redirected to Sign on URL which will be the login page of Okta. Once successfully logged in with Okta, user will be redirected to the ‘Reply URL’ defined, where the ‘email address’ or the ‘Login Name’ (as configured) will be available. SmartProject will use this Okta login credentials to identify the corresponding SmartProject user account.
Configuring authentication for online storage
When users check out documents in SmartProject, it is downloaded to the desktop. This document is edited using the corresponding native application. Since SmartProject cannot remember the location of the checked-out document, to check in the document, the user must select the file from the disk. For this user must remember the location where the file has been checked out. Also, there is a high possibility of the user selecting the wrong file for check-in.
Now since online editors like Office365 is available, files can checked out to a cloud location so that SmartProject can remember the location where the document is checked out to. The document can be checked in without the user having to select the file. This is especially convenient when many files are to be edited for making small changes. Or else the user will have to remember the check-out location of each file.
In SmartProject documents can be edited online. If the document is an MS Office document, then the file is opened in the corresponding MS Office application in a new browser tab so that the user may edit it online. Or else the file location where it is checked out is displayed. The checkout location is displayed only, if necessary, configurations are made in SmartProject.
To configure authentication
- Click the Configure button next to Authentication for online storage.
The Online Storage Settings window is displayed.
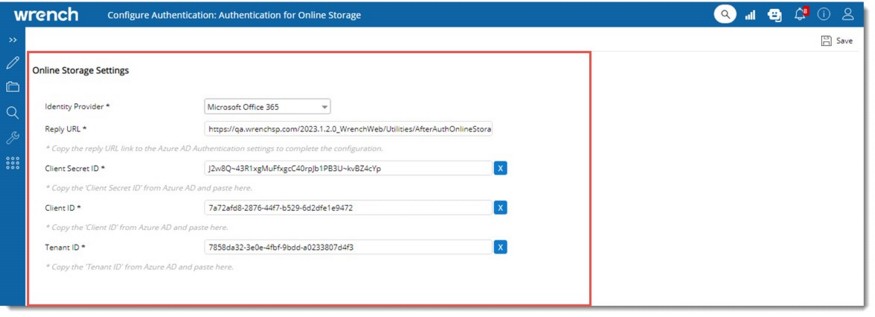
Figure: Online storage settings window
- Enter values for different properties mentioned in the following table.
|
#
|
Item
|
Description
|
|
1
|
Identity provider
|
Since currently SmartProject only supports Office365 it is displayed.
|
|
2
|
Reply URL
|
Specify the location where the application expects to receive the online storage token. To complete the configuration, copy the Reply URL link to the Azure AD Authentication settings.
|
|
3
|
Client Secret ID
|
Copy the Client Secret ID from Azure AD and paste it into this field. This client's secret ID is required for uploading and downloading the document.
|
|
4
|
Client ID
|
Client ID is generated when the application is created in Azure AD and, it is different for every application created in Azure. Copy the Client ID from the Azure AD and paste it into this field.
|
|
5
|
Tenant ID
|
A Tenant ID is a unique identifier that is based on the organization's domain name and the tenant ID remains the same while creating an APP at Azure AD. The tenant ID is required to identify the tenants and the app created by the tenants in Azure AD. Copy and paste the unique tenant ID from the azure AD to the online storage settings.
NOTE: Organization ID is called Tenant ID in Azure.
|
- After entering the details click Save to store changes.
The same configuration can be carried out for Customers, Vendors, and Other Units also.
Defining email address modification permission
Since users, especially Vendors enter their personal email address or incorrect email address instead of their official email address, it is recommended to allow only users with proper permission to modify their email setting. So, it is required that restrictions are made on the level of origin group, by Admin group users.
To define email address modification permission
- Click the configure button next to the option Email Address Modification Permission.
Email Address Modification Permission window is displayed.
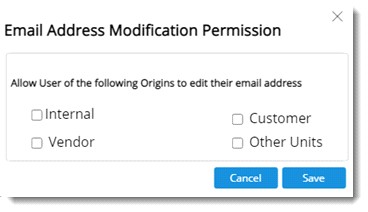
Figure: Email address modification permission window
Origin types Internal, Vendor, Customer and Other Units are displayed in the window.
- Select the checkbox next to the required Origin Type.
Selected origin type will be able to modify their Email address.
When a user for whom this permission is not specified modifies the email id and tries to save the changes a warning message You do not have permission to modify the Email Address is displayed.
Enable Origin wise user account administration: When the setting ‘Enable Origin wise user account administration’ is enabled, a user with adequate permissions in user master will be able to see only users of their origin. If this setting is enabled and the current user has Edit permission in user master, user is permitted to add or remove users from user master to the projects where the current user is a member, even when current user does not have ‘edit’ permission in the project.
When the setting is disabled or if the user does not have Edit permission in User Master, when a user with manage permission try to assign a project to a user, a warning message is displayed.
When the setting is enabled, and if the current user has no ‘Edit’ permissions in the Project, modification of project information is restricted.
In certain scenarios, it may be required for an administrator in one origin to administer user accounts in certain other origins as well. For Example: A main contractor may need to administer their subcontractor’s user accounts. To achieve this, the sub contractor’s origin (sub origin) is to be assigned to the main contractor’s origin (master origin).
To extend user administration
- Enable the setting Enable Origin wise user account administration.
- Click the hyperlink Extend user account administration.
Configure Origins window is displayed.
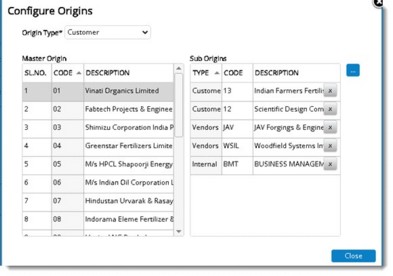
Figure: Configure Origins window
Different elements in the window are mentioned in the following table.
|
#
|
Property
|
Description
|
|
1
|
Origin Type
|
List of all the available origin types in Wrench is displayed in the drop-down list. Select the required Origin type.
|
|
2
|
Master Origin
|
Based on the Origin selected, all the available origins corresponding to the selected origin type is listed.
|
|
3
|
Sub Origin
|
Sub-origins available against the selected origin, in the master origin list is displayed here.
To add a sub origin to the selected Master Origin
- Click the browse button.
Add Sub Origins window is displayed.
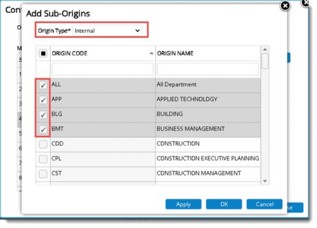
- Select an Origin Type from the drop-down list. Based on the selection Sub Origins are displayed.
- Select the checkbox next to the sub origins that are to be selected.
- Click OK to assign the selected sub origins to the Master origin.
|
Allocating user licenses
Some organizations have several vendors. Separate origins and logins are created for these vendors. As vendors log in multiple times using the same Login name from different instances, internal users in the organization may not have sufficient licenses available when they attempt to log in. As a solution to this, facility to allocate licenses only for the required vendors is available.
To allocate licenses
- Click the button Configure.
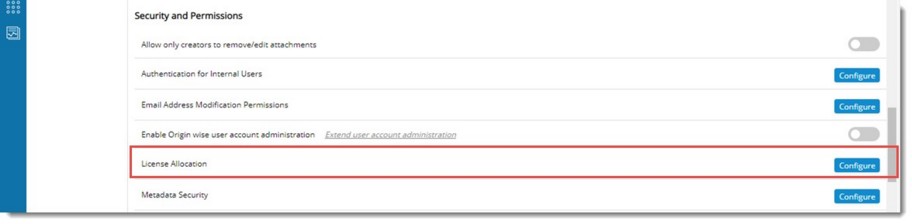
Figure: Opening license allocation window
The License Allocation window is displayed.
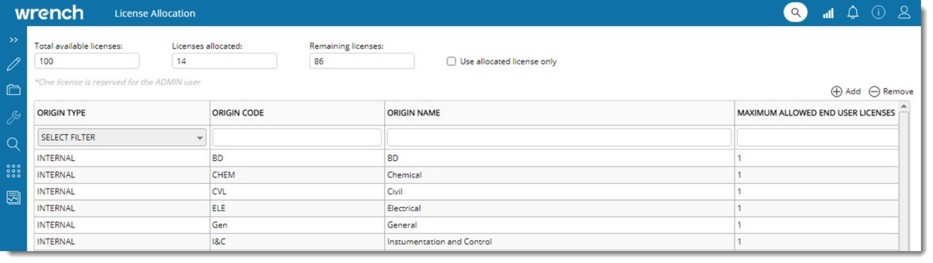
Figure: License Allocation window
The number of total available licenses allocated licenses and remaining licenses are displayed in the window.
To allocate licenses to an origin
- In the grid click Add.
Add Origins window is displayed.
- In the Add Origins window select an Origin Type from a drop-down list.
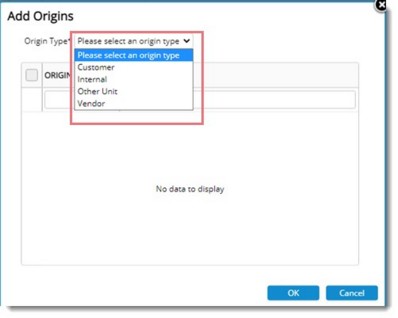
Figure: Add Origins window
Based on the origin type selected, different origins are displayed in the window.

Figure: Selecting Origin
- Select the checkbox next to the Origin code and click OK.
Selected origins are displayed in the License Allocation window. Details of the added origins are displayed in the grid.
If the checkbox next to the option Allow to allocated license only is selected, vendors, customers, and other units will not be able to consume internal licenses (if available) after exceeding the specified limit.
In the column MAXIMUM ALLOWED END USER LICENSE, specify the number of end-user licenses for an Origin.

Figure: Defining maximum allocated end user license
The value entered is saved when the user selects a different cell. On saving if the allocated licenses are greater than the remaining licenses then an alert message is displayed.
Configuring Metadata Security
When WRENCH is deployed across multiple organizations, people from different organizations will need to work together on projects. In such scenarios, it is required to control the permission to modify specific document properties and task properties to specific groups or users. For Example: Users other than the originator’s group needs to be restricted from editing some of the basic document properties such as “Description”, “Sheet Number” etc. Whereas they should be allowed to modify certain other properties such as “Approval Status Code” etc. Security for different document properties can be configured here so that a user / user group can only edit the property which they are authorised to do.
To configure metadata security
- Click the configure button next to Configure Metadata Security button. Configure Metadata Security window is displayed. In the window option User Group is selected by default. Click the radio button next to User, if metadata security is to be configured for users.
- Select an Object Type for which Metadata Security is to be selected. This can be selected from a drop-down list. Objects types available are Document and Task.
- In the window select a User Group/User that has to be prevented from editing some properties.
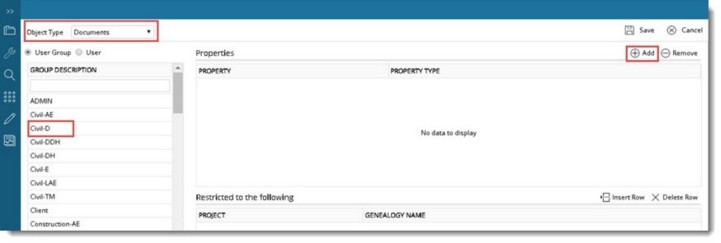
Figure: Configure Metadata Security
- In the Properties section click Add.
A list of basic document properties and custom properties will be displayed.
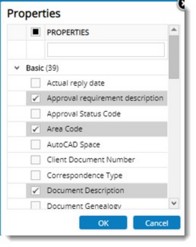
Figure: Selecting document properties
- Select the properties that has to be prevented from editing and click OK button.
NOTE: If Object Type is selected as Tasks, then task properties and custom properties will be displayed in the window.
Next step is to assign the selected properties to a project or genealogy.
- After selecting the properties that has to be prevented from editing click Insert Row.
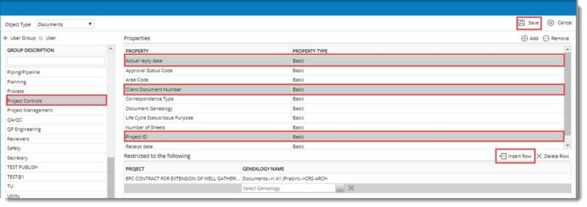
Figure: Creating an exception list
- Select a Project Number or Genealogy. You can also select both together.
In this manner you can insert rows and assign multiple projects for document properties.
- Click Save to store changes. You have successfully configured the metadata security.
NOTE: The metadata security defined will be exempted from the primary operations like check out-in, replace, transmittal creation. For Example: A user group "UG" in the Project P1 is exempted from editing the property revision number for the genealogy G1. If members of the group UG tries to replace a document for the same project and genealogy, there will be no restriction in updating the revision number in replace window as primary operation is �replace� here but the revision number will not be editable from document details for the same document. �
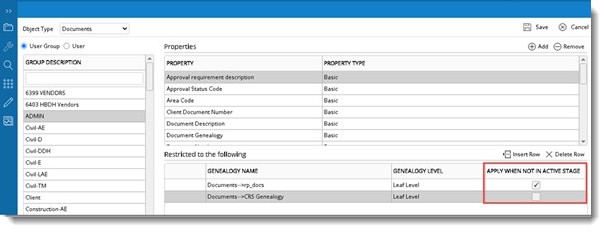
If the checkbox next to the option APPLY WHEN NOT IN ACTIVE STAGE is selected, system restricts updating a property when the user not in active stage.’ This can be set exclusively for a property or in combination with ‘Project’ or ‘Genealogy’.
Authentication Rules
Emerging security requirements, recommends user accounts to be locked out after a predefined number of failed attempts.
To lock user accounts after several number of failed attempts, the following parameters is defined in SmartProject.
- The number of attempts after which a user needs to enter a captcha for login.
- The number of failed logins after which the user account is locked.
- The interval after which locked accounts gets automatically released.
To define authentication rules
- In the Administrative Settings, Configuration settings click the button, Configure corresponding to the option Authentication Rules.
Authentication rules window is displayed.
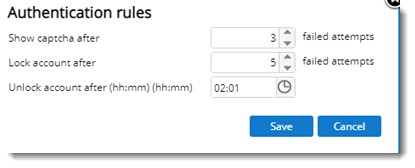
Figure: Authentication rules window
Enter values for the following fields.
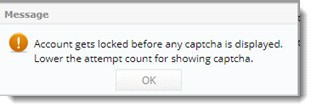
Show captcha after <> failed attempts: Enter the number of failed attempts after which the captcha is to be displayed.
Lock account after <> failed attempts: Enter the number of failed attempts after which the account is to be locked. If a value is entered for this property, with each failed attempt, a message Invalid login details. Your account gets locked in <remaining attempts count> attempts is displayed in the log in page.
When the number of failed attempts exceeds the count configured in ‘Authentication rules’, a message Your account is locked due to multiple failed attempts. You may contact the administrator to unlock or try after <Date & time> is displayed.
Unlock account after: Enter a period to unblock the user after a specified number of failed attempts.
If the value entered for displaying the captcha is higher that the value provided for locking the account, on saving the settings, the following warning message is displayed.
NOTE: An account that is locked can be unlocked from the User Master.
Meeting Settings
Add Meetings to MS Outlook calendar: If this options is enabled, meetings created in WRENCH is added to MS Outlook Calendar, based on an Outlook plug-in configuration created in Administrative Settings>>Plug-In.
Meeting type is mandatory: If the checkbox next to this option is enabled, meeting type and meeting sub type will be mandatory for creating a meeting.
Views
Configuring display format while creating smart folders from genealogy
Usually genealogy structure comprising of Code and Description is created as per the standards followed by an organization. When this genealogy structure is replicated to smart folders in SmartProject, only genealogy description is displayed. This results in a mismatch between the genealogy structure and smart folder created, which leads to confusion for users. Option to define display pattern for the folders created from genealogy will help in solving this issue.
To configure display format for smart folders
- Click the option Display format for smart folder from genealogy.
Configure Display Format window is displayed.
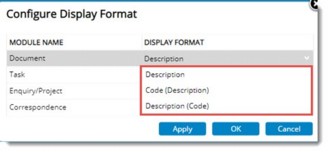
- Here a Display Format can be selected against a Module Name. Display formats available are Description, Code (Description) and Description (Code).
Newly created smart folders will have the display pattern based on the options selected.
Configuring display format for templates
Here you can configure the display format for properties like Area, System in Import/Export templates. Display format can be configure for selected properties of tasks, documents, risk management, meetings and time sheet.
To configure display formats
- In the Configuration window click the configuration button next to Configure display format for templates.
Configure window is displayed.
- In the window select an Object Type from a drop-down list. Types available are Task, Document, Timesheet, Risk Management, Meetings, Snag, Issues, Non Conformances-Quality and Non-Conformance - Safety.
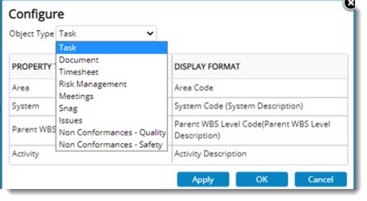
Figure: Configure window
On selecting an object type corresponding object properties are displayed. A display format can be selected for an object.
To select a display format
- Select a Property and click the Display Format column.
- Click the drop-down arrow.
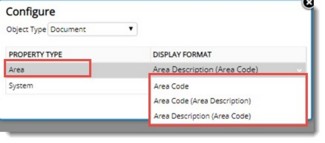
Figure: Selecting display formats
Different available display formats are displayed.
- Select a display format.
In the Import/Export template the selected property will be displayed in the format selected from the drop-down list. In this way you can define display formats for properties of a selected object type.
Notification Settings
Mail Template: Here option to configure mail template is provided.
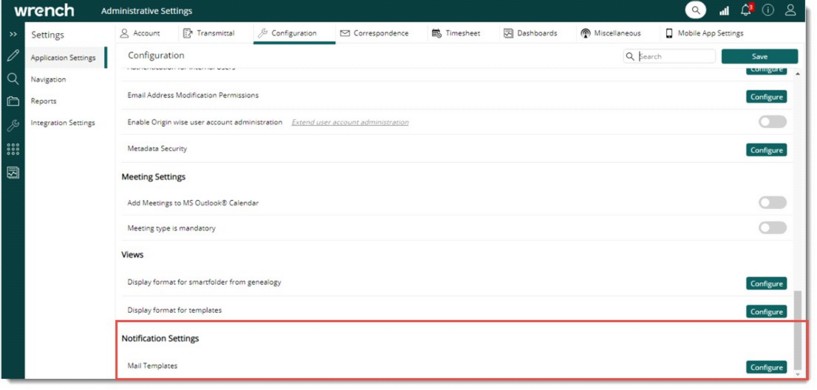
Figure: Configuring notification mail template
To configure mail template
- Click Configure.
Mail Template Configuraions window is displayed. All mail template configured in desktop version of SmartProject will be available for selection.
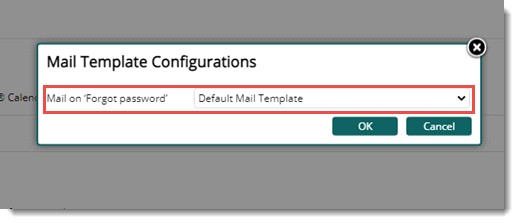
Figure: Mail Template Configurations window
- Select a template from the drop-down list and click OK.
Selected template is saved.
When user clicks Forgot Password? hyperlink in the login page, the password reset is sent to the user in the configured mail template format.

