You can manage Users and User Groups from User Accounts Master. Different topics in managing users and user groups are discussed in the following sections. They are mentioned in the following navigation table.
Opening User Master window
 To open user master window
- In the Global menu click Utilities>>Masters.
Masters window is displayed.
- In the Masters window click User Accounts tab.
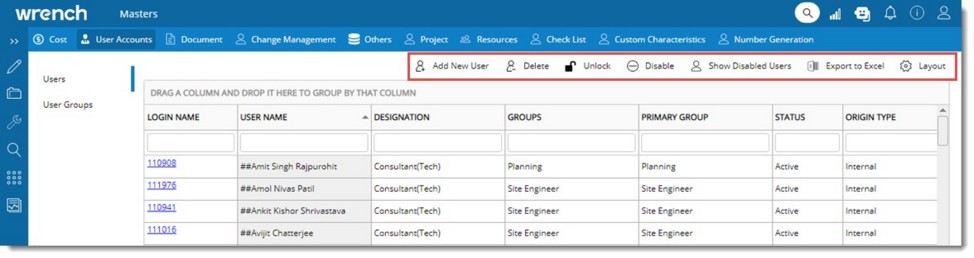
Figure: User Master window
List of Users already created is displayed. Different operations can be carried using the options on the tool bar.
To add a new user
- In the tool bar click Add New User.
Add New User window is displayed. Here Basic and Advanced Details can be entered.
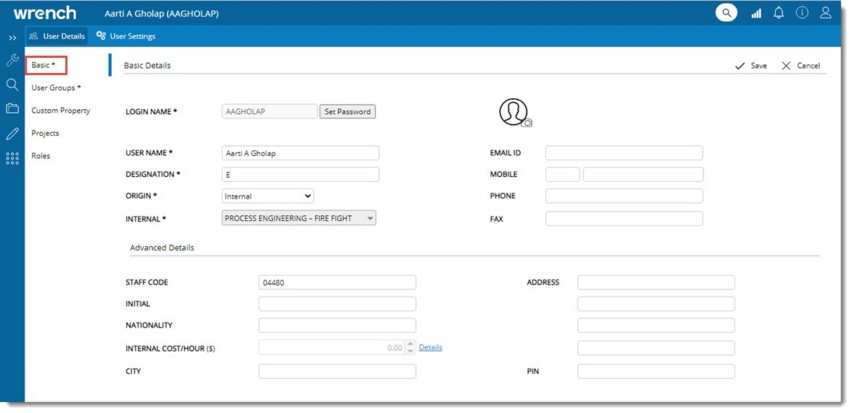
Figure: Add New User window
Entering basic and advanced user details
- Enter the following mandatory details in the window.
Basic Details (Mandatory)
|
#
|
Property
|
Description
|
|
1
|
LOGIN NAME
|
This is the unique identification using which a user can log into WRENCH. The login name can be alphabets, numbers or a combination of these (alphanumeric characters.) If the login name specified is that of an active or disabled user saving the account is not permitted and a warning message is displayed.
|
|
2
|
USER NAME
|
The name of the user for whom account is being created.
|
|
3
|
DESIGNATION
|
Enter a designation or official name for the user being created.
|
|
4
|
DISCIPLINE
|
Select a discipline from the drop-down list. Pre-defined list of disciplines are available.
|
|
5
|
ORIGIN
|
Specify the category to which the user belongs from a drop-down list. You can select from Internal, Customer, Other Unit and Vendor.
|
- Click Set Password button next to LOGIN NAME to set a password for the user. Set Password box is displayed.
- Enter a Password and re-enter the password to confirm.
NOTE: When a user account is created, if there is no password specified, but if an email address is specified, a temporary password is created automatically. When the email address and passwords are not specified, if the setting �Enforce strong password� is ON, user creation is aborted, and a warning message is displayed.
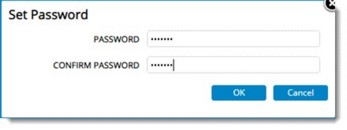
Figure: Set Password window
- Enter details like EMAIL ID, MOBILE, PHONE and FAX.
Advance Details
- Enter the following Advanced Details.
|
#
|
Property
|
Description
|
|
1
|
STAFF CODE
|
Enter the unique staff code assigned to this user.
|
|
2
|
INITIAL
|
Enter a unique initial to identify the user.
|
|
3
|
NATIONALITY
|
Enter the nationality. Nationality is the country to which the user belongs to.
|
|
4
|
INTERNAL COST/HOUR ($)
|
- Click the hyperlink Details to enter the hourly cost for the user. On clicking Details, Resource Internal Cost Details window is displayed.
- In the window click Add.
Add Internal Cost Details window is displayed.
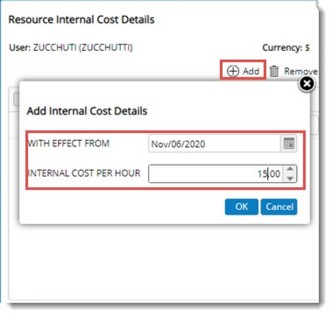
Figure: Resource Internal Cost Details window
- Enter the date from which the rate will be in effect and the Internal Cost Per Hour and click OK.
Entered details are saved.
|
|
5
|
CITY
|
Enter the city to which the user belongs to.
|
|
6
|
ADDRESS
|
Enter the address of the user.
|
|
7
|
PIN
|
Enter the pin number of the city.
|
- After entering basic and advanced details click Save.
NOTE: Once the user account is successfully created, if there is an email address for the user, a notification mail is sent to the user informing about the account creation and the password.
User Groups window is displayed.
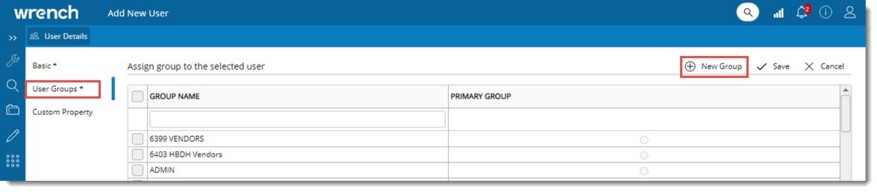
Figure: Add New User window
- Groups already created is displayed here. Select a User Group for the user by selecting the checkbox next the user group displayed in the window and click Save. The selected group will be the primary group of the user. Also, a new group can be created.
- Click New Group to create a User Group. New Group window is displayed.
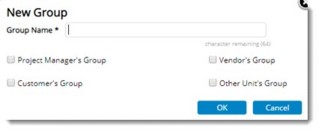
Figure: New Group window
- Enter a Group Name.
- Select the checkbox next to Project Manager's Group, if the users in the specified group are to be specified as Project Managers.
- Click OK. Saved Successfully message is displayed.
- Select the checkbox next the group created and, in the toolbar, click Save.
- If mandatory custom properties are assigned to the User Origin, User Custom Property Details window will be displayed. Update values for the custom properties and click Save
- User Created Successfully message is displayed. Click OK to continue.

Details of the created user is displayed in the window. Option to define User Settings, and assign the user to a project and role will be available in the window.
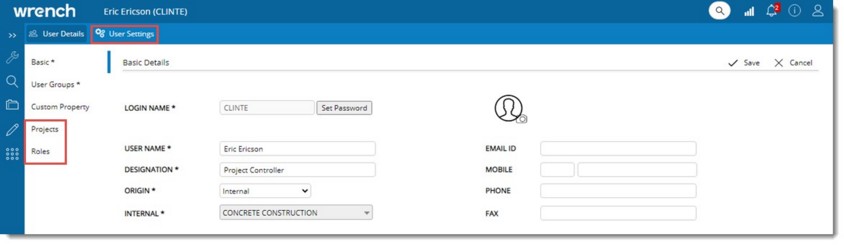
Figure: User Details window
Assigning Project to the user
Project can be assigned to a user.
To assign user to a Project
- In the User Details window click Projects.
Assign project to the selected user window is displayed.

Figure: Assigning Project to Users
- In the tool bar click Add.
Projects window is displayed. Here list of Projects is displayed.
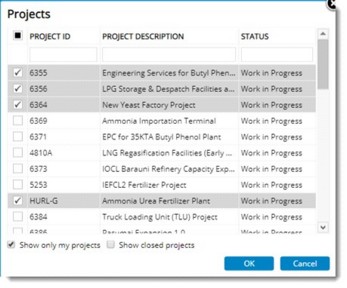
Figure: Project Selection window
- Select the checkbox next to the Projects that are to be assigned to the user and click OK.
Saved Successfully message is displayed. Selected Projects are assigned to the user.
Selecting roles for the user
Users may be member of multiple groups, but their roles in different project may vary. Role of the user in different Projects can be defined if multiple Projects are assigned to a User.
To define roles in a Project
- In the User Details window click Roles.
Project assigned to the user will be displayed.
- Click Expand to expand the Projects. Different roles of the user in a Project is displayed.
- Select the check box next to the required roles and click Save.
User details are updated successfully message is displayed.
Defining User Settings
In addition to basic and advanced user details, additional settings can be defined for a user.
To define user settings
- In the User window click User Settings tab. User Settings window is displayed.
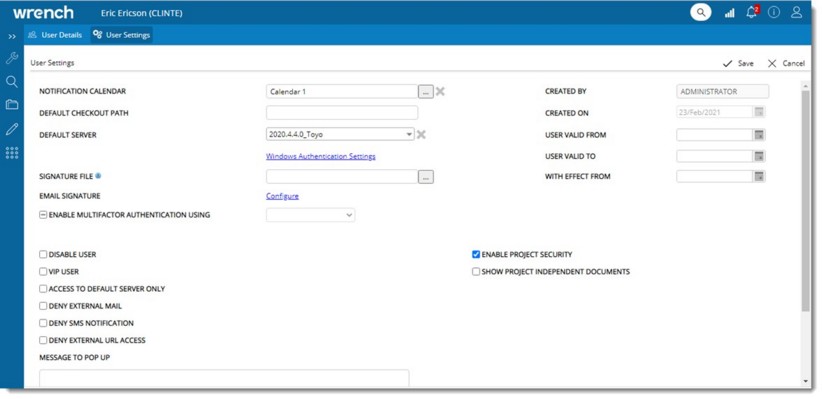
Figure: Defining User Settings
|
#
|
Setting
|
Description
|
|
1
|
Notification Calendar
|
A notification calendar may be assigned to a user. Click the browse button to select from a pre-defined list of calendars. Once a calendar is assigned to a user escalation mails are sent to the user based on the settings in the calendar.
|
|
2
|
Default Check Out Path
|
Enter a default checkout path.
|
|
3
|
Default Server
|
Select the default server from a drop-down list. Once a server is assigned as default for a User, login will be permitted only to this server.
|
|
4
|
Windows Authentication Settings
|
Defining windows authentication settings permits a user to
- Access the network externally with a valid windows login and MAC ID.
- Access WRENCH from an external domain without a valid user name and MAC ID in the host domain.
- Access WRENCH internally if windows authentication is enabled in the server.
- Restrict unauthorized usage of other user's WRENCH login details.
The tedious task of maintaining multiple passwords; one for windows login and another for logging in to WRENCH is avoided by making use of this facility. For more information on Windows Authentication Settings refer Defining Windows Authentication Settings.
|
|
5
|
Signature File
|
Click the browse button to select a signature file.
The signature file for the respective users needs to be added in the user master. If the signature file does not confirm with the specifications, a message �Signature file size to be less than 30 Kb and dimensions less than 230 X 50 (Width X height in pixels)� is to be provided to the user.
|
|
6
|
Email Signature
|
The signature file for the respective users needs to be added in the user master.
Click the browse button to select a signature file from the location where it is stored.
|
|
|
AUTHENTICATION MODE
|
Select an authentication mode from a drop-down list. Available options are:
- As per Origin
- Native Login (MFA)
- Native Login
|
|
|
RECEIVE VERIFICATION CODE OF MULTIFACTOR AUTHENTICATION USING
|
Select an option to receive the verification code. Available options are Email, Mobile App and SMS.
|
|
7
|
Created By
|
Name of the user who created the user account is displayed here.
|
|
8
|
Created On
|
Date on which the account was created is displayed here.
|
|
9
|
user valid from
|
Select the date from which the user account is valid.
|
|
10
|
user valid to
|
Select the date up to which the user account is valid.
|
|
11
|
with effect from
|
Select the date from which the time sheet entry will be effective.
|
In addition, the following settings can also be defined.
|
#
|
Setting
|
Description
|
|
1
|
disable user
|
If "Disable User" is selected the disabled user will not be able to perform operations related to Projects, WBS, Documents, Change Request, Change Note, Minutes of Meeting, Transmittal or Work Flow. The disabled user is also not listed in any of the Master entries.
NOTE: Even if there are works pending in the user’s workspace, you can disable the selected user. You can reassign the activities of this user to another resource in the workflow.
|
|
2
|
VIP user
|
Once you select the check box next to this option. when the user logs in, if the number of active users exceeds the number of licence's allowed, any user logged in with the maximum idle time will be logged off to allow the VIP User to log in.
|
|
3
|
access to default server only
|
Once you select the checkbox next to his option, login will be permitted to default server only.
|
|
4
|
deny external mail
|
If " Deny External Mail" is selected, notifications are not sent to the External Mail Id irrespective of whether or not " External mail Id" is configured in the Personal Preference.
|
|
5
|
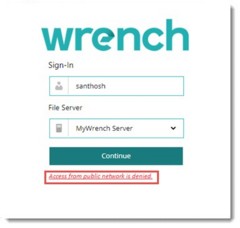
deny external url access
|
If the setting is selected for a user, then the user will not be able to access WRENCH using the external URL configured in Server Config i.e., access to WRENCH will be permitted only using the internal URL for such users.
Once the user enters the log in name, a warning message Access from public network is denied is displayed.
|
|
6
|
deny sms notifications
|
If this setting is selected, sending SMS notifications to the user will be restricted.
|
|
7
|
enable project security
|
If "Enable project security" setting is selected, the user can view ONLY those project details associated with a specific project in which he/she is the assigned project resource. In addition to this the user will be able to view the Documents added by the user. The Project independent Documents can be viewed in Document Search.
NOTE: Checkbox next to Show Project Independent Documents option is enabled only if "Enable Project Security" option is selected.
|
|
8
|
show project independent document
|
If this option is selected user will have access to documents that are not part of the Project.
|
Defining windows authentication settings
The tedious task of maintaining multiple passwords; one for windows login and another for logging in to WRENCH is avoided by making use of this facility.
To define windows authentication settings
- In the User Settings window click the hyperlink Windows Authentication Settings.
- On clicking this hyperlink Windows Authentication List window is displayed. Existing entries are listed in the window.
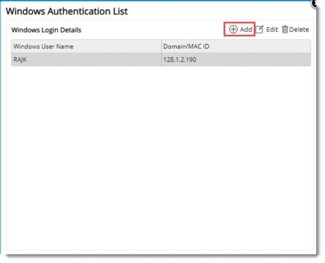
Figure: Windows Authentication List
- In the tool bar click New to add additional windows user name and MAC ID to an existing list.
NOTE: Media Access Control address (MAC address) is a unique identifier assigned to most network adapters or network interface cards.
Windows Login Details window is displayed.
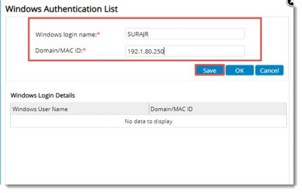
Figure: Window Login Details window
- Enter a Windows login name and a Domain/MAC ID.
- Click Save to continue. Click OK to store changes. Created Windows Authentication will be displayed in the window.
If duplicate entries are detected system returns a warning message
- After entering all values click Save to store changes.
Deleting a User
While creating a user from User Master there are chances of error occurring in user name or login name. It is possible to delete a user account before it is active.
To delete a user
- In the User Master window, select the user that is to be deleted and click Delete.
The following warning message is displayed.
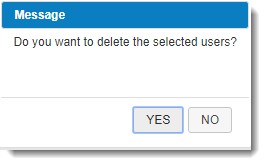
- Click Yes to delete the user.
NOTE: Delete option will be visible only for Admin, Admin group user and users with Edit permission. Admin and Admin group users can delete any user. Non-Admin User with Edit permission can delete the users created by them.
Disabling Users
Personal details of a user like (Email id, Address, Mobile number, Nationality, Signature, Image) are stored in the system. Under GDPR guidelines, data controllers and processors are obliged to remove all personal data after the end of services, or on expiry of a contract or agreement. To implement this, a provision to remove personal details is available in SmartProject. This will help to remove the personal information of a user permanently from databases and backups.
To remove data permanently
- After selecting a user from User Master, in the tool bar click Disable.
A message Do you want to Disable the selected User is displayed. In the message box if the checkbox next to the option Permanently remove user’s profile details is selected, on clicking YES user details are permanently removed from the system.
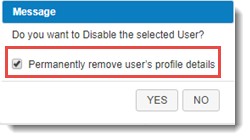
NOTE: When administrator enables a disabled user, and if the checkbox next to Permanently remove user�s profile details is selected while disabling, user will be enabled without any personal date. Administrator needs to provide all the personal data.
Managing disabled users
When a resource resigns from the organization or validity of contract user expires, administrator needs to disable the user from the user master. By doing so, the status of the users will change to ‘Disabled’ but they are still displayed in user master. For an organization which has been using smart project for a long period, there may be handful of users who were disabled, but are still displayed in user master. This results in filtering the active users from the disabled users difficult. Hence, a facility to filter the disabled users, and to delete such users is provided.
To manage disabled users
- In the User Master toolbar click Show Disabled User.
Disabled Users window is displayed.
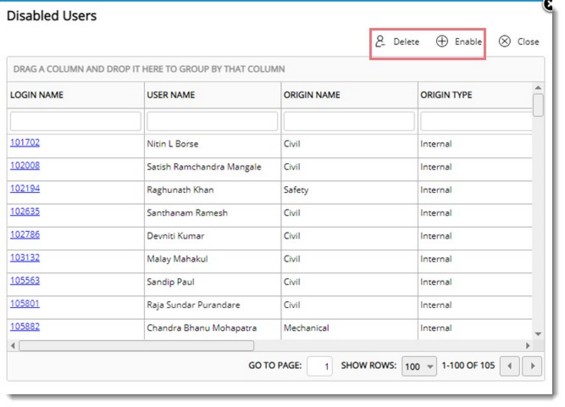
Figure: Disabled Users
All the users that are disabled will be displayed here.
To delete a disabled user
- In the window select single or multiple user and in the tool bar click Delete.
A message Do you want to delete the selected users is displayed.
- Click Yes to delete the user.
On clicking Yes, system will verify whether the selected user has performed any operation in SmartProject. If the user has performed any operations, system will mark those users as ‘Deleted’ else users are removed from the database.
To enable a disabled user
- In the window select the users that are to be enabled and in the tool bar click Enable.
A message Do you want to Enable the selected users is displayed.
- Click Yes to enable the user. Enabled successfully message is displayed.
Unlocking a locked user
Emerging security requirements, recommends user accounts to be locked out after a predefined number of failed attempts. Based on the authentication configurations, a user account gets locked. A locked account usually is unlocked automatically after a specific period. Unlocking a locked user account manually is also possible.
To unlock a locked user account
- In the User Master window, select the user with status as locked. Single or multiple users can be selected.
- In the tool bar click Unlock.
A message Do you wish to unlock the selected users? is displayed.
- Click Yes to unlock the selected users. A message User accounts unlocked is displayed.
Once a user account is unlocked, the user status changes from Locked to Active in the status column in user master.
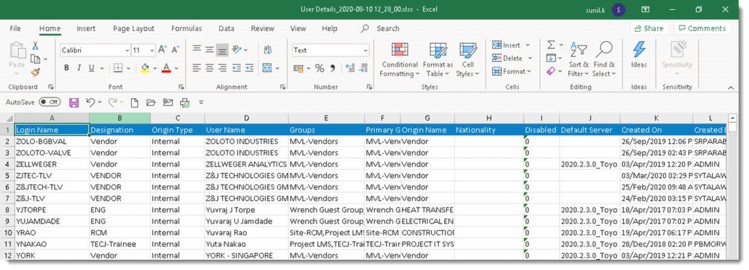
Exporting user list
There are scenarios where a project manager needs to see the list of users under a specific group like Reviewers. In such cases, the project manager makes a request to the administrator to generate an excel file with details of the users. Hence, a facility to export the users list from the user master is available
To export user list
- In the User Master window click Export to Excel.
If this option is clicked without selecting any row or after selecting a single row, the following message is displayed.
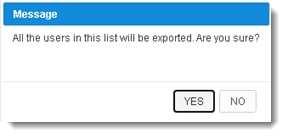
- Click YES, to export all the users in the list to Excel.
When more than one user is selected in the grid, list of selected users are exported in the order displayed in the grid.
A message User details exported successfully is displayed.
The excel file with exported user list is opened.
Managing User and User Group creation in master
Rights permitted to different roles to manage Users and User Group are mentioned in the following table.
|
Role
|
Scenario
|
User Master
|
User Group
|
|
Admin User
|
|
Create New User
Edit User
Enable/Disable
Assign User to a Group
|
Create new group
Edit group
Manage Users
Manage Group admins
Manage Calendars
|
|
Admin Group User
|
|
Create New User
Edit User
Enable/Disable
Assign User to a Group
|
Create new group
Edit group
Manage Users
Manage Group admins
Manage Calendars
|
|
Group Admin
|
With permissions
Without permissions
|
Create New User
Edit User
Enable/Disable
Assign User to a Group (In which logged in User is a Group Admin or Groups without Group Admins)
No Action can be performed
|
Manage Users (In which logged in User is a Group Admin or Groups without Group Admins)
Manage Calendars (In which logged in User is a Group Admin or Groups without Group Admins)
No Action can be performed
|
|
User with Permissions
|
With permissions
|
Create New User
Edit User
Enable/Disable
Assign User to a Group (Groups without Group Admins)
|
Manage Users (Groups without Group Admins)
Manage Calendars (Groups without Group Admins)
|
Currently, the system assigns the creator of a user group as "Group Admin". From this build version creator of user group is not assigned as Group Admin.
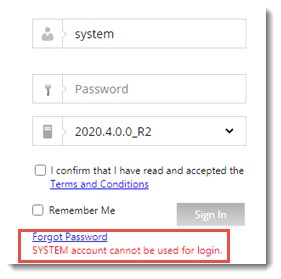
System User
The SYSTEM user will have permissions to perform all operations expect log in. Log In permission is denied for the SYSTEM user due to security reasons. It can be used only for performance internal operations when required automatically. When a user attempt to login using the ‘SYSTEM’ account, the operation is aborted with an alert shown below.
While accessing the document links, instead of using credentials of guest user, system will use ‘SYSTEM’ user’s credentials to retrieve the files.

