In the life cycle of any project, there will almost always be unexpected problems and questions that crop up. When these issues arise, you have to be ready to deal with them – or they can potentially affect the project's outcome. Since most issues are, by their nature, unexpected, dealing with them quickly and effectively is a challenge. Ideally, you need an issue resolution process in place before you start your project – to make sure that you stay on schedule, and meet your objectives.
Issue management is the process of identifying and resolving issues. Problems with staff or suppliers, technical failures, material shortages – these might all have a negative impact on your project. If the issue goes unresolved, you risk creating unnecessary conflicts, delays, or even failure to produce your deliverable.
Issue versus Risks
Issues and risks are not quite the same thing. However, the exact nature of both is largely unknown before you begin. With risks, you usually have a general idea in advance that there's a cause for concern. An issue tends to be less predictable; it can arise with no warning. For Example: Being unable to find qualified staff is an identifiable risk. However, when one of your staff is in a car accident, and hospitalized for three weeks, that becomes an issue!
When you don't identify and reduce risks at the beginning of a project, they can often become issues later on. Make sure you understand your risks early. Learn from previous projects, and benefit from the team's past experiences. This way, you'll have fewer issues to manage as you move forward.
Issue management module in SmartProject helps you in managing issues related to a Project.
Issues are managed in the same way as managing snags and non-conformances.
Issues facility can be opened from the Modules option in the global menu.
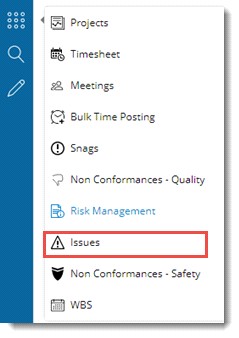
Figure: Opening from Global Menu
and from the Project.
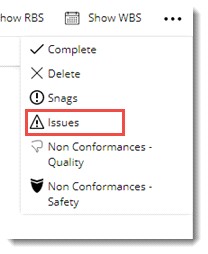
Figure: Opening from Project
If Issues facility is opened from the Project, Issues List of the Project is displayed directly. In case Issues facility is opened from the Module options, the following window is displayed.
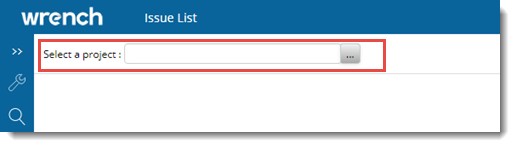
Figure: Selecting a Project
- Click the browse button to select a Project. List of Projects will be displayed. Select a Project from the list.
Issue List window is displayed. In case already Issues are created for the Project, details of the Issues are displayed in the window.
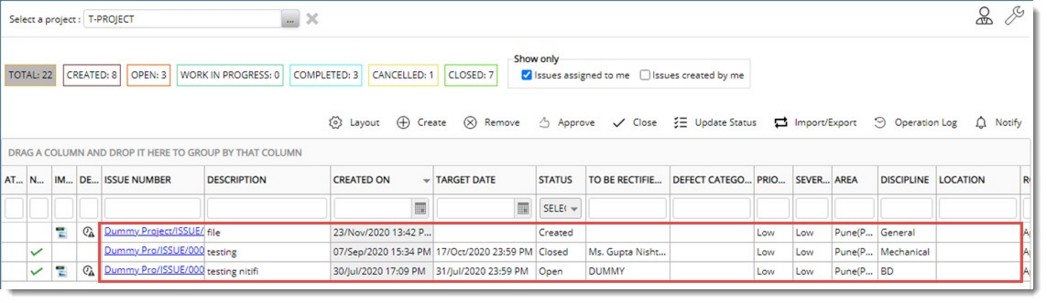
Figure: Issue List window with issues
Count of Total number of
Issues and count of Issues with different statuses like Created, Open, Closed, Work In Progress, Completed and Cancelled will be displayed in different tabs. On clicking a tab, the respective Issues List will be displayed. For Example: If the tab OPEN is clicked, list of Issues with status Open will be displayed.
In case for the selected project Issues are not created the following window is displayed.

Figure: New Issue List window
Creating an Issue
An Issue can be created only by a user with security permission to create an Issue.
 To create an Issue
- In the window click Create. Create Issue window is displayed.
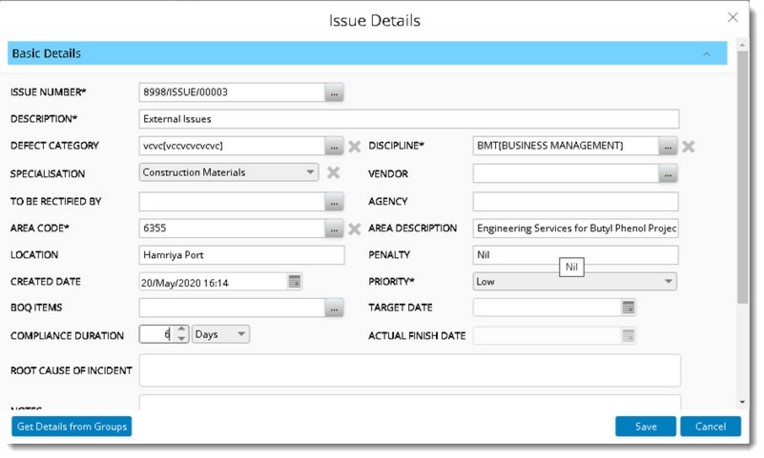
Figure: Create Issue window
Create Issue window is divided in Basic Details pane, Advance Details pane and Documents pane. Basic Details pane is expanded by default.
- Enter values for different properties displayed in the window. Properties with an Asterix mark is mandatory.
Properties and their description are provided in the following table.
|
#
|
Property
|
Description
|
|
1
|
ISSUE NUMBER
|
ISSUE NUMBER is generated automatically.
|
|
2
|
DESCRIPTION
|
Enter a description for the
Issue.
|
|
3
|
DEFECT CATEGORY
|
Click the browse button to select a defect category. Defect Category window is displayed. Select a category from the list.
|
|
4
|
DISCIPLINE
|
Click the browse button to select a Discipline. Disciplines window is displayed with a list of pre-defined disciplines. Select a discipline from the list.
|
|
5
|
SPECIALISATION
|
Click the drop-down to select a specialisation. List of specialisations defined in masters is displayed. Select the required specialisation from the list.
|
|
6
|
VENDOR
|
Click the browse button next to the field vendor. Search Vendors window is displayed. Select a Vendor from the list and click OK.
|
|
7
|
TO BE RECITIFIED BY
|
Click the browse button to select the name of person who is assigned to Inspect/Rectify the Issue. Search User window is displayed. Select a User from the list of users.
|
|
8
|
AGENCY
|
The origin of the selected To Be Rectified By user is displayed automatically.
|
|
9
|
AREA CODE
|
Click the browse button to select an Area Code. On clicking the browse button Area window with the list of Areas is displayed. Select an Area from the list.
|
|
10
|
AREA DESCRIPTION
|
Description of the selected area is displayed here.
|
|
11
|
LOCATION
|
Enter details about the location where the Issue was found.
|
|
12
|
PENALTY
|
If an issue is not solved as per the norms, there will be a penalty for this. User can enter the penalty value here.
|
|
13
|
PRIORITY
|
Select a Priority from a drop-down list. Options available are Low, Medium and High.
|
|
14
|
CREATED DATE
|
The date (with time) on which the Issue is created is displayed here. Current date with time is displayed by default. The date can be changed by the user.
|
|
15
|
BOQ ITEMS
|
On clicking the browse button next to BOQ ITEMS, BOQ Items window is displayed. Select a BOQ Item and click OK. Selected BOQ Item is displayed in the window.
|
|
16
|
TARGET DATE
|
Select the date (with time) by which the Issue is to be closed (rectified or accepted). This can be selected from a date picker. The selected date should not be higher than the Created Date.
|
|
17
|
COMPLIANCE DURATION
|
Enter the time took to rectify the issue. Here a facility to specify the numeric value and a unit is available.
|
|
18
|
ACTUAL FINISH DATE
|
Enter the finish date of the issue as specified by user. This field is disabled when creating an Issue. Date is captured automatically when the status is changed to ‘Closed’. The date can be changed in edit mode while closing the Issue. Actual Finish Date can be edited while carrying out Update Status operation, when new status is changed to closed.
|
|
19
|
NOTES
|
Enter any additional information as specified by user.
|
- After entering basic details, enter values for properties under Advanced Details. Properties under Advanced Details are mentioned in the following table.
- After entering Advanced Details, attach files and images to the Issue. Details are mentioned in the following table.
|
#
|
Property
|
Description
|
|
1
|
IMAGES
|
Click here to add images that support the reported Issue Duplicate images can be added.
|
|
2
|
FILES
|
Click here to add any supporting files as assigned to the reported Issue.
|
After attaching images and files next your can attach Reference and Related Files. Details are mentioned in the following table.
|
#
|
Property
|
Description
|
|
1
|
DOCUMENTS
|
Click here to add latest revision of any documents in WRENCH that can act as reference to the Issue. On clicking this option Search window is displayed. Enter a search criteria and search for the required document.
|
|
2
|
PACKAGES
|
Packages can be attached to the Issue.
To attach a package
- Click the browse button next the field PACKAGES.
WBS Levels selection window is displayed.
- Select a level from the displayed levels.
Selected level is displayed in the field PACKAGES.
|
|
3
|
TASKS
|
Tasks can be attached to the Issue.
To attach a task
- Click Add Tasks.
Advanced Search window is displayed.
- Here carry out a task operation and select a task from the search results.
You can select single or multiple snags and close them.
|
- After entering the details click Save to store changes. Issue created successfully message is displayed. Created
Issue List is displayed in the grid.
Fetching details from Issue group
If Issue groups are available against the project, it is possible to fetch the details associated with the group, only if the corresponding data field in window is empty. This helps to specifying details quickly.
To fetch details from Issue group
- In the Create Issue window click Get Details from Groups.
Issue Groups window is displayed. Group Names are displayed in the window.
- Select a Group Name and click OK. Details assigned to the group will be inherited to the Issue
Notifying Issue creation
When an Issue is created a single notification mail can be send to the concerned users.
To send notifications
- Select the created Issue in the tool bar click Notify.
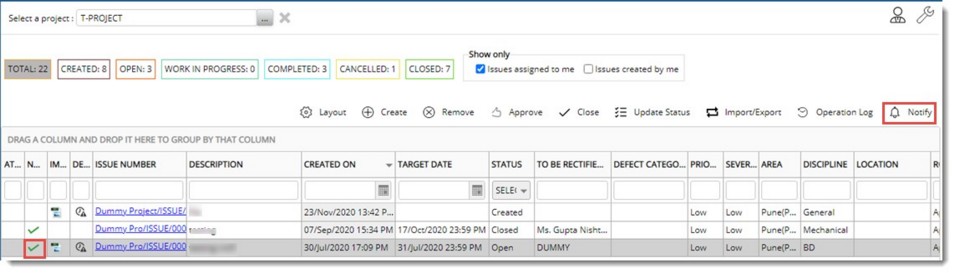
Figure: Notifying creation of Issue
Notification Request Posted Successfully message is displayed. In the grid, a green tick mark is displayed in the column NOTIFICATION STATUS.
Modifying Issue Details
Issue details of an Issue in CREATED status can be modified.
To modify an Issue
- Click the Issue number which is a hyperlink. Update
Issue window is displayed.
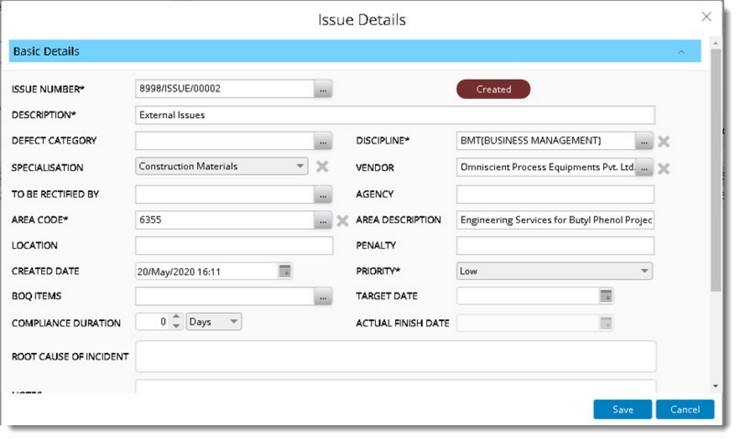
Figure: Update Issue window
Only fields edit mode can be updated.
- After updating the fields click Save to store changes.
Viewing history of remarks
A facility to view the history of remarks is also available.
In the Issue details window, a hyperlink History of Remarks is available in the Advanced Details Pane.
On clicking the hyperlink, Status History is opened in a new tab.
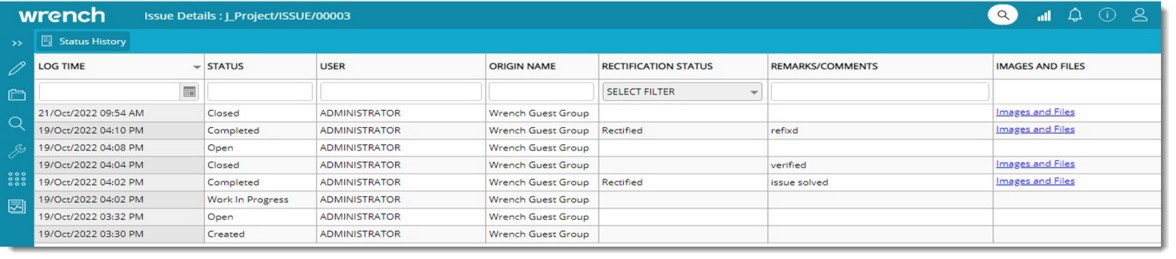
Figure: Status History window
Closing an Issue
A user who is authorised to close an Issue only can carry out this operation.
To close the Issue
- Select the Issue and in the tool bar click Close.
Close Issue window is displayed.
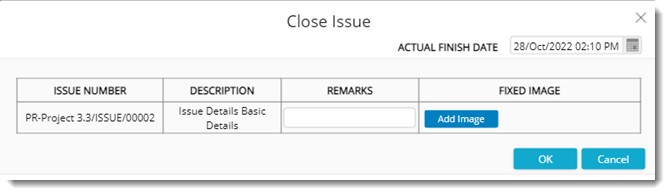
Figure: Close Issue window is displayed
The following information are displayed in the window.
Issue Number: Issue Number of the selected issues are displayed here.
Description: Description of the selected issues are displayed here.
Remarks: Enter the remarks here.
Fixed image: Here images can be added before closing. Multiple images can be added.
Actual Finish Date: Select a closure date from the date picker.
- Click OK to close the selected Issues. Issue Closed Successfully message is displayed.
If there are multiple users assigned to close the Issue, system will capture the actual finish date specified by the last user.
In case multiple users are authorised to close the Issue, status of the Issue will change to close only after all the authorised users have closed the Issue. In the Issue window, user who have closed the Issue is highlighted in green colour as displayed in the following figure.
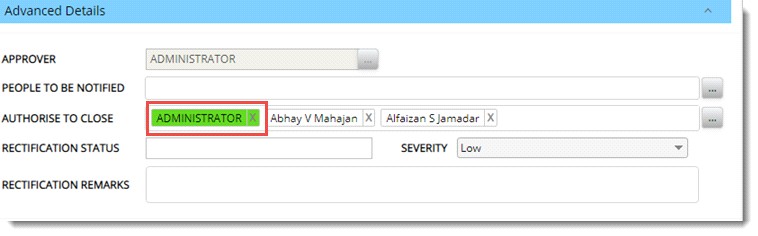
Figure: Displaying resource who closed
The Issue status will be set to closed only when all the users in the field ‘Authorise Closure’ have updated the status to ‘Close’. If an already closed user is removed and then added, user status will be not closed.
Updating Issue status
During the lifecycle of a Issue, if some mistakes happen, user may need to reverse the status. For Example: When an Issue item is wrongly approved, wrongly updated with a rectification status etc.
To update Issue status
- Select the Issue for which status is to be updated, and in the toolbar click Update Status.
Update Status window is displayed.
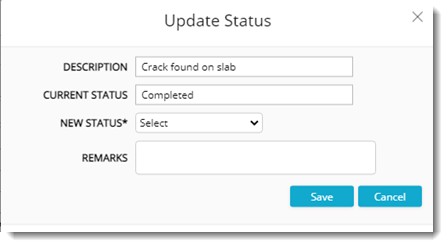
Figure: Update Status window
The following fields are displayed in the window.
DESCRIPTION: Description of the Non-Conformance is displayed here.
CURRENT STATUS: Current Status of the Non-Conformance is displayed here.
NEW STATUS: This can be selected from a drop-down list. Options available are Cancelled, Closed and Completed if the current status is open. The items in the drop-down list changes based on the current status of the snag.
REMARKS: Enter remarks.
If the New Status selected is Completed or Closed, additional fields will be displayed in the Update Status window.
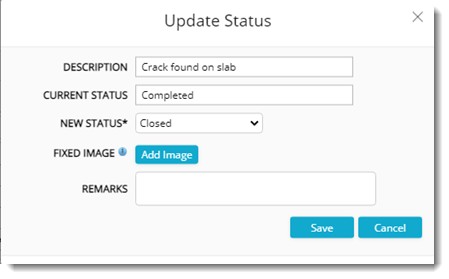
Figure: Displaying additional fields
- Click Add Image to add an image from the disk.
- Select a Rectification Status from a drop-down list.
- Enter remarks if any.
- Click Save.
Status Updated Successfully window is displayed.
Approving an Issue
Only the ‘Approver’ assigned to an Issue may approve it. When other users attempt to approve the Issue, a warning message is displayed, and the operation is aborted.
To approve an Issue
- Select the Issues that are to be approved from the grid.
- In the tool bar click Approve.
Approved Successfully message is displayed.
Removing an Issue
An Issue can be removed by authorised users. Creator of the Issue can remove the Issue before it is approved. Approver and Authorised to Close user can remove the Issue any time.
To remove an Issue
- In the grid select the Issue that is to be removed.
- In the tool bar click Remove.
A message Do you want to remove the selected items is displayed.
- Click YES to remove the Non-Conformance.
Issue is removed successfully. Once removed, immediate notifications will be sent to the following resources (excluding the current user):
- Approver (if not approved)
- To be rectified By (if approved and not closed)
- Authorised to close (If approved and not closed)
Operation Log
Operation log captures the following Issue operations.
- Creation
- Editing
- Removal
- Approval/ cancellation
- Completion
- Closure
- Updating Status
To view the operation log
- Select the Issue and in the toolbar click Operation Log.
Operation Log window.
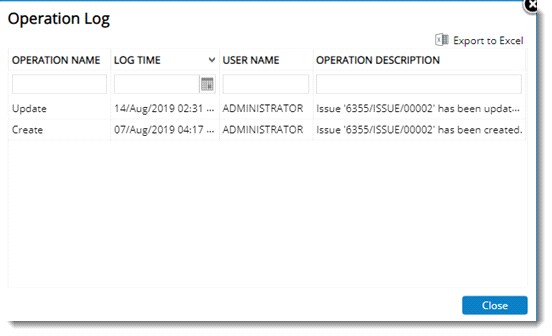
Figure: Operation Log window
Here the following details will be displayed.
- Operation Name
- Log Time
- User Name
- Operation Description
- Click Close to close the window.
Bulk Exporting of Issues
In some project sites, engineers need to export the details of issues for analysing and generating reports. To meet this requirement, Export option is available for Issue.
To bulk export issues
- Open the Issues List window
- Select the Issues that are to be exported and in the Import/Export menu click Export.
Export Wizard is displayed.
- In the window select the column names that are to be exported to excel and click the arrow.
Columns will be displayed in the Selected Columns section. Here columns Description and Issue number are displayed by default.
- After selecting the columns click Download.
Excel file is generated with the selected columns.
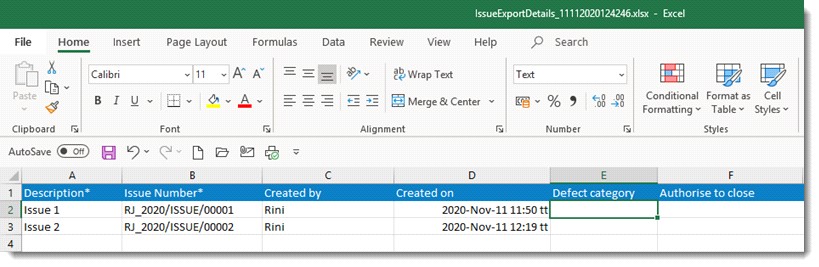
A notification indicating the export operation is completed successfully is displayed in users home page.
Status of the export operation can viewed by clicking the option Bulk Operations Log.
Configuration and security settings
Several configurations are required to avail the
Issue handling functionality. The administrators can use the ‘Administrative Settings option available in the Issue main window to manage the configurations.
Creating Defect Categories
When reporting Issues, it is a common practice to categorise them based on the nature of defects. This helps in assigning the experts in rectifying the respective type of defects. Also, common practices for rectification can be defined, making the rectifications quicker.
To create defect categories
- In the Issue main window click the Administrative Settings window.
Issue Management Administration window is displayed.

Figure: Issue Management Administration window
Defect Categories tab is selected by default. Category codes created are displayed in the grid.
- In the toolbar click Add. A pop-menu is displayed.
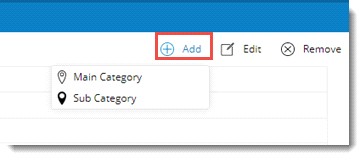
Figure: Adding a category
Option Main Category can be used to create a new defect category at the first level of the hierarchy and the option Sub Category can be used to create a sub category under a selected category. If no categories are currently selected, this option will be disabled.
- Click Main Category.
Defect Category window is displayed.
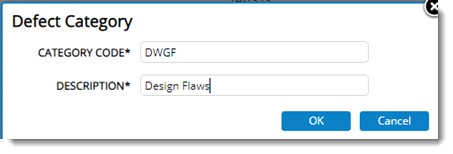
Figure: Defect Category window
- Enter a Category Code and Description.
- Click OK to save entered values.
To create a sub category
- Select a category and in the tool bar click Add. A menu is displayed.
- In the menu click Sub Category. Defect Category window is displayed.
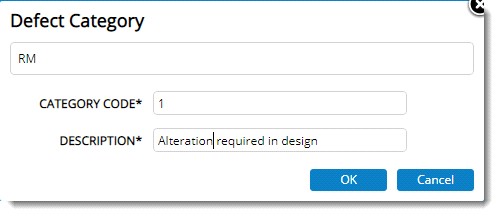
Figure: Defect Sub-Category
Value of main category is displayed in the window.
- Enter a Category Code and Description.
- Click OK to save the entered values.
Modifying defect categories
Defect categories created can be modified.
To modify a defect category
- Select the defect category that is to be modified.
- In the toolbar click Edit.
Defect Category window is displayed. Here it is possible to edit the entered values.
- After editing the values click Save.
Removing defect categories
Defect Categories can be deleted. Only defect categories that are not in use can be removed.
To remove defect categories
- Select single or multiple defect categories and in the toolbar click Remove.
A message Are you sure to remove the selected categories and its child levels is displayed.
- Click YES to remove the category. Click NO to abort the operation.
Creating Issue groups
Groups helps to define a list of common types of Issues for which default set of characteristics values can be predefined. This will help to create Issues easily instead of specifying values for each Issue properties individually. A group can be assigned to an Issue and the property values as defined for the group will be inherited by the Issue.
To create Issue groups
- In the Issue main window click Project Settings.

Issue Management Settings for the respective project is displayed.

Figure: Issue management settings window
The window has two tabs, Groups and Security. By default, tab Groups is selected.
To create a group
- In the toolbar click Add.
Issue Group Details window is displayed.
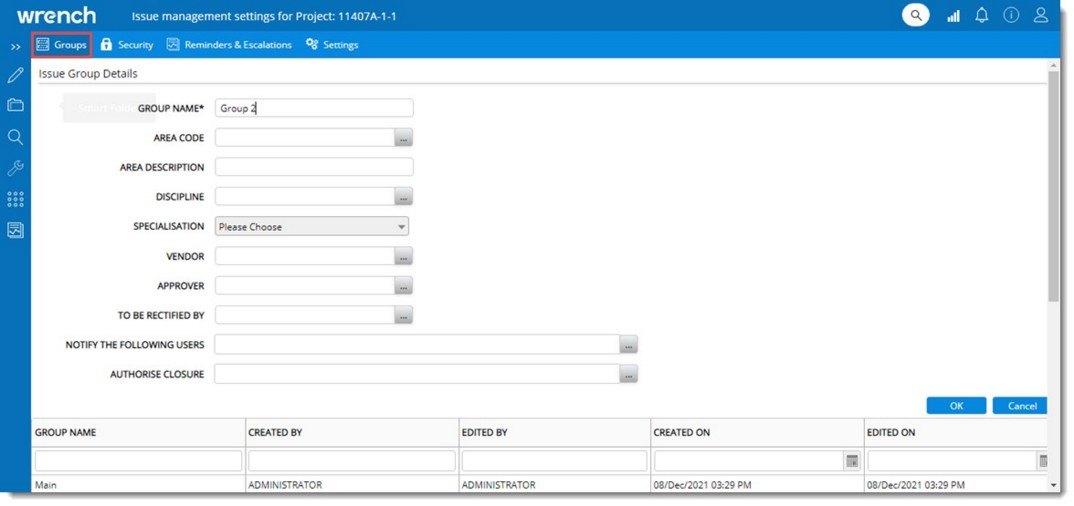
Figure: Issue Group Details window
- In the window enter values for the fields mentioned in the following table.
|
#
|
Property
|
Description
|
|
1
|
Group Name
|
Enter a name for the group.
|
|
2
|
Area Code
|
Click the browse button to select an Area Code. Area window is displayed where available areas are listed. Select an area from the list.
|
|
3
|
Area Description
|
Value is filled in automatically when an area is selected.
|
|
4
|
Discipline
|
Click the browse button to select a Discipline. Disciplines window is displayed where available disciplines are listed. Select the discipline from the list.
|
|
5
|
Approver
|
Click the browse button to select an approver from the Search User window.
|
|
6
|
To be rectified by
|
Click the browse button to select the name of the user who is expected to rectify/ resolve Issues in this group. Users can be selected from the Search User window.
|
|
7
|
Notify the following users
|
When the Issue is created or updated as not resolvable or closed, notifications can be sent to a group of people. Click the browse button to select multiple users from Search User window.
|
|
8
|
Authorise Closure
|
When the Issue is marked for closure, it gets closed only when authorized personnel accepts it. User may specify multiple users here separated by comma, any one of whom may close snags in this group.
|
- After entering the values click OK.
Group is saved successfully and is displayed in the grid.

Figure: Issue Group displayed
It is possible to edit group details and remove a group.
Security Settings
Security defined here is applicable to both Users and User Groups (Roles). Only users with security right can manage a snag.
To define security
- In the Issue window click the Administrative Setting icon.
Issue Management Settings window for the respective project is displayed.

Figure: Non Conformance Quality management settings window
- Click the tab Security. List of users in the project is displayed.
- Select the checkbox in the column Manage corresponding to a user.
- Click Save to store the changes. Saved Successfully message is displayed.
Manage permission is assigned to the set of users.
Configuring reminders and escalations
Reminders and escalations can be configured for Issues.
To configure reminders and escalations
- In the Issue Management Settings window click Reminders & Escalations.
Reminders and Escalations settings window is displayed. In the window separate panes are available for configuring Reminders and Escalations.
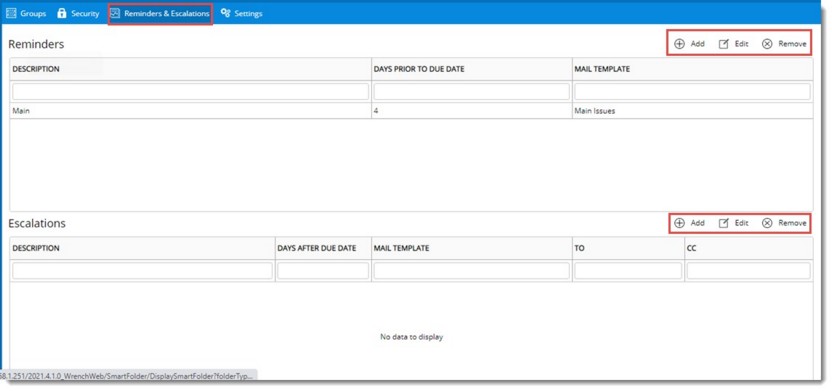
Figure: Reminders and Escalations configuration window
To configure a reminder
- In the Reminders pane tool bar click Add.
Issue - Reminder Details window is displayed.
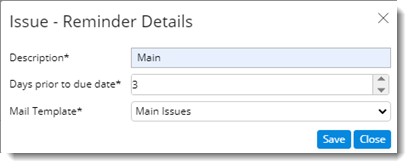
Figure: Issue - Reminder Details window
- In the window enter values for the following properties.
Description: Enter a description for the reminder.
Days prior to due date: Enter the number of days before the due date, when the reminder should be sent.
Mail Template: Select a mail template from the drop-down list.
- Click Save to store the settings. The created reminder setting is displayed in the window.
To configure an escalation
- In the Escalations pane tool bar click Add.
Issue - Escalation Details window is displayed.
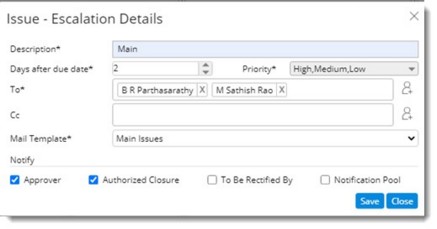
Figure: Issue - Escalation Details window
- In the window enter values for the properties mentioned in the following table.
|
#
|
Property
|
Description
|
|
1
|
Description
|
Enter a description for the escalation.
|
|
2
|
Day after due date
|
Enter the number of days after the due date, on which an escalation is to be sent.
|
|
3
|
Priority
|
Select a priority for the escalation from a drop-down list.
|
|
4
|
To and Cc
|
Enter the recipients for the escalation.
|
|
5
|
Mail Template
|
Select a mail template from a drop-down list.
|
|
6
|
Notify
|
Select the checkbox next to the resource that is to be notified.
|
- Click Save to store the changes.
Escalations and reminders are sent based on the configuration made here.
Managing Settings
User who creates the issue is automatically assigned as the approver. But in some project sites, issue created by a resource must be approved by another resource. Since both scenarios are required on site, a setting Assign creator as approver by default is available in the Settings tab of Issue Management Settings window. If the checkbox next to this option is selected, creator is assigned as the approver by default. If the checkbox next to this option is not selected, user needs to select an approver.
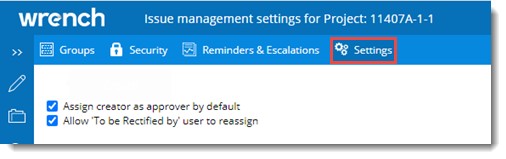
Figure: Issue Settings
There are scenarios where a PMC user may raise a Snag, issue and NCR and assign it to the contractor user. The contractor user assigned to the Snag, Issue or NCR may need to reassign the Snag, Issue or NCR to the actual user in their team who will work on the objects to close it. Currently, this is not allowed. The assigned resource cannot reassign.Also, when the PMC has assigned one contractor user to a Snag, Issue and NCR, it cannot be changed. Hence if a wrong user is assigned, it cannot be rectified. This also needs modification.
As a solution to this, a setting to allow the user in “To be rectified by” field to assign work to another resource is available.
If the checkbox next to the setting Allow "To be Rectified by" user to reassign is selected, resources assigned as To be Rectified by users will be able to reassign the issue.

