Meeting minute is an important constituent of a meeting. Various steps in managing meeting minutes is explained in this section. Following navigation table will help you in easily accessing different topics related to managing meeting minutes.
Adding meeting minutes
After the meeting is conducted minutes of meetings is prepared. Person who is supposed to take action on different decisions are identified and minutes is published.
Organiser or Chairperson can prepare the minutes for a meeting. This is prepared before the meeting.
 To add minutes
- In the Minutes section of the Meeting Details window, click Add Minute.

Minute window is displayed.
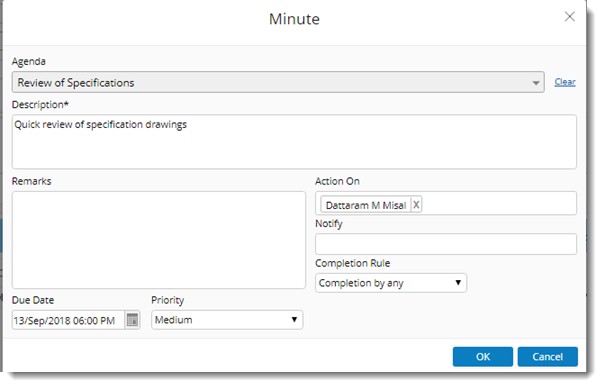
Figure: Entering minutes of meeting
- Enter values for the following fields.
|
#
|
Properties
|
Description
|
|
1
|
Agenda
|
An Agenda for the meeting can be selected from a drop-down list. Created agendas will be displayed in the list.
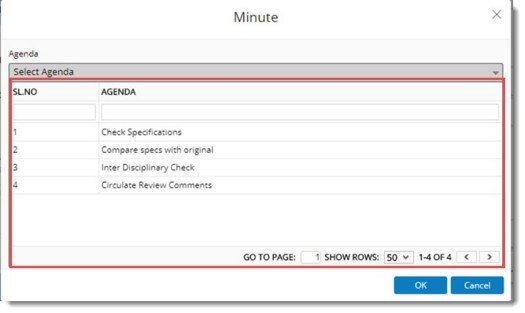
NOTE: An agenda is not mandatory for creating a Minute.
Select the agenda from the list and enter values for other properties.
|
|
2
|
Description
|
Enter the description for the minutes.
|
|
3
|
Action On
|
WRENCH user to whom an action is assigned. Enter the user name. As you type in a list of user names is displayed and you can select the user from the list.
NOTE: External users can be added as an Action On user when adding or editing minutes, depending on the accessibility set for the meeting. If the accessibility of the meeting is set to “Project resources & Meeting participants” then the system allows the users specified in external project resources to be added as Action On user. If the accessibility of the meeting is set to Meeting Resources, mail id of external resources in invitee list can be added as Action On user. If the accessibility of the meeting is set to ALL, mail id of external users can be added as Action On user. Internal users can be added using their user name. If mail id of the internal user is entered it is changed to user name.
Once the meeting minute is published, the external user added as Action On user will receive a notification.
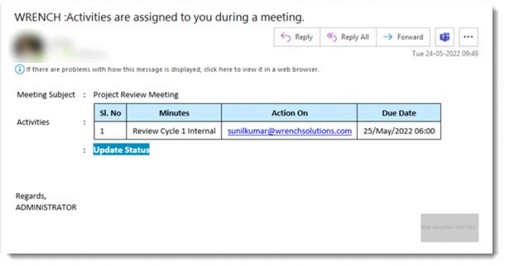
Figure: Notification for external user
- Click Update Status to open the meeting details window and update minutes for which the user is added as “Action on” users.
Since user is authenticated using OTP, a window for authenticating OTP is displayed.
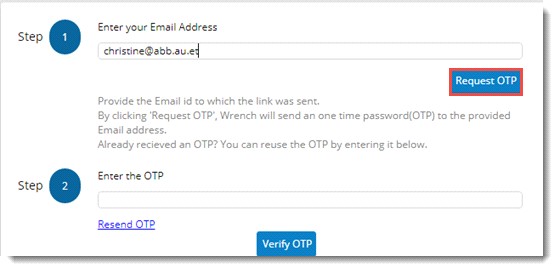
Figure: OTP verification window
- Enter your email address and click Request OTP.
A message OTP sent successfully is displayed. An OTP is sent to the entered email id.
- Enter the OTP in the space provided and click Verify OTP.
A message Verification Successful is displayed.
- Click OK to continue.
Meeting Details window is displayed. Only the minutes in which the external user is added as an “action on” user is displayed in minute’s section.

User can carry out the required operations from the window.
|
|
4
|
Notify
|
Name of WRENCH user who is to be notified about this action. Enter the user name. As you type in a list of user names is displayed and you can select the user from the list.
|
|
5
|
Completion Rule
|
In the drop-down list that is displayed on clicking the down-arrow, two options Completion by all and Completion by any are available.
If the rule selected is Completion by all, each user can complete the action item with comments but the status of action item will change to Complete until the last user completes the action item. If a user completes an action item, it will be removed from the Meeting minutes smart folder, but will remain in the Smart folder of other actionee users and the status will be still Action pending.
If the rule selected is Completion by any, once a user completes the action item with comments, the status of action item will change to Complete, even though other users have not acted upon the action item.
|
|
6
|
Due Date
|
The date on which the action is to be completed (with time). This is mandatory if “Action On” is specified.
|
|
7
|
Priority
|
Select a priority for the meeting. Choose from the available values; Low, Medium, High. By default, this is set to “Medium”.
|
|
8
|
Remarks
|
Enter remarks. This is not mandatory.
|
- After entering the details click OK.
Minutes is created and is displayed in the Minutes pane as shown in the following figure. If any agenda is linked to the minutes, it is also displayed here.

- Click Edit Minute to edit the created minutes of meeting.
- Click Attach to add attachments to the minute.
Importing Minutes of Meeting
Minutes from other meetings can be imported.
 To import minutes
- In the Minutes window toolbar click Import.
- In the menu click Import from Meetings.
Import Meetings window is displayed.
- Select a Meeting Minutes from the window.
- Action items defined for the meeting is displayed. Select the check box next to the action item. Click OK.
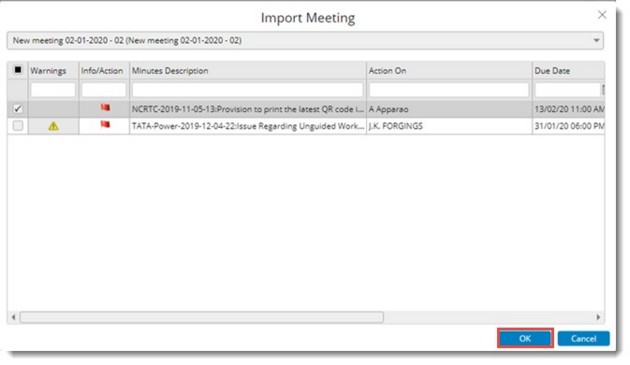
Figure: Import Meetings window
Selected items will be available in the minutes window.
NOTE: While importing, if the due date is less than the meeting start date a warning message is displayed and import is not possible. But the date can be changed, and the import operation can be continued. In addition, while importing if Action On user is disabled from the system, a warning message is displayed, and import is not possible. The action on user can be changed and the import operation can be continued. A pending action item once imported to another meeting cannot be imported, if the meeting to which it is imported is not completed. In such cases a warning message is displayed.
Importing Minutes in bulk
Minutes can be imported in bulk using an MS Excel import template. An Import template is generated, values for different columns are entered in template and the details entered are imported to the meeting.
 To generate a template
- In the minutes window click the option Import.
A pop-up menu is displayed.
- In the menu click Download Template.

Figure: Downloading template
Minutes Bulk Import template is displayed.
Enter values for different columns or fields in the template. Fields available in the template are mentioned in the following table.
|
#
|
Field
|
Description
|
|
1
|
Agenda
|
Select the agenda from a drop-down list. All the agendas of the selected meeting will be available in drop-down.
|
|
2
|
Minute Description
|
Enter a minute.
|
|
3
|
Remarks
|
Enter remarks against each minute.
|
|
4
|
Due date
|
Enter a due date.
|
|
5
|
Priority
|
Select a priority from a drop-down list.
|
|
6
|
Action On
|
Select the actionee from a drop-down list. The drop-down will contain all the user names in the user master.
|
|
7
|
Notify
|
Select a user from the drop-down. The drop-down will contain all user names in the user master.
|
 To import minutes
- In the minutes window click Import.
- In the menu click Import From Excel.

- Select the excel file from the location where the file is stored.
Minutes details are imported successfully.
NOTE: Once the operation is complete user will receive a notification mail, about the operation status. If the import fails, user will receive a mail indicating this.
Publishing the minutes
After creating the meeting next step is to publish the meeting. Chairperson, Organizer and Approver can publish the meeting. Before publishing, the approver approves or reject meeting if the meeting is associated with a Project and the option Approver is required for Meeting is selected in project settings. Once this setting is selected all meeting minutes must be approved by the approver before it is published.
NOTE: If a meeting does not have any approvers assigned to it, then approval is not required to publish the meeting. If a project is selected and approver is assigned to the meeting, then the approver has to approve the meeting before publishing. If minutes for a meeting without approver is published, in the notification mail generated, among the list of participants name of approver will not be displayed.
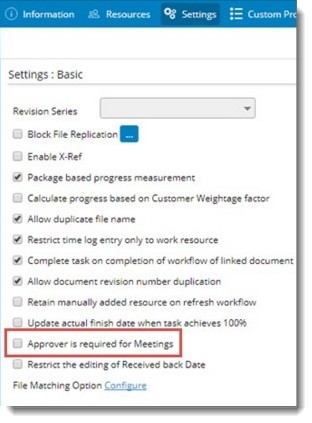
Figure: Setting in Project for enabling requirement of meeting approval
In this case if user tries to publish the meeting without adding an approver, a warning message is displayed.
If approval is required for the minute’s, user must approve the minutes.
 To approve minutes of meeting
- In the Minutes pane after selecting the minutes of meeting click Approve.

Figure: Approving a meeting
Minute items approved successfully window is displayed.
- Click OK to continue. Status of the minute will change to Approved.
To publish the meeting
- In the Minutes window click Publish Minutes.
Minutes is published successfully. Status of the Minutes changes to Action Pending.
Completing a meeting
Once minutes is published, notifications are sent to all participants who have attended the meeting. In the notifications pane when the notification is clicked by the user following window is displayed.
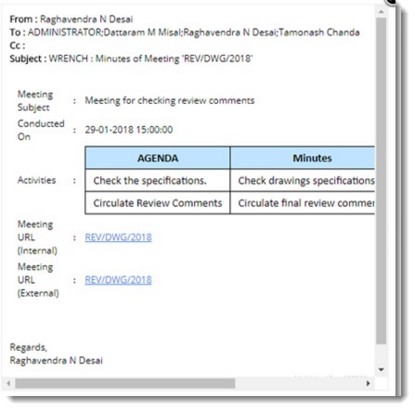
Figure: Notification window
On clicking the meeting URL, meeting window is opened. For the user assigned as Action On, the following window is displayed.

Figure: Marking meeting as completed
Details of the action is displayed here.
 To complete the meeting
- After completing the action assigned select the checkbox next to the action item and click Complete.
- Remarks window is displayed. Enter your remarks and click OK.
Minute Items Completed Successfully window is displayed.
Status of the meeting changes to COMPLETED.
Holding action items
Sometimes the recipients of an action item (actionee) may need extra time to complete the action assigned to them. They will be holding the action item for a specific time. They might also require to update the intermediate action taken for a minute.
 To hold/resume action items
- In the Meeting Details window select the checkbox next to an action item.
- In the tool bar click Hold.

Figure: Holding action items
Remarks window is displayed.
- In the window enter the comments or remarks and click OK.
Status of the action item changes to On Hold.
When the action item on hold is selected, in the tool bar label of the Hold button changes to Resume. Resume button is displayed only if all the action items are on hold.

Figure: Resuming action items
NOTE: If any user tries to complete or close an action item on hold a warning message is displayed.
- After completing working on the action item, click Resume.
- Remarks window is displayed. Enter the remarks or comments and click OK.
Status of the action item changes to Action Pending.
Updating action taken and viewing event log
After completing the intermediate activities related to the action item, user can update the action taken.
 To update action taken
- Select the action items and in the tool bar click Action.
Action Taken Comments window is displayed.
- Enter the comments and click OK.
Actions carried out and remarks entered will be displayed in the Event Log.
 To view the event log
- Expand the action item. Here a new tab Event Log will be displayed.
- Click the Event Log tab.

Figure: Event Log
Entire details of the action carried out on the Action Item is displayed here. Items in the log can be grouped by column header.
For a smart folder of type Meeting Minutes, options Hold/Resume and Update Action Items will be available in the smart folder tool bar.
Re-opening a completed meeting
If the Organiser or Chairperson of a meeting feels the work is not completed, they can re-open items marked as completed.
 To mark completed items as open
- In the minute pane select the item that you want to open.
- In the available options click Re-open.

Figure: Opening a meeting
- Remarks window is displayed. Enter remarks and click OK.
Completed item is opened and status changes to Action Pending.
When an item is reopened, the ‘Action On’ and ‘Notify’ resources will receive notifications in their notification pane as shown below.
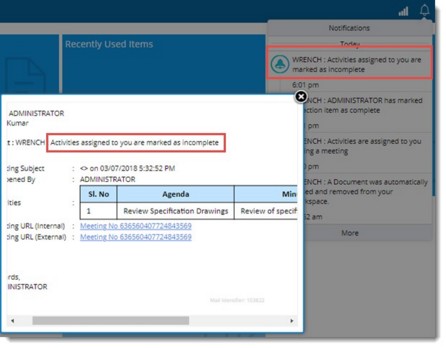
Figure: Notification window
Notify resource will receive the following message.
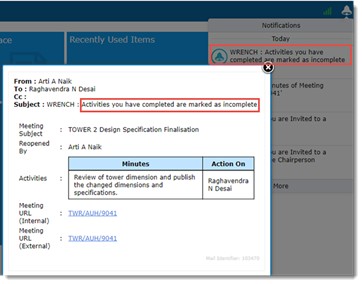
Figure: Notification window
Closing the meeting minutes
After completing the meeting, the meeting can be closed.
 To close the meeting
- Select the checkbox next to the action item.
- In the tab strip options click Close.

Figure: Closing a meeting
Minute items closed successfully message is displayed.
- Click OK to continue.
Status of meeting and the action item changes to Closed.

Figure: Displaying status of minutes
Saving or Exporting minutes of meeting
Minute details can be exported to a minutes template available in the system. If the meeting is in closed or follow up status, minutes details can be saved to a pre-defined template and the template file can be added to WRENCH.
 To export minutes details
- In the minutes window click More.
- In the menu displayed click Export. In the pop-up menu click Save as File.

Figure: Saving minute details to template
Meeting Template window is displayed.
- Select a template from the window and click OK.
Minutes details are saved to template and the template file is downloaded.
- Save the file
If the meeting is in follow up or closed status, minutes details can be saved to a template and the template file can be added to WRENCH.
 To save minutes details to WRENCH
- In the menu click Add to Wrench.
Meeting Template window is displayed.
- Select the template.
Minutes details are added to the document and document addition window is opened.
- Add the template file as a document in WRENCH.
For more information on adding document to WRENCH, refer Adding a Single Document.
NOTE: If the meeting is for a Project, then only meeting templates assigned to the Project is displayed. Or else entire meeting templates created in the Masters is displayed.
Escalating Action Items
Action items can be assigned to different resources. If these resources failed to complete the action assigned to them in time, an escalation is to be sent to concerned authorities. Action Items can be escalated only for meetings with Follow Up or Scheduled status. Only Chairperson or Organizer can define the escalation.
 To escalate action items
- Select a Minute.
- In the Meetings window click Escalations.

Figure: Sending Escalations
Configure Escalation window is displayed.
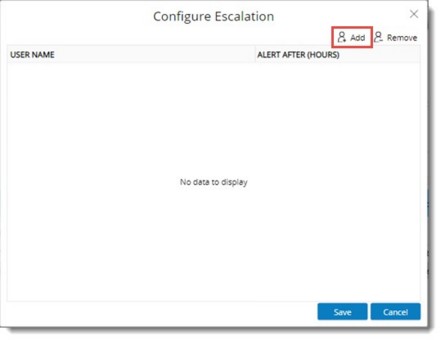
Figure: Configure Escalation window
- In the window click Add.
Search User window is displayed.
- Search and select users from the window.
- Enter a value for ALERT AFTER. Value should be entered in hours. Escalation will be sent after the time specified here.
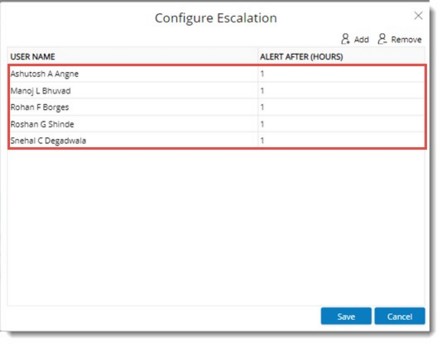
- After entering the values click Save to save the values. If values are not entered for the value ALERT AFTER, an alert message is displayed.
Escalations can be configured for multiple action items also. After selecting multiple action items, on clicking the option Escalations, if all the selected action items have the same escalation settings, Configure Escalation window is displayed. If the selected action items have different escalation settings the following window is displayed.
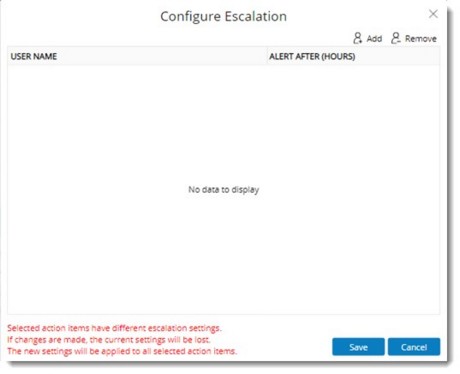
An alert message as displayed in the preceding figure will be displayed and no escalation details will be displayed. Any new settings made will be save against selected action items and any existing settings will be lost.


 To mark completed items as open
 To save minutes details to WRENCH