Snagging facility in WRENCH Smartproject, helps you in defining the process of inspection necessary to compile a list of minor defects or omissions in building works for the contractor to rectify is simplified. Site teams will be able to create snags on the fly, add a photo and quickly assign it to the responsible person with no paperwork. Snag feature manages and records what are typically referred to as “Snags” within the construction industry. This feature provides the site team a seamless process for creating multiple snag items and issue them to third parties without ever needing a piece of paper.
Opening the Snag facility
Snag Facility can be opened from the Modules option in the global menu,

Figure: Opening from Global Menu
and from the Project.
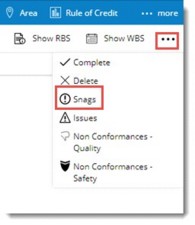
Figure: Opening from Project
If the Snag facility is opened from the Project, Snag List of the Project is displayed directly. In case Snag facility is opened from the Module options, the following window is displayed.

- Click the browse button to select a Project. List of Projects will be displayed.
- Select a Project from the list.
Snag List window is displayed. In case already Snags are created for the Project, details of the Snag are displayed in the window as shown in the following figure.
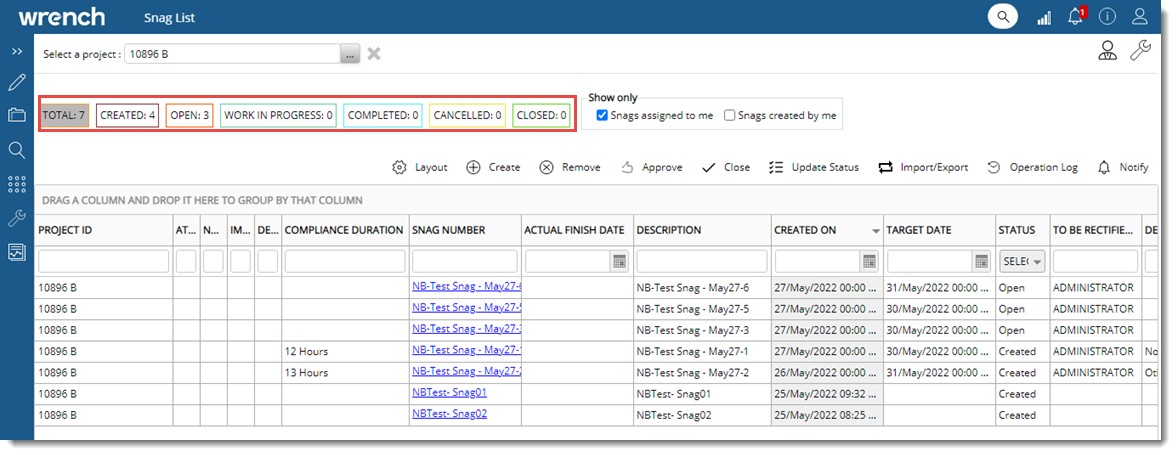
Figure: Snag List window
Count of Total number of Snags and count of Snags with different statuses like Created, Open, Closed, Work In Progress, Completed and Cancelled will be displayed in different tabs. On clicking a tab the respective Snag List will be displayed. For Example: If the tab OPEN is clicked, list of Snags with status Open will be displayed.
In case for the selected project, Snags are not created the following window is displayed.

Figure: Snag List window
Creating a Snag
A Snag can be created only by a user with security permission to create a snag.
 To create a new snag
- In the window click Create. Create Snag window is displayed.
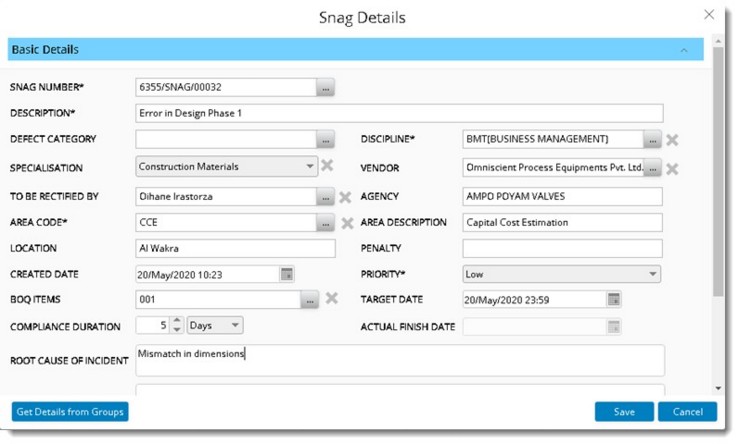
Figure: Create Snag window
Create Snag window is divided in Basic Details pane, Advanced Details pane and Documents pane. Basic Details pane is expanded by default.
- Enter values for different properties displayed in the window. Properties with an Asterix mark is mandatory.
Properties and their description are provided in the following table.
|
#
|
Property
|
Description
|
|
1
|
SNAG NUMBER
|
SNAG NUMBER is generated automatically.
|
|
2
|
DESCRIPTION
|
Enter a description for the Snag.
|
|
3
|
DEFECT CATEGORY
|
Click the browse button to select a defect category. Defect Category window is displayed. Select a category from the list.
|
|
4
|
SPECIALISATION
|
Click the drop-down to select a specialisation. List of specialisations defined in masters is displayed. Select the required specialisation from the list.
|
|
5
|
VENDOR
|
Click the browse button next to the field vendor. Search Vendors window is displayed. Select a Vendor from the list and click OK.
|
|
6
|
DISCIPLINE
|
Click the browse button to select a Discipline. Disciplines window is displayed with a list of pre-defined disciplines. Select a discipline from the list.
|
|
7
|
TO BE RECITIFIED BY
|
Click the browse button to select the name of person who is assigned to Inspect/Rectify the snag. Search User window is displayed. Select a User from the list of users.
|
|
8
|
AGENCY
|
The origin of the selected To Be Rectified By user is displayed automatically.
|
|
9
|
AREA CODE
|
Click the browse button to select an Area Code. On clicking the browse button Area window with the list of Areas is displayed. Select an Area from the list.
|
|
10
|
AREA DESCRIPTION
|
Description of the selected area is displayed here.
|
|
11
|
LOCATION
|
Enter details about the location where the snag is found.
|
|
12
|
PENALTY
|
If an issue is not solved as per the norms, there will be a penalty for this. User can enter the penalty value here.
|
|
13
|
PRIORITY
|
Select a Priority from a drop-down list. Options available are Low, Medium and High.
|
|
14
|
CREATED DATE
|
The date (with time) on which the snag is created is displayed here. Current date with time is displayed by default. The date can be changed by the user.
|
|
15
|
BOQ ITEMS
|
On clicking the browse button next to BOQ ITEMS, BOQ Items window is displayed. Select a BOQ Item and click OK. Selected BOQ Item is displayed in the window.
|
|
16
|
TARGET DATE
|
Select the date (with time) by which the snag is to be closed (rectified or accepted). This can be selected from a date picker. The selected date should not be higher than the Created Date.
|
|
17
|
COMPLIANCE DURATION
|
Enter the time took to rectify the snag. Here a facility to specify the numeric value and a unit is available. Unit can be selected from a drop-down list.
|
|
18
|
ACTUAL FINISH DATE
|
Enter the finish date of the snag as specified by user. This field is disabled when creating a snag. Date is captured automatically when the status is changed to ‘Closed’. The date can be changed in edit mode while closing the snag. Actual Finish Date can be edited while carrying out Update Status operation, when new status is changed to closed.
|
|
19
|
ROOT CAUSE OF INCIDENT
|
Enter root cause of the Snag.
|
|
20
|
NOTES
|
Enter any additional information as specified by user.
|
- After entering basic details, enter values for properties under Advanced Details. Properties under Advanced Details are mentioned in the following table.
|
#
|
Property
|
Description
|
|
1
|
APPROVER
|
Select a user who is authorized to approve the snag for further action. The current user name appears here by default. User may change by clicking the browse button and selecting a different user from User Search window. Only a single user can be selected as an approver.
|
|
2
|
PEOPLE TO BE NOTIFIED
|
Select the users to whom notifications are to be sent when the snag is created or closed.
|
|
3
|
AUTHORISE TO CLOSE
|
Select the users who are authorized to close the snag. Current user name appears here by default. Click the browse button to select a different user. Multiple users can be selected.
|
|
4
|
SEVERITY
|
Select the severity level from a drop-down list. Values available are LOW, MEDIUM, HIGH. By default, LOW is displayed.
|
- After entering Advanced Details, attach files and images to the snag. Details that are grouped under Attachments are mentioned in the following table.
|
#
|
Property
|
Description
|
|
1
|
IMAGES
|
Click here to add images that support the reported snag. Duplicate images can be added.
|
|
2
|
FILES
|
Click here to add any supporting files as assigned to the reported snag.
|
After adding attachments, references and related files can be added in the section References and Related Files.
|
1
|
DOCUMENTS
|
Click Add Documents to add latest revision of any documents in WRENCH that can act as reference to the snag. On clicking this option Search window is displayed. Enter a search criteria and search for the required document.
|
|
2
|
PACKAGES
|
A package can be attached to a snag.
To attach a package
- Click the browse button to attach a package.
WBS Levels selection window is displayed.
- Select a level from the displayed levels.
Selected level is displayed in the field PACKAGES.
|
|
3
|
TASKS
|
Task can be attached to a Snag.
To attach a task
- Click Add Tasks.
Advanced Search window is displayed.
- Here carry out a task operation and select a task from the search results.
You can select single or multiple snags and close them
|
- After entering the details click Save to store changes. Created Snag List is displayed in the grid.
Fetching details from snag group
If snag groups are available against the project, it is possible to fetch the details associated with the group, only if the corresponding data field in window is empty. This helps in specifying details quickly.
To fetch details from snag group
- In the Create Snag window click Get Details from Groups.
Snag Groups window is displayed. Group Names are displayed in the window.
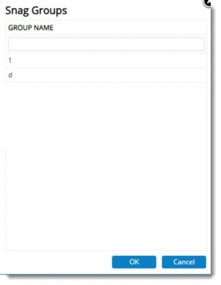
Figure: Snags group window
- Select a Group Name and click OK. Details assigned to the group will be inherited to the snag.
Notifying Snag creation
When a snag is created a single notification mail can be send to the concerned users.
To send notifications
- Select the created Snag in the tool bar click Notify.
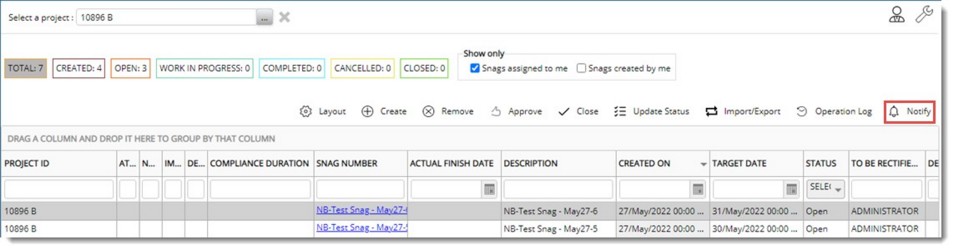
Notification Request Posted Successfully message is displayed. In the grid, a green tick mark is displayed in the column NOTIFICATION STATUS.
Modifying Snag Details
Snag details of a Snag in CREATED status can be modified.
To modify a snag
- Click the snag number which is a hyperlink. Update Snag window is displayed.
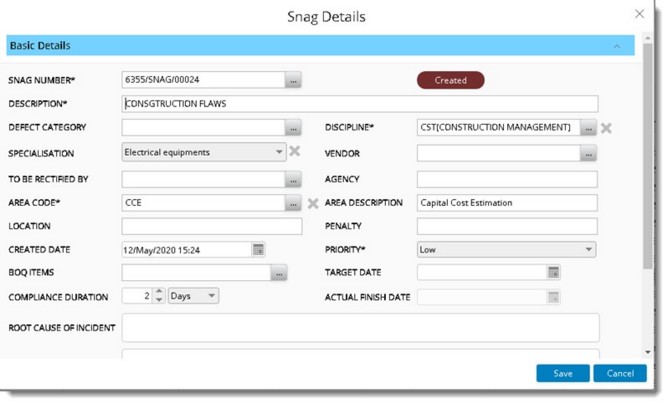
Figure: Update Snag window
Only fields in edit mode can be updated.
- After updating the fields click Save to store changes.
Viewing history of remarks
A facility to view the history of remarks is also available.
In the Snag details window, a hyperlink History of Remarks is available in the Advanced Details Pane.
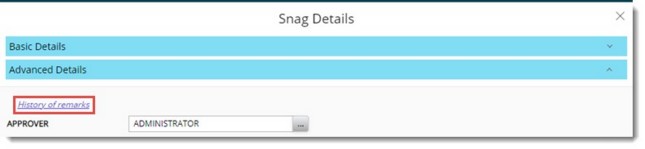
Figure: Viewing history of remarks
On clicking the hyperlink, Status History is opened in a new tab.
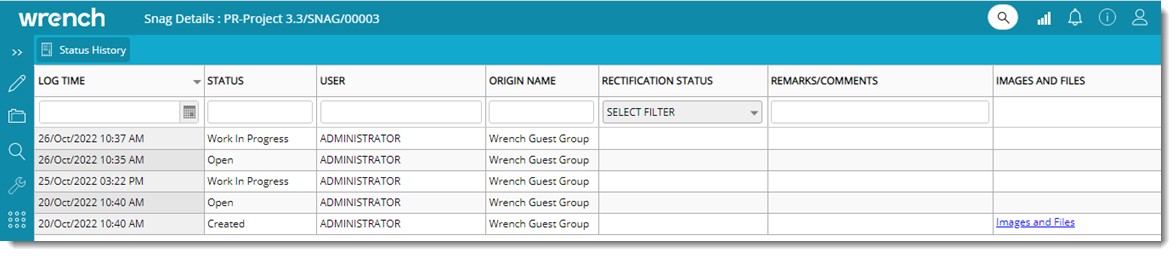
Figure: History of remarks
Closing a Snag
A user who is authorised to close a snag only can carry out this operation.
To close the snag
- Select the snag and in the tool bar click Close. Close Snag window is displayed.
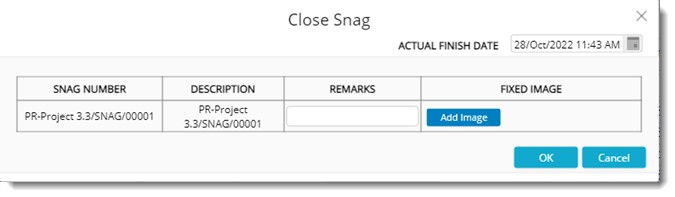
Figure: Close Snag window
The following information is displayed in the window.
Snag Number: Snag Number of the selected snags are displayed here.
Description: Description of the selected snags are displayed here.
Remarks: Enter your remarks here.
Fixed image: Here images can be added before closing. Multiple images can be added.
Actual Finish Date: Select a closure date from the date picker.
- Click OK to close the selected Snags.
If there are multiple users assigned to close the snag, system will capture the actual finish date specified by the last user.
Snag Closed Successfully message is displayed.
In case multiple users are authorised to close the snag, status of the snag will change to close only after all the authorised users have closed the snag. In the Update Snag window, user who have closed the Snag is highlighted in green colour.
The snag status will be set to closed only when all the users in the field ‘Authorise Closure’ have updated the status to ‘Close’. If an already closed user is removed and then added, user status will be not closed.
Updating Snag status
During the lifecycle of a snag, if some mistakes happen, user may need to reverse the status. For Example: When a snag item is wrongly approved, wrongly updated with a rectification status etc.
To update snag status
- Select the snag for which status is to be updated, and in the toolbar click Update Status.
Update Status window is displayed.
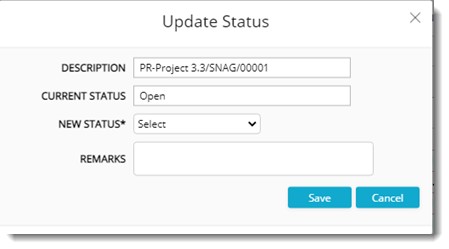
Figure: Update Status window
The following fields are displayed in the window.
DESCRIPTION: Description of the snag is displayed here.
CURRENT STATUS: Current Status of the Snag is displayed here.
NEW STATUS: This can be selected from a drop-down list. Options available are Cancelled, Closed and Completed if the current status is open. The items in the drop-down list changes based on the current status of the snag.
REMARKS: Enter the remarks or notes here.
If the New Status selected is Completed or Closed, additional fields will be displayed in the Update Status window.
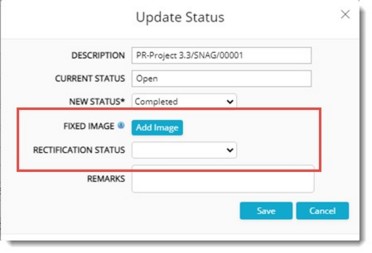
Figure: Additional Fields in Update Status window
- Click Add Image to add an image from the disk.
- Select a Rectification Status from a drop-down list.
- Enter remarks if any.
- Click Save.
Status Updated Successfully window is displayed.
Approving a Snag
Only the ‘Approver’ assigned to a snag may approve it. When other users attempt to approve the snag a warning message is displayed, and the operation is aborted.
To approve a snag
- Select the snags that are to be approved from the grid.
- In the tool bar click Approve.
Approved Successfully message is displayed.
Removing a Snag
A snag can be removed by authorised users. Creator of the snag can remove the snag before it is approved. Approver and Authorised to Close user can remove the snag any time.
To remove a snag
- In the grid select the snag that is to be removed.
- In the tool bar click Remove.
A message Do you want to remove the selected items is displayed.
- Click YES to remove the snag.
Snag is removed successfully. Once removed, immediate notifications will be sent to the following resources (excluding the current user):
- Approver (if not approved)
- To be rectified By (if approved and not closed)
- Authorised to close (If approved and not closed)
Operation Log
Operation log captures the following snag operations.
- Creation
- Editing
- Removal
- Approval/ cancellation
- Completion
- Closure
- Updating Status
To view the operation log
- Select the Snag and in the toolbar click Operation Log.
Operation Log window.
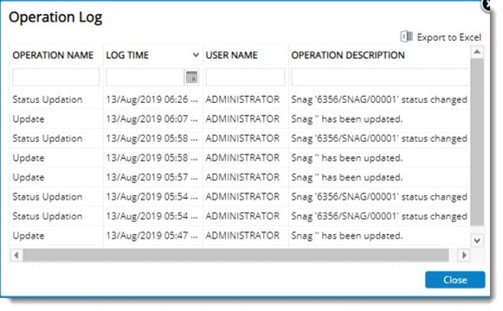
Figure: Operation Log window
Here the following details will be displayed.
- Operation Name
- Log Time
- User Name
- Operation Description
- Click Close to close the window.
Import/Export operations
Facility to import and export is available in Snag, Issues and Non-Conformance windows. When a user hovers the mouse over the option Import / Export the following menu items are displayed in the menu:
Download Template: Click this option to create the import template.
Import: Click this option to import the details entered in the template to the system.
Export: Click this option to export the details to an Excel template.
Bulk Operation Log: Click this option to view the status of import/export/update operation in a separate window.
To download import template
- In the Import / Export menu click Download Template.
Download Template window is displayed.
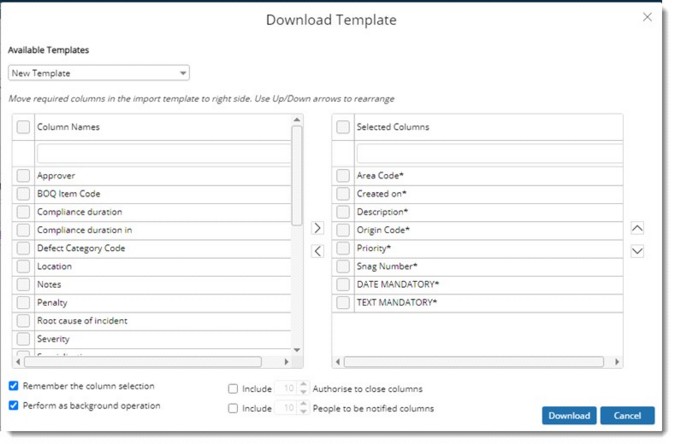
Figure: Download Template window
If there are any templates already created, they are displayed in the drop-down list corresponding to the property Available Templates. By default, value New Template is displayed here.
By default, all columns that are mandatory are displayed in the Selected Columns section.
To add columns to the list and generate template
- In the Column Names section, select the checkbox next to the required columns and click the forward arrow. Selected columns are displayed in the Selected Columns section.
- Click Download. A message Do you want to save the template? is displayed.
- Click Yes. Save Template Name window is displayed.
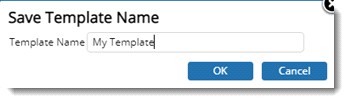
- In the window, enter a template name and click OK.
A message Template Creation in Progress. You will be notified when completed is displayed.
- Click OK to continue.
To import details
- In the menu click Import.
Bulk Import Wizard is displayed.
- Click Choose File to select the template from the location where it is stored.
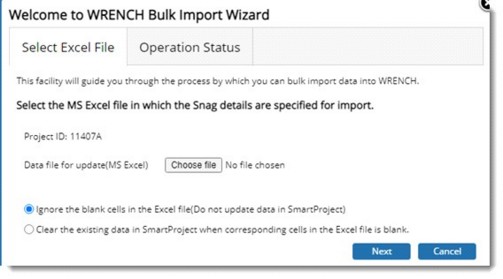
Figure: WRENCH Bulk Import Wizard
File selection window is displayed.
- Select the template file and in the wizard click Next.
On clicking Next, Bulk Operation Status window is displayed. Here information bulk import operation is displayed.
- Click Finish to continue.
On clicking Finish, bulk import operation is carried out in the background.
To export details
- In the menu click Export.
Export Wizard is displayed.
- Select the required properties for export and click Download.
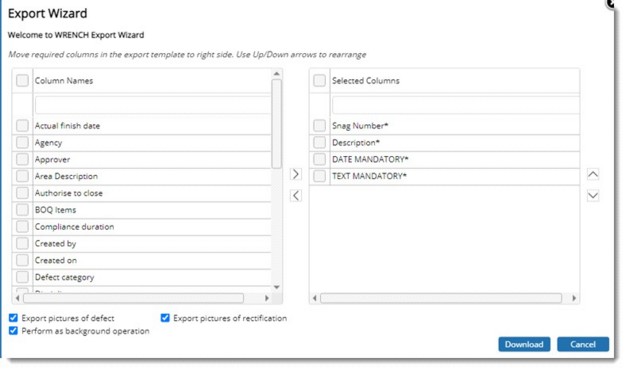
Figure: Export Wizard
Selected properties are exported to the excel template.
To view log of import operations
- In the menu click Bulk Operation Log.
Bulk Operations Log window is displayed.
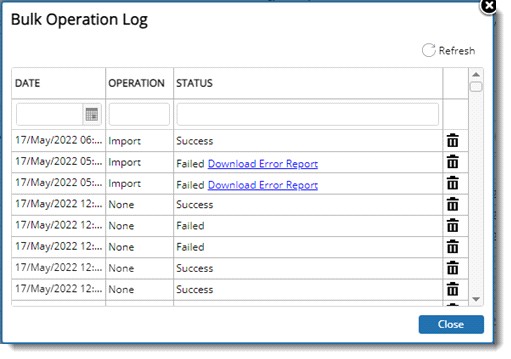
Figure: Bulk Operation Log window
In the window, date of operation, operation name and status of the operation is displayed. For failed operations, option to download the error report is available.

