Pre-defined workflows or guided workflows are used in case of engineering documents as the sequence of work and the stages through which the document will pass is predefined.
NOTE: You have to be in the current stage of the work flow i.e. the document should also be available in "Documents" in work space.
Workflows can be assigned while adding a document to Wrench or from the Document Details window.
For more information on assigning pre-defined workflows refer Adding a Single Document>>Assigning a workflow or Document Details>>Workflow.
 To send a document
- In the smart folder select the document and click Send.
Send window is displayed.
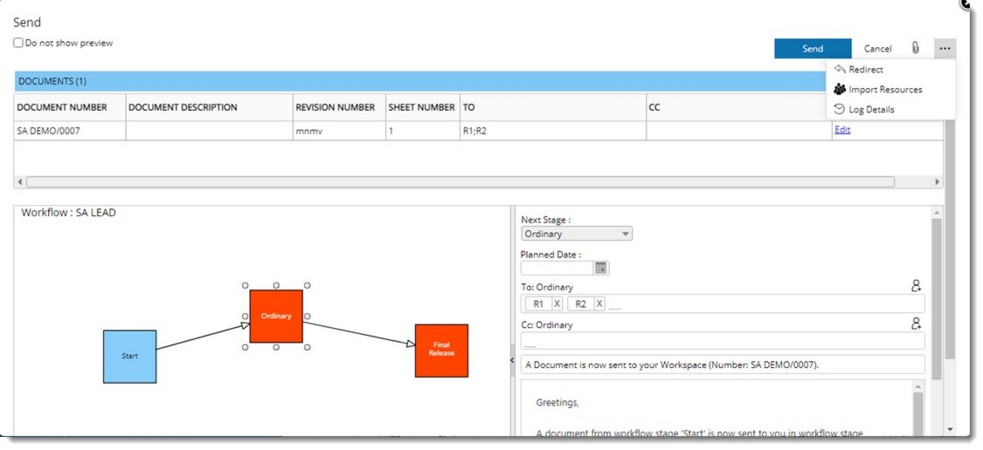
Figure: Send window
- Click add user icon to add recipients from a User List window.
- Next Stage: Here the next stage in the workflow is displayed by default. You can bypass an existing stage by selecting a stage from the drop-down list. All the stages to which object can be send directly will be grouped together and other stages to which the object can only be bypassed is grouped under a different group.
- Response Code: When sending the workflow from one stage to another, if response code is configured against the stage, select a response code before sending the document..
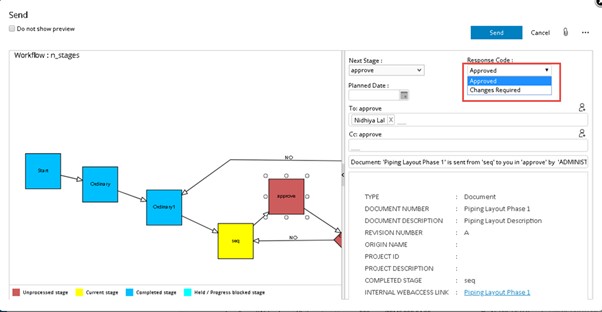
Figure: Selecting a response code
- Click the Send tab to send to next stage.
NOTE: When a document is sent through a workflow and if a project is configured for the document, LOV of the custom properties is filtered based on the project.
Viewing or Changing user sequence
Interdepartmental or Intra departmental squad checks can be performed in SmartProject by defining a stage as a sequenced stage in Work flow organizer. If a sequence has been defined and locked in the workflow the sequence is displayed here. This pre-defined sequence cannot be changed. If a sequence is not defined in the workflow stage, you can define a sequence here. If a sequence is defined in the workflow and it is not locked, the sequenced can be altered here.
To view/change a sequence
- In the Send window expand the document pane.
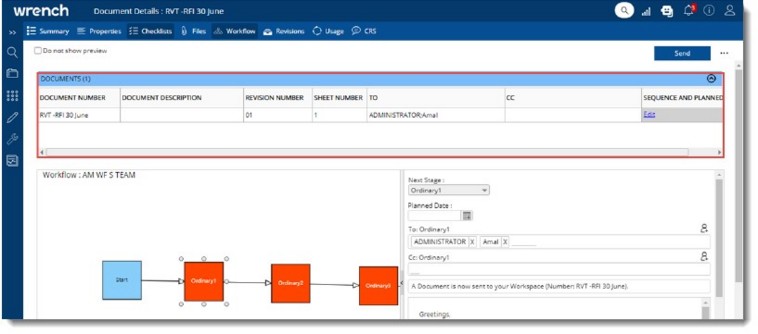
Figure: Send window
In the grid a column SEQUENCE AND PLANNED DATE is available.
- In the column click the hyperlink Edit. Sequencing and Planned Date window is displayed.
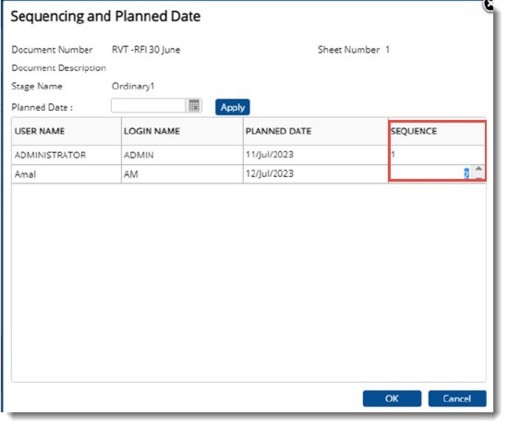
Figure: Sequence and Planned Date window
- In the column SEQUENCE, click the arrows to enter a new sequence or to change the sequence.
- Click OK to save changes and continue.
Only the user who is in the active sequence of the stage will be able to do any operation in that stage.
NOTE: The sequence of the existing user cannot be updated if the sequence is locked in the workflow. When a document template is sent through workflow, edited document properties are updated in the template.
NOTE: If the genealogy setting �Approval code mandatory in release stage� is selected, and in the workflow stage properties setting �Approval status code is mandatory� is also selected, the documents cannot be send from that stage without updating the client comment and approval status code. If the approval status code is not updated a warning message is displayed. In the case of sending tasks this settings will be applicable only if the task is a document task.
Sending from Approve by All stage
When a user sent an item from a stage where the sending option is ‘Approved by All’, since there are other users yet to close their routing, the ‘Close’ routing window is displayed instead of ‘Send’ window. The same happens when user other than in the last sequence is trying to send workflow from a Sequence stage.
To send when sending option is Approved by All
- In the Close window enter other resources that are to be notified.
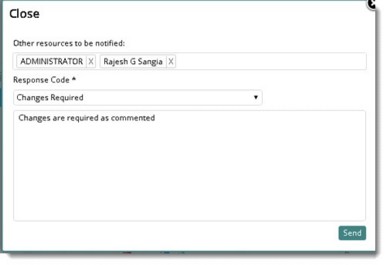
Figure: Close sending window
- Select a response code from the drop-down list.
NOTE: If the current stage is non-conditional, the list of available response codes against the stage from the database is filled in the �Response Code� drop-down list in ascending order. If there is only one item in the drop-down, it is selected automatically as default option.
Response details associated with the selected response code will be displayed in the ‘Comments’ section, which user may modify.
If a response code is defined against the stage, it is mandatory to specify a response code and description (comments). On clicking ‘Send’ option without specifying a response code/ comment, operation fails, and alert message is displayed.
- After entering the details click Send. Item closed successfully message is displayed.
Redirecting to a stage
In some organizations, while sending documents through a workflow, there are chances that the active stage users are away or busy with other tasks, and the team lead wants to skip the current stage, as the resource in the next stage will be able to perform the same operations. In such cases the document can be redirected to the next stage from the Send window
To re-direct to a stage
- In the Send window click Redirect.
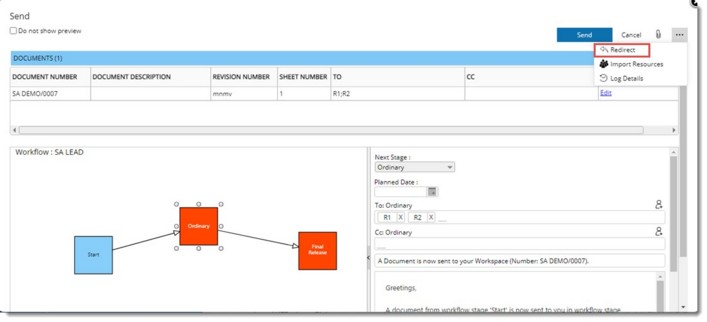
Figure: Redirecting stages
- Select the stage to which you want to redirect the document and click OK.
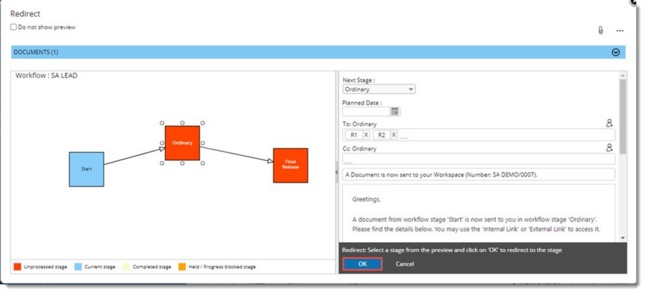
Figure: Selecting a stage for redirecting
- Click OK to confirm changes.
To select recipients
To : You can select the recipients in the next stage.
- Click the To. button.
User List window is displayed.
- In the user list window choose the users whom you want to add as recipients.
- Click OK to continue.
- Cc : Recipients to whom the document has to be sent for information can be selected here.
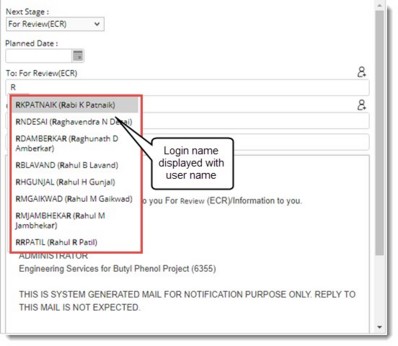
NOTE: When typing in the user name a list of users are displayed. Login name is displayed along with the user name as displayed in the following figure. This helps in preventing any confusion that may arise when users with identical user name exists.
Once all these entries are made in the tab strip click Send. The document is sent to the next workflow stage successfully.
NOTE: In the case of work flows with parallel stages, no stage will be selected by default if next stages are parallel. User has to manually select the required stage or all stage for sending.
Importing stage resources
Next stage resources can be imported from a pre-defined distribution list.
To import resources
- In the send window, more menu click Import Resources.
Distribution List window is displayed. Distribution list configured for the selected next stage is displayed here. .
- Select the distribution list and click OK.
Resources in the selected distribution list is populated in the send window.
Automatic closure of workflow stages after planned completion date
In the Send window you can set a Planned Completion Date for the next stage. Once a Planned Date is set, the workflow stage is closed, after the date expires.
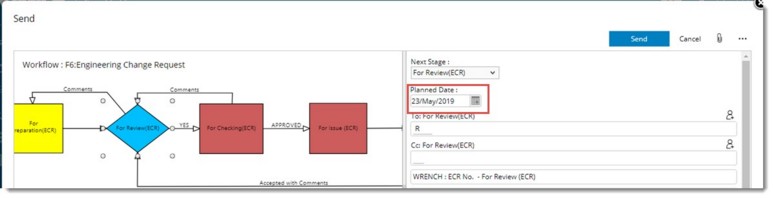
This is based on a setting defined in WRENCH Masters, when workflow stages are configured. Planned Date is calculated based on the lead time entered in workflow organizer. The number of hours entered as lead time is added to the current date.
NOTE: In the Workflow Organizer, Stage Properties under Sending Rules if the setting Can override Planned Finished Dates while sending is not selected, the Planned Finish Date in the Send window will display the date based on the stage setting (Lead Time allotted in Hrs:) and will be non-editable. The date picker will be disabled in such cases.
Sending from a sequential stage
Interdepartmental or Intra departmental Squad Checks can be performed in WRENCH by defining a stage as a Sequenced stage in Work flow Designer. "Sequenced Sending" is a feature in sending, which follows a predefined pattern within a stage. Only the user who is in the active sequence of the stage will be able to do any operation in that stage.
While sending from a Sequenced stage to the next stage, there are few things to remember.
- While sending from a sequenced stage to next stage, only the final user in the sequence is permitted to sent to the next stage. Other users can only close route their workspace entries. When a user close route a workflow entry the following window is displayed.
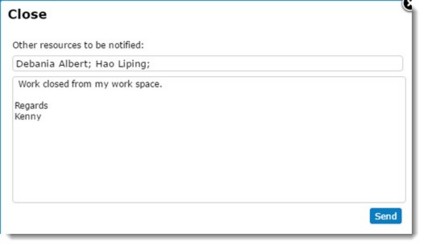
Figure: Close window
From this window notification can be send to users who are to be notified. Enter other users to be notified and a message to other users. Click OK to continue.
- Before the final user in the sequence begins to send to the next stage, the user should ensure that all the other users existing in the sequenced stage have closed routed from their workspace. If any of the users in the sequenced stage haven't close routed the entry from the workspace, then routing cannot proceed to the next stage.
- Users can close route from their workspace only in the sequential order.
- If there is a user who is available both as a stage user and in the group, then his sequence specified as 'User' need to be given preference.
- The sequence number specified for a certain group is applicable for all the users in that group. All the users of the group will inherit the same sequence number assigned to the group. As a result, any of the users in the group has the right to close routing on behalf of all.
Sending from final release stage
When user selects an object from the smart folder which is in the final release stage and clicks the Send option, the following message is displayed.
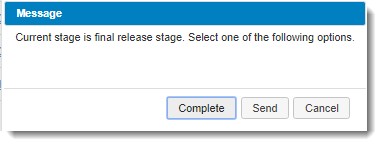
- On clicking Complete, the following window is displayed.
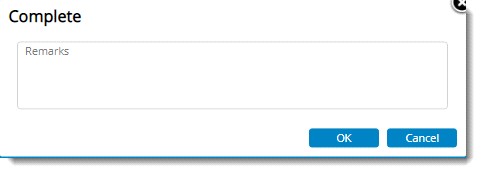
- Enter comments in the Remarks field and click OK to complete the workflow.
- On clicking Send, Send window is displayed and the object can be send to the next stage.
- On clicking Cancel, the operation is aborted.
Log Details
Deliverables in Wrench can flow through different stages before it is released. This flow of documents through different stages before the work is completed is called workflow. The workflow can be defined stages as in guided workflow or without any definition like in unguided workflow. Log details include:
- Different stages through which the work passed through.
- Details on recipients of the work.
- Date on which the work was received.
- Date on which the work was closed.
- Purpose of sending the work.
- Time taken to complete a stage.
- Duration for which the task was held in a stage.
To view log details
- In the Send window click the hyperlink Log Details.
Log Details window is displayed with the Workflow Log tab selected by default.
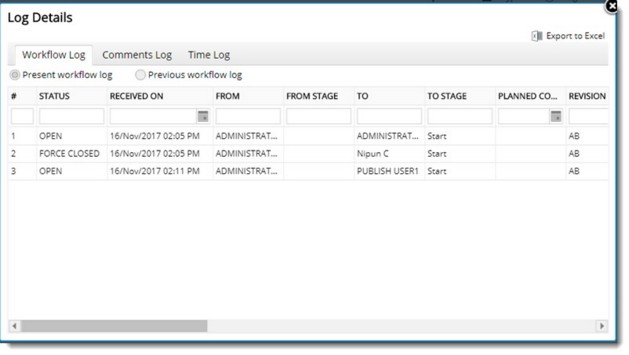
Figure: Log Details window
Here logs of the current workflow are displayed.
Viewing Time Log
Time Log displays the total time spent for each stage and details of the respective user for each stage.
To view time log
- In the Log Details window click the tab Time Log.
Time taken in each stage by a user is displayed here.
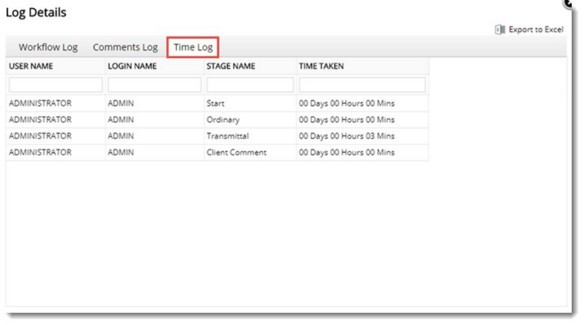
Figure: Time Log Details
Viewing Comments Log
On selecting this tab comments entered when the document passes through different stages in a workflow are displayed here.
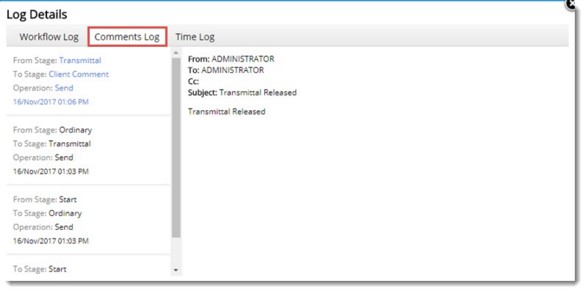
Figure: Comments Log
Viewing and adding attachments
Options to add attachments to a workflow stage and view the attachments is available in a workflow. This facility is not available for unguided workflows.
To add attachments
- In the workflow stage window click Attach icon.
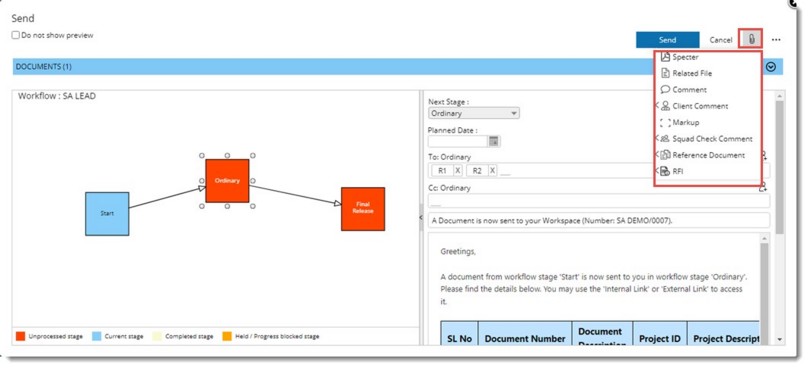
Figure: Adding attachments to workflow stages
A menu listing different attachment types is displayed.
- In the menu click the Attachment type that you want to add and follow the procedure for adding attachments.
To view attachments
- In the workflow stage window click View Attachments.
Document Details window is opened with the Files tab selected by default.
Here different attachments linked to the document is displayed.
Handling unclosed checklists
When the setting ‘Checklist must be completed’ is ON (control panel), system will prevent users from sending workflows from one stage to another, when unclosed checklists are existing. If the setting ‘Checklist must be completed’ configuration is ON (control panel), and there are unclosed checklists existing for the item being sent, the following alert message is displayed.
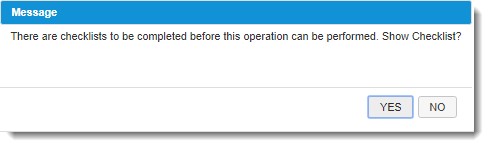
On clicking YES, Active Checklist window is displayed in a different tab. Checklists to be handled before closing the current stage will be displayed.
Update the checklists and save the changes. After saving close the tab. After closing the checklist, you send the objects to the next stage of the workflow.
Entering time log while sending objects
While routing documents, some organizations keep the timesheet entry mandatory at the workflow stage. As a result, the timesheet window is opened while sending documents. User will enter the time log entry and submit it. Timesheet tab is closed once the time log is saved so that the workflow page becomes visible and user can continue sending the object.

