To feed any construction management application, large volumes of data is to be collected from project site. A major chunk of organisations still uses manual methods for data collection. With latest innovations in hand-held devices and portable file formats, instead of feeding the data from paper documents it is possible to capture this data directly into the application using digital forms.
A digital form, in simple terms, is a digitized or electronic version of a paper form, that eliminates the time-consuming and inefficient process of manual data collection and communication.
Digital forms can be created using different applications available in the market. SmartProject accelerates the process of paperless field data management by providing smooth mapping of data from PDF forms to document properties in SmartProject using pre-defined templates. These templates can be customized to include the form fields and options that are required by the company.
Option Document Templates in the Masters will help in creating and managing PDF templates.

Figure: Managing PDF templates
 To open template management window
- On the Masters window, click the option Document.
- Select the option Document Template.
Template Management window is displayed.

Figure: Template management window
Here different options to create and manage a document template is available.
Creating a template
Users with ‘Add’ permission in ‘Document Template Master’ under ‘Security Centre’ can create a template.
 To create a template
- On the tool bar click Create.
Template Details window is displayed.
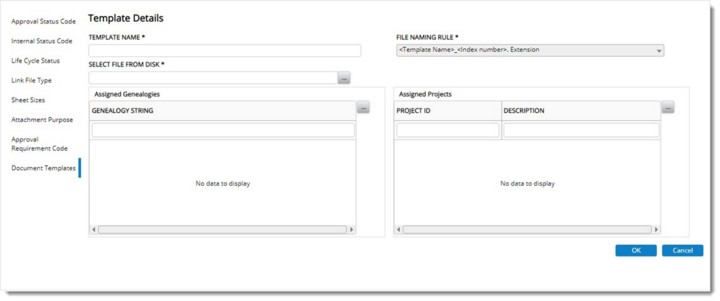
Figure: Template Details window
- Enter value for properties mentioned in the following table.
|
#
|
Property
|
Description
|
|
1
|
TEMPLATE NAME
|
Enter a unique name for the template.
|
|
2
|
FILE NAMING RULE
|
When multiple documents are created from same template, instead of all documents getting the original file name as that of the template, the ‘File name logic’ helps to generate file names with the document number etc., so that the document can be better identified from the file name itself.
Select the required logic from the drop down list.

|
|
3
|
SELECT FILE FROM DISK
|
Click the browse button to select the required file for template creation from the location where it is saved.
|
|
4
|
Assigned Genealogies
|
- Click the browse button to select a genealogy.
Document Genealogy window is displayed.
- On the window select single or multiple genealogies and click OK.
Selected genealogies are displayed in the window.
|
|
5
|
Assigned Projects
|
- Click the browse button to select the required projects for assigning the template.
Project Search window is displayed.
- Select the required projects for assigning the template and click OK.
|
- After entering the values click OK to save. Template added successfully window is displayed. Created template is displayed in the Document Templates window.
Defining Template Mapping
Properties for mapping the template can be defined by users with Edit permission in Document Template Master under Security Centre.
 To map properties
- Select a template and On the tool bar, click Mapping.
Document Template Properties Mapping window is displayed.
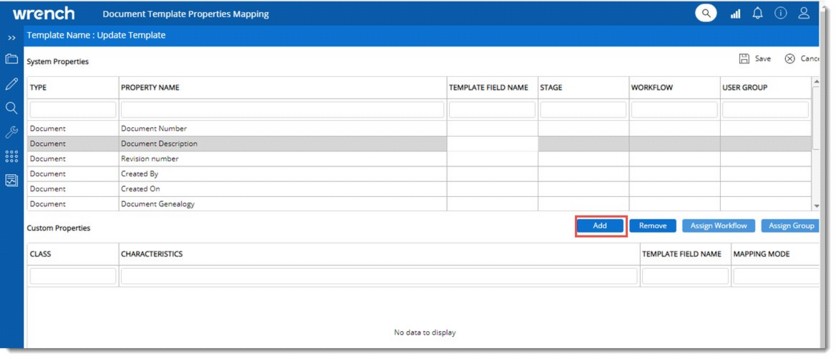
Figure: Document Template Properties Mapping window
- On the window click Add.
Select Characteristics window is displayed.
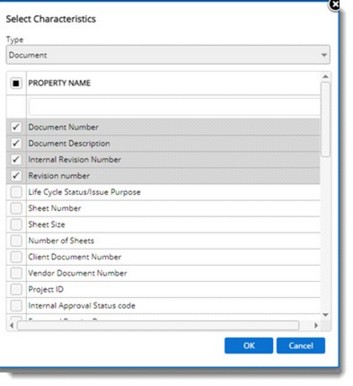
Figure: Select Characteristics window
- Select a Type from a drop-down list. Available options in the list are Document, Task, Workflow, Project and Organization. By default, Document is selected.
Based on the selected type, properties are displayed in the window.
- Select the checkbox next to the required properties and click OK.
- Selected properties are displayed in the mapping window.
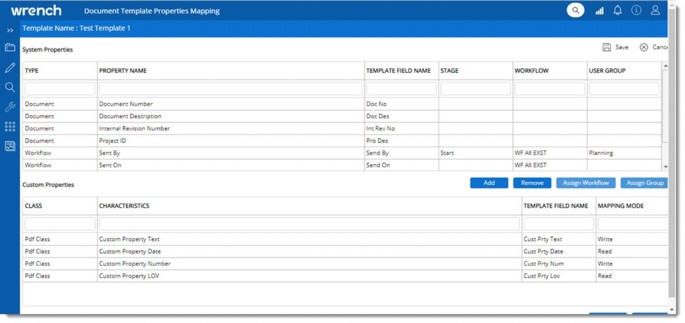
Figure: Mapped document properties
NOTE: Value for the property Template Field Names will be available in a drop down for selection if the values are provided in the PDF template.
Assigning workflow and groups
Workflow and groups can be assigned if workflow properties are selected. Assign Workflow and Assign Group options are enabled only if a workflow related property is selected.
 To assign workflow
- Select a workflow property.

Figure: Assigning workflow
- Click Assign Workflow. Select Workflow Team is displayed.
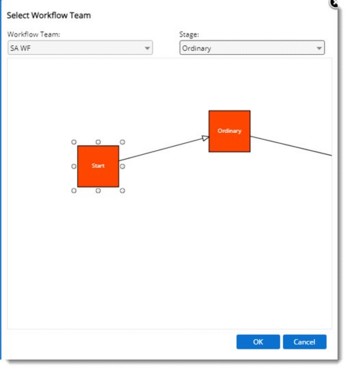
Figure: Select Workflow Team
- Select a Workflow Team and Stage from a drop-down list.
- Click OK to complete the selection.
 To assign groups
- Select a workflow property.
- Click Assign Group. Select User Group window is displayed.
- Select single or multiple groups.
- Click OK to complete the selection.
Adding Custom Properties
Custom properties defined for the Project and RFI can be added to the template.
 To add custom properties
- On the Custom Properties pane click Add.

Figure: Adding Custom Properties
Select Characteristics window is displayed. Here list of custom properties which are linked to the custom classes are listed.
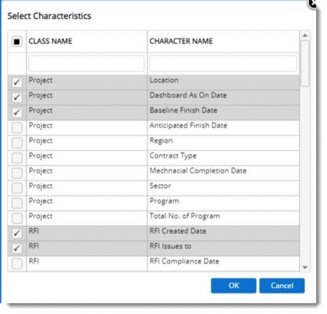
Figure: Select characteristics window
- Select the required customer characteristics and click OK.
Selected characteristics are displayed in the window.
Editing template
Users with Edit permission in Document Template Master under Security Centre can edit template.
 To edit a template
- Select a template and On the tool bar click Edit.
Template window is displayed with the values entered during creation.
- Change the required values and click OK to save changes.
In case the template file is changed, and all the mapped fields are not available in the new file, errors in mapping are displayed in a window as shown in the following figure and the operation is cancelled.
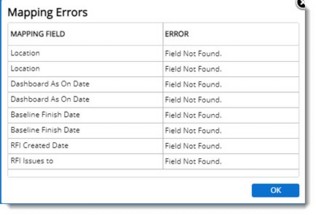
Figure: Mapping errors


 To open template management window