|
|
Only a user with ‘Create JMS’ permission in the respective project genealogy is permitted to create a JMS.
To create a JMS
1.On the Joint Measurement Sheet window click Create.
Joint Measurement Sheet Details window is displayed.
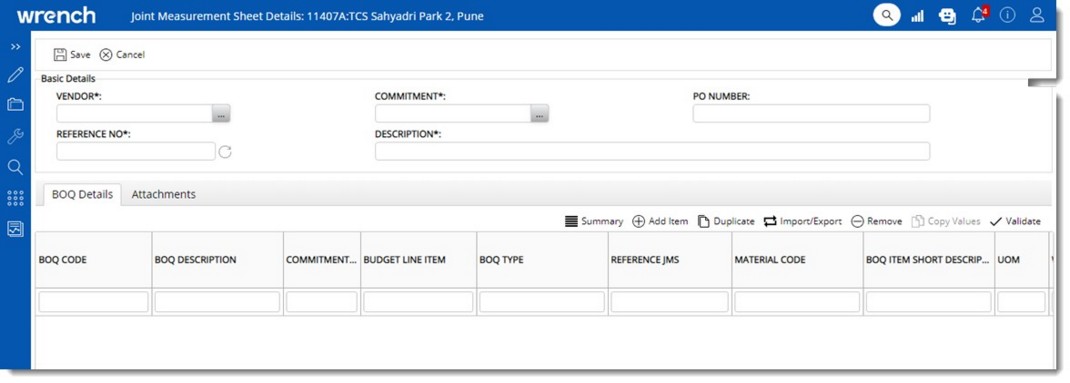
Figure: JMS Details window
2.On the JMS Details window enter value for the following fields.
|
#
|
Property
|
Description
|
|
1
|
VENDOR
|
When origin of the logged in user is of Internal, Client or other Units , the browse button to select vendor will be enabled. On clicking the browse button, Vendors window is displayed. Here vendors in the selected project is listed.
Select a vendor from the list and click OK.
|
|
2
|
COMMITMENT
|
1.Click the browse button to select a Commitment. Select Commitment window is displayed.
2.Select a commitment from the list displayed in the window.
|
|
3
|
REFERENCE NO
|
JMS reference number will be created automatically after a commitment is selected. If the user has manually specified a number before selecting a commitment, a new one will be generated This is to avoid a possibility of using a wrong number if the commitment number is changed.
NOTE: While saving a JMS, if JMS reference number generated is already used, click the Refresh button next to the JMS Number to regenerate a new number
|
|
4
|
P O Number
|
P O Number is displayed here.
|
|
5
|
DESCRIPTION
|
Enter a description for the JMS
|
|
6
|
STATUS
|
JMS status is generated by the system automatically. Once a JMS is created, the status will be Created. Once the JMS is submitted for approval, the status will be Submitted. Once JMS is reviewed and approved, then the status is set as Approved.
|
3.After entering the basic JMS details, click Save. A JMS is created and status of the JMS is displayed as created.
Next step is to specify BOQ details.
|
|