|
Organizations may need a standard pattern for some documents, for example Purchase Order, Invoice etc. These standard patterns or Templates can be created from the Document Template master. These standard templates are used while adding a new document. Values for the properties in the template can be mapped from SmartProject. Values are mapped when the document is checked out and checked in after editing or the values can be updated using the option Update Template.
Opening the Document Template Master
To open the Document Template Master,
1.On the Masters window select “Document”.
2.On the left pane, select “Document Template Master”.
The Document Template Master window is displayed. On the window options to create a template, edit the template, download the template, define mapping values and remove the template is available.
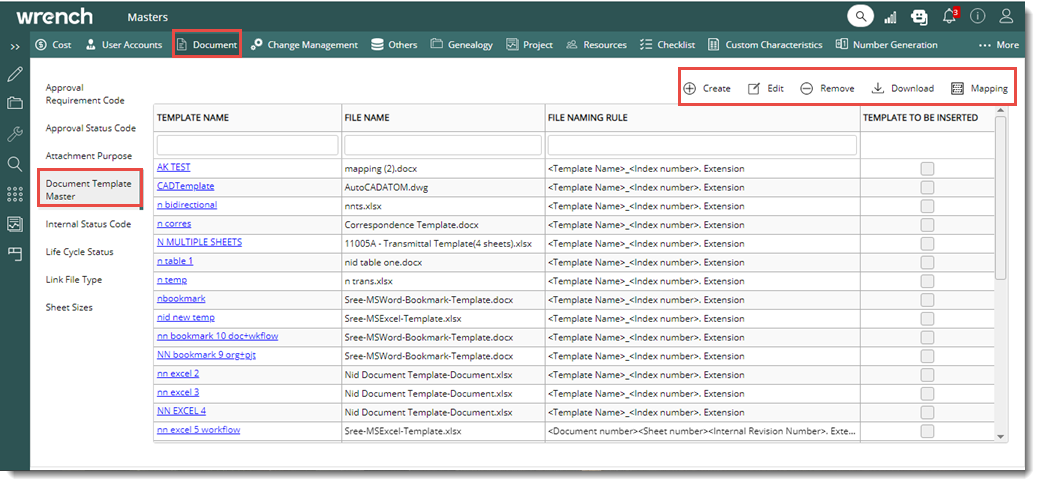
Figure: Document Template Master Window
Different Operation related to document template is explined in the following sections.
Creating a document template
Mapping values to a document template
Assigning Workflows
Adding Custom Properties
Selecting Mapping Locations
Mapping Signatures
Editing a document template
Removing a document template
Downloading a document template
Creating a Document Template
A standard document template is created from the document template master window.
To create a document template ,
1.On the document template master window, click “Create”.
The Template Details window is displayed.
.png)
Figure: Template Details window
Enter values for the properties described in the following table.
|
#
|
Item
|
Description
|
|
1
|
Template Name
|
Enter a template name.
|
|
2
|
File Name Rule
|
Select a File Name Rule from the drop-down list. File Name Rule is usually pre-defined.
|
|
3
|
Select File from the Disk
|
Click the browse button to select the template file from the disk. You can click on “Remove” button to clear the selected file.
|
|
4
|
Template to be inserted
|
This option is enabled if the file selected is an AutoCad or Microstation drawing file. If the check box against this option is selected it denotes that template may be inserted into other drawings.
|
|
5
|
Assigned Genealogies
|
Select a genealogy and assign the template to this genealogy. Once you assign a template to a genealogy the template will be available while adding documents under this genealogy.
To assign template to a Genealogy,
1.Click the “Browse” button.
2.“Document Genealogy” window is displayed. Select a genealogy.
3.The template will be available while adding documents under this genealogy.
NOTE: You can also assign a template to multiple genealogies.
|
|
6
|
Assigned Projects
|
Select a Project ang assign template to the Project.
To assign template to a Project,
1.Click the “Browse” button.
2.“Projects” window is displayed. Select a Project.
3.The template will be available while adding documents under this genealogy.
|
1.Click “OK” to save the template.
All the selected properties are displayed in the template details window as shown in the following figure.
.png)
Figure: Template details window
Mapping values to a document template.
Properties that are to be inserted in a template can be mapped to the template file. Once the properties are defined, values are mapped when the template is updated. Mapping can be classified as follows Single directional mapping and Bi-directional mapping.
NOTE: In the default properties of the genealogy to which the document is added, ensure the Character updation mode is selected as Export Characteristics to Documents.
Single directional mapping: In single directional mapping, values of the document properties in SmartProject are mapped only in a single direction, from SmartProject to the template. The security is implemented because the details populated here are the primary details of document and is confidential. This is extremely important for the integrity of the document management system.
Bi-directional mapping: In bi-directional mapping, values can be mapped from SmartProject to template and from a template to SmartProject. Only custom property values can be mapped in both the directions. Some file properties of 'MS Word' and 'MS Excel' are read only. If these read only fields are defined in 'Template Mapping', and in document genealogy default properties if, Character Updation mode is selected as Export characteristics to Document the synchronization of document will fail when you try to "check-in" the document.
To map a Document Template,
1.Select the “Document Template” to be mapped.
2.On the tool bar click Mapping.
The Document Template Mapping window is displayed. The window consists of two tabs, System Properties and Custom Properties. By default, System Properties is selected.
.svg)
Figure: Document Template Mapping window
To add System Properties,
1.On the Document Template Mapping window, select “System Properties”.
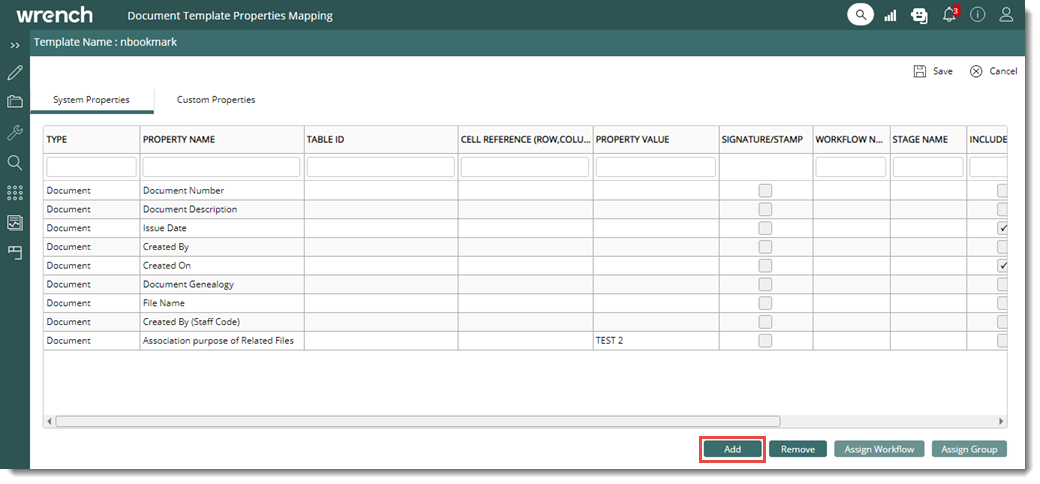
Figure: System Properties
1.Click the button “Add”.
Select Characteristics window is displayed.
.png)
Figure: Select Characteristics window
Characteristics can be selected for Document, Organization, Task, Workflow and Project, from the drop-down list. Based on the object selected, corresponding characteristics will be displayed in the grid.
1.Select the required Object. Characteristics corresponding to the selected object is displayed.
2.Select the checkbox next to the characteristics that are required in the template.
3. Click the Select button.
Selected characteristics are displayed on the System Properties grid.
Assigning wokflows
If workflow properties are selected for mapping, a workflow and stage can be selected.
To assign workflows
1.On the list of properties click the workflow property. The button Assign Workflow is enabled.
2.Click Assign Workflow.
Select Workflow window is displayed.
.svg)
Figure: Select Workflow window
1.Select a Workflow Name and Stage from a drop-down list.
2.Click OK to continue.
The selected workflow and stage is displayed on the grid corresponding to the workflow properties. When the workflow selected here is assigned to the document, mapping of the properties is carried based on the stages defined here.
Adding custom properties
Like system properties, custom properties can also be included in the template.
To select custom properties
1.Click the tab Custom Properties.
2.Click the Add button.
Select Characteristics window is displayed. Here available custom properties are displayed.
3.Select the checkbox next to the property that you want to add.
4.Click OK.
The selected custom properties are displayed in the grid.
Selecting mapping locations
The location on the document where the values are to be mapped must be defined. Mapping location columns are different for MS Word, MS Excel, CAD and PDF templates. In the case of MS Word documents, Table ID, Cell Reference, and Bookmark is entered in the System Properties window. Mapping location can also be entered for custom properties.
To select mapping location for word template
1.On the System Properties window on the column TABLE ID enter the table identification number.
2.On the column CELL REFERENCE (ROW, COLUMN) enter the position of the cells.
.png)
Figure: Selecting mapping locations (MS Word)
3.If mapping is to be carried out based on bookmarks, it can be selected from the drop-down list in the column BOOKMARKS. The bookmarks inserted in the template will be available in the column BOOKMARKS. The mapped value will be inserted in the template against the selected bookmark.
.png)
Figure: Selecting bookmarks
4.Click Save to store the values.
Selecting mapping location for MS Excel templates
In the case of MS Excel templates, Worksheet Name and Cell Reference (Row and Column) is entered.
To select mapping location for excel template
1.On the System Properties window on the column WORK SHEET NAME enter the name of the excel worksheet.
2.On the column CELL REFERENCE (ROW, COLUMN) enter the position of the cells.
.png)
Figure: Selecting mapping locations (MS Excel)
3.Click Save to store the values.
Selecting mapping location for Autocad templates
In the case of AutoCad templates Block Name and Attribute Tag can be entered.
To select mapping location for autocad template
1.On the System Properties window on the column BLOCK NAME enter the name of the block where property is to be mapped.
2.On the column ATTRIBUTE TAG, enter the tag name.
.png)
Figure: Selecting mapping locations (AUTOCAD)
3.Click Save to store the values.
Selecting mapping location for PDF templates
In the case of PDF templates (PDF Forms) Template field names are selected from a drop-down list.
To select mapping location for PDF template
1.On the System Properties window, corresponding to the property name, select the TEMPLATE FIELD NAME from a drop-down list.
.png)
Figure: Selecting mapping locations (PDF)
1.Click Save to store changes.
Mapping Signatures
Digital signatures of a user can be mapped and displayed in MS Word and MS Excel. Signatures are mapped to bookmarks. Hence ensure a bookmark is available in the template file. The digital signatures will be mapped and displayed in the specified template if the following settings are carried out.
1.Select a signature file on the User Advanced Details window.
2.In the default properties of the genealogy to which the document is added, ensure the Character updation mode as Export Characteristics to Documents.
3.On the Document Template Properties Mapping window select the checkbox for SIGNATURE/STAMP against the document property.
.png)
Figure: Mapping signature
Editing a Document Template
To edit a Document Template,
1.Select a Document Template and click on “Edit”.
Make necessary changes.
2.Click “OK”.
The Document Template is updated successfully.
Removing a Document Template
To remove a Document Template,
1.Select the Document Template to be removed and click on “OK”.
2.Choose “Yes” to remove the Document Template.
The Document Template is removed successfully.
Downloading a Document Template
To download a Document Template,
1.Select the “Document Template” to be downloaded.
2.Click on “Download”.
The Document Template is downloaded successfully.
|