|
Several configurations are required to avail the snag handling functionality. The administrators can use the ‘Administrative Settings option available in the snag main window to manage the configurations. Different configurations that can be defined is mentioned in the following navigation table.
Creating Defect Categories
When reporting snags, it is a common practice to categorise them based on the nature of defects. This helps in assigning the experts in rectifying the respective type of defects. Also, common practices for rectification can be defined, making the rectifications quicker.
NOTE: Defect category created for a module will be available only for that module. Also, if a defect category is deleted for a module, the operation has no effect for other modules. Defect categories are independent of a module.
To create defect categories
1.On the Snag main window click the Administrative Settings icon.
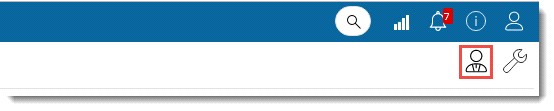
Snag Management Administration window is displayed.
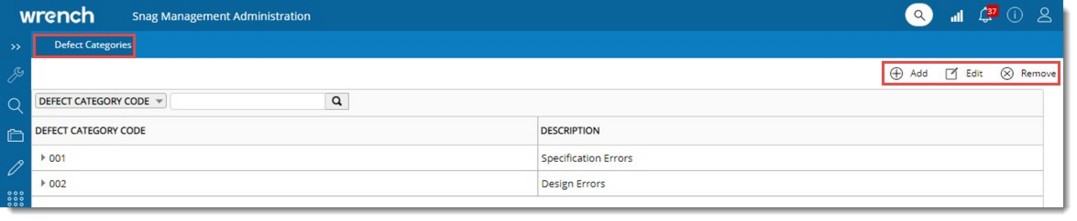
Figure: Administration window
Defect Categories tab is selected by default. Category codes created are displayed in the grid.
2.On the toolbar click Add. A pop-menu is displayed.
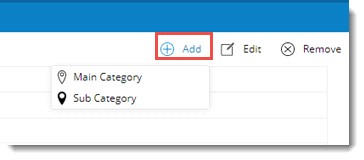
Option Main Category can be used to create a new defect category at the first level of the hierarchy and the option Sub Category can be used to create a sub category under a selected category. If no categories are currently selected, this option will be disabled.
3.Click Main Category.
Defect Category window is displayed.
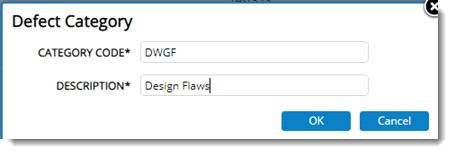
4.Enter a Category Code and Description.
5.Click OK to save entered values.
To create a sub category
1.Select a category and On the tool bar click Add. A menu is displayed.
2.On the menu click Sub Category. Defect Category window is displayed.
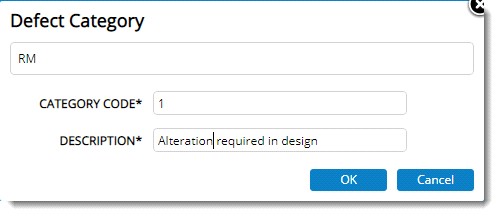
Figure: Defect Category
Value of main category is displayed in the window.
3.Enter a Category Code and Description.
4.Click OK to save the entered values.
Modifying defect categories
Defect categories created can be modified.
To modify a defect category
1.Select the defect category that is to be modified.
2.On the toolbar click Edit.
Defect Category window is displayed. Here it is possible to edit the entered values.
3.After editing the values click Save.
Removing defect categories
Defect Categories can be deleted. Only defect categories that are not in use can be removed.
To remove defect categories
1.Select single or multiple defect categories and in the toolbar click Remove.
A message Are you sure to remove the selected categories and its child levels is displayed.
2.Click YES to remove the category. Click NO to abort the operation
Creating snag groups
Groups helps to define a list of common types of Snags for which default set of characteristics values can be predefined. This will help to create Snags easily instead of specifying values for each Snags properties individually. A group can be assigned to a Snags and the property values as defined for the group will be inherited by the Snags
To create Snags groups
1.On the Snag main window click Project Settings.
Snag Management Settings for the respective project is displayed.

Figure: Snag management setting window
The window has four tabs, Groups, Security, Reminder & Escalations and Settings. By default, tab Groups is selected.
To create a group
1.On the toolbar click Add.
Snag Group Details window is displayed.
2.On the window enter values for the fields mentioned in the following table.
|
#
|
Property
|
Description
|
|
1
|
Group Name
|
Enter a name for the group.
|
|
2
|
Area Code
|
Click the browse button to select an Area Code. Area window is displayed where available areas are listed. Select an area from the list.
|
|
3
|
Area Description
|
Value is filled in automatically when an area is selected.
|
|
4
|
Discipline
|
Click the browse button to select a Discipline. Disciplines window is displayed where available disciplines are listed. Select the discipline from the list.
|
|
5
|
Approver
|
Click the browse button to select an approver from the Search User window.
|
|
6
|
To be rectified by
|
Click the browse button to select the name of the user who is expected to rectify/ resolve Non-Conformance in this group. Users can be selected from the Search User window.
|
|
7
|
Notify the following users
|
When the Non-Conformance is created or updated as not resolvable or closed, notifications can be sent to a group of people. Click the browse button to select multiple users from Search User window.
|
|
8
|
Authorise Closure
|
When the Non-Conformance is marked for closure, it gets closed only when authorized personnel accepts it. User may specify multiple users here separated by comma, any one of whom may close snags in this group.
|
3.After entering the values click OK.
Group is saved successfully and is displayed in the grid.

Figure: Displaying created group
It is possible to edit group details and remove a group.
Security Settings
Security defined here is applicable to both Users and User Groups (Roles). Only users with security right can manage a snag.
To define security
1.On the Snag window click the Administrative Setting icon.
Snag Management Settings window for the respective project is displayed.
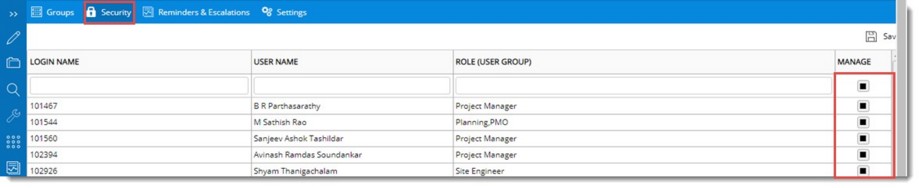
Figure: Snag Security Settings window
2.Click the tab Security. List of users in the project is displayed.
3.Select the checkbox in the column Manage corresponding to a user.
4.Click Save to store the changes. Saved Successfully message is displayed.
Manage permission is assigned to the set of users.
Configuring Escalations and Notifications
Reminders and escalations can be configured for Snag.
To configure reminders and escalations
1.On the Snag Settings window click Reminders & Escalations.
Reminders and Escalations settings window is displayed. On the window separate panes are available for configuring Reminders and Escalations.
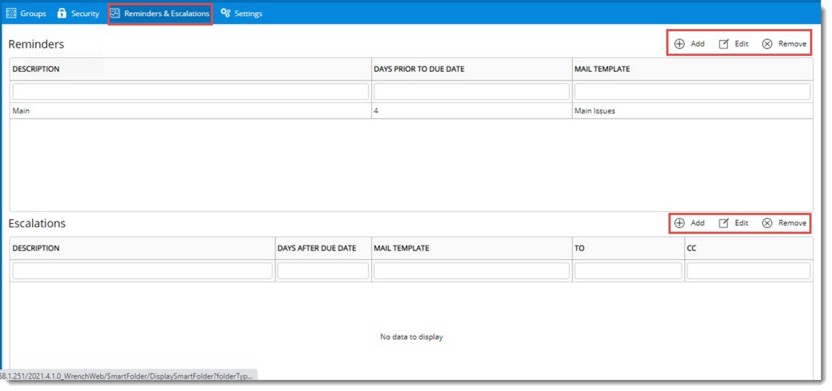
Figure: Reminders and Escalations configuration window
To configure a reminder
1.On the Reminders pane tool bar click Add.
Snag - Reminder Details window is displayed.

Figure: Snag - Reminder Details window
2.On the window enter values for the following properties.
Description: Enter a description for the reminder.
Days prior to due date: Enter the number of days before the due date, when the reminder should be sent.
Mail Template: Select a mail template from the drop-down list.
3.Click Save to store the settings. The created reminder setting is displayed in the window.
To configure an escalation
1.On the Escalations pane tool bar click Add.
Snag - Escalation Details window is displayed.
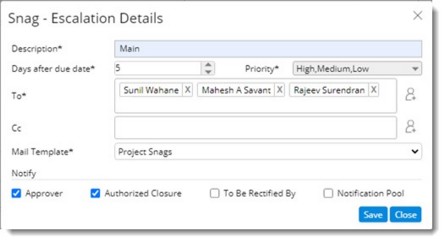
Figure: Snag- Escalation Details window
2.On the window enter values for the properties mentioned in the following table.
|
#
|
Property
|
Description
|
|
1
|
Description
|
Enter a description for the escalation.
|
|
2
|
Day after due date
|
Enter the number of days after the due date, on which an escalation is to be sent.
|
|
3
|
Priority
|
Select a priority for the escalation from a drop-down list.
|
|
4
|
To and Cc
|
Enter the recipients for the escalation.
|
|
5
|
Mail Template
|
Select a mail template from a drop-down list.
|
|
6
|
Notify
|
Select the checkbox next to the resource that is to be notified.
|
3.Click Save to store the changes.
Escalations and reminders are sent based on the configuration made here.
Managing Settings
User who creates the Snag is automatically assigned as the approver. But in some project sites, Snag created by a resource must be approved by another resource. Since both scenarios are required on site, a setting Assign creator as approver by default is available in the Settings tab of Snag Management Settings window. If the checkbox next to this option is selected, creator is assigned as the approver by default. If the checkbox next to this option is not selected, user needs to select an approver.
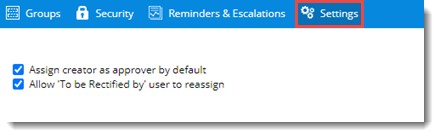
Figure: Snag Settings
There are scenarios where a PMC user may raise a Snag, issue and NCR and assign it to the contractor user. The contractor user assigned to the Snag, Issue or NCR may need to reassign the Snag, Issue or NCR to the actual user in their team who will work on the objects to close it. Currently, this is not allowed. The assigned resource cannot reassign.Also, when the PMC has assigned one contractor user to a Snag, Issue and NCR, it cannot be changed. Hence if a wrong user is assigned, it cannot be rectified. This also needs modification.
As a solution to this, a setting to allow the user in “To be rectified by” field to assign work to another resource is available.
If the checkbox next to the setting Allow "To be Rectified by" user to reassign is selected, resources assigned as To be Rectified by users will be able to reassign the issue.
|