|
This section contains information on various operations that can be carried out on the WBS. The menu listing the operations that can be carried out on the WBS is displayed when mouse is hovered above the WBS button. WBS Operations menu is displayed below.
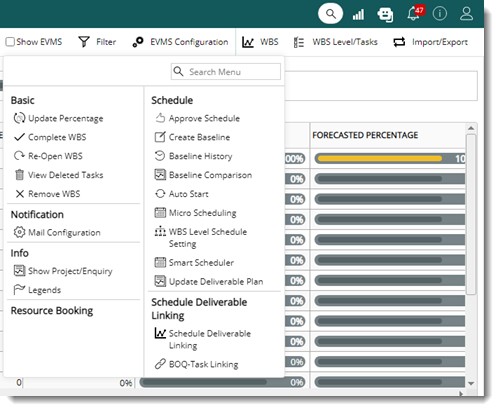
Figure: WBS Operations menu
Details on operations that can be carried out from the WBS menu can be explored using this navigation table.
Navigation Table
Approve Schedule
Prior to starting the project, the planning team creates the Master Deliverable List (MDL) and primary schedule for Master Deliverable List (MDL). MDL contains whole list of deliverables related to this Project. This is carried out using WRENCH. The schedule is finalized after approval by the project team and then the client. When the project schedule is finalised and it is ready to start the work the tasks in the MDL is scheduled. Approve Schedule option is used to schedule the MDL or WBS.
On clicking the Approve Schedule option, all the unscheduled tasks in the WBS are scheduled and baselined. If there are WIP and scheduled tasks in the WBS they are unaffected by this operation.
The following message is displayed.
1.Click OK to continue.
Task status is changed to Scheduled.
NOTE: You need to have Edit WBS permission to carry out this operation.
Complete WBS
After all the tasks in the WBS is completed, the WBS can be completed using this option. Once the WBS is completed, no new tasks can be added to the WBS nor can the task schedules be edited. If there are any incomplete tasks in the WBS, a warming message is displayed.
To complete the WBS
1.On the WBS Operations menu click Complete WBS.
A warning message "Once completed, changes cannot be made to this WBS" is displayed.
2.Click OK to continue.
The WBS status changes to COMPLETED and a message "The WBS is now completed" is displayed.
NOTE: Only users with Edit WBS and Edit Project rights can carry out this operation.
Re-Open WBS
Completed WBS can be re-opened using this facility. Once a WBS is re-opened, different WBS operations can be carried out on the WBS.
Baseline WBS
Baseline-WBS is the process of preserving a “snapshot” of the current plan so that changes can be made to it without losing the current state. Such “Snapshots” can later be viewed and compared to assess the efficiency of project planning.
Once you baseline the WBS:
1.All Work In Progress tasks are returned to Unscheduled status. Schedules can be modified for these tasks. After this operation worflow assigned to tasks are not affected.
2.All scheduled tasks return to Unscheduled status.
3.All completed tasks are unaffected. If changes are to be made to individual completed tasks, revise it separately.
4.The current list of tasks with its properties are retained for future reference.
To baseline a WBS
1.On the WBS operations menu click Create Baseline.
Remarks box is displayed.
2.Here enter remarks for creating baseline and click OK to continue.
3.Once the WBS is baselined, issue number is incremented by 1.
Baseline History
When the WBS is baselined old baseline details are maintained by the system. A list of such old baseline details will be available in the Baseline History. The history of baselines the WBS has undergone is displayed here. In the baseline history window the following fields are displayed.
|
#
|
Property
|
Description
|
|
1
|
Baseline Number
|
Issue number helps in identifying the version of the WBS and if it is the latest version.
|
|
2
|
Baseline Comments
|
The cause of baseline entered by the user while baselining the WBS is displayed here.
|
|
3
|
Baselined By
|
Name of the user who carried out the WBS baseline operation is displayed here.
|
|
4
|
Baselined On
|
Date on which the WBS was baselined is displayed here.
|
|
5
|
WBS Name
|
Name of the WBS is displayed here.
|
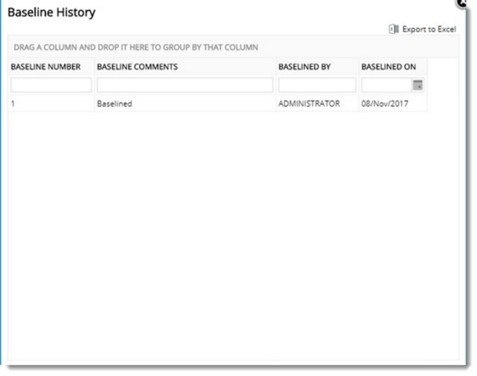
Figure: WBS Baseline History
The baseline history can be exported to MS Excel. In the Baseline History window click Expot to Excel to export the baseline history.
Update Percentage
This option is used to update the percentage of progress of tasks in bulk, when the area weightage has been edited in the project or when the weightage/schedule details have been edited for tasks and the progress according to the changes needs to reflect in the WBS.
Progress of the summary task is updated automatically as the child tasks are updated.
Show Project / Enquiry
On clicking this option Project Details page is displayed with the details on project of current WBS.
Mail Configuration
Email notifications are sent after different WBS operations for informing user about the action they have to take. Subject and content of these mails can be pre-defined. Notification mails can be configured for different Task or Rule related actions or events.
To configure notification mails
1.On the WBS Operations menu click Mail Configuration.
Notification Mail Configuration window is displayed.
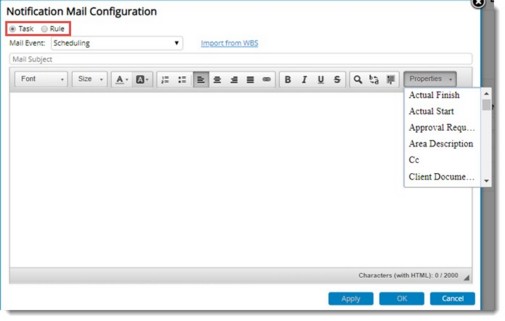
Figure: Notification Mail Configuration
In the window notification can be configured for Task and Rule related events. By default, option Task is selected.
2.Select the Mail Event from a drop-down list.
3.Select the task properties that is to be included in the Notification Mail from Properties drop-down list.
4.Create a format for the mail and click Apply.
To configure notifications for rules
1.On the Notification Mail Configuration window click the radio button next to Rule.
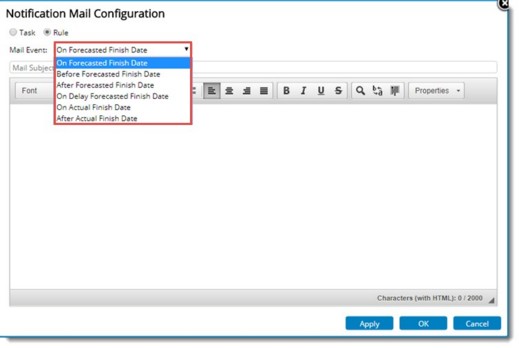
Figure: Configuring Mail Configuration for rules
2.Select the Mail Event from a drop-down list.
3.Create a format for the mail and click Apply. If there are any existing formats for the mail it can be edited.
To insert task/project properties in the mail
1.Click the down arrow next to Properties.
List of task properties is displayed.
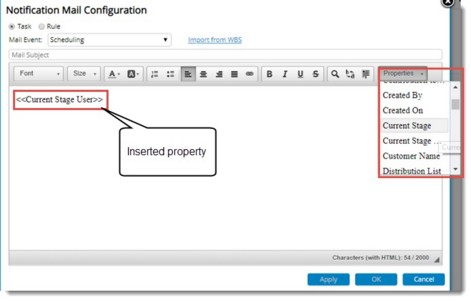
Figure: Mail Configuration window
2.Select the property that you want to insert from the window.
3.Click OK.
Corresponding values will be inserted when the email message is constructed.
NOTE: Only users with Edit WBS right in the project can carry out this operation.
To import mail events from WBS
1.Click Import from WBS.
Window to select mail events that are to be inherited is displayed.
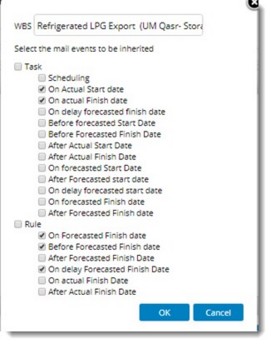
Figure: Mail events selection window
2.On the WBS search box enter a keyword and list of WBS based on the entered keyword is displayed.
3.Select the WBS from the list.
4.Select the required mail events from the list.
5.After making the selection click OK.
Mail options configured for the selected option is inherited to the destination.
Auto Start
You can auto-start or auto-initiate all the tasks in WBS using this option.
To auto-start tasks in the WBS
1.On the WBS Operations menu click Auto Start.
Auto Initiation window is displayed.
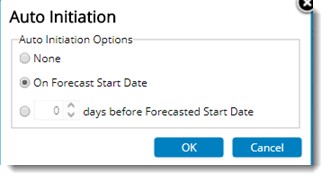
Figure: Auto Initiation window
The following options are available in the window.
None: On selecting the radio button next to this option, any existing auto-start settings are cancelled.
On Forecast Date: On selecting the radio button next to this option, all tasks in WBS will be scheduled to start their workflows on the forecast date.
"__" days before Forecast Start Date: Use this option to set number of days before forecasted date on which task workflows has to be started automatically.
After selecting the options to start the tasks automatically, if the workflow fails to start on scheduled dates an alert mails is sent to the user who edited the task last and to the project manager with the details of the task that failed to start.
NOTE: This email can be pre-formatted using Mail Configuration option.
View Deleted Tasks
When tasks are removed from a WBS, they are preserved for future reference. On clicking this option Deleted Tasks window is displayed. Tasks deleted from the WBS is displayed here.

Figure: Deleted tasks
An option to export the details of deleted tasks to MS Excel is available. All available task properties are exported to excel in a pre-defined format.
Remove WBS
1.Click this option to delete entire tasks from the WBS. On clicking this option the following message is displayed.
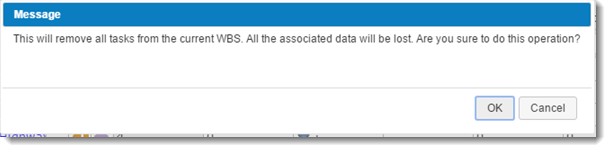
Figure: Warning Message - Removing WBS
2.Click OK to continue with deleting of tasks.
3.Click Cancel to suspend the operation.
Micro Scheduling
Micro scheduling is the operation in which the schedules for each rule in rules of credits assigned to tasks can be computed automatically, based on formulae defined in the project. For more information on this topic see Working from Task Details window>>Schedules>>Microscheduling
Smart Scheduler
Smart Scheduler in SmartProject helps you in creating and managing Project Master Schedule or plans and oraganize, assign and collaborate on tasks. Schedule is created as WBS Level and Tasks along with other WBS task properties. Successor and predecessor relationship details can be specified for each task in Smart scheduler. The Project Scheduling feature in SmartProject provide Forecast Finish date to Project Plan and show critical activities to Planner. Auto scheduling operation may be performed to determine the Early/Late Start/Finish of each tasks and identify critical tasks. Critical path method can be used by constructing a model of the Project that includes the following.
•A list of all tasks required to complete the project.
•The dependencies between the tasks.
•The estimate of time (duration) that each activity will take to complete.
With this information, you can determine the critical path by identifying the longest stretch of dependent activities and measuring them from start to finish.
Defining WBS Level/tasks as Schedule type
WBS Levels and Tasks can be selected and marked as Schedule type of tasks.
To mark WBS Levels/Tasks as schedule type
1.Select the required root level WBS Levels/Tasks.
2.On the WBS menu click WBS Level Schedule Setting.
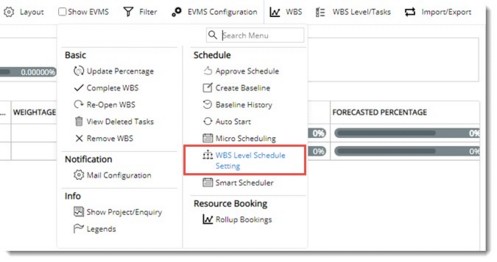
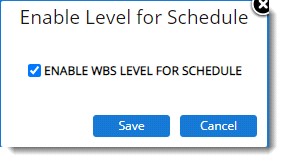
Enable Level for Schedule window is displayed. Setting ENABLE WBS LEVEL FOR SCHEDULE is selected by default.
3.Click Save to store the information. WBS Schedule Settings saved successfully message is displayed.
Opening Smart Scheduler
After saving the WBS Schedule settings next step is to open the smart scheduler.
To open smart scheduler
1.On the WBS menu click Smart Scheduler.
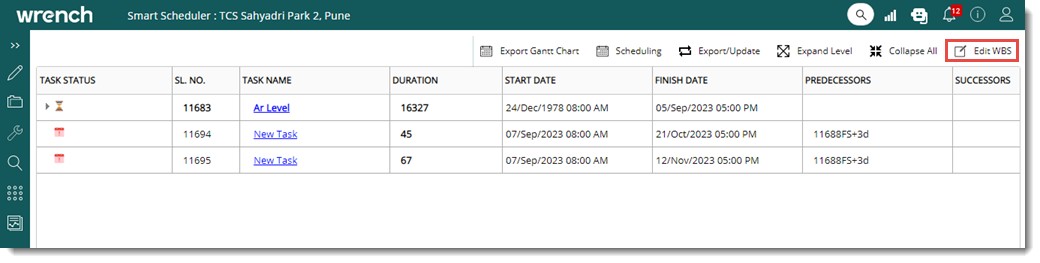
Figure: Smart Scheduler window
Smart Scheduler window is displayed. Tasks marked as Schedule type will be displayed in Smart scheduler window. In the window details like Task Status, Serial Number, Task Name, Duration, Start Date and Finish Date etc. is displayed.
2.Click Edit WBS to enable the edit mode. Once edit mode is enabled, different operations can be carried out on the tasks displayed here.
Adding tasks and levels
Tasks and Levels can be added in the smart scheduler window.
To add levels
1.Select the level under which new level is to be added.
2.On the operations menu under the group Add Level, based on your requirement, select Above, Below or As child.
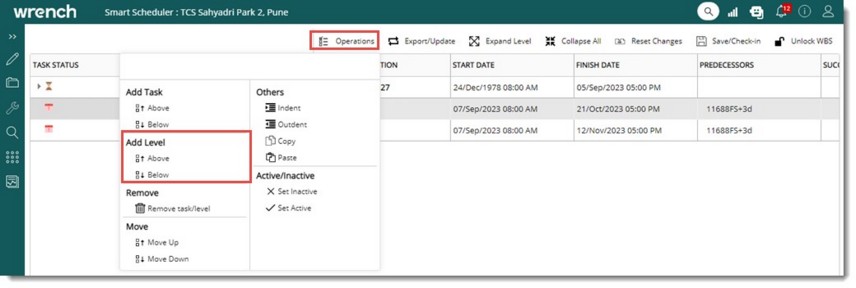
Figure: Adding levels
A level is inserted based on the selection made in the menu.
3.On the tool bar click Save/Check-in to save the changes.
To add tasks
1.Select a level or task.
2.On the operations menu under the group Add Task, click Below or As Child.
Based on the selection in the menu, task is added below or as a child task.
3.On the tool bar click Save/Check-in to save the changes
Though start and finish dates are populated automatically based on the Project start and end dates, new dates can be defined.
To enter start and finish dates
1.Select the required start date and finish date from a date picker.
The value for duration changes when start and finish dates are changes.
2.Click Save/Check in to store changes.
Modifying task duration
If Forecast start and Forecast finish date is available, duration will be calculated automatically. Existing duration of an activity can be modified. Value in the column Duration can be edited manually.
To edit task duration
1.Click the option Edit WBS.
2.Double click the value in the duration column.
Column changes to edit mode.
3.Enter a value for duration.
When duration is modified, if Start and Finish date is blank, the Start/Finish dates will remain as blank.
If start date is available and finish date is blank, finish date against the Task is calculated automatically based on Duration and Calendar.
If both Start/Finish dates are available, finish date is modified based on Start date, Duration and Calendar.
Editing Schedules
Task information of tasks in the smart scheduler can be modified.
To modify task details and schedules
1.On the window click the edit icon corresponding to the task.
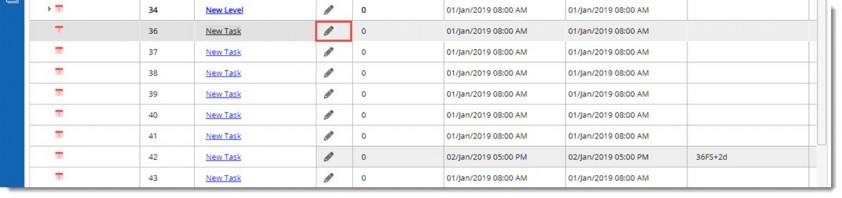
Figure: Editing Schedules
Edit Schedules window is displayed.
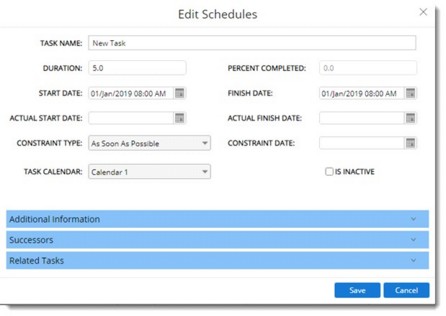
Figure: Edit Schedules window
Task basic details, Successor, Predecessor relationships etc can be modified from this window.
START DATE and FINISH DATE can be modified. A new constraint will be created if the Start or Finish dates are modified manually. If the Finish date is modified, constraint will be created against Finish date and If the Start date is modified constraint will be created against the Start date.
Select ACTUAL START DATE and ACTUAL FINISH DATE. When the Actual start date is updated, the Start date of the task is replaced with the date in ‘Actual start date’. When the Actual Finish date is updated, the Finish date of the task is replaced with the date in ‘Actual Finish date’.
Defining task relationships
Successor, Predecessor relationships can be defined between different tasks in Smart Scheduler. Relationships can be defined only for ‘Schedule’ Type tasks; hence this operation is only possible from the Smart Scheduler window.
For each task in Smart scheduler, successor /predecessor dependency can be specified from the Successor/Predecessor columns in smart scheduler. A dependency is the relationship between predecessor and successor tasks.
Standard dependency types used in Smart Scheduler is mentioned in the following table.
|
#
|
Type
|
Abbreviation
|
Remarks
|
|
1
|
Finish to Start
|
FS
|
Activity 1 must finish before activity 2 can start.
|
|
2
|
Finish to Finish
|
FF
|
Activity 1 must finish before activity 2 can finish.
|
|
3
|
Start to Start
|
SS
|
Activity 1 must start before activity 2 can start.
|
|
4
|
Start to Finish
|
SF
|
Activity 1 must start before activity 2 can finish.
|
In some cases, the Successor activity can be started only after certain number of days after completion of the Predecessor. This is called the Lag time. Lag is the delay of a successor activity and represents time that must pass before the second activity can begin.
Defining predecessors
Predecessors of task can be defined in the Smart Scheduler grid.
To define predecessor of a task
Enter task relationships in the Predecessor column of Smart scheduler. Here the relationship entered is 11688FS+2d. This means Task 11690 should be completed 2 days after Task 11688 is completed.
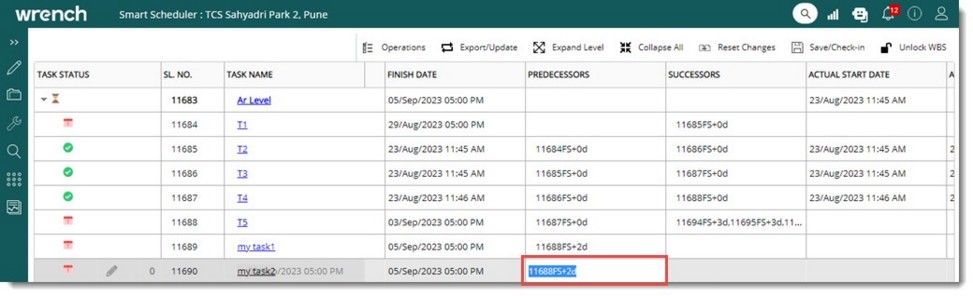
Figure: Defining predecessor tasks
On entering the relationships Start and Finish dates are updated, and the updated dates are highlighted in green colour.
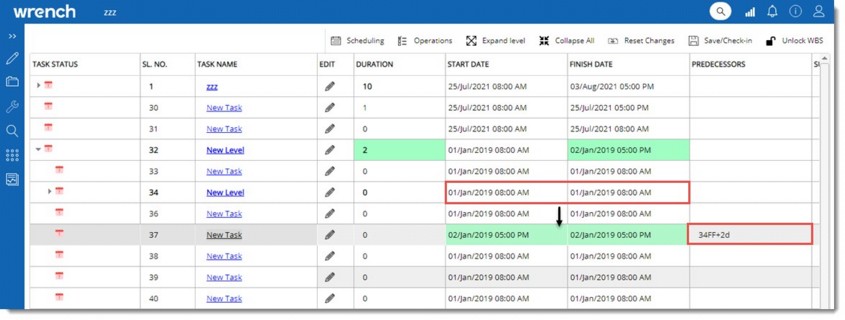
Figure: Automatic updating of start and finish dates
The following table illustrates the sample format for defining Predecessor Relationship.
|
#
|
Predecessor
|
Expected Output
|
|
1
|
1FS
|
The corresponding task may start only after #1 task is finished.
|
|
2
|
1
|
The corresponding task may start only after #1 task is finished.
|
|
3
|
1FF
|
The corresponding task may finish only after #1 task is finished.
|
|
4
|
1SF
|
The corresponding task may finish only after #1 task is started.
|
|
5
|
1SS
|
The corresponding Task may start #1 task is started.
|
|
6
|
1FS+03d
|
The corresponding task may start 3 days after the Finish of #1 task.
|
|
7
|
1FS-04d
|
The corresponding task may start 3 days before the finish of #1 task
|
|
8
|
1FS,2SS+5
|
The corresponding task may start after finish of #1 task and 5 days after the start of #2 task.
|
NOTE: The most common type of dependency followed in Projects is the Finish to start (FS) relationship. This relationship may be used in almost all projects. Hence if the user specifies the Task serial number alone without specifying the dependency abbreviation, it will be considered as FS dependency with ‘0’ lag. If there are multiple predecessors for a Task, it may be entered separated with a comma.
Predecessor and successor details are interdependent. Once predecessor relationships are entered , successor details of the related tasks are populated automatically as shown in the following figure.
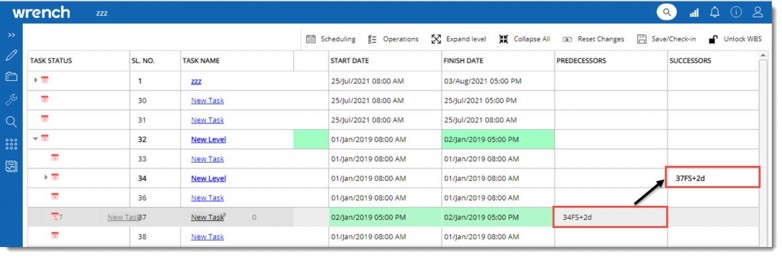
Figure: Automatic population of successor dependency
Defining successors
For defining successors of a task, applicable task relationships may be entered against the successor column of Smart scheduler. Format for specifying dependencies/relationships is similar to that in defining Predecessor.
To define a successor
1.On the column SUCCESSORS enter the required dependency or relationship.
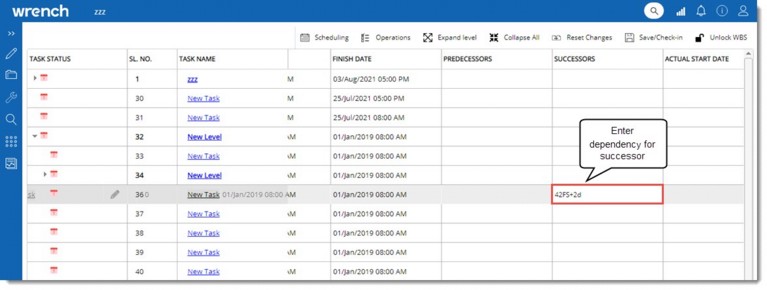
Figure: Entering successor dependency
On entering the relationships, Start and Finish dates are updated, and the updated dates are highlighted in green colour. Once successor relationships are entered, predecessor details of the related tasks are populated automatically as shown in the following figure.
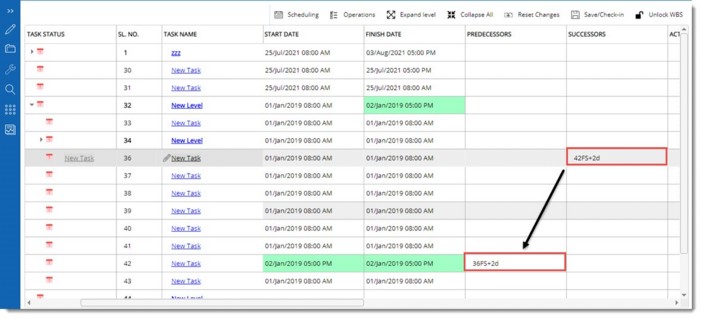
Figure: Automatic creation of predecessor details
Defining Constraints
Constraints can be used to create a link between a task and a particular date. By default, all tasks are created with the Constraint type 'As Soon As Possible' set. This allows Smart Scheduler to schedule the task based on its duration and dependencies, rather than against a particular date.
Sometimes it is required to prevent Smart Scheduler from rescheduling a task away from a key date. For example, imagine you are managing the review of a Project. The date of the review is likely to have been booked for months and is probably immovable. In this instance you might set a ‘Must start on’ project constraint for the date of the review.
In case ‘Review day’ has other tasks linked to it Smart Scheduler will warn you that a constraint might cause a future scheduling conflict.
1.Select a Constraint Type from a drop-down list and Constraint Date from the date picker.
Additional Information
Here Relationship or dependency already defined is displayed.
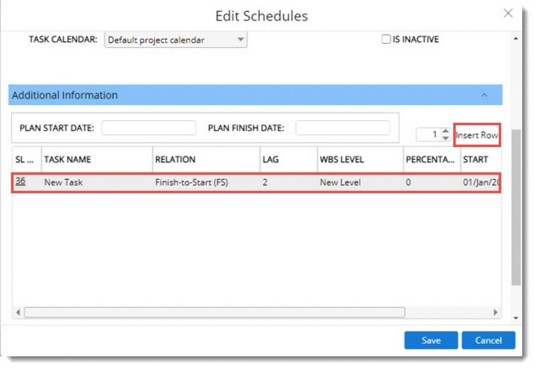
Figure: Additional Information
It is possible to edit TASK NAME, RELATION and LAG.
1.Click Insert Row to insert additional rows and create new dependencies.
If there are any SUCCESSOR tasks defined, they are displayed in the section Successors.
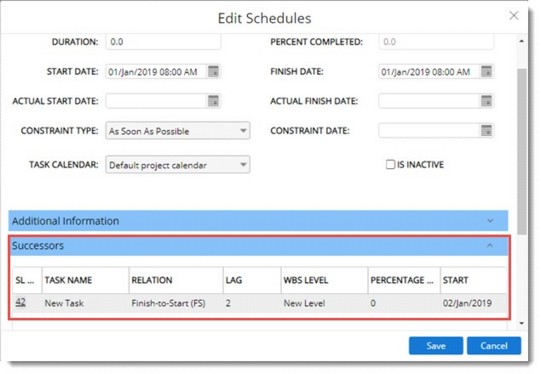
Figure: Successor task details
If there are any tasks related to the selected task, they are displayed in the section Related Tasks.
2.Click Save to store changes.
Critical Path Analysis
The critical path is composed of those tasks whose finish dates affect the finish date of the overall project. In other words, if a critical task finishes late, the project will likely finish late also, unless you are able to adjust to the delay and make up time elsewhere. The Critical Path is the series of tasks that must finish on time for the entire project to finish on schedule. Each task on the critical path is a time critical task.
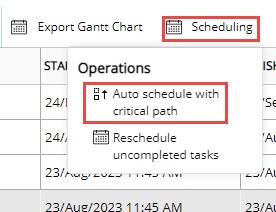
In Smart Scheduler option to auto schedule with critical path is provided. This option is displayed only if the Smart Scheduler is not in edit mode.
To auto schedule
1.On the Scheduling menu click Auto schedule with critical path.
The following message is displayed.
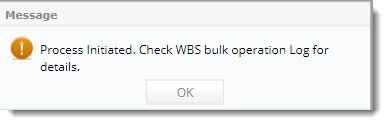
2.Click OK to continue.
Rescheduling incomplete tasks
Incomplete tasks in a WBS can be rescheduled from a new date.
To reschedule
1.On the Scheduling menu click Reschedule uncompleted tasks.
Reschedule Uncompleted Tasks window is displayed.
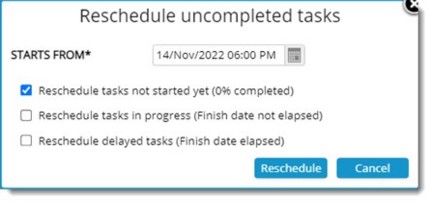
Figure: Reschedule uncompleted tasks
Selected tasks or entire tasks in the WBS can be rescheduled.
2.Select STARTS FROM date from a date picker.
Reschedule tasks not started yet (0% completed): If the checkbox next to this option is selected, tasks with zero progress percentage are also rescheduled.
Reschedule tasks in progress (Finish date not elapsed): If the checkbox next to this option is selected, user may decide whether WIP tasks (tasks having earned progress > 0) that have forecast finish dates greater than the current date is considered while performing the reschedule operation.
Reschedule delayed tasks (Finish date elapsed): If the checkbox next this option is selected, user may decide whether WIP tasks (tasks having earned progress > 0) that have forecast finish dates lesser than the current date is considered while performing the reschedule operation.
If none of the options are selected, then when user clicks on the ‘Reschedule’ option in the ‘Reschedule Uncompleted Tasks’ window, an alert message Nothing to reschedule. Select the required options is displayed and the reschedule operation is blocked.
3.Click Reschedule.
The following message is displayed.

4.Click OK to continue.
The tasks are rescheduled based on the reschedule date, days required for completion and Relationships and Constraints.
Operation in Smart Scheduler
The following operations can be carried out from the window.
Add Task: Click this option to add against default task Genealogy. If there is no default task genealogy, mandatory properties against default genealogy, a warning message is displayed.
Add Level: On clicking this option after selecting a task, a new Level can be added below or above the task.
Remove Task /Level: On clicking this option after selecting a row, the selected Level or Task is removed.
Indent: On clicking this option the selected level moves inside by one step.
Outdent: On clicking this option the selected level moves outside by one step.
Move: Options to move the selected Level up or down is available here.
Copy: Click this option to copy the selected level.
Paste: Click this option to paste the copied level.
Make Inactive: On clicking this option after selecting a task, selected tasks are made inactive. The relationship with an inactive task will not be considered if they are available in other tasks
Make active: On clicking this option after selecting inactive tasks, the tasks are made active.
Expand All: Click this option to expand all Levels/Tasks
Collapse all: Click this option to Collapse all Levels/ Tasks.
Reset Changes: Click this option to discard any unsaved changes and display the last saved information in the smart scheduler.
Save/Check-in: Click this option to save the information to WBS.
Unlock WBS: Click this option to unlock the WBS.
Exporting and updating tasks from the Smart scheduler
Tasks can be exported and updated from the smart scheduler.

To export the tasks
1.On the grid, select the tasks that are to be exported.
2.On the toolbar, place the mouse pointer over the option Export/Update.
3.On the menu displayed click Export to Excel.
Bulk Export Wizard is displayed. Export operation is similar to other export operations available in the WBS. Hence it is not explained in detail.
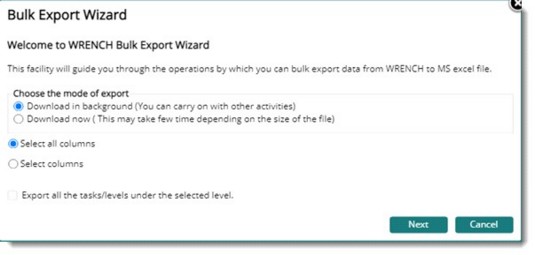
Figure: Bulk Export Wizard window
4.After selecting the required details click Next.
NOTE: If the checkbox next to the option, Export all the tasks/levels under the selected level is selected, then the user is permitted to export all the tasks, and sub-levels that are present under the selected levels. This option is enabled only if the selection contains at least one level for export.
If the option Select all Columns is selected, details are exported to an MS Excel file.
If the option Select Columns is selected, on clicking Next, a column selection window is displayed.
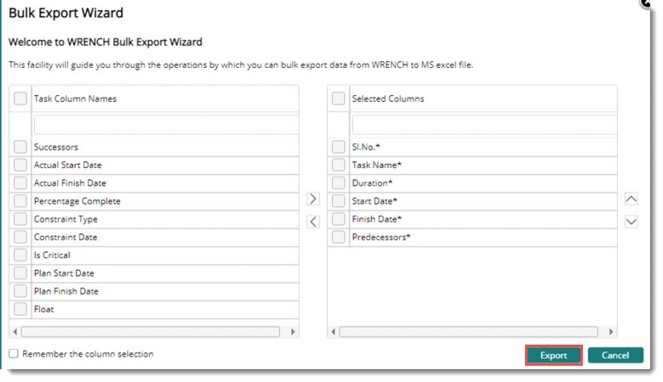
Figure: Select columns window
5.Click Export.
The selected columns and values in the columns are exported to an MS Excel template.
After exporting the task details to the MS Excel template, make the necessary modifications in the Excel; add data in blank cells, modify the existing data, remove unwanted data from the cells, etc.
Once the necessary modifications are done, save the Excel and update it back to SmartProject.
To import modified task details to SmartProject
1.On the menu click Update from MS Excel.
A file selection window is displayed.
2.Select the Excel file where the modified details are saved.
3.Click Next to continue.
If there are no errors, the bulk update operation is completed successfully, and a notification is sent to the logged-in user.
To view the log of operations
1.On the menu click Bulk Operation Log.
The Bulk Operation Log window is displayed.
Here a log of the bulk operations and its status is displayed.
Legends
Different properties and statuses in the WBS is depicted by different colours. This helps in recognizing different WBS statuses, progress and other properties. On clicking the legends the following window is displayed.

Figure: Legends
Scheduling deliverable linking
In large construction projects, the planning team creates the top-level project plan which consist of the L1 or L2 schedule. This schedule may not have the complete list of tasks but a summary, which can be broken down into various sub tasks. These sub tasks are the ones that can be monitored for progress, which needs to be rolled up to the plan.
Here, the schedule as created by the planning team is called the ‘Schedule’ or simply ‘Tasks’ and the detailed list of sub tasks are termed ‘Deliverables’ (because these are the actual work that is delivered).
For Example, consider the following project plan:
ABC Township
-> Generator Unit 1
-> ROW Tower 2
-> Desalination plant
-> Engineering
-> Civil
-> Helipad Offshore Rig
The ‘ABC Township -> Desalination plant -> Engineering -> Civil’ is a typical ‘Schedule’. This task will be assigned to the civil department where it is further broken down into different deliverables (document list), each of which will be assigned with a plan of completion. When each of the deliverable’s progress, it must contribute progress to the ‘Civil’ task in the ‘Schedule’.
To achieve this, it is required to link the schedules to corresponding deliverables. Large construction projects will have thousands of tasks and linking them manually is a Herculean task. In SmartProject it is possible to link schedules to deliverable automatically
NOTE: For updating the actuals of the schedule with the actuals from the deliverables, the schedules must be linked with deliverables.
To open schedule deliverable linking window
1.On the WBS options menu, click Schedule Deliverable Linking.
NOTE: This operation can also be performed for a single task, from the task details window also, where any type of tasks can be linked to other tasks. However, this option from WBS helps to link more than one deliverable quickly.
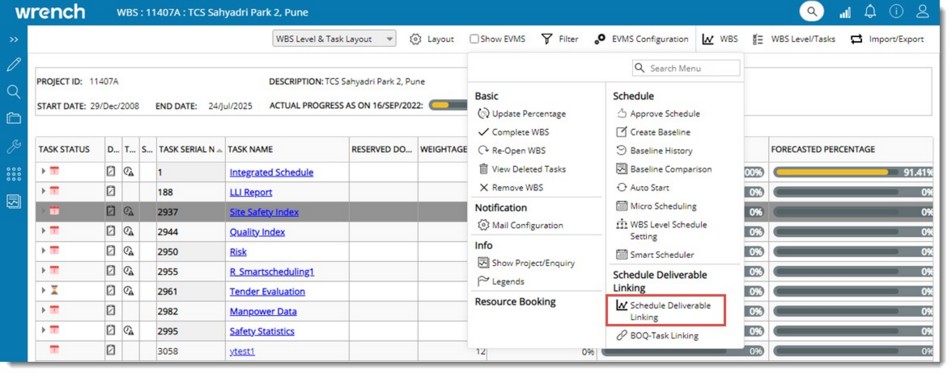
Figure: Linking schedule deliverables
Schedule Deliverable linking window is displayed. On the window, different options to link schedules and deliverables is available. Deliverables can be linked to schedule tasks. Linking can be carried out manually and automatically.
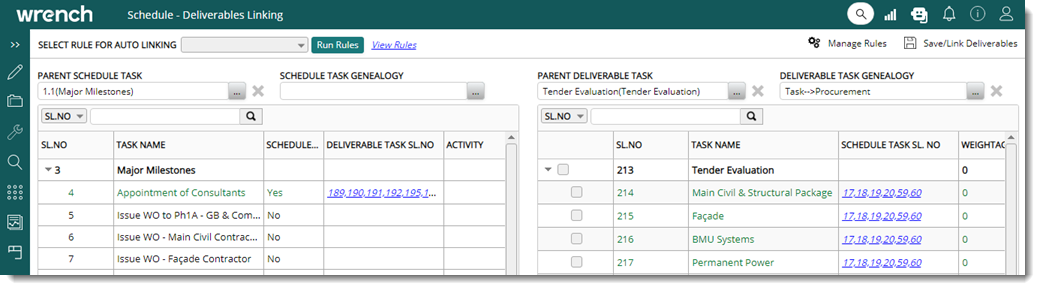
Figure: Schedule -Deliverables Linking window
Linking schedules and deliverables manually
For linking schedules and deliverables manually, schedules for linking is from parent schedule task and schedule task genealogy. Deliverables for linking is selected from parent deliverable task and deliverable task genealogy. Steps for linking schedules and deliverables manually is explained in the following sections.
Selecting schedule tasks
Schedule tasks can be selected from a parent schedule task and task genealogy.
To select schedule tasks from parent schedule tasks
1.Click the browse button next to PARENT SCHEDULE TASK.
2.WBS Levels window is displayed. All the parent tasks marked as schedule is listed here. Select the required level in the window and click OK.
Selected level and schedule tasks under the level are displayed in the window. Schedule tasks already linked to deliverables are displayed in green colour.
NOTE: When a schedule task is selected, any deliverables that are already linked to it will be displayed in the ‘Linked Deliverables’ section.
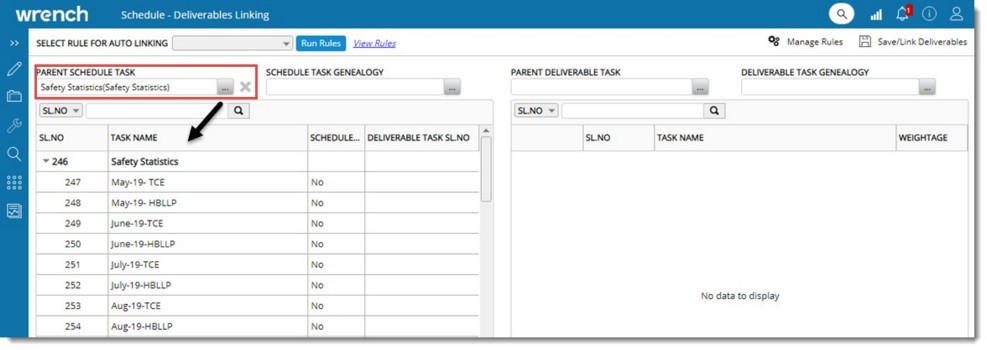
Figure: Displaying schedule tasks
To select schedule tasks from schedule task genealogy
1.Click the browse button next to the option SCHEDULE TASK GENEALOGY. Task Genealogy window is displayed.
All the genealogies available against the schedule tasks is listed here.
2.Select a Genealogy and click OK.
Schedule tasks under the selected genealogy are listed in the grid. Schedule tasks already linked to deliverables are displayed in green colour.
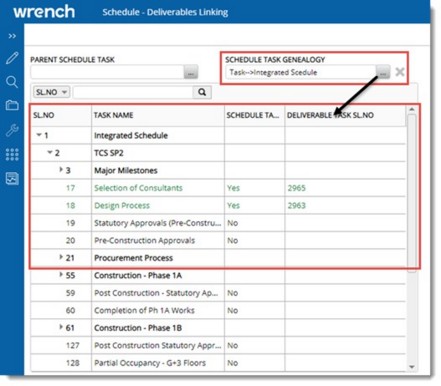
Figure: Schedule tasks under genealogy
NOTE: If PARENT SCHEDULE TASK and Schedule Task Genealogy is selected, then the tasks are filtered based on the combination and displayed.
Selecting deliverables for linking
Deliverables under a parent deliverable task or deliverable task genealogy can be selected and linked to schedule tasks.
To select deliverables under a parent deliverable task
1.Click the browse button next to PARENT DELIVERABLE TASK.
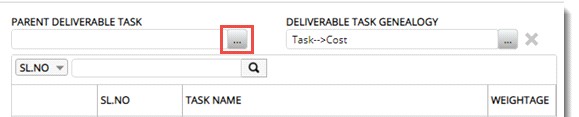
WBS Levels window is displayed. Here all the deliverable levels are listed in a hierarchical order.
2.Select the required deliverable level from the list and click the OK button.
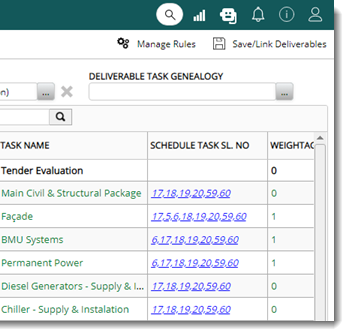
D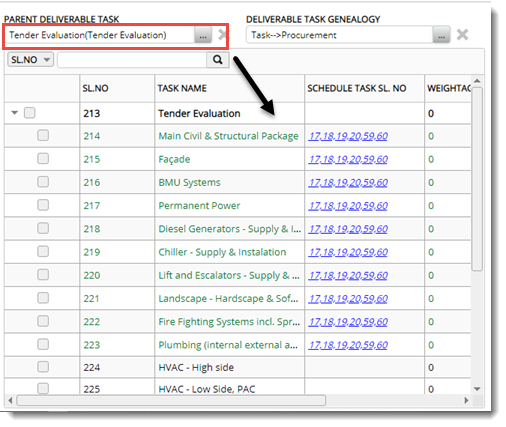 eliverable tasks under the select parent deliverable task are displayed in the window. eliverable tasks under the select parent deliverable task are displayed in the window.
Figure: Deliverable tasks under parent deliverable task
To select a deliverable under a deliverable task genealogy
1.Click the browse button next to the option DELIVERABLE TASK GENEALOGY.
Task Genealogy window is displayed. Here all the available task genealogies are listed.
2.Select the required genealogy and click the OK button. Deliverables based on the selected genealogy is displayed in the grid.
Linking schedules and deliverables
After selecting the schedule tasks and deliverable tasks, next step is to link the deliverables and schedules.
To link a deliverable to selected schedule task
1.Select a parent schedule task or a schedule task genealogy.
Based on the selections, list of schedules and their parent tasks are displayed.
2.Select the required schedule task. Only single schedule can be selected.
3.Select parent deliverable task or a deliverable task genealogy.
4.Select the deliverables that are to be linked to the selected schedule.
5.Select another schedule and then select the deliverables to which they need to be linked.
6.Click WEIGHTAGE column to change the deliverable’s weightage contribution to the linked schedule.
7.After editing the weightage, click anywhere outside the weightage area to save the changes.
8.Once the schedules and deliverables against it are selected, click ‘Save/Link Deliverables’ to confirm the linking.
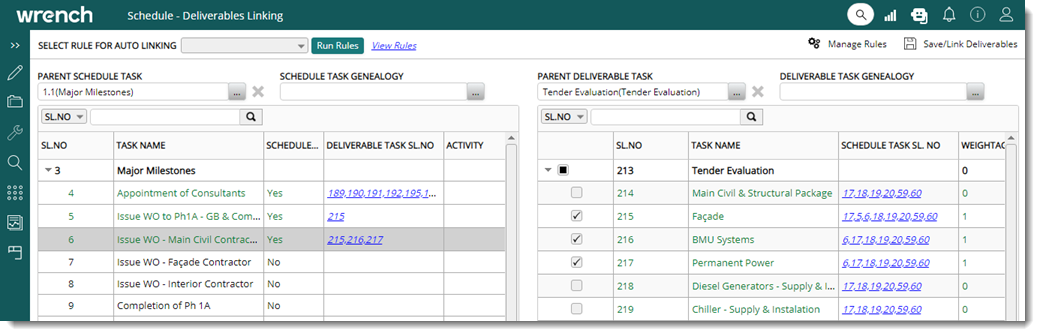
Figure: Linking schedules and deliverables
A message Deliverables saved successfully is displayed. Linked tasks and deliverables are displayed in green colour. On selecting the linked task, serial number of deliverables linked to the task is displayed in the column DELIVERABLE TASK SL.NO.
Once a schedule task is linked to a deliverable, the actuals of the deliverables will get updated to the actuals of the schedules automatically.
On the Schedule-Deliverable linking window, Deliverable pane, in the column, SCHEDULE TASK SL. NO, the list of scheduled tasks that are linked to the respective deliverables are displayed as a hyperlink. If there are multiple tasks, they are separated by a comma.
On clicking the hyperlink, the Linked Schedules window is displayed.
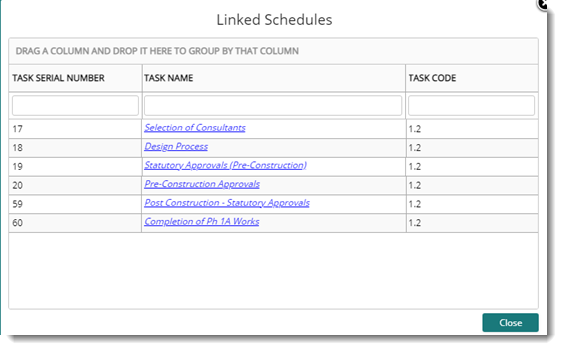
Figure: Linked Schedules window
Here a detailed list of linked schedule tasks is displayed.
Delinking deliverables from schedules
‘Linked Deliverables’ can be de-linked from the list.
To de-link deliverable from schedules
1.Clear the checkbox next to a deliverable.
2.Click ‘Save/Link Deliverables.’
A message Deliverables saved successfully is displayed.
3.Click Cancel to discard the operation.
The deliverable task linked to the schedule task will be listed under the Task tab in Task Details window. The following additional columns are available in Task tab grid.
Linking schedules and deliverables automatically
Schedule-deliverable linking can be carried out automatically using rules.
To automatically link schedules and deliverables
1.Select Schedules and Deliverables as explained in the previous section. Refer Selecting Schedule Tasks and Selecting Deliverables for linking.
2.On the Schedule-Deliverable Linking window click Manage Rules.
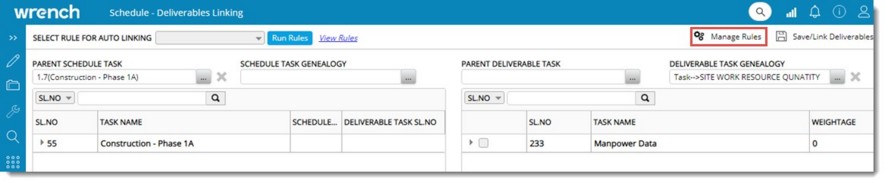
Figure: Selecting schedules and deliverables
The Manage Rules window is displayed.
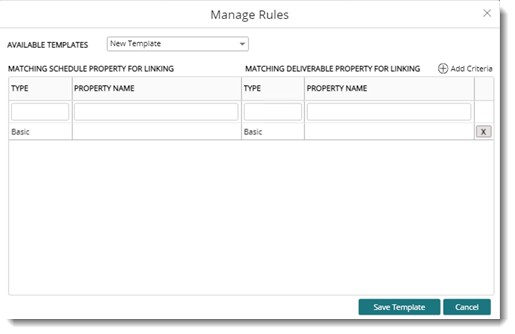
Figure: Manage Rules window
Templates already created can be selected from the drop-down list next corresponding to the property AVAILABLE TEMPLATES. By default, the option New Template is selected. Basic Properties and Custom Properties can be added to the template.
3.On the window click the option Add Criteria. A column for selecting properties is inserted.
4.Select the option Basic or Custom from the drop-down list corresponding to TYPE. Based on the selection here, available matching schedule property and deliverable property can be selected .
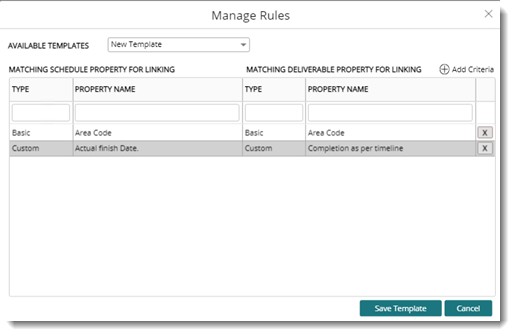
Figure: Selecting Properties
4.Click Save Template. Template Name window is displayed.
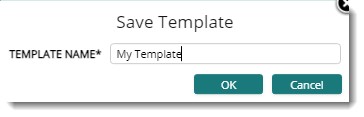
Figure: Save Template
5.Enter a Template name and click OK. A message Template saved successfully is displayed.
On the Schedule-Deliverable linking window, data in the column Deliverable Task Sl. No is displayed as a hyperlink.
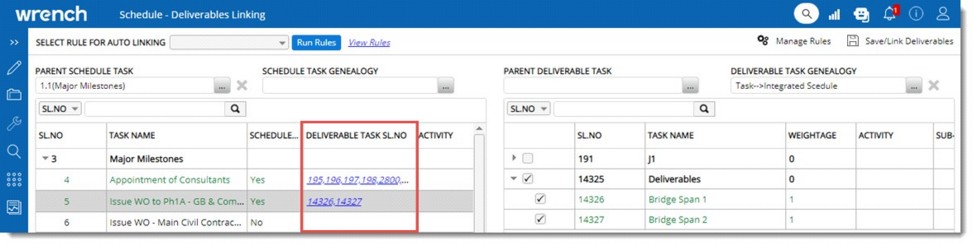
Figure: Schedule-Deliverable Linking window
On clicking the hyperlink, the Linked Deliverable window is displayed.
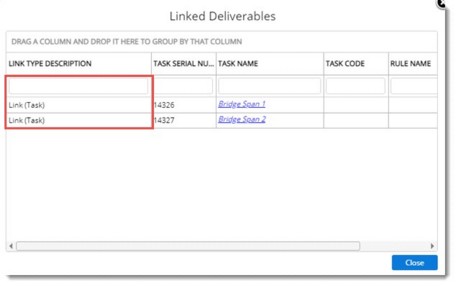
Figure: Linked Deliverables window
On the column LINK TYPE DESCRIPTION, the linked tasks and rules in the linked tasks’ is displayed.
To run a rule
1.Select the rule for auto-linking from a drop-down list and click Run Rules.
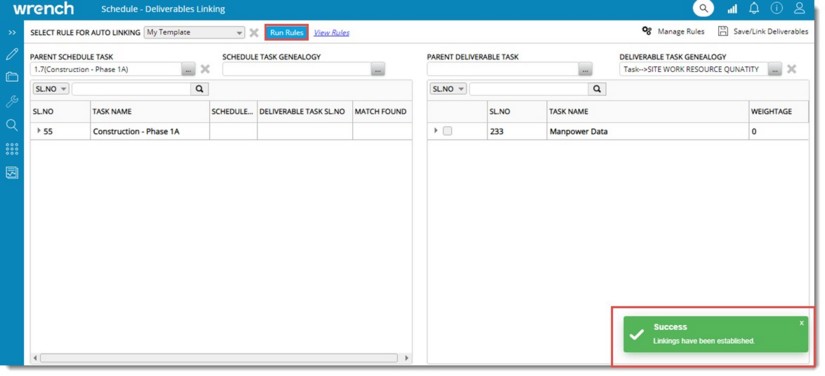
Figure: Running Rules
2.A message Linking has been established is displayed.
To view rules
1.Select the rule from auto-linking from the drop-down list.
2.Click View Rules.
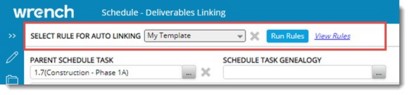
Figure: Viewing Rules
3.View Rules window is displayed.
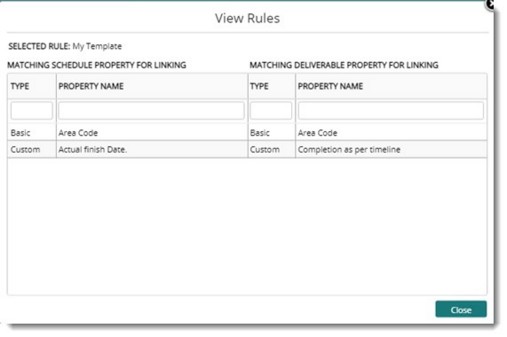
Figure: View Rules window
Selected Rule and properties assigned to the rule are displayed in the window.
4.Click Close to close the window.
Linking BOQ to multiple tasks
In some scenarios, it is more convenient to link a single BOQ to all that tasks.
To link BOQ to multiple tasks
1.On the WBS Operations menu click BOQ-Task Linking.
BOQ Task Linking window is displayed. Available BOQ's are listed in the window.

Figure: BOQ Task Linking window
2.Select the BOQ that is to be linked to tasks.
Linked Tasks pane is displayed. If the BOQ is already linked to a task, it is displayed here.
3.Click Link New Tasks.
Select WBS Tasks window is displayed. Here tasks of type Quantity, that are not yet linked to the BOQ is listed.
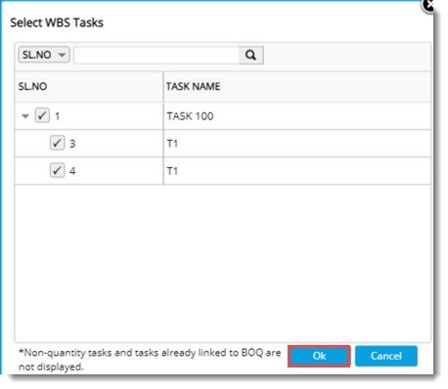
Figure: Selecting WBS Tasks
4.Select the tasks that are to be linked to the BOQ and click OK.
Selected tasks are displayed in the Linked Tasks pane. Value for the property ALLOCATED QUANTITY can be updated here.
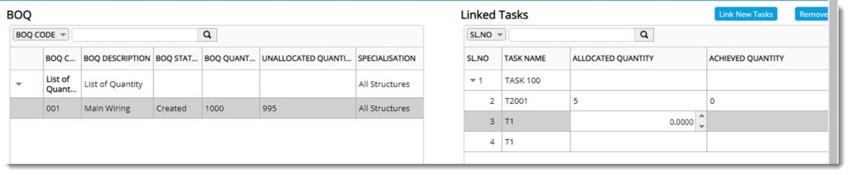
Figure: Tasks linked to BOQ
Updating deliverable plan
In typical construction projects, project schedules (Schedule Tasks) are created with a high degree of planning (high-level plan). For each of these schedules, the deliverables are created separately by the people who work on the deliverables. The deliverable plan is to be in sync with the corresponding schedules (all deliverables linked to a schedule must be completed within the schedule’s plan). Plan date of scheduled tasks can be automatically updated to all linked deliverables by default so that the planners can modify the schedule dates where required.
To update deliverable plan
1.On the WBS menu, click Update Deliverable Plan.
Update Deliverable Plan window is displayed.
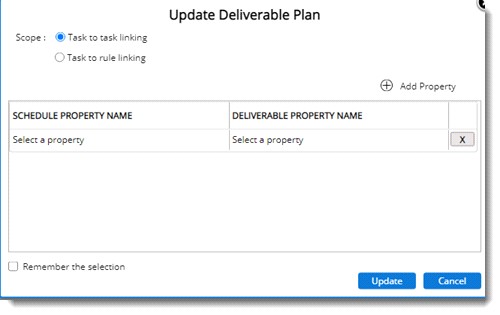
Figure: Update Deliverable plan window
The elements in the window are explained in the following table.
|
#
|
Property
|
Description
|
|
1
|
Scope
|
Select the type of linking based on which the plan from schedules needs to be updated to the deliverables. Options Task to task linking and Task to rule linking are displayed in the window. Select the radio button next to the required option.
|
|
2
|
SCHEDULE PROPERTY NAME
|
Select the date which needs to be updated from the schedules to deliverables from a drop-down list. Dates displayed in the list are Planned Dates, Forecasted Dates, Early Dates, Late Dates, Internal Dates.
|
|
3
|
DELIVERABLE PROPERTY NAME
|
Select the date to which the schedule dates need to get updated from a drop-down list.
|
|
4
|
Add Property
|
Click the option Add Property to add additional properties for updating the scheduled deliverable plan.
|
|
5
|
Remember the selection
|
If the checkbox next to this option is selected, then if the user re-enters the ‘Update Deliverable Plan’, the last defined properties are loaded in the window.
|
2.After selecting the date click Update.
The system verifies the Schedule Property (Date) and its corresponding Deliverable Property (Date). Once these dates are identified, the dates specified in the ‘Schedule Property Name’ are updated to the dates specified in the ‘Deliverable Property Name’.
In the list of values for the property DELIVERABLE PROPERTY NAME, value Internal Dates is not listed if the option Task to rule linking is selected. This is because internal dates do not apply to the rule of credit.
If the option Task to task linking is selected, on clicking Update, the planned date, forecasted date, early date/ and late dates of the linked schedule tasks get updated against the Planned date, Forecasted date, Early date, and late date of the linked deliverables.
If there are multiple deliverables linked against a scheduled task, then on updating schedule dates to deliverables, the planned, forecasted, late, and early dates of the linked deliverable rules get updated with the linked schedule’s planned, forecasted, late, and early.
When multiple schedules are linked to a single deliverable, then on updating the schedule plan to deliverables, the Minimum of the plan/forecast/late/early/internal start dates of the linked schedule get updated into the respective plan/forecast/late/early/internal start dates of the deliverables, and the Maximum of the plan/forecast/late/early/internal finish dates of the linked schedule get updated into the respective plan/forecast/late/early/internal finish date of the deliverables.
If the option Task to rule linking is selected on successful updating, the planned/forecasted/early/late finish dates of the linked schedule tasks get updated against the linked deliverable rules’ Planned/forecasted/early/late finish dates because rule of credit only have finish dates.
If there are multiple deliverable rules linked against a scheduled task, then on updating schedule dates to deliverables, the planned, forecasted, late, and early finish dates of the linked deliverable rules get updated with the linked schedule’s planned, forecasted, late, and early finish dates.
When multiple schedule tasks are linked to a single rule, then on performing the update operation, the Maximum of the plan/forecast/late/early finish dates of the linked schedule tasks get updated into the plan/forecast/early/late finish date of the linked deliverable rule.
When the update operation is completed, a success message is displayed.
Updating deliverable task codes
In most Project sites, the schedules are initially prepared with task codes in them and are imported into SmartProject using applications like Primavera or MS Project. These schedules and deliverables are then linked manually. Once the schedule and deliverables are linked, when new tasks are added, or when existing data gets corrupted it may be required to modify the schedules. For making such modifications, the schedules are removed or deleted from SmartProject, and new schedules are imported or updated back to SmartProject.
In such cases, the previous linking relationships are lost. Hence, the user may need to perform the linking operations again which is a time-consuming and repetitive process. In such scenarios option to update deliverable task code can be used.
.svg)
Using this option, schedule task codes are updated into the linked deliverable task code fields. Only a user with Edit WBS permission can carry out this operation. On clicking this option the following message is displayed.
.png)
Click Yes. If there are linked schedules and deliverables, then values in the TASK CODE property of the schedules get updated into the TASK CODE property of its linked deliverables.
If multiple deliverables are linked to a single deliverable, on carrying out this operation, a warning message is displayed, and the update operation for the entire WBS is blocked. Users can manually delete the link of tasks displayed in the warning message and repeat the operation.
What If Analysis
The progress of a Project may deviate from its plan due may unavoidable reasons.
Before the plan is rescheduled, the planning team may need to try various models of estimation by changing the tasks or altering the task relations, etc. After trying out multiple 'What-if’ scenarios, the production plan may be appropriately updated.
However, such What-If experiments cannot be performed on the live production schedule - as many stakeholders will be actively using it. Hence a facility to create copies of WBS, where the What-If scenarios can be created and compared with the production plan before the most suitable one can be identified is available in SmartProject.
The option to create a working copy of the WBS is available in the WBS and Project Details window. Working copy can be created only for scheduled tasks and the maximum number of working copies that can be created is three.
To create a working copy
1.Open the WBS.
2.On the WBS options menu, from the group What-If Analysis, click Working Copies.
.png)
The Working Copies window is displayed. If working copies are already created for the WBS, it is lited in the window.
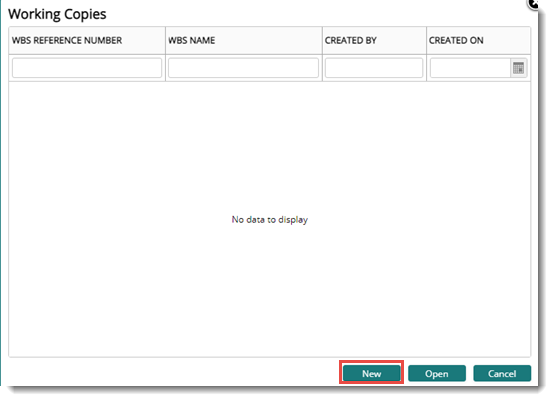
Figure: Working Copies creation window
3.On the window click New. The bottom part of the window expands.
.png)
4.Specify a name for the working copy of WBS. By default, a name is displayed.
5.Click Create.
A working copy is created successfully.
NOTE: A working copy is not created from another working copy.
On creating a working copy, the following data from the main WBS is copied.
Schedule tasks
Basic task information and dates like Plan, forecast, actual (if any), early and late dates.
Linked schedule tasks, referred tasks, and referred documents from the Task Details window.
Related Files, Remarks, Event Logs, and Task Hierarchy from the task details window.
Opening the working copy
The working copy created can be opened from the WBS and the Project Details window.
To open the working copy
1.On the WBS menu, from the group What-If Analysis, click Working Copies.
The Working Copies window is displayed.
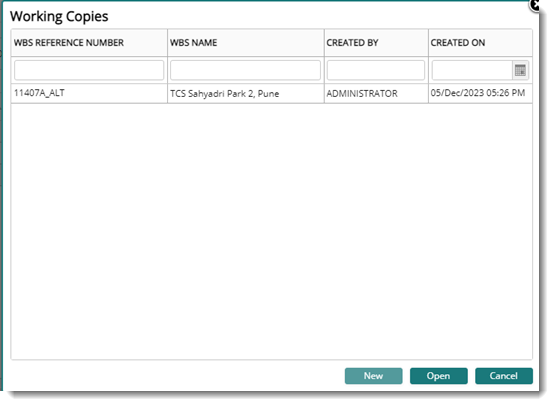
Figure: Working Copies window
2.Select the working copy that is to be opened and click the button Open.
The Working copy is opened, and the scheduled tasks are displayed.
Renaming the working copy
Working copies can be renamed.
To rename working copies
1.Open the working copy.
2.On the WBS menu click Rename.
Rename Working Copy window is displayed.
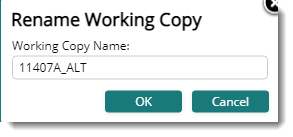
The initial name specified for the working copy is displayed in the window.
3.Rename the working copy name and click OK.
Deleting the working copy
A user with remove permission can delete the working copy.
To delete the working copy
1.Open the working copy.
2.On the WBS menu click Remove.
The working copy is deleted successfully.
Comparing the main WBS and working copy
Once the required modifications are performed in the Working Copy, including the Smart Scheduler, data from the main WBS and Working Copy can be compared.
By comparing, the differences in the schedules can be identified and the modifications can be verified before accommodating into the main (live) WBS.
To compare working copies
1.On the WBS menu click Compare Working Copies.
Compare Working Copies window is displayed.
2.Select the source Working Copy.
3.Select the target copy for the comparison operation.
4.Click the button Compare.
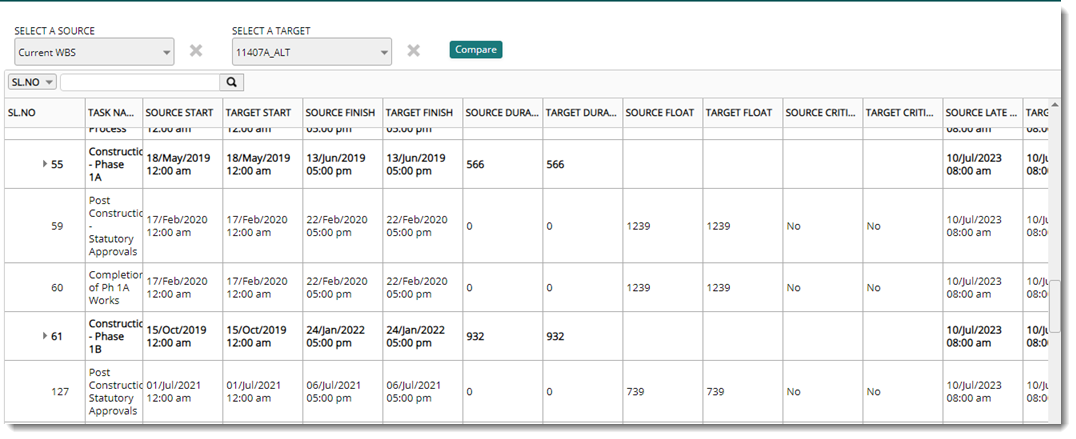
Figure: Comparing working copies
Comparison data from the selected target and source is displayed in the respective columns.
|