Different steps that has to carried out in adding risks and managing risks is explained in this section. Use the following navigation table to access different topics.
Adding Risks
Risks can be added to the RBS from the main window.
 To add a risk
- In the RBS window tool bar click Risks. In the menu click Add.
Add Risk window is displayed.
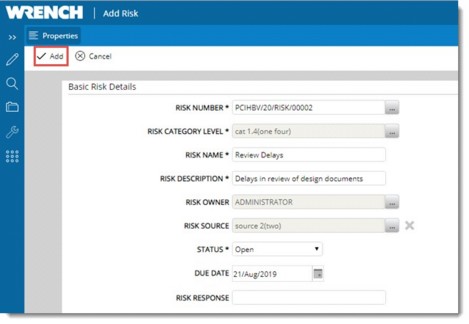
Figure: Add Risk window
- Enter values for properties displayed in Basic Risk Details. The properties are detailed in the following table.
|
#
|
Property
|
Description
|
|
1
|
Risk Number
|
Enter a unique risk number. Click the browse button to generate a number.
|
|
2
|
Risk Category Level
|
Click the browse button to select a category level. On clicking the browse button Risk Category window is displayed with a list of pre-defined categories. Select a category from the list.
|
|
3
|
Risk Name
|
Enter a risk name.
|
|
4
|
Risk Description
|
Enter a description for the risk.
|
|
5
|
Risk Owner
|
Click the browse button to select a risk owner from Search User window.
|
|
6
|
Risk Source
|
Click the browse button to select the resource assigned to mitigate the risk. On clicking the browse button next to this option, Risk Source window is displayed with a list of pre-defined risk sources. Select a risk source from the list.
|
|
7
|
Status
|
Select a status from the drop-down list. Statuses available are Open and Close.
|
|
8
|
Due Date
|
Select a due date for the risk.
|
|
9
|
Risk Response
|
Enter a response for the risk.
|
- After entering values for all the fields click Add. Risk Created Successfully message is displayed.
- Click OK to continue. The following window is displayed.
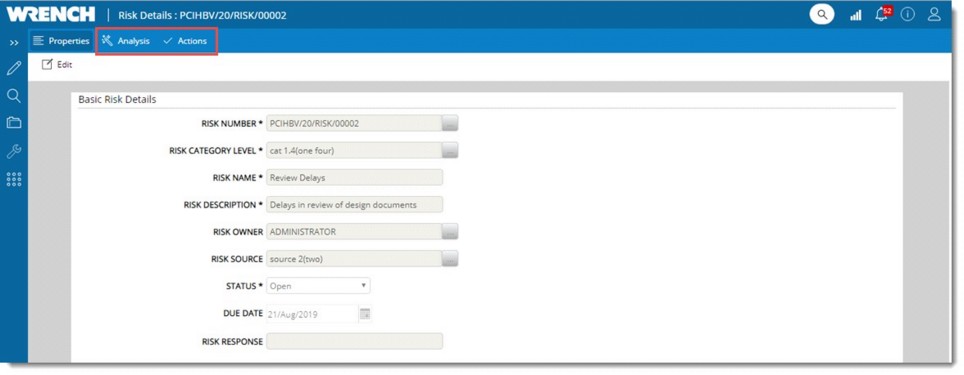
Figure: Created Risk
Analysing a risk
There are different practices of analysing risk. One is based on the impact and probability and the other is based on Impact and Cause. Smart Project is configured to do risk analysis based on the impact and likelihood by default. However, it can also be configured to analyse risks based on Impact and Cause.
 To analyse risks based on impact
- In the Risk Details window click Analysis tab.
- Click the Edit button.
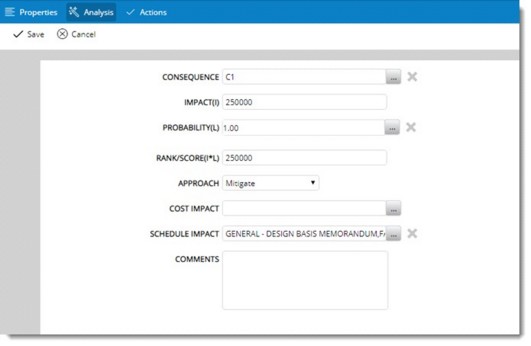
Figure: Risk Analysis
- Enter the necessary Analysis details in the window. Different Analysis Details that are to be entered in the window is explained in the following table.
|
#
|
Properties
|
Description
|
|
1
|
Consequence
|
Click the browse button to select a consequence. On clicking the browse button Consequences window is displayed with a list of consequences. Select a consequence from the list.
|
|
2
|
Impact
|
When a consequence is selected, any associated impact value will be displayed which may be edited by the user as required.
|
|
3
|
Probability
|
Click the browse button to select a probability for the risk.
|
|
4
|
Rank/Score
|
Product of Impact and Probability is displayed here if values for both are numeric.
|
|
5
|
Approach
|
Select an approach from the drop-down list. Values available in the list are Mitigate, Accept and Avoid. By default, Mitigate will be displayed.
|
|
6
|
Cost Impact
|
Click the browse button. Line Items selection window is displayed. Budget line items of the project will be listed in the window. Select a line item from the list.
|
|
7
|
Schedule Impact
|
Click the browse button to select a schedule impact. Tasks or Levels in the WBS will be displayed. Select a task from the list.
|
|
8
|
Comments
|
Enter any additional details here.
|
- After entering the details click Save to store changes.
 To analyse a risk based on impact and causes
This option will be available only if the setting Risk analysis with case and consequence, is selected in Project settings. Once this option is selected options to analyse risks based on impact and causes will be displayed in the window. By default Cause Analysis tab will be selected.
- Ensure edit mode is on. Click Add Cause.

Figure: Adding Cause
- Risk Causes window is displayed. Select the checkbox next to the risk causes that is to be selected. Selected items will be displayed in the grid.

Figure: Risk Cause window
- Enter comments against the selected risk causes.
- Click Save to store changes. Risks updated successfully message is displayed.
 To handle consequence and impact details
- In the Risk Details window click the tab Impact/Probability Analysis.
- Click the Edit button. The following window is displayed.
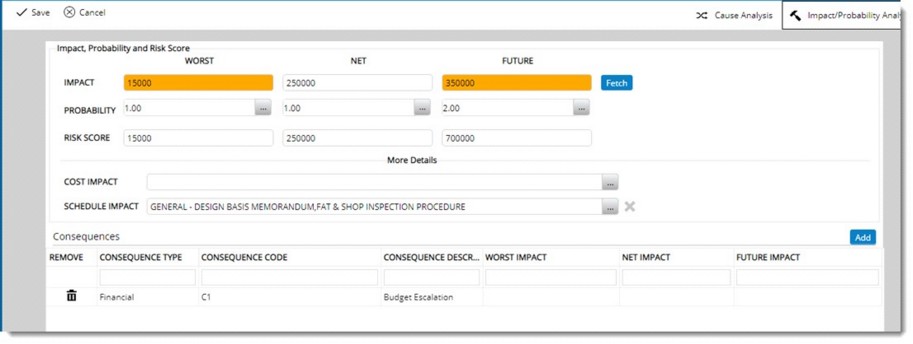
Figure: Impact/Probability Analysis window
- Enter values for the properties mentioned in the following table.
|
#
|
Properties
|
Description
|
|
1
|
Impact Worst/Net/Future
|
Enter Values or click Fetch to fetch the maximum from the consequences specified in the grid against Worst/Net/Future.
|
|
2
|
Probability Worst/Net/Future
|
Enter Values or click the browse button to select from a pre-defined list. On clicking the browse button Probabilities window is displayed. Select a value from the values listed in the window.
|
|
3
|
Risk Score Workst/Net/Future
|
If the values specified in ‘Impact’ and ‘Probabilities’ are numeric, these are calculated automatically as the product of the corresponding two. If the values are not numeric, user may specify values manually.
|
|
4
|
Cost Impact
|
Click the browse button to select a Cost Impact. Line Item Details window is displayed. Select a value from the listed budget line items.
|
|
5
|
Schedule Impact
|
When user click on the select button, the list of tasks/ levels in the WBS will be displayed, from which user may select single or multiple tasks. Selected items will be displayed, separated by comma.
|
- After entering the values click Save to store changes.
Managing consequence details
Consequence details can be managed from this window.
 To manage consequence details
- In the Consequences section click Add.

Figure: Adding Consequence Details
Consequences window is displayed. In the window list of consequences as assigned to the project is displayed.
- Select a consequence and click OK.
Added consequence will be displayed in the grid.

Figure: Consequence Details window
NOTE: Only leaf level sequence can be added.
Action on Risks
The most important part of mitigating a risk is to plan mitigation activities and assign to resources. The ‘Action’ tab houses facilities to do this.
Adding action on risks
Only risk owner and risk creator can add a Risk Action.
 To add risk action
- In the Risk Details window click the tab Actions.

Figure: Adding Actions
- In the tool bar click Add. Risk Action Control & Measures window is displayed.
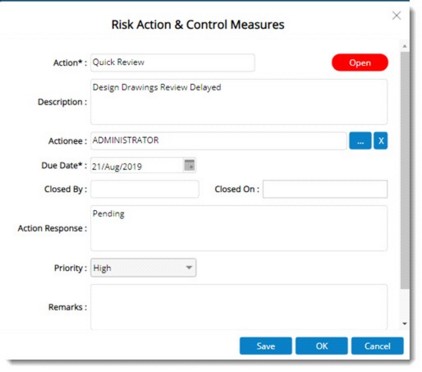
Figure: Risk Action & Control Measures window
- Enter values for the properties mentioned in the following table.
|
#
|
Property
|
Description
|
|
1
|
Action
|
Enter the action that is to be carried out. This should be a unique value.
|
|
2
|
Description
|
Enter a description for the action.
|
|
3
|
Actionee
|
Click the browse button select the user to whom action is to be assigned. On clicking the browse button Search User window is displayed. Search and select the users.
|
|
4
|
Due Date
|
Select the date by which the action is to be completed.
|
|
5
|
Closed By
|
Name of the user who close the action. This is filled in by the system automatically when the action is closed by a user.
|
|
6
|
Closed On
|
Date on which the action is closed. This value is filled in automatically when the action is closed.
|
|
7
|
Action Response
|
Enter a response. Actionee can update a response while mitigating the risk.
|
|
8
|
Priority
|
Select a priority from a drop-down list. Values available are Low, Medium and High.
|
|
9
|
Remarks
|
Any additional information regarding the action can be entered here.
|
- After entering the values click Save. Risk action is created successfully.
Created Action will be displayed in the grid. The status of the Risk Action will be Open.
Closing and reopening a Risk Action
Status of the risk action can be changed by closing the risk action. A closed action can also be reopened.
 To close a risk action
- In the grid select the risk action that is to be closed and in the tool bar click Close.
- A warning message is displayed. Click Yes to continue.
Action Response window is displayed. The Action Response already available for that Risk Action will be displayed, user can edit or add any further response to the Action.
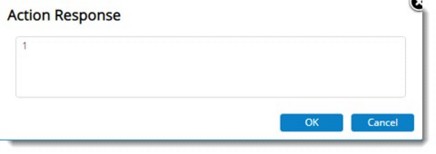
Figure: Action Response window
- Click OK after entering required value. Status of the action changes to Close.
 To reopen a closed action
- Select the closed risk action that is to be opened. On selecting a closed risk action, in the tool bar option Close changes to Reopen.

Figure: Reopening a close risk action
- A warning message is displayed. Click Yes to continue.
Risk action is reopened and the status changes to Open again.
Editing and removing a risk
After creating a risk, the values can be edited later. Only a created risk can be deleted.
 To edit a risk
- Select the risk that is to be edited and, in the menu, click Edit.

Figure: Editing a risk
Risk Details window is displayed with the Properties tab selected by default.
- The properties will be in the edit mode. Make the necessary changes and save the risk.
 To remove a risk
- Select the risk that is to be removed and, in the menu, click Delete.
- A warning message is displayed. Click Yes to continue.
Risk deleted successfully message is displayed.
Closing and reopening a risk
Status of a risk can be changed to Closed and a closed risk can be reopened.
 To close a risk
- Select an open risk and in the menu click Close.
- A warning message is displayed. Click Yes to continue.
Risk is closed successfully Once a risk is close Percentage completion of the RBS is updated
 To reopen a risk
- Select a closed risk and in the menu click Reopen.
- A warning message is displayed. Click Yes to continue.
Risk is reopened successfully.


 To analyse risks based on impact
 To analyse a risk based on impact and causes
 To handle consequence and impact details