|
Signing In to the application
|   |
|
Signing In to the application
| |
It is mandatory that users have to sign in to Wrench, before they can start working with the application. Sign In is possible using a unique Login Name and Password, which is usually provided by the administrator.
NOTE: It is possible to insert you company logo in the login screen.
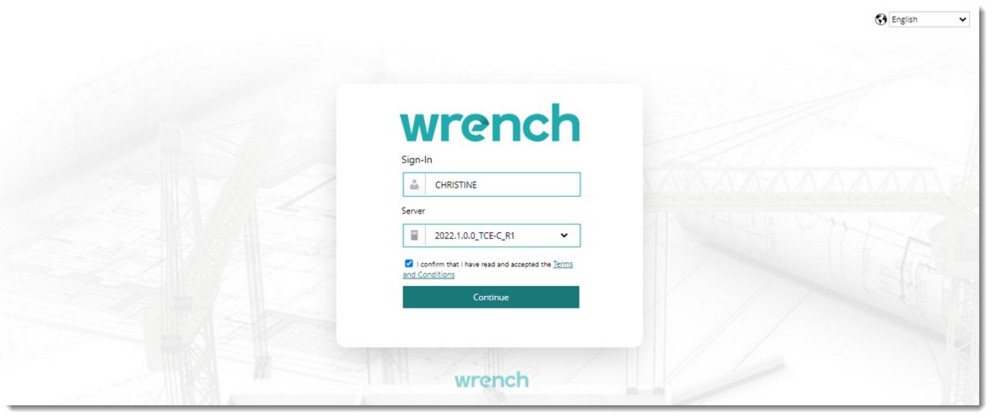
Figure: Signing In to Wrench
To sign in
NOTE: Default Server is displayed in the login window. In case there are multiple servers and you want to log in to a different server, click the down arrow to select a different server.
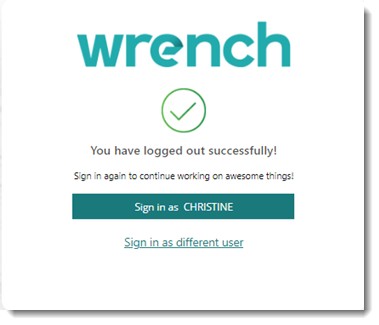
NOTE: In case you need to sign in as a different user, click Change. Window for entering login name is displayed.
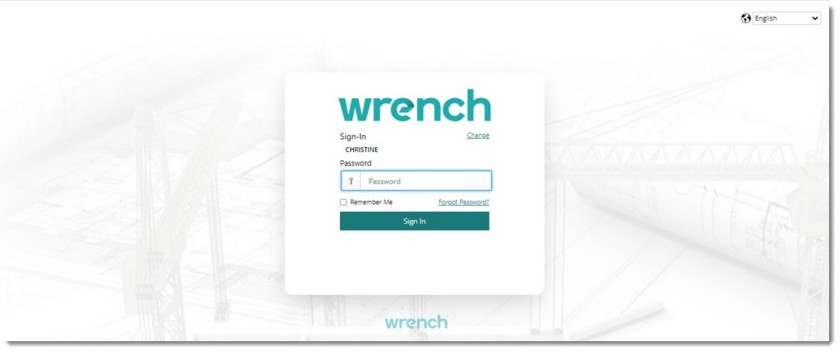
Figure: Signing In-Entering Password
NOTE: When a user tries to login using the login name of Active, Disabled or Deleted user an alert message is displayed. The alert message will be different for active, disabled and deleted user.
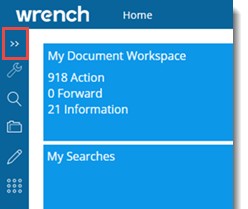
Once you sign in successfully a home page is displayed as shown in the following figure.

Figure: Home page
The home page is divided into different panes that are explained in the following section.
My Document Workspace: In this pane count of new documents in your workspace and documents awaiting your attention is displayed. Hover the mouse pointer above this pane and click Go To Workspace to start working with the documents in your workspace. The smart folder, My Workspace is opened and the documents inside this folder are displayed.
My Inbox: In this pane count of new mails in your Inbox and mails which you have not yet replied is displayed. Hover the mouse above this pane and click Go To Inbox to start working with mails in your smart folders. Your Inbox is opened and the mails are displayed in the grid.
Reports: Here the configured reports are displayed. Reports are displayed here only if the reports are forwarded to the homepage from the report folder using the Send to Homepage option. When a report hyperlink is clicked the report is opened in the report viewer. If a group name is selected when a report is configured, the report will be categorized under the selected group name in the Reports tile on homepage.
My Task Workspace: In this pane count of new tasks in your workspace and tasks awaiting your attention is displayed. Hover the mouse pointer above this pane and click Go to Task Workspace to start working with the tasks in your workspace.
My RFI's: In this pane count of pending RFI's are displayed. The following type of pending RFI’s are displayed.
Actions that are pending for more than seven days and require the logged in user’s immediate attention are marked with an alert icon.
The list of RFI’s can be viewed by clicking the corresponding category displayed in the My RFI’s tile in the home page. For Example: If user clicks on Response Pending, the following window is displayed.

Since RFI’s from all Projects are displayed, property Project ID will be blank. By default, Item Type displayed is All.
Recently Used Items: A list of recently used items are displayed here. Last item used by the user is shown first and the next used item is shown second. You can access items displayed directly from here. Recently opened items under the following categories can be accessed from the recent list window. Also smart folders pinned to the desktop will be displayed here.
On expanding each of the above mentioned categories, recently opened items under each category is displayed.
Checked Out Documents: Documents checked out for editing is displayed here. Clicking on the document link, document details window is displayed. Once the document is checked in, it is no more displayed here.
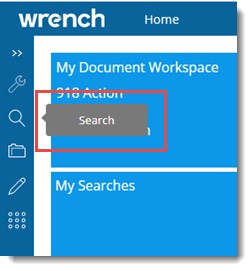
My Searches: Searches can be saved from search window. All such saved searches are listed here. Click the saved search link to open the saved search in the search window.
Pending Defects and NC's: Issue/Snag/NCS that is pending for action against a user for various projects is displayed here.
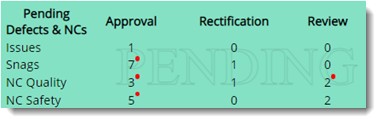
The following information is displayed.
|
# |
Field |
Description |
|
1 |
Pending for Approval |
Count of Issues, Snags and NCs (for all projects), which are pending for approval (in created status), where current user is the assigned as the approver is displayed here. On clicking the displayed count detailed information is displayed. |
|
2 |
Pending for Rectification |
Count of Issues, Snags and NCs (for all projects), which are pending for rectification, in open status, work in progress status is displayed here. |
|
3 |
Pending for Review |
Count of Issues, Snags and NCs (for all projects), which are pending for Rectification Review in Completed status, is displayed here. |
NOTE: Pending actions that require the logged in user�s immediate attention as they are pending for more than 7 days are marked with a red dot icon.
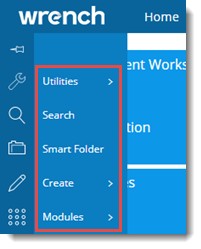
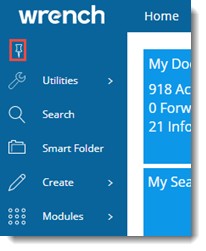
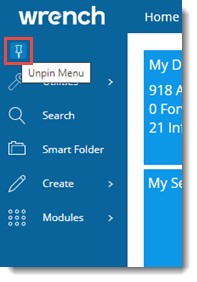
Global Menu: A button menu from where different operations can be carried out is displayed on the left side of the screen.
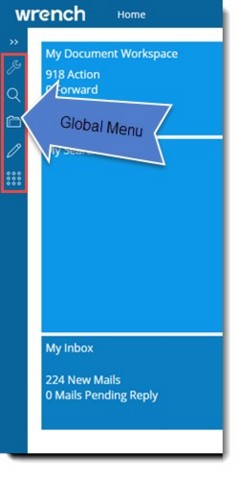
Figure: Desktop
On hovering the mouse over a button, the button label is displayed.
Global menu can be pinned so that the items in the menu is displayed clearly. Also label of each menu item is displayed. Once the global menu is pinned it remain until the menu is unpinned.
For more information on working with Smart Folders refer Opening Smart Folders and Working from Smart Folders.
Signing In using windows credentials
If Windows authentication is enabled in IIS and a user logs into WRENCH using windows credentials:
Multi-factor Authentication (MFA) is an authentication method that requires the user to provide two or more verification factors to gain access to a resource such as an application, online account, or a VPN. MFA is a core component of a strong identity and access management (IAM) policy. In addition to login name and password, OTP verification can also be configured. OTP is verified through email id of the user.
MFA option is a configurable option because this is an added security and is only required only in high security scenarios. MFA can be configured on a global level and user level from the administrative settings window.
If multi factor authentication is enabled for a user, when the user log in to SmartProject, an OTP authentication box is displayed, and an OTP is send to the users email id.

If the OTP entered is correct, login is completed successfully. If the OTP entered is incorrect or there are external errors like network errors an error message is displayed.
NOTE: Only 10 OTP’s can be generated for an active session.
Single sign on using SAML authentication
Single Sign On in SmartProject provides centralized session and user authentication service in which one set of login credentials can be used to access multiple applications.
SSO is implemented using Security Assertion Markup Language (SAML) which is an open standard that allows identity providers (IdP) to pass authorization credentials to service providers (SP). What that means is that user can use one set of credentials to log into different websites i.e. Single Sign-On (SSO).
By implementing SSO in SmartProject, in addition to Native Sign-on, option to login to SmartProject using Office 365 credentials and Active Directory Services credentials will be available.
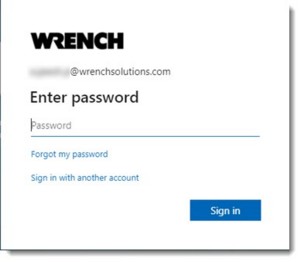
Figure: Office 365 credentials Login window
A configuration option that define what types of authentications are allowed is provided. Based on this, individual users many be allowed to use different means of authentication.
For configuration details refer Administrative Settings>>Application Settings>>Configuration>>Configure Authentication for Internal and External users.
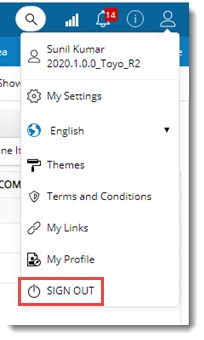
Signing Out of the application
After completing your activities it is recommended to sign out of the system.
 To pin global menu