Different document related operations can be carried out from the Document Smart Folders. When a smart folder is selected the contents in the folder are displayed. Select a document from the list and carry out an operation. Operation can be carried out from the Pinned items on the tab strip and options in the More menu.
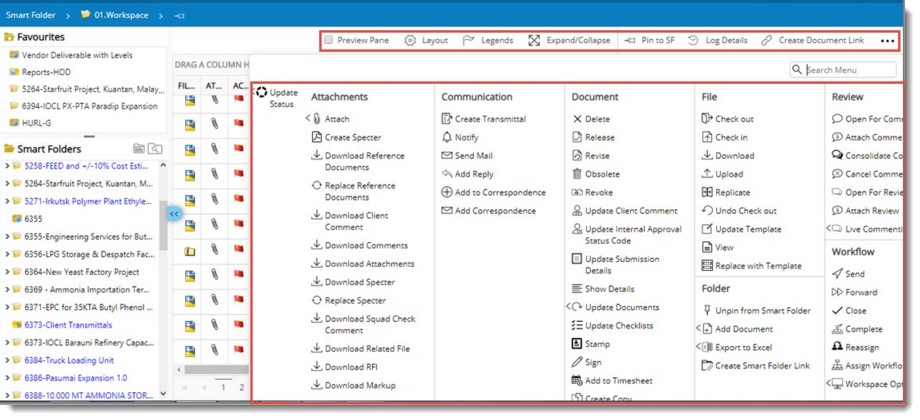
Figure: Operations from the smart folder
Operation buttons are grouped according to operation type. Option to search for an operation will be available in the menu.
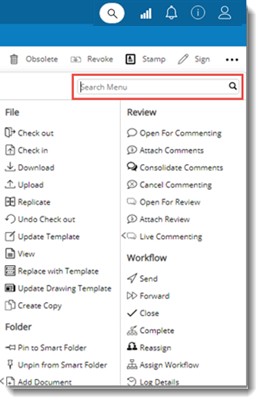
On entering a keyword and tapping the ‘Enter’ key or clicking on the search icon, the items in the menu matching the entered keywords will be highlighted in yellow color. The number of matched items will be displayed in the search text box.
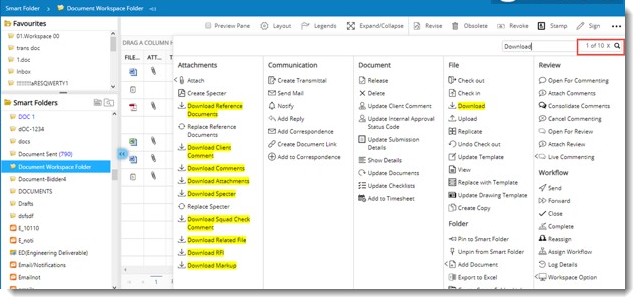
Use the up and down arrows in the search text box to navigate between the highlighted operation. The selected operation will be highlighted in yellow color. User can click on the ‘X’ icon to clear the search text.
Different operations that can be carried from the smart folder are explained in the following section.
 Assign Workflow
Click this option to a assign a workflow to single or multiple documents.
To assign workflow
- In the documents grid select single or multiple documents.
- Click Assign Workflow.
Assign workflow window is displayed. Select the workflow from a list.
 Send
Send
This option is used to send documents to next stage after completing the work. You can send a document using a guided workflow or an unguided workflow. For more information on sending documents refer Sending Documents through a workflow.
 Flush Workflow
This option is used to remove the workflow assigned to the document. The Workflow of single or multiple documents can be flushed.
To flush workflow
- Select single or multiple documents.
- In the option menu, under the group Wiorkflow click Flush Workflow.
Following message is displayed.
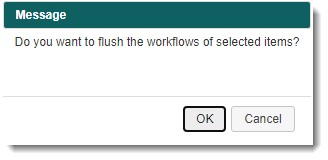
- Click OK to continue.
In case workflows are not assigned to the selected documents or tasks, the following error message is displayed.
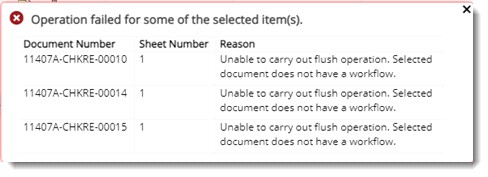
NOTE: To carry out this operation, current user must have Flush Permission in the genealogy or workflow module, and document, Correspondence or task should be in Work in Progress status.
 View Response Codes
A consolidate view of the response code entered while sending documents is displayed using the option View Response Codes.
This option is available in Smart Folder and Document Details window.
On clicking this option View Response Codes window is displayed.
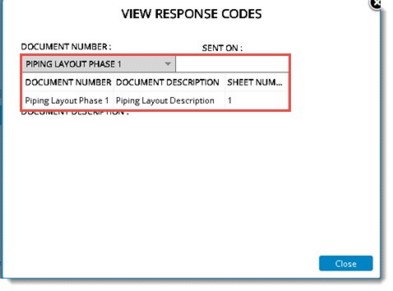
Figure: View Response Codes window
- Select a document number from the drop-down list. On selecting the document number Stage Name field is enabled.
- Select a stage name. On selecting the stage Response Code, date on which the response was made and the name of the resource who responded are displayed.
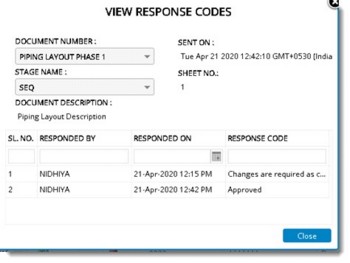
Figure: View Response Codes window
- Click Close to exit from the window.
In the case of multiple documents, response codes can be viewed only for items having similar workflow.
 Attach
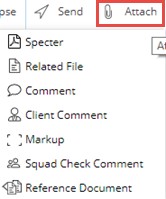
Here you can attach different types of associated files to the document. On clicking Attach, a pop-up menu is displayed with a list of associated file types. For more information on adding an attachment refer Document Details>>Files.
 Check Out
Entire documents managed by WRENCH are stored in a central server. When files have to be taken from WRENCH into the local machine for editing, it has to be checked out. On checking out, the file is locked by the user for editing. The checked out document is opened in the native application and user can make the necessary changes to the document. A checked out document is indicated by a red tick mark.
To check out a document
- Click Check Out.
Check Out window is displayed.
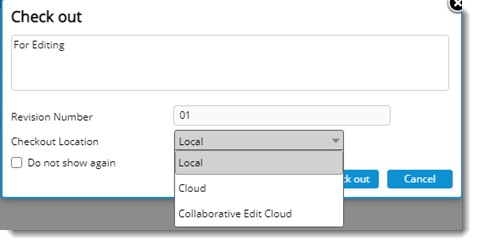
Figure: Check Out window
- Enter Remarks
- Select a checkout location. By default the option displayed is Local.
- Select the checkout location as Cloud if the document will be edited online.
- Click Check Out to continue. If the option selected is Local, a message The document has been successfully checked out is displayed.
- Click OK to continue.
If the checkout location selected is Cloud, the cloud storage location is authenticated as per the configurations in SmartProject, and the document is copied to the specified location using the original file name. If the file is an MS Office file, the file is opened in the corresponding MS Office application. The file can be edited online. Or else the file location where it is checked out is displayed.
If the checkout location selected is Collaborative Edit Cloud, the document is checked out for collaborative editing. For more information on collaborative editing, see Sharing files for collaborative editing.
To check out documents in bulk
- Select the documents that you want to check out. Multiple documents can be selected pressing the CTRL key.
- Click the Check Out button.
Selected documents are compressed to a zip file and are downloaded.
 Check In
Check In is the reverse operation of Check Out. It is the process of sending a document back to the server after editing. The Check In button is enabled on the menu only if the selected document is checked out. A red tick mark indicates whether the selected document is checked out. On checking in a document the version number increases.
To check in a document
- Click the option Check In.
Check In window is displayed.
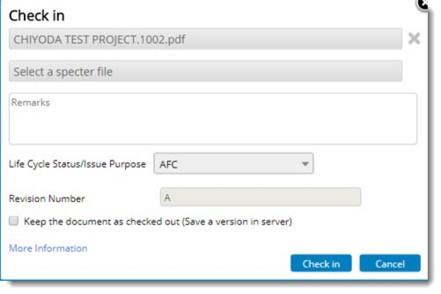
Figure: Check In window
- Click Select a File to choose the file to check in.
- Click Select a specter file to attach a specter file to the document you are checking in. if the selected specter file name (excluding the extension) is different from that of the main document, for helping the users to correct a possible mistake a warning message will be displayed.
- Click Check In to continue.
On successfully checking in a notification window is displayed.
TO field will be filled automatically with the users who has worked on the document by default. Users in the To field can be modified. The Subject field will be filled by default as Document <<Document number>> is modified. Subject field can also be modified.
On clicking Notify, mail will be sent to the email ID of the users in recipients list. Notification Sent Successfully message is displayed.
On checking “Do not show this message” this window will not be displayed unless the cache is cleared.
To check in documents in bulk
- Select the checked out documents that you want to check in. Multiple documents can be selected pressing the CTRL key.
- Click Check In.
Open File window is displayed.
- Select the edited checked out file and click Open button.
Selected files are successfully checked in.
Keep the document as checked out (Save a version in server): If the check box next to this option is selected, the changes you made to the document will be visible to other users, but the document will still be in the check out status.
 Undo Check Out
After checking out a document, editing and saving the document sometime you may need to cancel the changes made. You can use "Undo Checkout" option to cancel the changes made after checking out a document. The edited file is removed and the file on the server will be retained so that the original remains without any changes.
 Download
Click this option to download the document and view the document. On clicking this option the document is downloaded and the document is opened in the native application.
Also if you click the attachment icon displayed for a document in the smart folder, document attachments window is displayed with the list of documents. You can download the attachments from the document attachment window.
In the download window, if the checkbox next to the option Include main document also is selected, While downloading attachments, the main document to which the attachments are linked is also downloaded.
When downloading attachments of multiple documents, if the settings Download attachments of multiple documents in single folder is selected, all the attachments of the selected documents are downloaded into respective attachment type folder.

Figure: Downloading attachments
 Download with QR Code
On clicking this option, document (main document/specter) is downloaded with QR in the predefined location specified in sheet master. System will verify whether the main document is pdf or not, if yes main file will be downloaded with QR code. After downloading file with QR code inserted at the pre-defined location, document can be scanned using mobile application. On successful scanning if the document is in the latest version details page is displayed. If the version of the document is old, an alert message is displayed.
If a QR code is not define for a sheet size, on clicking this option a warning message is displayed and the operation is discontinued.
 Update Multiple Documents
Click this option to update document properties of the selected document. It is possible to update properties of single and multiple documents.
To update documents
- Open the folder where the documents are located.
- Select the documents and click the option Update Documents. A menu is displayed.
Update Document Details window is displayed with the selected documents.

Figure: Updating document details
- Edit the document properties.
- Click OK to update changes.
To bulk update document properties
- Select the check box next to documents for which you want to update the properties.
- Click Bulk Update.

Basic Properties window is displayed.
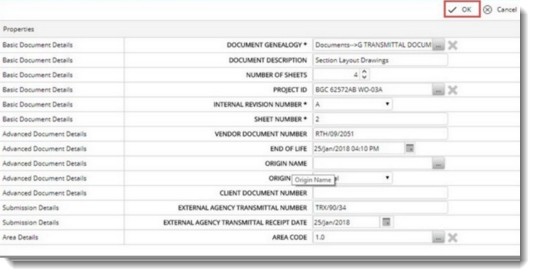
- Enter the document properties that you want to update in bulk. Click OK to continue.
- The properties are updated for the selected documents.
- Click OK to save and exit.
 Upload
Instead of checking out the document, editing it and checking in the document; the document can be replaced with the selected document. While replacing an open or read only document the system returns a message asking for confirmation of the operation. On confirmation the document is replaced with the last saved version of the document.
To upload a document
- Click Upload.
Upload window is displayed.
- Select a file with which you want to replace the existing file.
- Select a specter file that will be attached along with the replace file.
NOTE: if the selected specter file name (excluding the extension) is different from that of the main document, for helping the users to correct a possible mistake a warning message will be displayed.
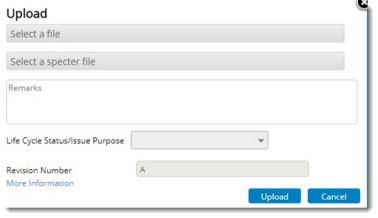
Figure: Upload window
- Click Upload to continue with the replace process.
On successful upload, notification window is displayed.
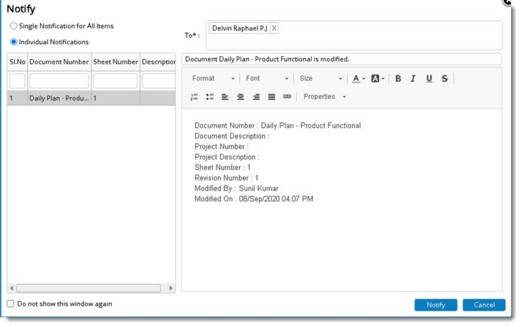
Figure: Notification window
TO field will be filled automatically with the users who has worked on the document by default. Users in the To field can be modified. The Subject field will be filled by default as Document <<Document number>> is modified. Subject field can also be modified.
On clicking Notify, mail will be sent to the email ID of the users in recipients list. Notification Sent Successfully message is displayed.
On checking “Do not show this message” this window will not be displayed unless the cache is cleared.
More Information: Click the hyperlink More Information to view additional details like current Version of the document, Internal Revision Number and Revision Number.
To upload a document by dragging to drop zone
- Select the smart folder where the document that has to be replaced is located.
- Drag the document to smart folder pressing down the left mouse key and when the drop zone is displayed, release the mouse key.
A message box is displayed.

- In the message box click Upload to replace the file in the selected smart folder.
Bulk Upload window is displayed.
Option to type in the document number and search for the document and a hyperlink to carry out Advanced Search is available.
If the File Name (name of the file in the local drive) and the existing Document file name matches, in the Bulk Upload window status column, the status is displayed as Match found.
For Example: If the file name of the document in the local drive is ABC.txt, for fulfilling the matching option, the file name of the document in Wrench has to be ABC.txt.

Figure: Replacing the document
- Click Upload button to replace the file.
NOTE: The file matching option by default would be File Name=Document File Name. You can select different options from a drop-down list. If any other options from File Matching Options are selected for replacing, the selected option would be saved in the cache as the default option. If you want to select files for replacing from the Bulk Upload Documents window, click Browse and select files for replace.
Different file matching options available in the drop-down list are as follows.
- File Name = Document File Name
- File Name = Document Number
- File Name = Client Document Number
- File Name = Vendor Document Number
 Bulk Upload
Instead of replacing a single document, a set of documents can be replaced together using the Bulk Update option.
To bulk upload documents
- Select multiple documents from the smart folder.
- In the tab strip click More>>Upload.
Bulk Upload Documents window is displayed.

Figure: Bulk Upload of documents
- The matching option selected is File Name = Document Number.
- Click the button Browse and select files for replace.
- If the File Name (name of the files in the local drive) and Document Number of files in Wrench match, in the Bulk Replace window status column, the status is displayed as File Transfer Completed.
- Once files are selected for replacing, in the Bulk Update Documents window, click Upload button.
The files are uploaded successfully.
Send Notifications: In the 'Bulk Upload Documents' window, if the setting Send Notifications is selected, notification will be automatically sent to the users who have accessed the document. Since there is no facility to select resources, resource pool is considered along with the setting for sending notifications.
Mail will be sent to resources defined in Notification Resource Pool and those who have accessed the documents. If the setting Send Notifications is not selected, no mail will be received. Once selected the setting will be cached. External Document Web Link and Internal Document Web Link will be included in the content of default mail for document operations Creation, Check-in, Replace and Upload.
NOTE: The mail configuration is carried out from db. (version change, revision change, doc addition, release etc).
In the bulk update window after selecting the documents to upload and successfully uploading the documents, the following message is displayed.
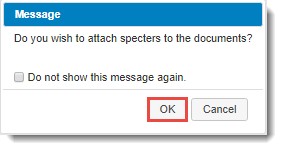
- Click OK. Bulk Attach Specters window is displayed.
Here you an attach specter files in bulk.
In the bulk update UI, if the user selects an LCS with a new revision series, the revision number field will display the first number of the new series, the drop down will display the new series. User can select from drop down or type in a revision number. LCS is updated for the selected documents.
For documents with revision series, if the value provided is present in the new series, value is updated to the document and documents continue with new series. If the value provided is not in the series, value is updated to the document and the series is overridden.
In the case of documents without revision series, in both cases revision series value is updated.
NOTE: On selecting the checkbox next to Send Notifications, notification mails are sent to all users who have accessed the files that were replaced.
 Add Document
Click this option to add a document to the smart folder. For more information on adding documents refer Adding a Single Document
 Export to Excel
On clicking this option a menu is displayed with the menu items, As Displayed and For Update.
In the Smart folder, after selecting a single row on clicking Export to Excel>>As Displayed, all the rows in the selected Smart folder are exported. After selecting multiple rows on clicking Export to Excel>>As Displayed selected rows are exported. After selecting top row and bottom row pressing ‘Shift’ button, on clicking ‘Export to excel>>As Displayed, all the rows in the page gets exported.
On clicking the option For Update, Bulk Export Wizard is displayed.
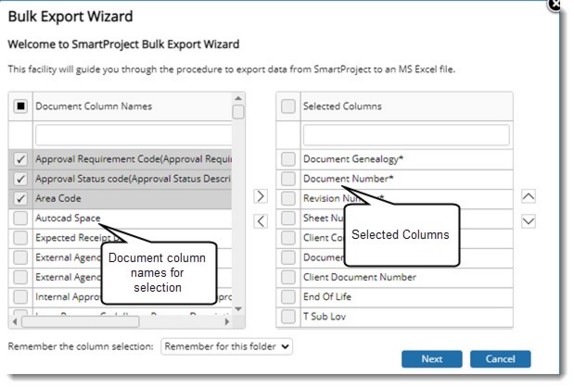
Figure: Bulk Export Wizard
Here you can choose the column names for the document. For the option “Remember the column selection” values are selected from a drop-down list. Following values can be selected.
Do not Remember: This option is selected by default. If this option is selected, then the column selection will not be remembered and hence when user accesses the column chooser option for the export operation, the previously selected columns will not be selected again. User needs to select the desired columns again. This is applicable only to the current folder.
Remember across folder: If user selects the above option and clicks on next, then the column selection across all the task smart folders will be the same. The drop-down option is reset to ‘Remember across folders’ for all task smart folders.
Remember for this folder: If this option is selected, then the column selection is remembered only for the current folder.
- Click Next. Bulk Export Wizard is displayed.
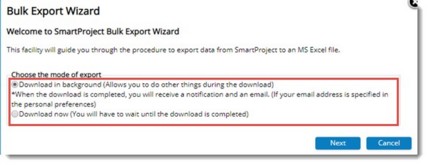
Figure: Bulk Export Wizard
- Select the radio button next to the mode of export and click Next.
Details of the document will be exported to an MS Excel file.
Once the excel file is downloaded, the data in the file can be modified. The modified document details are updated back into WRENCH.
To update data back to WRENCH
- In the document smart folder click Update Documents, a menu is displayed.
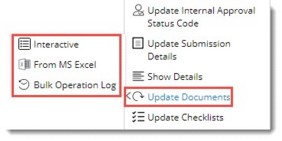
In the menu options available are Interactive. From MS Excel and Bulk Operations Log.
- If the option Interactive is clicked, existing Update Document Details window is displayed. Document Details can be updated from this window.
- If the option From MS Excel is clicked, Bulk Export Wizard is displayed.
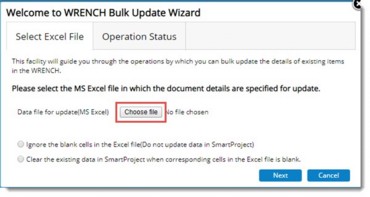
Figure: WRENCH Bulk Update Wizard
- Click the button Choose File to select the excel file.
- Select the file from the stored location and click Next. Bulk Update Operation Status wizard is displayed.
- Click Finish to complete the operation.
Once the Update process is completed, status of the update procedure can be viewed in the ‘Bulk Operation Log.
To view the status of update procedure
- In the menu click Bulk Operation Log.
- Bulk Operation Log window is displayed. Status of the document update is displayed here.
 Download Client Comments
Click this option to download client comments attached to a document. Attachment client comment is downloaded and opened in the native application.
 Download Comments
Click this option to download comments attached to a document. On selecting this option Download Comments window is displayed. In the window list of comment files attached are displayed. Select the comment files you want to download and click OK to continue with the download process.
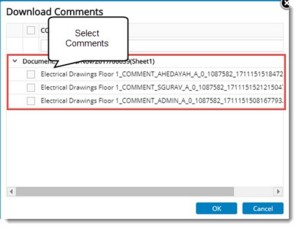
Figure: Downloading comments
 Download Specter
After selecting a document that have Specter files attached, when this option is clicked Download Specter window is displayed with a list of specter files. Click the check box next to the specter files that you want to download and click OK.
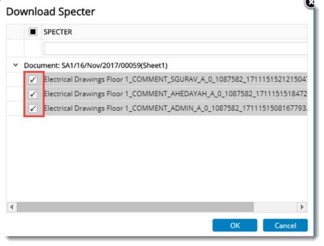
Figure: Downloading Specter files
NOTE: Latest version of the specter is downloaded. If latest version of the specter is not available, then previous revision/version of the document is downloaded.
 Download Attachments
Click this option to view and download all related files attached to a document. On selecting a document and clicking Download Attachments the following window is displayed. All the files attached to the document are displayed here. The the following options are available in the window.
Show latest revision: If the radio button next to this option is selected, attachments of only the latest revision of the document is displayed.
Show all revision: If the radio button next to this option is selected, attachments of all revisions of the document are displayed.
Show latest version: If the radio button next to this option is selected, attachments of latest version of the document are displayed.
Show all version: If the radio button next to this option is selected, attachments of all versions of the document are displayed.
Include main documents also: If the checkbox next to this option is selected, main document is also downloaded with the attachments.
Based on the option selected, attachments for download are displayed.

Figure: Downloading attachments
Select the documents that you want to download and click Download button.
 Downloading an attachment type from multiple documents
It is possible to download an attachment type after selecting multiple documents. For Example: If Markups attached to a set of documents are to be downloaded, select the documents and in the menu click Download Markups.The following window is displayed.
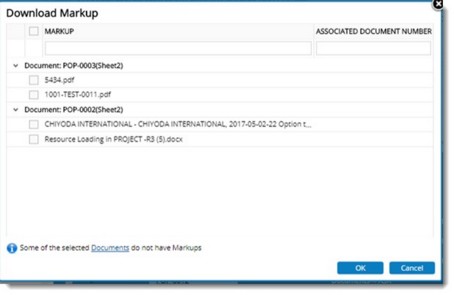
Figure: Downloading Markups
Documents and markups attached to them are listed in the window.
- Select the checkbox next to the markups that are to be downloaded.
- Click OK to download the selected markups.
NOTE: If some of the documents do not have the selected attachment type and information message “Some of the selected Documents do not have <<Attachment Type>> is displayed in the window. Click the hyperlink Documents to view the details of the document that do not have the selected attachment type.
If none of the selected documents have selected attachment type a message “No “<<attachment type>>” files available for selected documents” is displayed
 Create Specter
Click this option after selecting a document to generate a specter file. A request is sent to the PDF server for generating the specter file. Once the specter file is generated it is attached to the document
 Update Options
Different document properties can be updated. The following options can be updated. Though these options are mentioned under the group Update Options, they are displayed separately in the menu.
Update Client Comments
Usually the client marks their comment on the document and sends it back. This comment file is updated into Wrench along with approval status code details, received back date and other details. Client Comments can be updated for single or multiple documents.
To update client comments
- Click Update>>Client Comment.
Update Client Comment window is displayed.
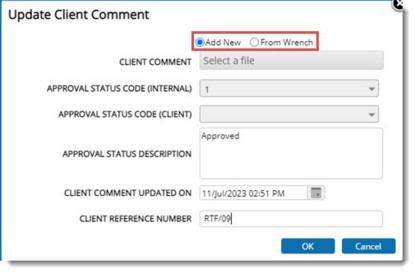
Figure: Updating Client Comment
Option to select comment file from SmartProject or from a location in your system is available. Select the respective radio button to select a comment file from your preferred location.
Select a File: Click this field to choose the comment file, if the radio button next to Add New is selected. File selection window is displayed. Select the client comment from the location where it is stored.
If the radio button next to From Wrench is selected, you can type in the client comment file number saved in WRENCH. As you type in a list of files with matching characters is displayed. Select the file from the list or enter the file name.
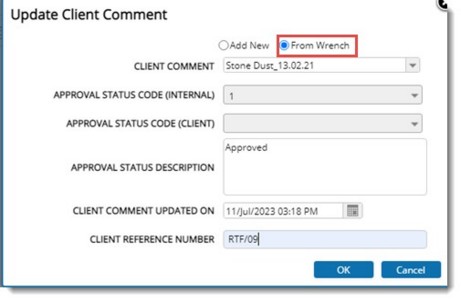
Figure: Selecting client comments stored in SmartProject
Approval Status Code (Internal): Select an approval status code from the drop-down list where a pre-defined list of codes will be available.
Fields Approval Status Code (Client) and Approval Status Description is filled in based on the internal status code selected.
Client Comment Updated On: This is the date on which the document was received after client comments. By default current date is displayed . Select the date from a date picker.
Client Reference Number: Enter the client reference number.
Revision Required: Define whether revision is required. Select Yes or No from a drop-down list.
- Click OK to store changes.
To update client comments for multiple documents
- Open the smart folder.
- Select the files for which you want to update client comments.
- In the more options click Update Client Comments.
Update client comments window is displayed and the selected files are listed here. Check box next to the files will be selected by default.

Files: Bulk Update Client Comments window
- In the button strip click Select Client Comment File. A menu is displayed.
- In the ensuing menu click From Disk if you want to select the comment file stored in your system and click From Wrench if you want to select client comments from Wrench.
- On selecting From Disk File selection window is displayed. Select the comment file that you want to attach to the selected documents and click Open button.
Selected client comment file is displayed under the column Attach File.

Figure: Bulk Updating client comments
To add comment files from Wrench
- In the menu click From Wrench.
Search window is displayed.
- Search and retrieve the documents and select the documents.
To update client comment details
Update values for the following properties.
- Approval Status Code Internal: Select the value for a drop-down list.
- Approval Status Code (Client): The value for this field is populated based on the approval status code (internal).
- Client Reference Number: Enter a value for this field.
- Client Comment Updated On: Select a date from the date picker.
- Click Apply to update changes. Approval status code details are updated.
- Click OK to store changes and continue.
Update Internal Approval Status Code
Approval status code defines the customer's response on a document that has been sent for customer approval. For Example: If a document is rejected by customer, the document will have to be revised as per suggestion and the overall percentage of progress (in creating the document) will drop considerably as it needs a lot of rework. The approval status codes are applied to each customer (in customer master). Every Client follows unique Approval Status Codes. To accommodate this Wrench saves the various Approval Codes with corresponding internal codes.
To update approval status codes
- Click Update>> Internal Approval Status Code.
Update Approval Status window is displayed.
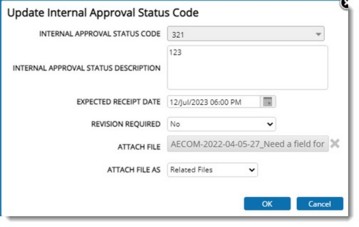
Figure: Updating approval status
- Select Approval Status Code from a drop-down list.
The description corresponding to the selected code is filled in.
- Select the receipt date from a date picker.
- Define whether revision is required. Select Yes or No from a drop-down list.
- Click Select File. File Selection window is displayed.
- Select a file from the list of files displayed. Selected file is displayed in the window.
Once a file is selected, option to select an attachment type will be displayed.
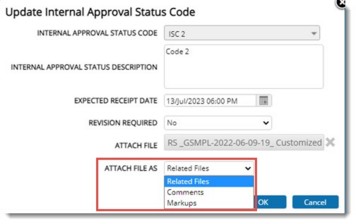
Figure: Selecting attachment type
- Select an attachment type. After entering the approval status code details click OK.
Internal Status Code Updated Successfully message is displayed.
Update Submission Details
Documents are sent by vendors to the contractor through transmittals. For identification these transmittals have a unique number. On receipt of these transmittals, document controller updates the transmittal number and transmittal receipt date into WRENCH. These details are used for future reference and communications.
To update submission details
- Click Update>>Submission Details.
Update Submission Details window is displayed.
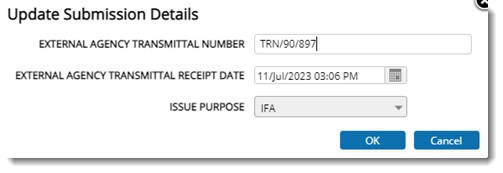
Figure: Updating submission details
- Enter the transmittal number of the contractor.
- Enter the date on which the transmittal was received.
- Select an issue purpose from a drop-down list.
- Click OK to continue.
Update Template
On clicking this option the document properties defined in Wrench are captured and updated to the existing template. If the mapping is successful a message is displayed.
 Forward
With this option you can notify users about the status of a document. In addition a user who is not a part of the workflow would be able to get information on the object which is being sent through a workflow. Thus you can send an item to a user who is not in the workflow stage for additional comments or help.
To forward a document
- In the document details window click Forward.
Forward window is displayed.
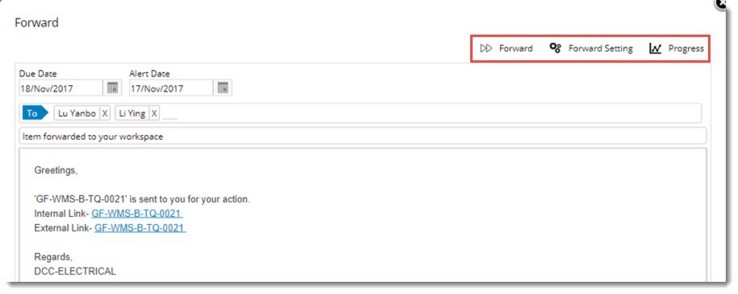
Figure: Forward window
- Click To button to select the recipients for the document.
- Select an End Date and Alert Date from a date picker. Due date is a date that specifies when the activity would be due. Alert date is a date on which the recipient has to be alerted.
- Click Forward to forward the document or task to the selected users for information.
NOTE: You can forward single and multiple objects.
Forward Settings: You can specify who among the mentioned recipients can forward the task/document information to other users.
To define forward settings
- In the Forward window click Forward Settings window.
Can Forward window is displayed.
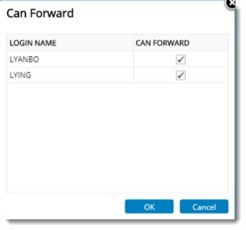
Figure: Can Forward window
- Select the check box next to a user to specify that the user can forward the information to others.
- Click OK to save selection.
The selected users will be able to forward the received task or document to another user.
Progress: You can define a rule for the progress of workflow here. The recipients of the object can act upon the work based on the rule defined here. This button is displayed only if you are forwarding an object (Send for Action) from your folder. This button is not displayed when you forward an item that was forwarded to you.
The following rules can be defined here.
To define a rule
- Click Progress.
In the drop-down menu, the following options are available.
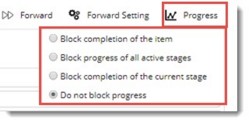
Block completion of the item: While forwarding an object or work if this option is selected, the workflow can be completed, if the recipient of the forwarded work or object has to close the work from the workspace.
Block progress of current stage: On selecting this option while forwarding, the recipient of the forwarded object has to be closed, for further processing of the object.
Block progress of all active stages: On selecting this option while forwarding, all the active stage users in the workflow are also blocked from doing any further processing of the object, until the recipient of the forwarded object sends the object back to you.
The selected users will be able to forward the received task or document to another user.
 Close
Close
Select this option to close the work in your workspace. The work will be open in other users workspace until they act upon it.
 Complete
Select this option to complete a document if it has gone through all workflow stages. User in the last stage of the workflow can complete the document using this option.
To complete a document
- In the document details window click Complete.
Complete window is displayed.
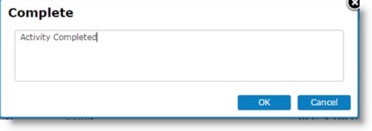
Figure: Complete window
- Enter your remarks or comments and click OK to continue.
 Notify
Notify operation is used to send a message to a user. The content of the message will be related to a document in most cases. The user who sends the message can provide more clarity to the messages by inserting the document/Task meta data values.
To send a notification
- Click Notify.
If multiple documents are selected the following Notify window is displayed.
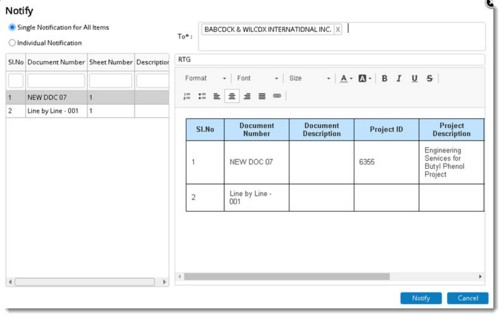
Figure: Entering values in notification window
- Option Single notification for all documents will be selected by default.
Serial number of the document, Document Number, Document Description and Sheet Number of the document are displayed in the left pane. The list of selected documents will be displayed in the message body in a table.
- Click Notify to send the notification.
If the option Individual Notification is selected the following window is displayed.
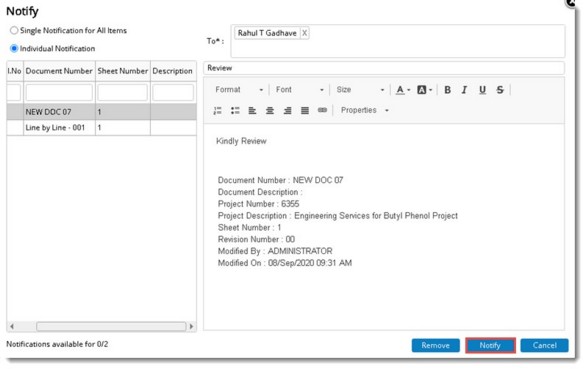
- Select the recipients for the notification.
- Enter the required message in the message content area.
- Click Notify button to send the notification.
 Delete
You can permanently remove the document from Wrench using the delete option. This helps in removing redundant documents and thus saving disk space
 Release
Select this option to release a completed document or task.
 Obsolete
A document is considered obsolete when it is no longer in use. An obsolete document is usually retained for knowledge preservation. This means the information contained in the document can only be used as a reference but cannot be used for any other purpose. Obsolete documents are removed from the point of use.
For Example: If you need previous specifications to be viewed by others for reference without using it the document can be made obsolete.
To obsolete a document
- Select the document.
- In the options menu click Obsolete.
Obsolete Document window is displayed.

- In the window enter comments.
- Click OK. Documents obsoleted successfully message is displayed.
- Click OK to complete the operation.
 Revoke
Revoking an obsolete document restores the status of the document to the point at which it was made obsolete.
For Example: A document Test.Doc was in work in progress status while it was made obsolete. Now on revoking this document the status is again preserved to as work in progress.
 Replicate
A replication request for the selected document can be raised using this option.
To raise a replication request
- Click Replicate.
Replicate window is displayed with a list of servers.
- Select the check box next to the server to which the document has to be replicated.
- Click Replicate to start the replication process.
 Pin to smart folder
Using this option you can add the documents to Smart Folder. The pinned document will be available in the selected smart folder irrespective of the rules based on which the smart folder is created. It is also possible to unpin documents from the smart folder. Document can be pinned to single or multiple smart folders.
To pin a document to smart folder
- Select the document and from different options click Pin to Smart Folder.
Pin to Smart Folder window is displayed.
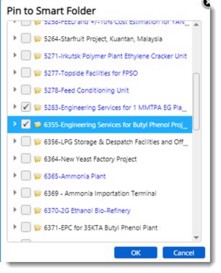
- Select single or multiple folders to pin the document and click OK.
Document is pinned to the selected folders.
 Unpin from smart folder
Select this option to remove a document from the smart folder.
 Add Reply
Using this option you can add a reply to a correspondence document. In case a genealogy is mapped to the correspondence type, the reply is added to this genealogy. Or else reply is added to the genealogy under which the parent correspondence is saved.
To add a reply
- Click Add Reply.
Document Addition window is displayed.
- Enter values for fields in the document addition window. For more information on working with document addition window refer Adding a Single Document.
The reply is added to correspondence genealogy defined
 Send Mail
Using this option mails can be send without using MS Outlook or any other mail program.
- Click the option Send Mail.
Distribution Options window is displayed.
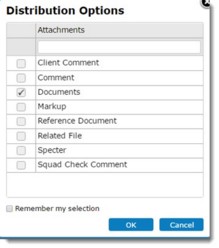
Figure: Distribution Option window
- Select the check box next to a attachment type.
Selected attachment type is displayed in the mail window. When the mail is send the selected attachment types are sent along with the mail.
- Click OK to continue.
Mail window is displayed.

Figure: Send Mail window
- Enter the mail recipients.
- Enter a subject and content for the mail.
- Click Send Mail to send the mail.
 Revise
Using this option a released document can be revised in fast track mode, if changes have to be made to that document.
To revise a document
- Select the document smart folder where the document is located.
- Select the document that you want to revise from the grid.
- In the Tab strip or in the More options, click the option Revise.
Revise window is displayed.
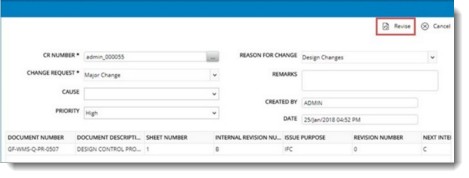
Figure: Revise window
- Enter the following values in the Revise window.
|
#
|
Property
|
Description
|
|
1
|
CR Number
|
CR number is generated automatically based on the setting in the master. Click the browse button to change the automatically generated number.
|
|
2
|
Change Request
|
You can enter the nature of change that has to be incorporated or select an existing Change Request by clicking the down-arrow. Select a change request from the drop-down list.
|
|
3
|
Cause
|
You can enter the Cause for raising Change Request. Select an existing Reason by clicking the down-arrow. Select a cause from the drop-down list.
|
|
4
|
Priority
|
Select the priority from a drop-down list.
|
|
5
|
Reason for change
|
You can enter the Reason for change that has to be incorporated or select an existing Reason by clicking the down-arrow. Select the reason for change from the drop-down list.
|
|
6
|
Remarks
|
Enter a note or remarks here.
|
|
7
|
Created By
|
This field is filled in automatically.
|
|
8
|
Date
|
Date on which the revision request is raised is displayed here.
|
- After entering the values click Revise to continue with the revision.
 Log Details
Log details provide you with detailed information on different operations that is being executed on the selected document. Details include time and date of operation, individual actions executed by stage resources, information on stage resources, status of different workflow stages etc.
To view log details
- In the smart folder select a grid.
- Form the list of options click Log Details.
Log Details window is displayed.
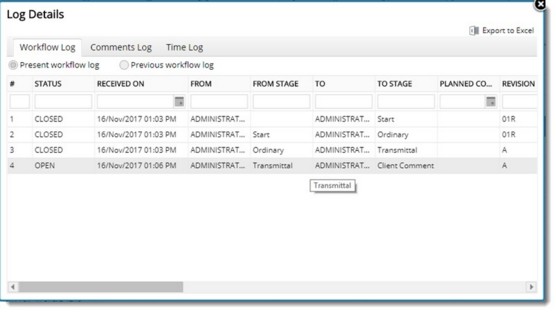
Figure: Log Details window
Workflow Log tab is selected by default. Here details like status of the document, date on which the document was received, sender of the document, stage from which the document was send, receiver of the document, stage to which the document was send etc. are displayed here.
Comments Log tab provide you with information on comments marked by different stage resources. Here details like From and To stage, date and time etc. are displayed as shown in the following figure.
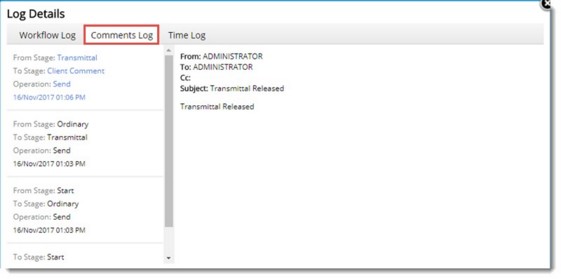
Figure: Comments Log window tab
Time Log tab provide you with information on time spent on the document in each stage. Here details like stage resource name, stage resource login name, stage name and time spent in a stage are available.
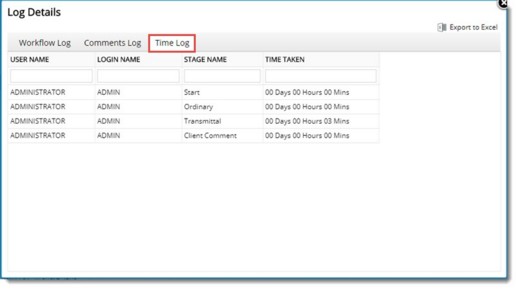
Figure: Time Log window tab
 Create Link
For sharing documents with clients or vendors a link for downloading the documents can be generated. Click Create Link to generate an external link. For more information on this topic refer Creating Document Links.
 Create Copy
On clicking this option after selecting a document, Document Addition window is displayed, with all the values of the source document except document number auto filled. Workflow from the source document will be inherited. Enter values for different fields and create the document.
On clicking Create Copy after selecting multiple documents, Multiple document addition window is displayed, with all the values of the source document except document number auto filled. Workflow from the source document will be inherited in the case of single and multiple document selection. If the selected multiple documents are from the same genealogy, the genealogy is auto filled in the multiple document addition window, else the user must choose the document genealogy. For both single and multiple documents, the referenced documents linked to the current revision of the source document will be referred for the newly created documents.
 View
View
When you select a document and click the option View, selected document is opened in its native application. This option is functional only when an additional tool is installed.
 Replace with Template
After importing the deliverables by using bulk import of tasks and the dummy documents are created against the corresponding document genealogies, these documents have to be replaced with Document Templates configured in Masters. To address this need, Replace with Template option is available in the list of options.
To replace with template
- In the smart folder grid select the document and click Replace with Template.
Select Template window is displayed.
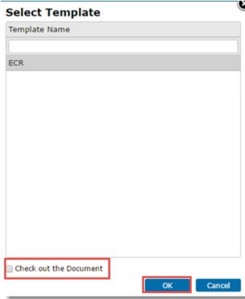
Templates assigned for the project will be displayed here.
- Select the template and click OK.
NOTE: If the check box next to Check out the Document is selected, after replacing with the template, document will be opened for editing.
 Live Commenting
 Add to Timesheet
This option is available In document and task type smart folders.
To add to timesheet
- Select single or multiple items from the smart folder and click Add to Time Sheet.
Timelog window is opened with the selected documents or tasks.

Enter Timelog corresponding to each activity and save the timelog.
 Add to Correspondence
While working with single/ multiple documents from smart folder, user may want to send these documents as attachments through WRENCH Correspondence. To simplify this procedure option, Add to Correspondence will be available in the Smart Folder.
To add documents to a correspondence
- In the smart folder grid select the documents.
- Click the option Add To Correspondence.
Correspondence window is opened.
- If only one correspondence genealogy is available by default this will be selected or else user should browse the genealogy from the genealogy selection window displayed.
- Select the genealogy and continue.
Compose window is displayed with the selected documents attached to the Attachments section.
- Enter values for different correspondence properties and send the documents through correspondence.
NOTE: Documents without physical file will not be added to the document.
 Download Reference Documents
After selecting a document with reference documents, when this option is clicked, reference documents attached are downloaded. In case only a single reference document is attached, document is downloaded and opened. If there are multiple reference documents attached, a compressed file is downloaded.
 Replace Reference Documents
Reference documents can be replaced in bulk using this option. On clicking this option after selecting a document, Bulk Upload Documents window is displayed.

Figure: Bulk Upload Documents
- Select a File Match Option.
- Click Browse and select files for upload.
- Select files from the location where it is stored in your system.
If the matching options are satisfied, files are transferred and status is displayed in the window.

Figure: Bulk replace
- Click Upload to complete the replace procedure.
Documents Uploaded Successfully message is displayed.
In addition to this, the following important operations can also be carried out from the smart folder.
Adding different types of attachments
Adding and consolidating interdepartmental review comments
Downloading attachments
Adding attachments directly to smart folders
Creating Document Links
Adding different types of attachments
Different types of attachments can be added from the Smart Folder.
To add an attachment
- Click the Attach button.
- In the menu click the attachment type.
Different types of attachments and procedure for adding them is explained in the following sections.
Adding Specters
Adding Related Files
Adding Reference Documents
Adding Comment files
Adding Client Comments
Adding Markup
Adding Squad Check Comments
Adding Specters
Specter or shadow files are the PDF files which are stored with the native files. These are stored so that while sending transmittals only the specter files are sent. Also it can be defined that users can only view the specter files and not the native files, so editing and copying is not possible.
Specter is a non-editable version of the original Document. (For Example: Adobe PDF.) For security and protection of the original, a non-editable version of the original Document can be created, which will be referred for all downstream operations. This prevents the original being modified in any context as the original is never distributed.
You can add attachments, specter files, comments or markups to existing and also to previous revisions of a document. This facility enables the user to identify the Comments/Attachments of a particular revision at a later point of time.
 To add specter files
- In the attachments type menu click Specter.
Specter File selection window is displayed.
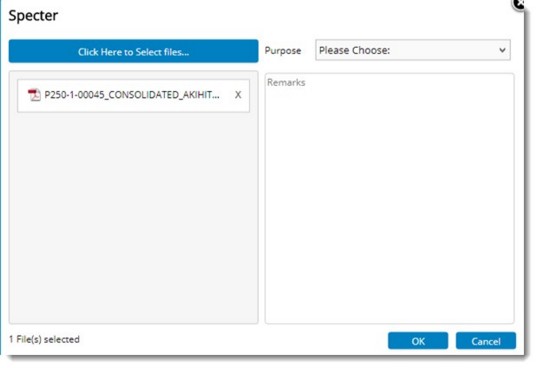
Figure: Adding Specter
- Click the field Click Here to Select Files and choose a file.
- Select the purpose of attachment from a drop-down list.
- Enter your Remarks.
- Click OK to save changes and continue.
Once the specter file is attached successfully, in the document details files tab, the attachment is displayed as shown in the following figure.
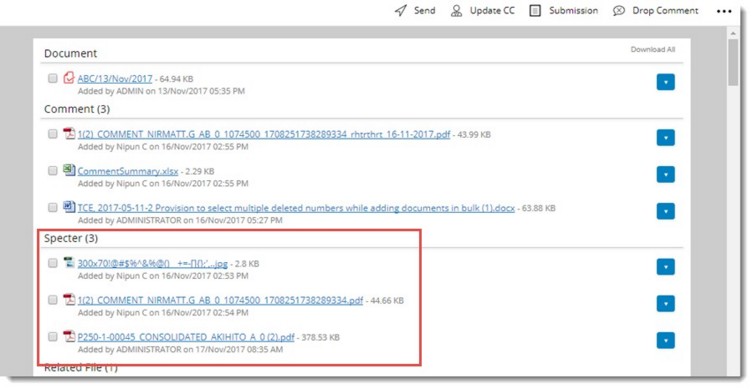
Figure: Attaching Specter file
Attached specter file can be downloaded to an external location, replaced and deleted.
Adding related file
Related Files are documents which are referred to the original document.
For Example, "Assembling Instructions" is a related file to an "Assembly Drawing". In another context, "Organization Chart" is a related file to "Leave Application procedure" document.
 To add related file
- In the attachments type menu click Related File.
Related file selection window is displayed.
- Click the field Click Here to Select Files and choose a file.
- Select the purpose of attachment from a drop-down list.
- Enter your Remarks.
- Click OK to save changes and continue.
Attached related file can be downloaded to an external location.
Adding reference documents
References which are attached to the document are displayed here. A new document (with all properties such as a genealogy ,document number, title, etc.) or an existing document in Wrench can be added as a reference document.
During the life cycle of a document, different wrench documents are referred for developing the document. Such links to other wrench documents can be preserved along with the document as “Reference documents”.
 To add reference documents
- In the attachments type menu select Reference Documents.
You can add documents saved in Wrench or documents stored in your system as reference documents.
- On clicking From Wrench, Document Search window is displayed. Search and retrieve the document you want to add as reference document.
- On clicking Attach Reference Document, Add Single Document window is displayed. You can add reference document from the add document window.
For more information on working with the Add Document window refer Adding a Single Document.
- Enter values for fields in the document addition window.
Reference document attached to the main document can be removed and details related to the attached document can be viewed by clicking the respective icons.
Adding comments
Comments files are the files which are used by internal checkers. A comment file can be attached in the comments tab. In the case of interdepartmental reviews, review comments by different users can be attached to the document and the comments can be consolidated to a single document. The consolidated comment document can be opened for reviewing and the reviewed document is attached to the main document as comment.
For Example: In the event of requirement of a change on the original design drawing, a document change request can be created for the original Document. The changes required are entered in a comment file and it is attached to the change request.
 To add comments
- In the attachments menu click Comment.
Comment addition window is displayed.
- Click the area with the text Click Here to Select Files.
- Select a File from the File Selection window and click Open.
- Selected file will be displayed in the Create window.
- Select a comment type from a drop-down list.
- Click OK to save the comment file and continue.
Attached comment file can be downloaded to an external location. The files can also be replaced and deleted. Click the following icons to carryout these operations.
Adding and consolidating interdepartmental review comments
When a drawing or document undergoes interdepartmental review, each reviewer opens the document and marks their comment on the document. For each reviewer a different document is generated automatically while opening the document for commenting. The reviewer then attaches this commented document to the main document. If five reviewers open the document for commenting five separate comment documents are created. Each of the document is attached to the main document by the reviewer as Attachments. The different comments files can be consolidated to a single document. This consolidated comment document can be further reviewed and the reviewed document can be attached to the main document.
The following operations are available in the comments window of the Files tab. Using these options you can:
Open the document for commenting
Attach comments
Consolidate client comments
Review consolidated comment document
Attach Review
Open for Commenting
This option is for opening the main file or attaching specter and commenting on it.
 To open a file for commenting
- Click the smart folder in which the document is stored.
List of documents is displayed.
- Select the document that you want to open for commenting and double-click.
Document Details window is displayed.
- In the tab strip click more icon and in the pop-up menu click Open for Commenting.
You can also open the document for commenting by clicking Files>>Comment>>Open For Commenting from the document details window.

Once you click this option system checks for an auto attached specter file. If the file exists it is opened for commenting. If auto attached specter file is not present, system checks whether the main document is PDF. If so, the file is opened for commenting. If the main document is not a PDF file, system searches for manually attached specter files. If manually attached specter file is found it is opened for commenting. If multiple file exists the following window is displayed.
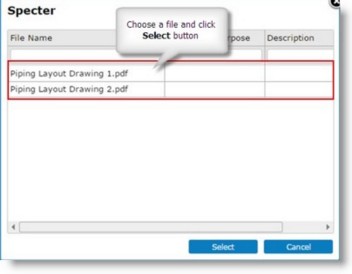
Figure: Opening documents for commenting
- Select the document that you want to open for commenting and click Select.
- In the document enter your comments and save the document.
Opening multiple document for commenting
Engineering designs are mostly made in multiple sheets. These sheets are required to be viewed together during the design reviews. Hence facility to download multiple documents for commenting is
 To open multiple documents for commenting
- In the smart folder select multiple documents.
- Click Open for Commenting.
The specter files of the selected documents are downloaded into a zip folder. if specter files are not available, the pdf format of main document gets downloaded. If pdf format of main documents are not available a warning message is displayed.
Attach Comments
This option is for attaching comment file stored in the local system to the server. Comments can be attached from the Files tab in the document details window and smart folder.
 To attach comments
- Select the document to which you want to attach comment.
- Click Attach>> Comment.
Comment dialog box is displayed. A message to attach file downloaded for commenting and close the commenting session is displayed in this window.
- Click the field Click Here to Select files.
- Open File window is displayed. Select the comment file from the location where it was saved.
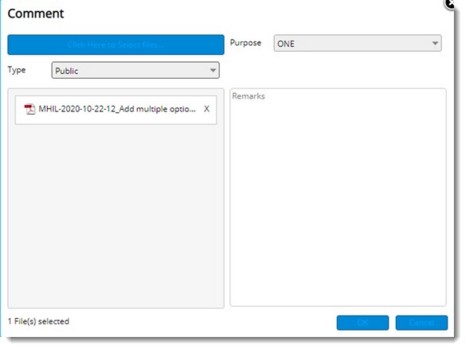
Figure: Attaching Comments
- Select a comment type from the drop-down list next to the option Type.
- Enter the purpose of attaching the document in the Purpose of attachment field.
- You can also select the purpose of attaching the document from a drop-down list.
- Click the down arrow next to Purpose of attachment to choose a purpose from the drop-down list.
- Enter your Remarks. This is not mandatory.
- Click OK to continue.
Your comment file is attached successfully.
Consolidate Comments
Comments entered by different reviewers in the attachment have to be consolidated to one single comment file. Consolidate Comments option helps you in carrying out comment consolidation.
 To consolidate comment file
- Click Comment>>Consolidate Comment.
Consolidate Comment window is displayed. Here details of comment files attached by different reviewers are displayed.
- Select the check box next to the files that has to be included for consolidating.
- Click Preview to view the consolidated file.
- Click Attach Consolidate to attach the consolidated comment file to the document.
- Click the Cancel button if you want to discard the consolidation operation.
If the operation is successful the following message is displayed.
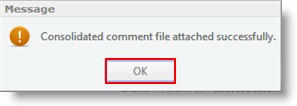
- Click OK to continue.
A single consolidated comment file is created as shown in the following figure. This file will contain comments marked by different users consolidated.
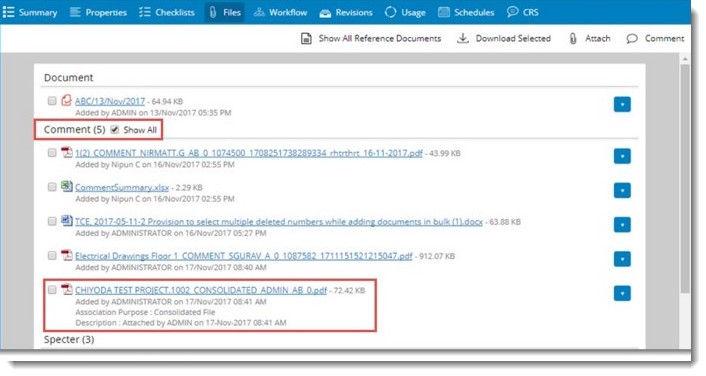
Figure: Consolidated comment file creation
Attaching consolidated files to other attachment types: When multiple stakeholders are using WRENCH SmartProject, consolidated comment file attached by a user will be visible only to users of the same origin. The consolidated comments of the stakeholder will not be available to other stakeholder unless the consolidated comments are added under other tabs like client comments, related items etc. Hence a facility to attach consolidated comments to other tabs like Related Files, Client Comments etc. is provided so that users of different origins will be able to access the consolidated comment file.
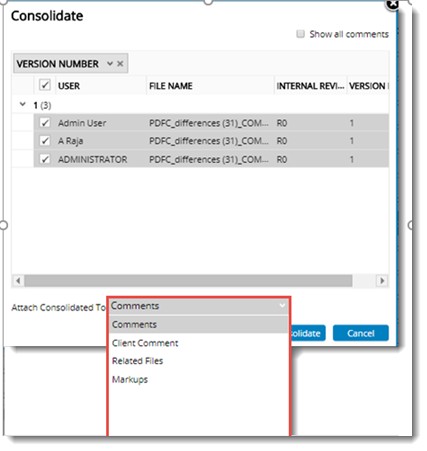
In the drop-down list options Comments, Client Comment, Related Files and Markups will be available. Option Comments will be selected by default. The option once selected will be cached and made available for that user next time.
When attaching consolidated comments in locations other than Client Comments, association purpose will be Consolidated file automatically. When consolidated comments is attached in the tab Client Comments, consolidated comment is added as a new WRENCH document.
Open for Review
The consolidated comment file can be opened for commenting. Consolidated Comment file can be opened for review from Attachments tab in the document details window and from the smart folders menu.
 To open for review
- Click Open for Review.
The consolidated file is opened for Review.
NOTE: The file opened for review will have the tag CONSOLIDATED_REVIEWED for the purpose of identifying the review file.
- After reviewing the consolidated comment file, the file is saved.
NOTE: Multiple documents can also be opened for review. The consolidated documents of the selected documents get downloaded into a zip folder.
Attach Review
The saved review file can be attached to the document.
 To attach review file
- Click Attach Review.
Comment dialog box is displayed.
- Click Click Here to Select files, to choose the reviewed consolidated file.
- Enter the review purpose or select the review purpose from a drop-down list that would contain a list of pre-defined review purposes.
- Click OK to continue.
Comment files, consolidated comment files and reviewed consolidated file would be listed under the comments sections in the attachments tab.
Adding client comments
Client comments reflect the client's remarks on various operations. Usually the client comments are attached to the documents.
 To add client comments
- In the attachments menu click Client Comments.
Options to add Client Comments from disk and from Wrench are available here.
- Click From Disk to attach client comments from your system.
Document Addition window is displayed with basic document details filled in. For more information on adding a document refer Adding a Single Document.
- Select the comment file and save changes.
To add comment files from Wrench
- Click From Wrench
Document Search window is displayed.
- Search and retrieve the comment file you want to attach.
You can carry out the following operations on an attached comment file.
NOTE: Multiple files can be selected and client comment can be attached.
Adding Markups
Markup is a means of highlighting a required change on a drawing/document. When a drawing is in the final stages of a design, the drawings are published for review. Corrections and comments are received electronically through markups. You can re-publish your drawings based on these comments. Doing all this electronically shortens review cycles, and results in a more efficient design process. The default document viewer used with Wrench Enterprise has a native facility to create markups. It means you can create comments without editing the original file. These are also similar to comments. The difference is, comments are mostly textual whereas markups are mostly graphical.
NOTE: In order to understand how to create a markup it is recommended to refer the Autovue user manual.
 To add markup
- In the attachments menu click Attach Markup.
Markup Addition window is displayed.
- Click the area with the text Click Here to Select files.
- Select a File from the File Selection window and click Open.
The selected markup is displayed in the Create window.
- Select the comment type from a drop-down list.
- Click OK to save changes and continue.
Adding Squad Check Comments
Process of circulating the document for the comments of respective disciplines is referred as Inter-Disciplinary Commenting or Squad Check.
 To add squad check comments
- In the attachments menu click Squad Check Comments.
- Click Attach Squad Check Comments.
Document Addition window is displayed with basic document details filled in. For more information on adding a document refer Adding a Single Document.
- Select the Squad Check Comment file and complete the document addition procedure.
You can carry out the following operations on an attached squad check comment file.
Adding squad check comments to multiple documents
In the document review process practiced in some organizations, when multiple documents are submitted for review, a single “Squad Check Comment document will be received from the review team, which will contain comments about all the main documents submitted for review. Hence the Squad Check Comment document is to be attached to each of the main documents.
 To attach squad check comments to multiple documents
- Select the documents to which you want to add squad check document.
- In the tool bar click Attach>>Squad Check Comments.
In the pop-up menu two options From Disk and From Wrench is available.

Figure: Adding Squad Check Comments
- Click From Disk to add a squad check comment from the stored location. Add Single Document window will be displayed. Enter different document properties and add the squad check comment document.
- Click From Wrench to add the file already available in Wrench. Search window will be displayed.
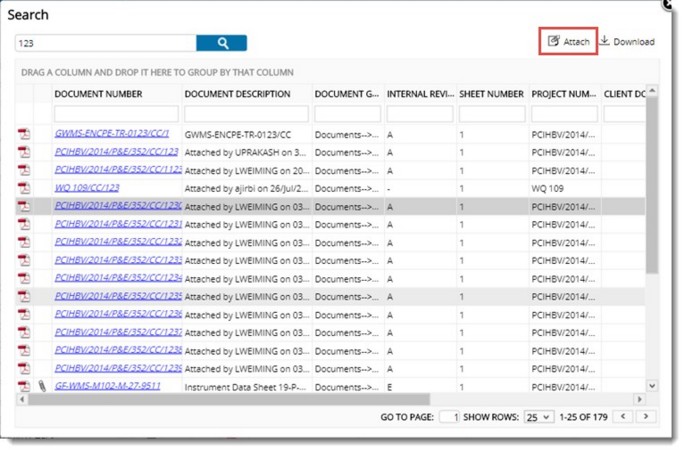
File: Adding squad check comments stored in WRENCH
- Search for the squad check document, Select the squad check document from the search results and click Attach to add squad check document to the selected documents.
NOTE: If the selected documents have different default Squad Check Comment genealogies, the operation fails and a warning message is displayed.
Downloading attachments
Different attachments types attached to a document or drawing can be viewed and downloaded from a separate window.
 To download attachments
- In the smartfolder grid select the document.
- Click Download Attachments.
Document Attachments window is displayed.

Figure: Download Attachments window
- In the window select the attachments you want to download.
- Click Download button.
The selected attachment is downloaded.
To download multiple attachments
- In the smart folder grid select multiple documents with attachments.
- In the list of options click Download Attachments. Document Attachments window is displayed with a list of attachments added to different documents.
- Select the document that you want to download and click Download button.
Documents are downloaded.
Adding attachments directly to smart folders
Different types of smart folders are available for different types of attachments. After selecting the respective attachment smart folder, attachments can be directly added to the smart folder.
 To add attachment directly to attachment smart folder
- Select an attachment smart folder.
- Click Attach.
Depending on the type of attachment folder selected, window for adding attachment is displayed.
- On selecting Client Comments and Squad Check Comments Add Single Document window is displayed.

Figure: Adding Client Comments or Squad Check Comments
- Enter Link Properties.
- Enter the document properties and complete the document adding process.
Added attachment will be displayed in the selected folder.
On selecting Comments, Markups, Related File and Specter the following window is displayed. Only difference in the windows displayed is the title of the window. It changes with the attachment type selected.
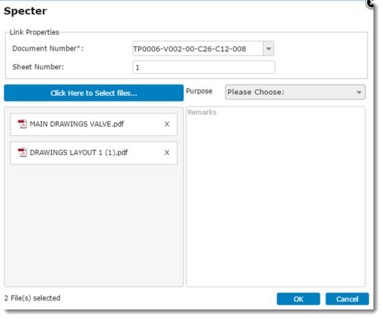
- Click the field Click Here to Select files.
- File selection window is displayed. Select the file from the location where it is stored.
- In the Link Properties enter the document number of the main document or the document to which you are adding the attachment.
- Click OK to continue.
Added attachment will be displayed in the selected folder.
Creating document links
For sharing documents with clients or vendors a link for downloading the documents can be generated. A link authentication user is selected before generating a link. Once a link authentication user is created the recipient of the document link need not authenticate to open the link.
 To create document link
- In the smartfolder grid select the document.
- In the list of options click Create Link.
Create Link window is displayed.
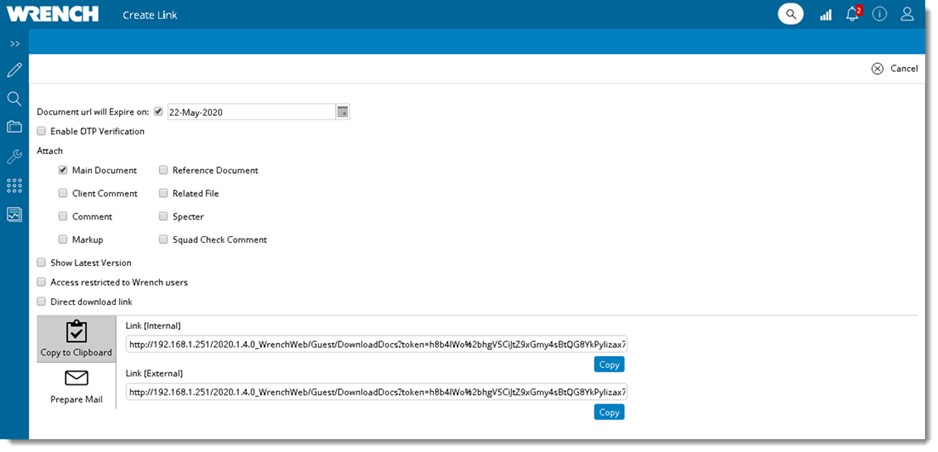
Figure: Create Link window
Different elements in the Create Link window is mentioned in the following table.
|
#
|
Property
|
Description
|
|
1
|
Document url will expire on
|
Select an expiry date for the link from the date picker. The checkbox next to this option is selected by default. Once the check box is cleared, the specified date is also cleared and the date picker is disabled. If expiry date is not specified while creating the link, user can always access this link.
Once an expiry date is selected the link created cannot be opened after the expiry date.
|
|
2
|
Enable OTP verification
|
On selecting the checkbox next to this option. for opening the document link, you have to provide a one time password. For more information see Verifying download link using OTP.
|
|
3
|
Attach
|
A document or drawing will have different types of attachments linked to it. While creating a link you can decide the attachments the user who receives the link can view. Click the check box next to different attachment types. Selected attachments will be available for the user.
|
|
4
|
Show latest version
|
Since most of the documents or drawings are revised at regular intervals, their versions change from time to time. If this option is selected users who open the link will have access to latest version of the document.
|
|
5
|
Access restricted to WRENCH users
|
Select this option to allow only WRENCH users to open the document link. If this option is selected when a user opens the document link a login window is displayed. Enter the login credentials to login and open the link.
|
|
6
|
Direct Download Link
|
When multiple documents are selected and a link is created, when a user download the documents using the link, documents for download is to be selected from the download window. In case there are large number of documents for download, the process is time consuming. If the checkbox next to this option is selected and user clicks the document access link, complete files will be downloaded as a ZIP file.
|
|
7
|
Copy to clipboard
|
Click this option to copy the link. This link can be pasted to a location of your choice.
|
|
8
|
Prepare Mail
|
The document link is sent to users through mail. On clicking Prepare Mail, mail window is displayed. Enter the recipients for the mail and a Subject. Internal and External document links and a subject is displayed in the mail window. Resources added to the project or users in the distribution list created from Personal Settings will be listed in the recipient’s field.
On entering the address book or distribution list, resources in the list will be populated in the recipient’s field. Document Link can be created directly for the pre-defined set of recipients.

NOTE: If Bcc recipients are to be added to the mail, click the button BCC. An additional column for entering Bcc users will be inserted in the window.
|
When you click the link sent to you through mail, if OTP authentication is not enabled, download window is displayed.

Figure: Download window
- Select the documents and click Download. Selected documents will be downloaded.
Verifying download request using OTP
When you click the document link in the email id sent to you the following window is displayed.
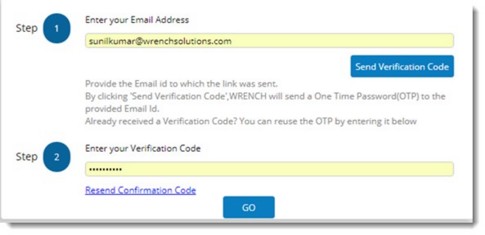
Figure: Generating OTP
- Enter the email id to which OTP has to be sent.
- Click Send Verification Code.
An OTP is sent to the email id provided in the window.
- Enter the OTP and click GO.
Verification successful window is displayed.
- Click OK to continue.
A window is displayed with the documents that can be downloaded.

Figure: Download window
- Select the checkbox next to the documents that has to be downloaded and click Download.
Selected files are downloaded.
Creating Smart Folder links
Smart Folder links can be created from document smart folders and task smart folders.This will help users to access documents and tasks in WRENCH smart folders from external locations.
 To create smart folder link
- Select a smart folder.
- In the list of options click Create Smart Folder Link.
External and Internal links are generated as shown in the following figure.

Figure: Creating Smart Folder Links
- Click Copy to copy the link to clipboard.
Generated links can be send through mail.
- Click Prepare Mail.
Mail window is displayed. External and Internal links are displayed in the window.
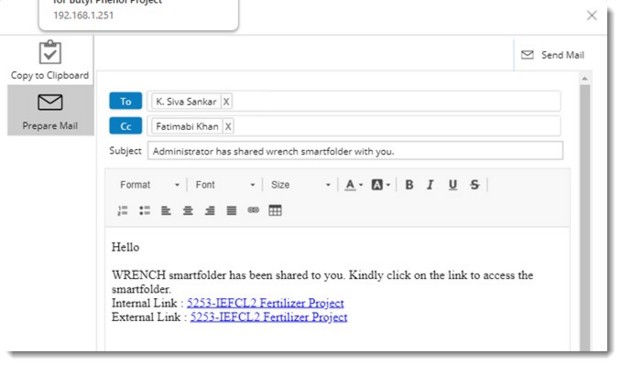
- Enter the recipients and click Send Mail.


 Downloading an attachment type from multiple documents
 To open multiple documents for commenting
 To attach squad check comments to multiple documents
 To add attachment directly to attachment smart folder