Navigation: WRENCH SmartProject 202341 > Masters > Workflow >

Custom Stages


If there is a stage that is used in more than one Workflow,  then this stage can be defined as a custom stage and can be assigned to more than one Workflow.

To define a custom stage

1.On the Workflow Masters window left pane click Custom Stages.

Custom Stages window displayed.

Figure: Custom Stages window

2.On the window click New. Custom Stage Details window is displayed.

Figure: Custom Stage Details window

3.On the window enter values for the properties described in the following table.

#.

Property

Description

1

Stage  Name

Enter a stage name.  The custom properties are defined for this stage .

2

TYPE

Select the type of the stage from a drop-down list.

3

STYLE

Select a style for the stage from a drop-down list. Options available are Conditional Stage and Non-Conditional Stage.

4

Activate this Stage on the Completion Of

The user can specify the condition for the activation of the stage. The stage can be activated on completion by any of the workflow resources or all the workflow resources. Options available on the drop-down list are All and ANY.

5

Move to the Next Stage on Approval by

Here the user can specify if the object is to be  send to the next stage on approval either by any one user or all users or sequenced users. In case of a sequenced stage, the user may enter the sequence for each User/Group.

6

Physical file is mandatory

 If this option is enabled, a physical file should be attached for sending from the stage.

7

Approval Status Code mandatory (for issued documents)

If this option is enabled, Client comment and approval status code should be updated from the selected stage.

8

Default Mail Intimation Required

If this options is enabled, a drop-down list for selecting the stage is enabled. A mail is sent to the user in the next stage, if the selected stage is activated.

9

Assign only a single resource to this stage

If this option is selected you can only assign a single resource to this stage and only this resource can close this stage. If the checkbox next to this option is selected, the drop-down box next to From is displayed. A stage can be selected from the drop-down list. Select the stage for which notification mail is required. On sending the document, a notification mail is sent based on the source-destination defined against the current stage.

10

Enforce sequencing for stage activation

This setting can be enabled only if the stage is sequenced. Once this option is enabled, the sequenced stage will be opened to the user only if the previous user closes it.

11

Stall workflow when reference documents are of older revisions

On selecting this option for a stage, on sending the document from that stage, system will check if any of the reference document linked to that document is of the latest Revision. If Revision of any of the reference document is not latest, document cannot be send to next stage and alert message is displayed.

12

General transmittal is mandatory

In some organizations there may be multiple consultants reviewing the documents using one workflow, here a consultant can only send an object through a workflow after releasing a transmittal (general). Hence a validation is required to ensure that a general transmittal is released from a particular stage of workflow before proceeding to next stage.

Once you select this option for moving to the next stage a general transmittal has to be send.

13

Timelog entry is mandatory

On selecting this option for moving to the next stage timelog entry will be mandatory for a workflow stage.

14

Budgeting

Settings required for defining budgeting can be specified here.

Lead time Hrs: Enter the anticipated time (in hours) required to finish this stage.

Percentage of Completion: Percentage of Completion of a stage is entered here to specify the Percentage completed on completion of the stage.

Can override Planned Finish Date while sending: If this option is enabled, the planned finish date assigned to the stage can be changed while sending.

Close routing automatically after planned finish date: This option is not selected by default. On selecting this option, the workflow stage is closed after planned finish date for the stage expires. Planned finish date is calculated based on the value entered for Lead time allotted in Hrs.

Send Alerts <<number>> days before the Planned Finish Date: Based on the number of day specified here, notifications can be send indicating the expiry of planned finish date, before the planned finish date.

Send Alerts <<number>>days after the Planned Finish Date: Based on the number of days specified here, notifications can be send indicating the expiry of planned finish date, before the planned finish date.

15

User Accessibility

Here the administrator can provide access rights for the resources assigned to each stage. Against each association type two check boxes Allow and Mandatory are provided.

To define user accessibility for a workflow stage

1.Click Configure button to define User Accessibility for a workflow stage. On clicking the configure button the following window is displayed.

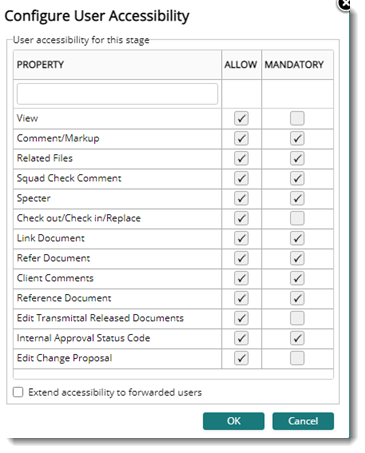
Figure: Configure User Accessibility window

If the check boxes next to Allow and Mandatory are selected then the association type will be mandatory for that stage.

If the check box next to Allow is only selected the association type will not be mandatory for the stage, but user will be able to attach one.

If the check boxes next to both options are not selected, user will not be able to attach any associated files.

NOTE: Rights assigned here will have precedence for the current stage users over the rights assigned in the genealogy. The settings can be made for each stage in work flow. All these rights are selected by default.

View: The checkbox against view is selected by default. Once this checkbox is selected the documents may be viewed by the current stage user, even if the user does not possess rights in the genealogy. User may also consider the following arguments.

‘View’ permission in the genealogy takes precedence if view right is unspecified for a specific stage.

If the option is selected, user without view permission in the genealogy is permitted to view the document. Once the document is routed to the next stage the user is restricted from viewing the document.

If the option is cleared for a specific stage current stage user is restricted from viewing the document even if the user possesses view right in the genealogy.

You can assign unspecified status to any of the user accessibility options available in the workflow stage property window. Once the status is assigned as unspecified the rights assigned in the document or task genealogy is given higher precedence

Edit: Users can edit the document if the checkbox against Edit is selected.

Markup: The users can add markup if the checkbox against Markup is selected.

Comments: If the selected stage is a sequenced stage, the ‘Comments’ option controls the user accessibility for the stage to add comment files. if this  option is unchecked, the specific user in the current stage will not be able to add comment files. Otherwise, the user may have the privilege to add comment files.

Related Files: If the selected stage is a sequenced stage, the ‘Related Files’ option controls the user accessibility for the stage to add related files. if this option is unchecked, the specific user in the current stage will not be able to add related files. Otherwise, the user may have the privilege to add related files.

Squad Check Comment: You can add a Squad Check Comment file to a specific document from his/her workspace only if he/she has the above mentioned rights in that work flow. Once a squad check comment is added the system restricts further addition of comment files.

Specter: You can add Specter files if the Specter check box is selected.

Check Out/Check In/Replace: If the check box is enabled users in this stage can perform check out, check in and replace operations form their workspace

Link Document: Select this option if a document or drawing has to be linked to this stage.

Refer Document: Select this option if a document or drawing is to be referred to this stage.

Client Comments: Select this option if client comments is to be attached to a stage.

Reference Documents: Select this option if reference documents is to be attached to a stage

Edit Transmittal Released Documents: Select this option if editing of transmittal released documents attached to the stage is to be permitted.

Internal Approval Status Code: Select this option if updating approval status code is to be permitted for document in the selected stage.

Edit Change Proposal:  Select this option if editing change proposals in the stage is to be permitted.

Extend accessibility to forwarded users: If the checkbox next to this option is selected, the settings defined here is extended to users to which the object is forwarded.


4.Click Appy to save changes. A custom stage is created successfully.


Copyright © 2024 WRENCH Solutions