|
Here, user can select a workflow, enter a team name and save the workflow, assign resources to the Workflow, define mail options, configure escalations and notifications, and define a set of advanced settings. These operations are described in the following section. These sections can be accessed by clicking the hyperlinks below.
Opening the workflow organizer
Open the workflow created in designer
Saving the workflow team
Assigning stage resources
Defining properties for workflow stages
Assigning sending rules
Defining mail options
Adding stage resources and distribution list
Configuring a sequenced stage
Configuring escalations and notifications
Workflow mail configurator
Assigning workflow to modules and release workflow
Creating worklfow from another workflow
Opening the workflow organizer
To open Workflow Organiser,
1.On the Workflow window left pane, select Organiser.
The Workflow Organiser window is displayed.
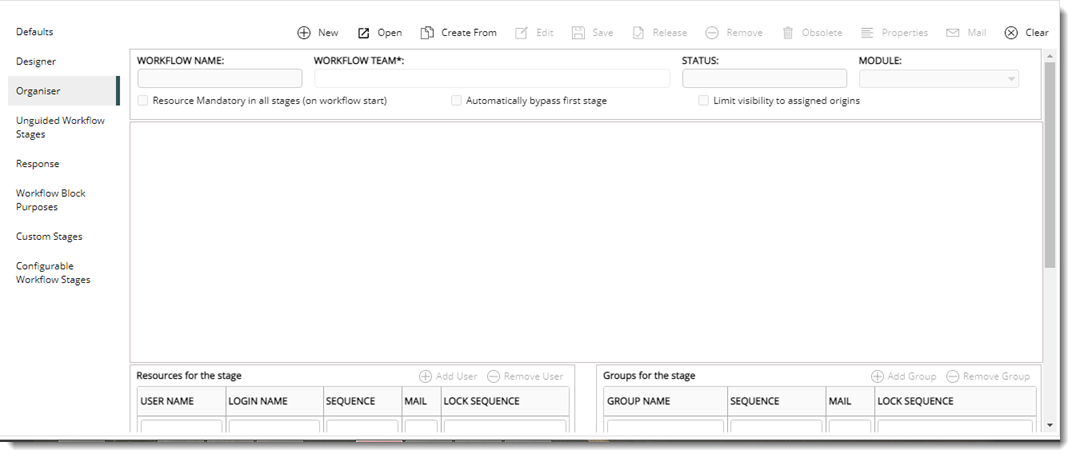
Figure: Workflow Organiser window
Opening a workflow
A workflow created and designed in the workflow designer and later released can be opened from the workflow organiser, a workflow name can be specified and different properties can be assigned to different stages. in the workflow.
To open the workflow
1.On the Workflow Organiser window, click New. Select Workflow window is displayed.
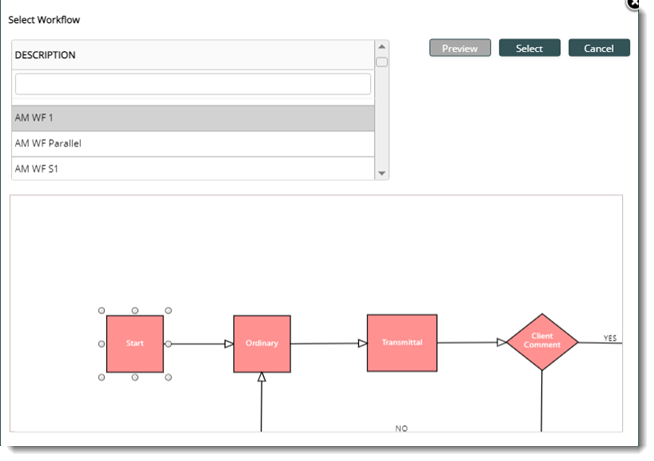
Figure: Select Workflow window
2.On the window, select the Work flow .
3.Click "Preview" button to view the Work flow.
4.After previewing the workflow, click Select to open the selected workflow.
Saving the workflow team
Once the new workflow is selected, the workflow is saved with a Workflow Team name. Only after saving the Workflow Team, properties can be assigned to the workflow.
To save the workflow team
1.After opening the workflow on the organizer window enter a team name for the workflow in the field WORKFLOW TEAM.
2.Click Save to save the Workflow Team. The workflow team is saved successfully.
The following settings are also available on the Workflow Organizer window.
Resource mandatory in all stages (on workflow start): If the checkbox next to this option is selected, a workflow can be started, only if resources are assigned in all stages of the workflow.
Automatically bypass first stage: If the check box next to this option is selected for a workflow team, on sending an object using this workflow team, first stage of the workflow is bypassed.
Limit visibility to assigned users: When multiple organisations work together within a single workflow, it is not desirable for each organisation to view workflow process of other origins and the resources assigned to their stages. Select this option to control this. Also an option to select origin type is available in stage properties window of Workflow Organizer. Once this option is selected after selecting origin type in stage properties window, the workflow stage will be visible only for the selected origin type.
Adding resources to workflow stages
After saving the workflow team, resources can be added to workflow stages.
NOTE: Resources can also be added from the Stage Resources tab on the Stage Properties window.
To add resources
1.On the workflow organizer window click Open. Search Workflow window is displayed.
2.Search and select the workflow team.
3.On the tool bar click Edit. The organizer will be in edit mode.
4.Select the stage to which resources are to be added.
5.In the section Resources for the stage, click Add User.
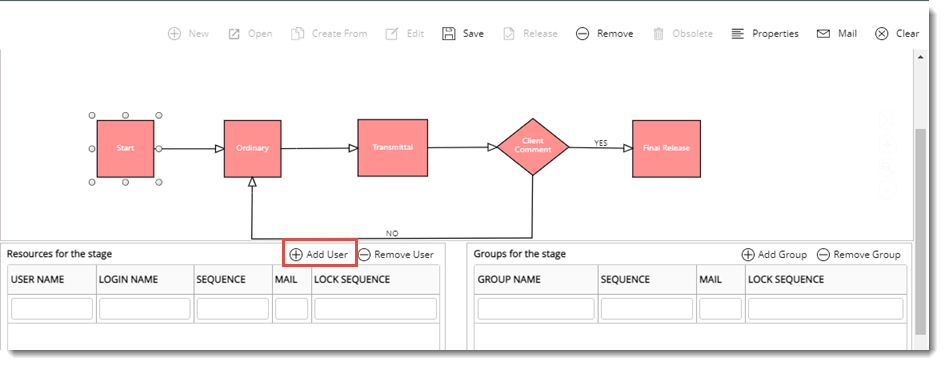
Figure: Adding resources
6.Search User window is displayed. Search and select the required users. The selected users are displayed on the grid.
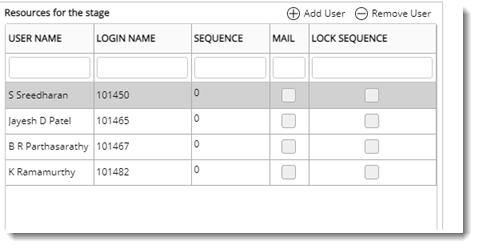
Figure: Assigned users
A sequence can be assigned to the stage users and the sequence can be locked. For more details on this topic see Defining a sequence for stage users. After adding the resources, next step is to define different properties for the workflow stage.
Defining properties for workflow stages
Properties like sending rules, mail options, stage resources and notification can be defined for a workflow stage.
To define properties
1.Select a stage and on the tool bar click Properties.
Stage properties window is displayed.
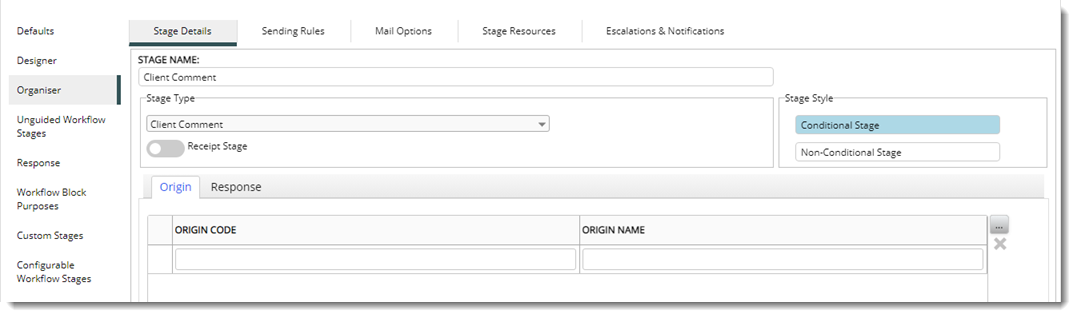
Figure: Stage Properties window
On the window information is arranged under different tabs. The tabs are:
•Stage Details
•Sending Rules
•Mail Options
•Stage Resources
•Escalations & Notifications
By default the tab Stage Details is selected. Different properties on the Stage Details window is described in the following table.
|
#
|
Property
|
Description
|
|
1
|
Stage Name
|
The stage name is displayed here. This field can be edited.
|
|
2
|
Stage Type
|
Based on the workflow stage selected, the stage name is displayed here. The possible stage names are as follows.
Start Stage:- The initial stage.
Ordinary Stage:- The Ordinary Stage.
Transmittal Stage (Stage that comes before Client Comment stage): The stage through which Documents are send to the customer.
Client Comment Stage (Release to Customer):- A stage in which a comment has to be received from a customer (which requires an approval code from the customer). By default system, assigns Transmittal stage before a Client Comment Stage.
Final Release Stage:- The end stage. It can be a conditional/ Non conditional stage.
Receipt Stage:- Enable this option my switching on the toggle button, if the users wants to update the Receipt Details(External agency Transmittal Number and Receipt Date) in this stage.
Stage to be closed by single resource only:- Select this option, if this stage should be closed only by a single resource.
|
|
3
|
Stage Style
|
The stage style of the selected stage is displayed here. This field is non-editable.
Conditional Stage: if a stage requires to be met with certain conditions or decisions, the system can specify it in as a conditional stage. If the conditions are met then the routing is carried forward else the object is send backward.
Non Conditional Stage: If there are no conditions to be checked before sending to the next stage then SmartProject treats this as a non-conditional stage.
|
|
4
|
Origin Details
|
Origin details can be defined for a stage from the stage details window. By default the tab Origin is selected. Selecting an origin type is useful when access to workflow stages is controlled based on assigned origins.
To select an origin
1.Click the browse button next to Origin name. Select Origin Name window is displayed.
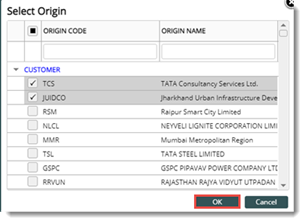
Figure: Select Origin Name window
2.Select an Origin from the list. and click OK.
Origin Type is displayed based on the origin name selected.
NOTE: In the Workflow Organizer window, if the setting "Limit visibility to selected origins" is selected, workflow stages will be displayed in black colour for users who do not belong to the selected origin.
|
|
5
|
Response
|
In a typical design review scenario, the IDC stage will have multiple reviewers from various disciplines. Usually, the IDC stage is a ‘Send by All/Sequence’ stage, where the workflow can be navigated further after all stage users complete their work. Only the last user can send the workflow while the others needs to close it from their workspace, with a comment.
The immediate next stage to IDC is where the comments are consolidated. This user now views the ending comments made by each reviewer and decides on an approval status code before sending it further. The reviewer views the individual routing history to understand the sending comments.
To standardize sending comment, response code can be assigned for conditional and non-conditional stages. Multiple response codes can be defined.
To assign response codes
1.Select the tab Response.
2.Click the browse button to select a response code from a pre-defined list. Selected response codes are displayed in the Response tab grid.
When a user sends an item from a stage where the sending option is ‘Approved by All’, and there are other users yet to close their routing, the ‘Close’ window is displayed instead of the ‘Send’ window.
If a response code is defined against the stage, it is mandatory to specify a response code and description (comments).
When a document is sent through a workflow from one stage to another and the response code is configured against the stage, in the Send window, a provision to select a response code is displayed.
|
After saving the stage details Sending Rules can be assigned for the stage.
Assigning sending rules
Different rules that can be assigned to a workflow stage is defined here. For more information on assigning sending rules see Designer>>Sending Rules.
After assigning sending rules, mail options can be defined for the stage.
Defining mail options
Notification mails are sent when objects are sent from one stage to another. The mail body for these notification mails can be defined here.
To define mail options,
1.On the properties window, click Mail Options. Mail Options window is displayed.
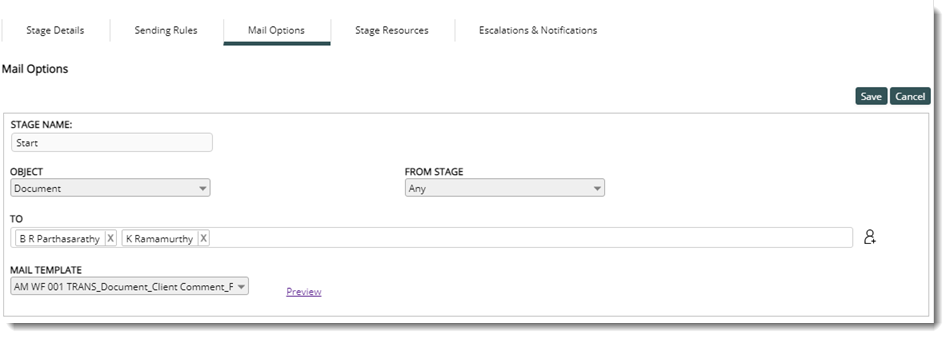
Figure: Mail Options window
Different properties on this window is explained in the following table.
|
#.
|
Property
|
Description
|
|
1
|
Object
|
Select an Object from the drop-down list. In the drop-down list items Document, Task and Change Proposal are available.
|
|
2
|
From Stage
|
Resources in the selected stage or current stage are displayed here.
|
|
3
|
To
|
Resources in the next stage are displayed here.
|
|
4
|
Mail Template
|
Choose a mail template from the dropdown list.
|
Previewing the mail template
A preview of the selected mail template can be viewed.
To preview the mail template
1.Click the hyperlink Preview next to the mail template selected.
A preview of the selected mail template is displayed on the PREVIEW OF MAIL window.
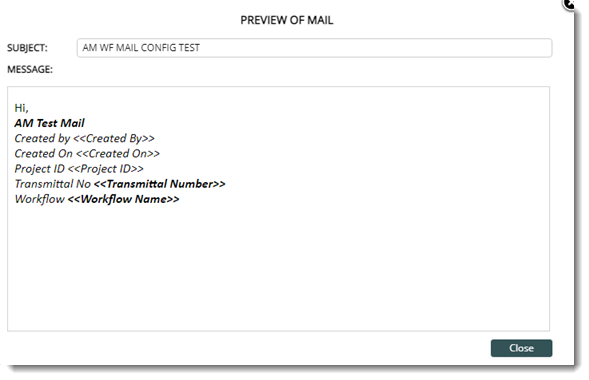
Figure: Preview of the Mail
Adding stage resources
Stage resources and distribution list can be added here. If stage resources are already added from the workflow organizer window, it can be modified here. Resources added are displayed on the window. In addition Cc resources can also be added here.
Adding Cc resources
Cc resources are usually defined in organizations where specific users are only permitted to process and forward a document, while other resources in that stage are permitted only to incorporate their comments and close the document from the stage. Users and User Groups can be added as Cc resources.
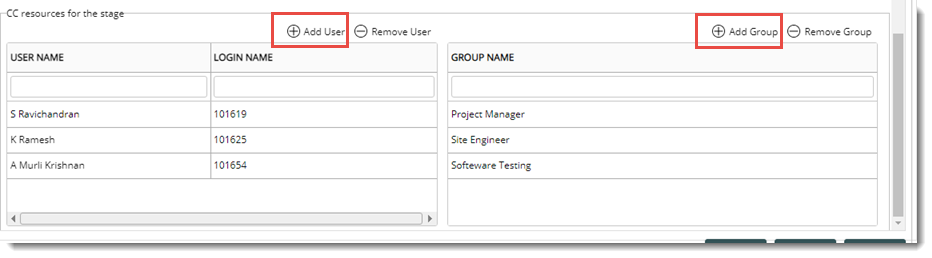
Figure: Adding Cc resources
To add Cc resources
1.Click Add User.
The Search User window is displayed.
2.Search and select users from the list.
3.Click OK to continue.
Similarly user groups can also be added.
To add user groups
1.Click Add Group.
The User Groups window is displayed.
2.Search and select users from the group.
3.Click OK to continue.
Assigning Distribution List
In scenarios where, different categories of documents are sent for review and commenting, they are checked by a combination of different disciplines. For Example: Category 1 would be checked by ROT (Mechanical Rotating) and HTAT (Heat Transfer& Applied Technology), Category 2 would be checked by C&I (Control & Instrumentation), ELE (Electrical) and ROT. So here there are different discipline combinations for each category documents that go for inter departmental comments.
To address such scenarios provision to configure separate Distribution List for assigning the combinations of different discipline to each category of document against workflow stage is provided.
To assign distribution list,
1.On the Stage Properties window, click the tab Distribution List. Assign Distribution List window is displayed. Name of the stage is displayed on the window.
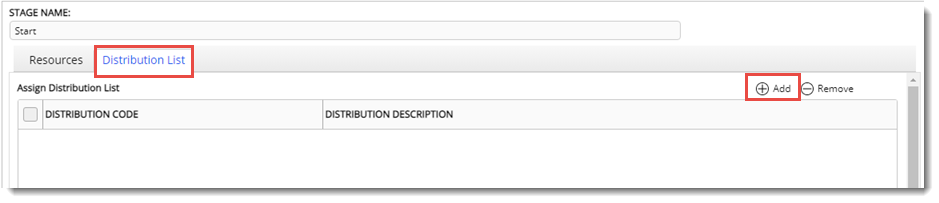
Figure: Assign Distribution List window
2.Click Add. Distribution List window is displayed.
.png)
Figure: Distribution List window
3.Select the distribution and click OK.
4.Select the distribution that is to be deleted and click Remove.
5.Click OK to continue.
NOTE: When user creates a workflow team using the option ‘Create From’ in ‘Organiser’, the stage resources from the source/parent workflow team and distribution list defined against the source workflow team if any gets inherited.
Defining a sequenced stage
Sequenced sending is different for normal sending. In sequenced sending the stage users follow a pre-defined sequence when objects are send from the stage. The sequence of the users are defined when stage resources are added to a sequence stage.
For configuring a stage as sequenced stage ensure the following conditions are satisfied when sending rules are defined.
•The stage is not the START stage, TRANSMITTAL stage and FINAL RELEASE STAGE.
•The sending rule Move to next stage on approval by is SEQUENCED.
.png)
Once these settings are defined for the workflow stage, the column for entering sequence is enabled against a user.
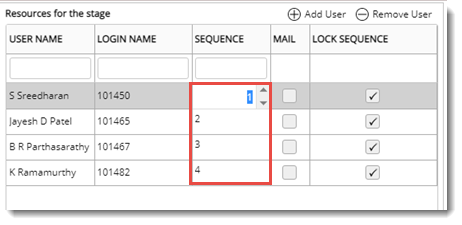
Figure: Entering a sequence
In the column SEQUENCE enter the sequence for the user or user group.
Locking Sequence: The sequence of users in a stage can be locked by selecting the checkbox in the column LOCK SEQUENCE. Once the sequence is locked, the sequence cannot be modified while sending . In case, new resources are added to the specific stage,a sequence can be added for the added users.
The following points would be helpful, when objects are send from a sequenced stage.
1.While sending from a sequenced stage to the next stage, only the final user in the sequence is permitted to send to the next stage. Other Users can only close their workspace entries. This is applicable to conditional stage also. Only the final User can send forward or reject from the conditional stage.
2.Before the final User in the sequence begins to send to the next stage, the user should check that all the other users existing in the sequenced stage have closed the object from their workspace. If any of the users in the sequenced stage do not close object from their workspace, then sending to the next stage is not possible.
3.In case, the current user in the sequenced stage is not the final user, he can only close the entry from his workspace.
4.Before closing, the current user must check that all the previous users have closed from their workspace in the sequential order.
5.If there is a user who is available both as a stage user and in the group, then his sequence specified as 'user' is given preference.
6.The sequence number specified for a certain group is applicable for all the users in that group. All the users of the group will inherit the same sequence number assigned to the group. As a result, any of the users in the group has the right to close on behalf of all.
7.When a comment file is send through a work flow which has a sequenced stage, all the users in the squad check stage can check out the comment file from their respective workspace. A sequenced user would be intimated by mail on the activation of their sequence.
Configuring Escalations & Notifications
Notifications and escalations are sent when different users work on workflow objects. Different settings for these notifications can be configured.
To configure escalations & notifications,
1.On the Stage Properties window, click Escalations & Notification.
The Escalations and Notification window is displayed.
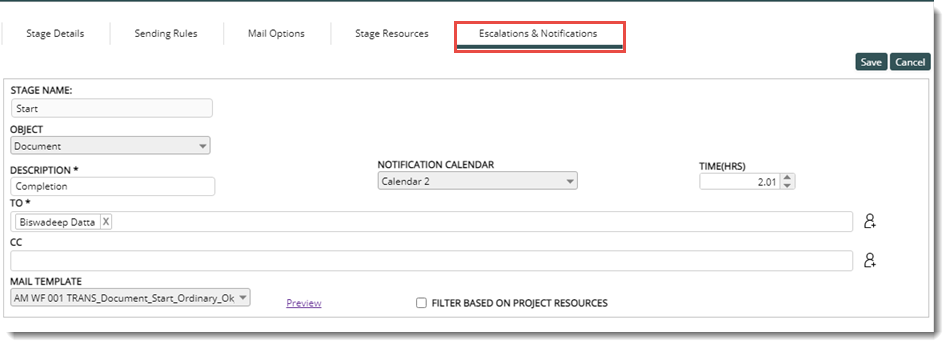
Figure: Escalations and Notifications window
Various fields in the window are described in the following table.
|
#
|
Item
|
Description
|
|
1
|
Object
|
Select an Object from the drop-down list. In the drop-down list items Document, Task and Change Proposal are available.
|
|
2
|
Description
|
Enter a Description. This is a mandatory field.
|
|
3
|
Notification Calendar
|
Click the dropdown to select from a pre-defined list of calendars. Once a calendar is assigned to a user escalation mails are sent to the user based on the settings in the calendar.
|
|
4
|
Time(Hrs)
|
After the planned finish date is over, as per the time(in hrs) specified here, the user will receive escalation mails.
|
|
5
|
To
|
Click the add user icon to select the user.
|
|
6
|
CC
|
Click the add user icon to select the user.
|
|
7
|
Mail Template
|
Choose a Mail Template from the dropdown.
|
Viewing preview of the mail
A preview of the selected mail template can be viewed.
To view the mail template
1.Click the hyperlink Preview, next to the field MAIL TEMPLATE.
A preview window is displayed where the user can view the mail template selected.
Workflow Mail Configurator
The "Work flow Mail Configurator" helps a user in the current stage to configure mails that are send to selected users or user groups in the next stage of the Work flow. Response, Subject and Message can be included in the mail. You can also list the object properties in the "Subject" and "Message" lines of mails sent to different users in the organization. Mail bodies can be defined for a particular stage.
To open Workflow Mail Configurator,
1.On the Workflow Organiser window, click the Edit button to enable edit mode.
2.On the tool bar click Mail.
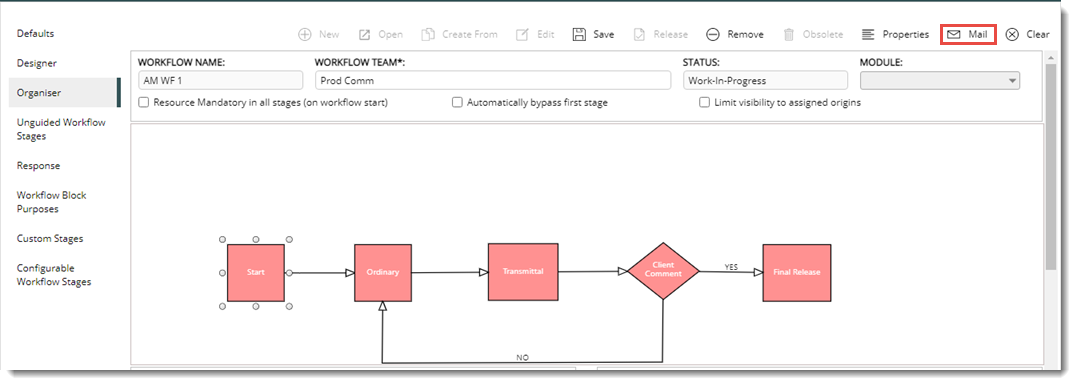
Figure: Opening mail configurator
The Mail Configurator window is displayed.
3.On the window click Create. The workflow is displayed on the mail configurator window.
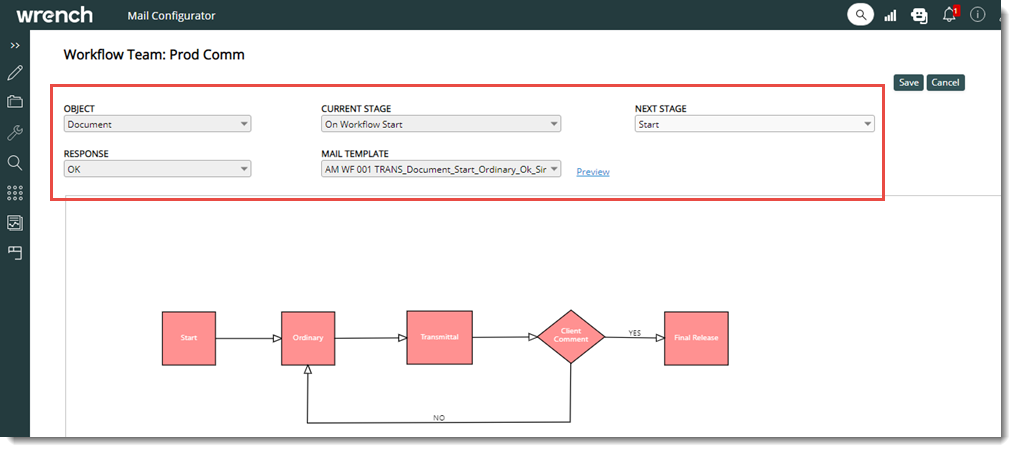
Figure: Mail Configurator window
4.Specify values for the different properties displayed on the window.
|
#.
|
Item
|
Description
|
|
1
|
Object
|
Select an Object from the drop-down list. In the drop-down list items Document, Task and Change Proposal are available.
|
|
2
|
Current Stage
|
Select the current stage to which the object must be sent.
|
|
3
|
Next Stage
|
Select the next stage or the stage to which the object must be sent.
|
|
4
|
Response
|
Select a response from the dropdown list.
|
|
5
|
Mail Template
|
Select a mail template from the dropdown list. Click the hyperlink Preview, view the mail template.
|
5.Click Save to store the values.
6.After defining all workflow related properties, on the Workflow Organizer tool bar, click Save to save the configurations.
Assigning workflow to modules and releasing the workflow
For sending different objects through a Workflow, a workflow is assigned to different modules and the workflow is released. Once released the workflow will be available for different modules.
To assign a workflow to different modules,
1.On the workflow organizer tool bar, click Edit to enable the edit mode.

Figure: Assigning modules
2.Select a Module from the drop-down list. The available options are Document, Task and Change Proposal.
3.Select the checkbox next to the required modules.
4.After selecting the modules click Save to store the selection.
NOTE: A workflow containing transmittal stage cannot be assigned to Change Proposal module.
To release the workflow
1.On the workflow organizer tool bar click Release.
A message Are you sure to Release the selected workflow is displayed.
2.Click YES to release the workflow. The workflow is released successfully.
The workflow will be available for using with objects in SmartPRoject.
Creating workflow from an existing workflow
A workflow can be created from a workflow that is already released.
To create a workflow
1.On the workflow organizer toolbar click Create From.

Figure: Creating workflow from a workflow
Search Workflow window is displayed.
2.On the window, select a Workflow and on the tool bar click Select.
The selected workflow is displayed in the workflow organizer
3.Enter a Workflow Team Name and save the workflow.
|