|
Diffrent workflow stages can be designed here. In an effort to provide the user with maximum ease, facility is provided for the user to actually sketch the workflow. Each stage is physically created and properties assigned to it. In addition, conditional stages can also be defined and the linking conditions are also taken care of.
Opening Workflow Designer
To open Workflow Designer,
1.On the Workflow window left pane , clici the option Designer.
The Workflow Designer window is displayed.
.png)
Figure: Workflow Designer
Creating a Workflow
A workflow is designed or created from the Designer.
To create a Workflow,
1.On the Workflow Designer window, click New. The Start stage is inserted on the designer.
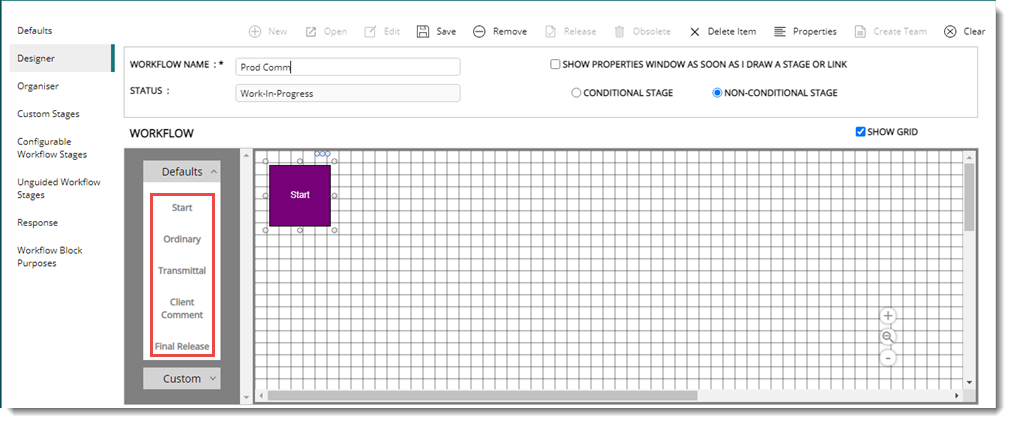
Figure: Creating a workflow
2.Enter the Workflow Name.
3.Click the default stage name displayed on the Defaults panes to add stages to the workflow.
4.Select the stage type. Options available are Conditional Stage and NON-Conditional Stage. A conditional stage can have only two outgoing links, a non-conditional stage can have any number of outgoing links. While sending from a non-conditional stage, a Stage Selection window is displayed with the list of stages defined in the outward link.
5.On the Designer window grid, ‘click and drag’ the mouse to insert a Stage. ‘Click and drag’ from one stage to another to create a link (forward/backward arrow).
.png)
Figure: Saving the workflow
2.After adding the stages and creating a link, click Save to save the workflow.
NOTE: A workflow should always have a Start stage and a Final Release stage, the last stage in a workflow. The Final Release Stage could be a conditional stage where if the user approves, the entire workflow ends or else it can be routed back to the previous stage.
While creating a workflow, the following discussion would be helpful.
•A minimum of two stages is required. A stage can be either made a conditional stage or a non-conditional one.
•A conditional stage can have only two outgoing links, a non-conditional stage can have any number of outgoing links.
•While routing from a non-conditional stage, a Stage Selection window is displayed with the list of stages defined in the outward link.
•User can select the required stages.
•The object is routed to the selected link.
•In a workflow the user needs to set certain properties for every "Stage" and "link."
•Once a workflow is created, unless it is 'Released' it cannot be assigned a team.
•A workflow after release cannot be edited.
After saving the workflow different properties can be defined for a workflow stage. Also rules for sending from one stage to another stage can also be defined. Properties for the stage links can also be configured. These are described in the following sections.
Defining Stage Details
For each stage in a workflow, different properties can be assigned based on the requirement of the organization.
To assign stage details,
1.Select a workflow stage and on the tool bar click Edit.
2.On the tool bar click Properties.
The Properties window is displayed. By default, Stage Details window is opened.
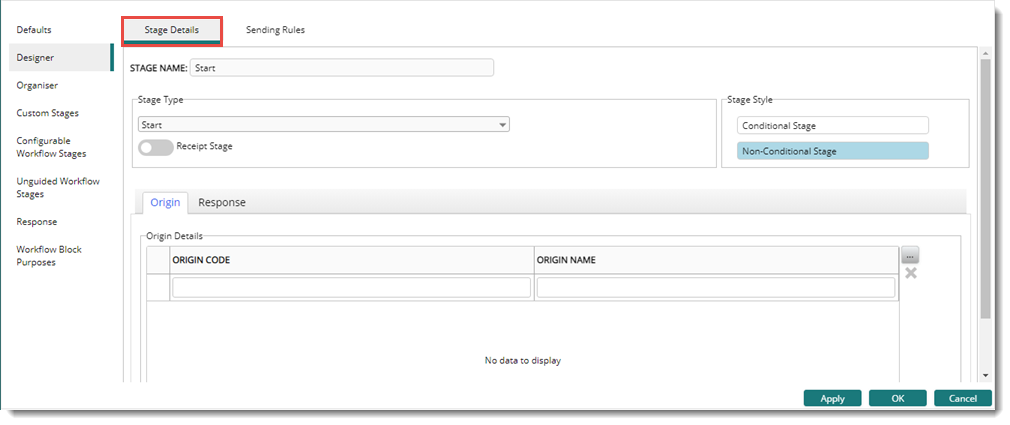
Figure: Stage Details
Different properties in Stage Details are described in the following table.
|
#
|
Property
|
Description
|
|
1
|
Stage Name
|
The stage name is displayed here. This field can be edited.
|
|
2
|
Stage Type
|
Based on the workflow stage selected, the stage name is displayed here. The possible stage names are as follows.
Start Stage:- The initial stage.
Ordinary Stage:- The Ordinary Stage.
Transmittal Stage (Stage that comes before Client Comment stage): The stage through which Documents are send to the customer.
Client Comment Stage (Release to Customer):- A stage in which a comment has to be received from a customer (which requires an approval code from the customer). By default system, assigns Transmittal stage before a Client Comment Stage.
Final Release Stage:- The end stage. It can be a conditional/ Non conditional stage.
Receipt Stage:- Enable this option my sliding the toggle switch, if the users wants to update the Receipt Details(External agency Transmittal Number and Receipt Date) in this stage.
Stage to be closed by single resource only:- Select this option, if this stage should be closed only by a single resource.
|
|
3
|
Stage Style
|
The stage style of the selected stage is displayed here. This field is non-editable.
Conditional Stage: if a stage requires to be met with certain conditions or decisions, the system can specify it in as a conditional stage. If the conditions are met then the routing is carried forward else the object is send backward.
Non Conditional Stage: If there are no conditions to be checked before sending to the next stage then SmartProject treats this as a non-conditional stage.
|
|
4
|
Origin Details
|
Origin details can be defined for a stage from the stage details window. By default the tab Origin is selected.
To select an origin
1.Click the browse button next to Origin name. Select Origin Name window is displayed.
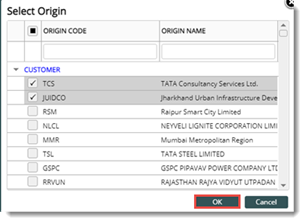
Figure: Select Origin Name window
2.Select an Origin from the list. and click OK.
Origin Type is displayed based on the origin name selected.
NOTE: In the Workflow Organizer window, if the setting "Limit visibility to selected origins" is selected, workflow stages will be displayed in black colour for users who do not belong to the selected origin.
|
|
5
|
Response
|
In a typical design review scenario, the IDC stage will have multiple reviewers from various disciplines. Usually, the IDC stage is a ‘Send by All/Sequence’ stage, where the workflow can be navigated further after all stage users complete their work. Only the last user can send the workflow while the others needs to close it from their workspace, with a comment.
The immediate next stage to IDC is where the comments are consolidated. This user now views the ending comments made by each reviewer and decides on an approval status code before sending it further. The reviewer views the individual routing history to understand the sending comments.
To standardize sending comment, response code can be assigned for conditional and non-conditional stages. Multiple response codes can be defined.
To assign response codes
1.Select the tab Response.
2.Click the browse button to select a response code from a pre-defined list. Selected response codes are displayed in the Response tab grid.
When a user sends an item from a stage where the sending option is ‘Approved by All’, and there are other users yet to close their routing, the ‘Close’ window is displayed instead of the ‘Send’ window.
If a response code is defined against the stage, it is mandatory to specify a response code and description (comments).
When a document is sent through a workflow from one stage to another and the response code is configured against the stage, in the Send window, a provision to select a response code is displayed.
|
Sending Rules
Different rules that can be assigned to a workflow stage is defined here.
To open sending rules window,
1.On the Properties window, select the Sending Rules tab. Sending Rules window is displayed.
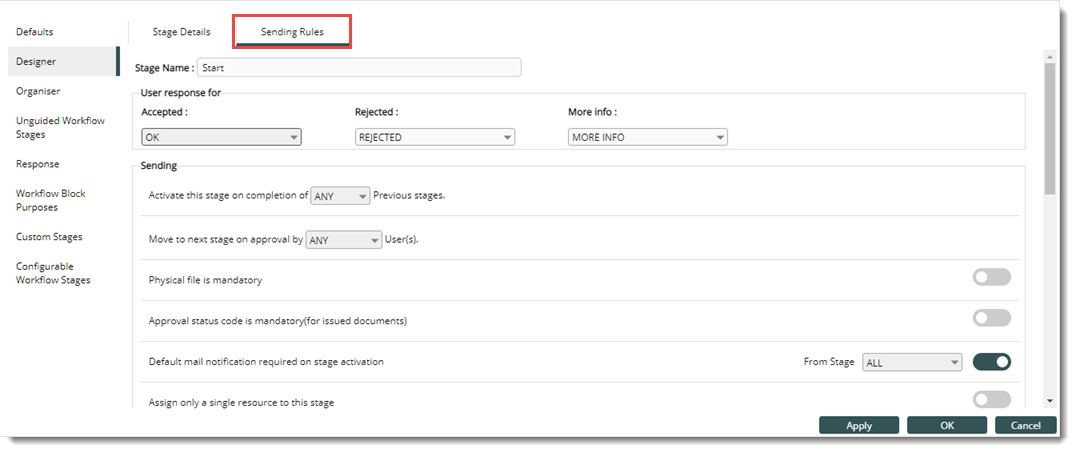
Figure: Sending Rules window
Different properties in the Sending Rule window are described in the following table.
|
#
|
Property
|
Description
|
|
1
|
Stage Name
|
Name of the stage is displayed here.
|
|
2
|
User Response For
|
Select the value for this property from the drop-down list. A stage can have different outcomes. It can be Accepted, Rejected or More info. Here the user can set the terminology to appear while sending to next stage.
Instead of values like APPROVE, REJECT etc. customised values can also be used. The response values configured here will be displayed in SmartProject Workflow window Response drop-down list for both documents and Tasks.
|
|
3
|
Sending
|
Here a trigger, which will activate this stage and the condition the stage has to satisfy to move to the next stage can be set. The user can select from the list of options provided in the drop-down list.
Activate this stage on completion of ANY/ALL stage: In the case of a work flow with parallel stages previous to the specified stage this option specifies the activation of this stage on completion of any one of the previous stages or all of them.
Move to next stage on approval by ANY/ALL users: Here the user can specify if the object is to be routed to the next stage on approval either by any one user or all users or sequenced users. In case of a sequenced stage, the user may enter the sequence for each User/Group.
Physical file is mandatory: If this option is enabled, a physical file should be attached for sending from the stage.
Approval Status Code mandatory (for issued documents): If this option is enabled, Client comment and approval status code should be updated from the selected stage.
Default Mail Intimation required on stage activation: If this option is enabled, a drop-down list for selecting the stage is enabled. A mail is sent to the user in the next stage, if the selected stage is activated.
Assign only a single resource to this stage: If this option is selected you can only assign a single resource to this stage and only this resource can close this stage. If the checkbox next to this option is selected, the drop-down box next to From is displayed. A stage can be selected from the drop-down list. Select the stage for which notification mail is required. On sending the document, a notification mail is sent based on the source-destination defined against the current stage.
Enforce sequencing for stage activation: This setting can be enabled only if the stage is sequenced. Once this option is enabled, the sequenced stage will be opened to the user only if the previous user closes it.
Stall workflow when reference documents are of older revisions: On selecting this option for a stage, on sending the document from that stage, system will check if any of the reference document linked to that document is of the latest Revision. If Revision of any of the reference document is not latest, document cannot be send to next stage and alert message is displayed .
General transmittal is mandatory: In some organizations there may be multiple consultants reviewing the documents using one workflow, here a consultant can only send an object through a workflow after releasing a transmittal (general). Hence a validation is required to ensure that a general transmittal is released from a particular stage of workflow before proceeding to next stage.
Once you select this option for moving to the next stage a general transmittal has to be send.
Timelog entry is mandatory: On selecting this option for moving to the next stage timelog entry will be mandatory for a workflow stage.
|
|
4
|
Budgeting
|
Lead time Hrs: Enter the anticipated time (in hours) required to finish this stage.
Percentage of Completion: Percentage of Completion of a stage is entered here to specify the Percentage completed on completion of the stage.
Can override Planned Finish Date while sending: If this option is enabled, the planned finish date assigned to the stage can be changed while sending.
Close routing automatically after planned finish date: This option is not selected by default. On selecting this option, the workflow stage is closed after planned finish date for the stage expires. Planned finish date is calculated based on the value entered for Lead time allotted in Hrs.
Send Alerts <<number>> days before the Planned Finish Date: Based on the number of days specified here, notifications can be send indicating the expiry of planned finish date, before the planned finish date.
Send Alerts <<number>>days after the Planned Finish Date: Based on the number of days specified here, notifications can be send indicating the expiry of planned finish date, before the planned finish date.
|
|
5
|
User Accessibility for this Stage
|
Here the administrator can provide access rights for the resources assigned to each stage. Against each association type two check boxes Allow and Mandatory are provided.
To define user accessibility for a workflow stage
1.Click Configure button to define User Accessibility for a workflow stage. On clicking the configure button the following window is displayed.
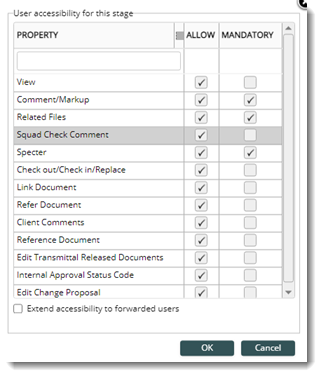
If the check boxes next to Allow and Mandatory are selected then the association type will be mandatory for that stage.
If the check box next to Allow is only selected the association type will not be mandatory for the stage, but user will be able to attach one.
If the check boxes next to both options are not selected, user will not be able to attach any associated files.
NOTE: Rights assigned here will have precedence for the current stage users over the rights assigned in the genealogy. The settings can be made for each stage in work flow. All these rights are selected by default.
View: The checkbox against view is selected by default. Once this checkbox is selected the documents may be viewed by the current stage user, even if the user does not possess rights in the genealogy. User may also consider the following arguments.
•‘View’ permission in the genealogy takes precedence if view right is unspecified for a specific stage.
•If the option is selected, user without view permission in the genealogy is permitted to view the document. Once the document is routed to the next stage the user is restricted from viewing the document.
•If the option is cleared for a specific stage current stage user is restricted from viewing the document even if the user possesses view right in the genealogy.
•You can assign unspecified status to any of the user accessibility options available in the workflow stage property window. Once the status is assigned as unspecified the rights assigned in the document or task genealogy is given higher precedence
Edit: Users can edit the document if the checkbox against Edit is selected.
Markup: The users can add markup if the checkbox against Markup is selected.
Comments: If the selected stage is a sequenced stage, the ‘Comments’ option controls the user accessibility for the stage to add comment files. if this option is unchecked, the specific user in the current stage will not be able to add comment files. Otherwise, the user may have the privilege to add comment files.
Related Files: If the selected stage is a sequenced stage, the ‘Related Files’ option controls the user accessibility for the stage to add related files. if this option is unchecked, the specific user in the current stage will not be able to add related files. Otherwise, the user may have the privilege to add related files.
Squad Check Comment: You can add a Squad Check Comment file to a specific document from his/her workspace only if he/she has the above-mentioned rights in that work flow. Once a squad check comment is added the system restricts further addition of comment files.
Specter: You can add Specter files if the Specter check box is selected.
Check Out/Check In/Replace: If the check box is enabled users in this stage can perform check out, check in and replace operations form their workspace.
Link Document: Select this option if a document or drawing has to be linked to this stage.
Refer Document: Select this option if a document or drawing is to be referred to this stage.
Client Comments: Select this option if client comments is to be attached to a stage.
Reference Documents: Select this option if reference documents is to be attached to a stage.
Edit Transmittal Released Documents: Select this option if editing of transmittal released documents attached to the stage is to be permitted.
Internal Approval Status Code: Select this option if updating approval status code is to be permitted for document in the selected stage.
Edit Change Proposal: Select this option if editing change proposals in the stage is to be permitted.
Extend accessibility to forwarded users: If the checkbox next to this option is selected, the settings defined here is extended to users to which the object is forwarded.
|
|
6
|
Apply to all teams of this design
|
A wokflow design teams can have different workflow teams. The user accessibility settings can be applied to all the teams.
To assign user accessibility to all teams in a design
1.Click the hyperlink Apply to all teams of this design.
Select Workflow Team window is displayed. On the window different team names and status of the workflow team is also displayed.
2.Select the checkbox next to the required workflow teams and click OK.
The user accessibility settings is extended to the selected workflow teams.
|
Defining Link Properties
Forward link is used for both conditional and non-conditional stage. In this link, after the completion of each stage the work flow is routed automatically to the next stage. Backward link is present only for non-conditional stage. This link is activated when a stage is in the rejected status. Only after the stage gets approved, the work flow will be routed to the next stage.
To link properties,
1.Select the link and on the tool bar click the Properties button.
Link Properties window is displayed.
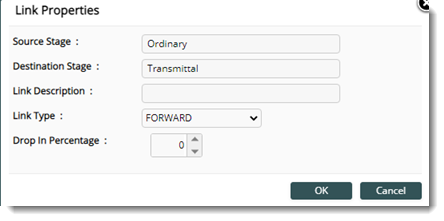
Figure: Link Properties
Source Stage and Destination Stage is displayed on the window. For non-conditional Stage the system displays a forward link. For a Conditional Stage, specify the link description as "Yes" in a forward link and "No" for a backward link.
If the link description is "No" the user may specify the drop in percentage here. A drop in percentage is an estimate made by the Work flow designer wherein the user specifies the percentage of rework that is needed if the routed object is not approved. Here it is important that the user reaches upon an accurate estimate of the work that has to be redone and from this calculate how much this will impact the entire work flow.
Saving and releasing the workflow
After entering all the required properties the workflow is saved. After saving the workflow is released, so that the workflow will be available in the Orgnaizer for adding a workflow team and assigning different workflow properties.
To release the workflow
1.On the Designer window click Release.
A message, Are you sure, you want to release the workflow? is displayed.
2.Click YES to release the workflow.
Workflow released successfully: message is displayed.
The status of the workflow changes to Released as shown in the following figure.

Obsoleting an active workflow
If a workflow is made obsolete, It cannot be used for further assignments. However a workflow that is assigned to an object cannot be made obsolete.
To obsolete an active workflow
1.On the tool bar click Obsolete.
A message Are you sure, you want to make the workflow obsolete is displayed.
2.On the message box click YES to obsolete the workflow.
NOTE: If there are many workflows which are in obsolete status and cannot be used for different objects in SmartProject, these workflows can be removed from SmartProject.
Removing a workflow from workflow designer
Workflow designs with any status can be removed from SmartProject if there are no workflow teams defined for it. You can remove all existing workflow teams assigned to a workflow to remove it.
Enabling and disabling designer grids
The designer grid in the workflow designer window helps you to position and align different stages and links that you are creating for a workflow. Depending on your preference the grid can be made visible or hidden.
To show and hide grids
1.In the workflow designer window select the check box next to Show Grid.
Grid is displayed in the organizer window.
1.Clear the check box if you want to hide the grid.
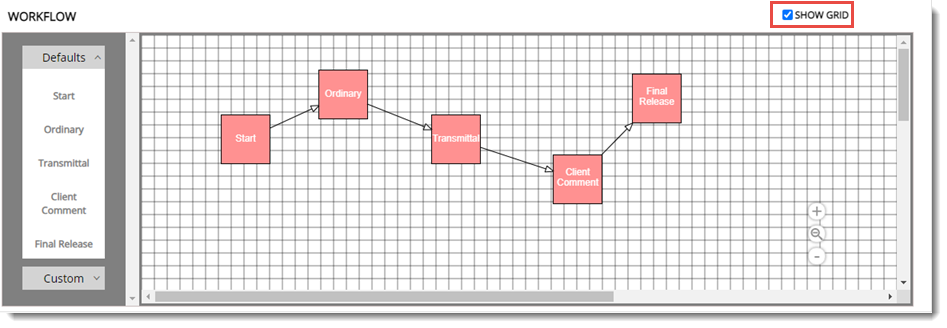
Figure: Showing and hiding grid
|