|
Usually, the quantity of completed work information is received from work sites in MS Excel files. It is convenient to import it directly to the system instead of typing in the details. A template can be generated for specifying such quantity information. Data entered in the generated excel template is imported to the system using the Import option. Also, when quantities are to be edited, the list is exported to MS Excel file, changes are made to the values and imported back again.
Generating Import Template
An import template is generated from the Joint Measurement Sheet window.
To generate import template
1.On the Joint Measurement Sheet window click Generate Template.
2.Select Commitment window is displayed. On the window select the commitment and click OK.
JMS template is downloaded successfully message is displayed.
3.Enter values for different properties and save the template.
Importing Line Item Details
Details entered in the JMS Import template can be imported to the system.
NOTE: The current JMS must be in Created status and in edit mode to import from MS Excel
To import line item details
1.On the Joint Measurement Sheet Details window tool bar click Import/Export.
2.On the menu displayed click Import.
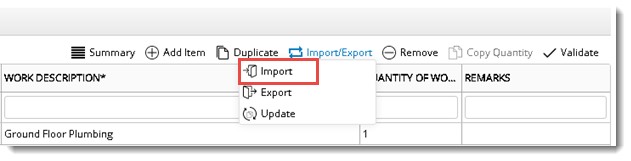
3.File Selection window is displayed. On the window select the updated Import template. System will verify whether the template belong to the commitment of current JMS, or else a warning message is displayed. If the template is of current JMS BOQ details are automatically retrieved based on the ID.
4.Once the import operation is completed successfully, line item details imported is displayed in the grid. Edit the details as required and save.
Exporting Line item Details
After saving the entered BOQ or line item details, the entered details can be exported. Details are exported to an MS Excel file.
To export line item details
1.Save the entered line item details.
2.On the Joint Measurement Sheet Details window tool bar click Import/Export.
3.On the menu displayed click Export. JMS BOQ Details are exported successfully message is displayed.
Excel file to which details are exported is opened. Values of properties in the file can be edited.
4.After editing the values save the changes.
NOTE: When exporting, if no rows are selected or a single row is selected, all rows will be exported. If multiple rows are selected, only the selected rows are exported.
|