|
|
All the basic project settings can be defined here. Different options to define general settings related to a project are available here. These settings are grouped under different panes in the Project Settings window. Different settings that can be defined are described in the following sections.
Basic Settings
Here basic document and Work Breakdown Structure settings can be defined. The settings that can be defined in this pane are described in the following section.
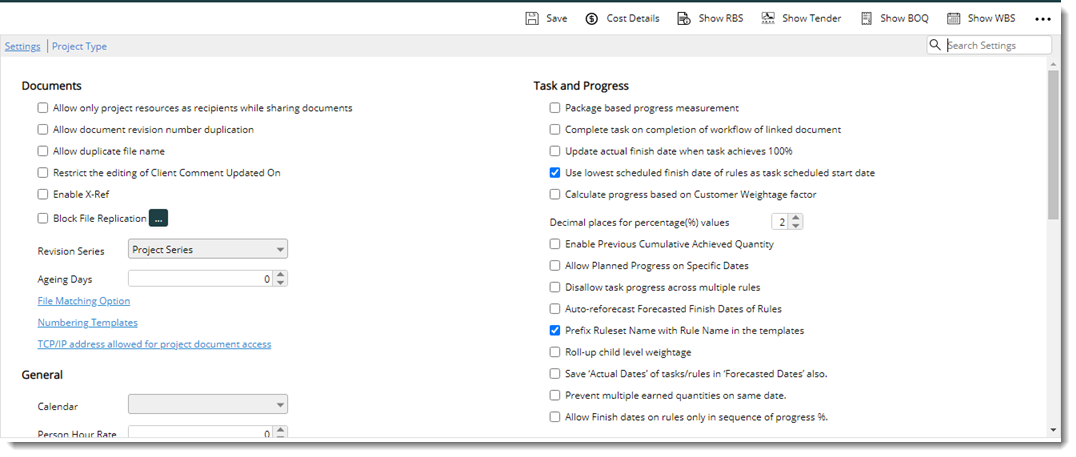
Figure: Basic Settings
Under the heading Documents, the following settings area available.
|
#
|
Setting
|
Description
|
|
1
|
Revision Series
|
The revision number indicates the number of times a document is revised. Different series, like 0, 1, 2, 3, 4, and A, B, C, D etc. can be assigned as revision number. If there are no client revising options then revision number is only used.
The revision series to be used for documents in a project can be restricted by selecting the series in project.
To select a revision series
1.Click the down-arrow.
On the drop-down list all revision series created in Wrench master is displayed.
2.Select your revision series.
3.On the project properties window tool bar click Save to store changes.
|
|
2
|
Allow only project resources as recipients while sharing documents
|
When a project is created, only Work resources, View resources and External resources have access to the project and its documents. If the project is marked as confidential then only work resources can view or modify documents of the project. But, if the document is to be sent to an unauthorized resource like non-project resource or view resource in confidential project, through transmittals, correspondence, notification mails etc. they would have access to these documents. Although in some cases there are warnings informing the user that non-project resources are in the recipient list, there are no restrictions to who these recipients can be. This is a cause for concern from a confidentiality point of view as the sender can add the recipients of their choice. Hence a provision for the users having edit project permissions to restrict the recipients to resources of the project is provided.
On the Project Setting window, under the group Documents a new setting Allow only project resources as recipients is available.
If the checkbox next to this option is selected, a warning message is displayed.
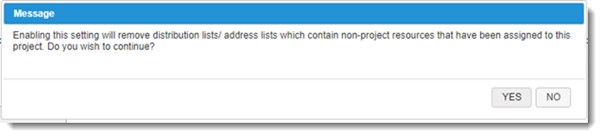
On clicking YES, setting is enabled and distribution lists, address lists which contain non-project resources that have been assigned to the project is removed. Only project resources will have access to shared documents.
|
|
3
|
Allow document revision number duplication
|
When a transmittal is released and client comment is updated, internal revision number is not incremented and the document remains still in released status. Now when the document is checked out for the first time after transmittal release, an option to select revision number is enabled and you can select a revision number.
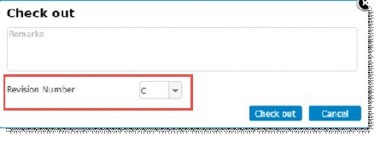
If the check box next to this option is not selected, when you select the current revision number of the document from the drop-down list a warning message is displayed informing the user selection of duplicate revision number is restricted. You have to select a different revision number and continue. Internal revision number incremented and status of the document will be work in progress.
|
|
4
|
Allow Duplicate Name
|
When adding documents or drawings to Wrench drive, adding documents with filename already existing in Wrench drive is restricted. This usually occur when templates are used to add documents. This option permits the user in adding documents with the same file name to Wrench drive.
|
|
5
|
Restrict the editing of Client comment updated on
|
If this options is selected Client Comment Update On date of transmittal released documents cannot be edited by any user. Only users of customer origin will be able to edit the received back date.
|
|
6
|
Enable X-Ref
|
Select the check box next to this option to enable X-ref handling for this project. Click the configure button to define link file types.
|
|
7
|
Block File Replication
|
On selecting the check box next to this, manual replication of documents and drawings related to this project is restricted.
Click the browse button next to this option to select the server for which this option has to be blocked.
|
|
8
|
Ageing Days
|
During the initial stage of a Project, a mutual agreement is made between the company and the client on the number of days the client will take to respond to the submitted documents. This period can be defined as 'Ageing Days' of the project.
1.Enter value here.
|
|
9
|
File Matching option
|
You can define different file matching options for documents in a project. You can either assign a basic matching option or predefine the matching option format for the documents added under the project. For more information see Selecting file matching options.
|
|
10
|
Numbering Template
|
There can be practically only one numbering template per project. But in practice, each department may have its own numbering templates. Hence it is required to attach multiple numbering templates per project.
To attach or select multiple numbering templates
1.Click the link Numbering Template.
Numbering Template selection window is displayed.
2.Select the check box next to the templates that you want to attach.
3.Select a type. Options available are Internal Document Number, Client Document Number and Vendor Document Number.
4.Click OK.
Selected numbering templates will be available for the project.
|
|
11
|
TCP/IP allowed for project document access,
|
In confidential projects which need high security, project documents are to be made accessible only from specified network segments based on TCP/IP address. Hence, a facility to assign each high security projects with a TCP/IP segment, ensuring only users working from this specified network segments will access files of the project is required.
Click the hyperlink TCP/IP allowed for project document access, to configure TCP/IP address. For more information refer Restricting project access for internal domain users.
|
Under the heading General, the following settings are available.
|
#
|
Setting
|
Description
|
|
1
|
Calendar
|
Click the browse button to select a calendar for the project. All time sheet calculations and notifications would be based on this calendar.
|
|
2
|
Person Hour Rate
|
In some cases billing of the project may be done against man hours spent on the project.
"Person Hour rate" is the cost spent on a person per hour for execution of the tasks assigned to him. Person hour rate field is useful to mention the rate of billing of man hour in the project. This is used internally to calculate the costs of the Tasks based on the resources which in turn can be used to gauge the progress of the Project.
1.Enter a value for Person hour rate here.
|
|
3
|
Inherit custom properties to automatically created linked items from parent.
|
If this option is selected, custom properties assigned to the parent document or task will be inherited to automatically created linked task or document.
|
|
4
|
Synchronize changes to inherited custom property values
|
If this option is selected, changes in custom properties assigned to the parent document or task will be inherited to automatically created linked task or document. Blank values are also accommodated, when task or document is revised.
|
|
5
|
Link transmittal types only against primary user groups
|
User may have one or more roles in a project. In the transmittal type master, user cannot create transmittals from roles other than the primary role as only primary user groups are assigned for the User group mapping in Type master.
For Example: If an Electrical Engineer has been assigned an additional role of Engineering Document Controller, the same user cannot create transmittal as Engineering Document Controller as it’s not his primary group.
But in certain scenario, users may work in roles other than their primary roles in projects. Hence it is required to allow user to use transmittal types assigned to the user’s role in the project. This setting helps in handling this scenario.
If this option is selected, in the Type Master window, when user groups are selected for a submission type, only the primary roles assigned against the project work resources is displayed. If this option is disabled, all the user groups assigned against the work resources in the project is displayed. If this option is selected and when user selects a project document and creates a transmittal, only the transmittal types assigned against the project work resource’s primary role is displayed. If the setting is disabled, all the transmittal types configured against both the primary and non-primary roles are displayed.
|
|
6
|
Default incoming transmittal type
|
Select a transmittal type for incoming transmittal from a drop-down list.
|
|
7
|
Use source transmittal number as incoming transmittal number
|
This setting is enabled only if the default incoming transmittal type is selected.
If this setting is selected, and the user performs the operation Update/Register as Existing, from DocXchange window transmittals are created in the destination instance with the transmittal numbering the same as that present against its respective incoming transmittal. The transmittal numbering template specified against the incoming transmittal type is ignored.
In case, if the transmittal number present in the source already exists in the destination, then a duplicate transmittal is not created. Instead, Create Transmittal window is displayed. Users can specify the required transmittal number and create the incoming transmittal.
|
|
8
|
Time zone for updating templates
|
Usually, SmartProject instances are created in an Azure cloud server and normally the time zone defined in the server will be UTC. When a user logs in to SmartProject, the time displayed here will match the end user's system time (as the server time zone is being converted based on the system time) whereas the date and time mapped to the document template are still mapped in the server time zone. This creates confusion among users, which needs to be resolved. Hence, a provision where the user can define the time zone in the project so that when the date or time is mapped to templates, before updating the template, it is converted to the specified time zone is available.
Select the required time zone based on the project from the drop-down list. If a time zone is selected, in the document template mapping and transmittal cover sheet the date and time will be mapped as per the selected Time zone.
|
Under the heading Workflow, the following settings area available.
|
#
|
Settings
|
Description
|
|
1
|
Retain manually added resources in workflow
|
If this option is selected, when workflow is refreshed, manually added resources are not removed. Or else they will be removed. This option is selected by default.
|
|
2
|
Retain manually added stage users when revising items
|
After the document gets released and when it is revised, the previously assigned workflow is retained. However, the previously assigned workflow stage users will not be retained and hence, the stage users need to be assigned again and again. This is a repetitive process. To handle such scenarios in cases where users are assigned manually to workflow stages, if this option is selected, on document revision, if the workflow used in the next revision is the same as that used in the previous revision of the document, then the manually added stage users are retained.
When reassign operation is performed in any stages, then those reassigned users are considered in the next revision of the workflow also.
|
Under the heading Meeting, the following settings are available.
|
#
|
Setting
|
Description
|
|
1
|
Approver is required for meeting
|
If this option is selected, minutes of meeting for this project is to be approved by an approver.
|
Under the heading Task and Progress, the following settings are available.
|
#
|
Setting
|
Description
|
|
1
|
Package based progress measurement
|
Package based progress measurement in WBS of the project will be enabled if the check box next to this option is selected.
|
|
2
|
Complete task on completion of workflow of linked document
|
If this option is selected, when workflow of document linked to the task is completed, task is also completed.
|
|
3
|
Update actual finish date when task achieves 100%.
|
If this option is selected, when the task achieves a progress of 100%, actual finish date of the task in WBS is updated automatically.
|
|
4
|
Use lowest scheduled finish date of rules as task scheduled start date.
|
In scenarios, where schedules are imported to SmartProject, there are instances where the schedule dates (of ROC) of a deliverable can undergo change. In such cases, when the new dates are imported to SmartProject, the new schedule dates (of ROC) are not being updated to the task schedule dates.
If the checkbox next to this option is selected, on clicking the Schedule button, the minimum and maximum dates of the ROC get rolled-up with the start and end dates of the task. If the checkbox next to this option is not selected, on clicking the Schedule button, an alert message “Failed to schedule the task. Scheduled start/finish not updated will be displayed.
|
|
5
|
Calculate progress based on Customer Weightage factor.
|
On selecting the check box next to this option project progress is calculated in terms of customer weightage factor.
|
|
6
|
Decimal place for percentage values.
|
Here you can define the number of decimal places that has to be included in percentage values.
|
|
7
|
Enable Previous Cumulative Achieved Quantity
|
If the checkbox next to this option is selected, while updating progress for a task in bulk , Previous Cumulative Achieved Quantity can be updated.
|
|
8
|
Allow Planned Progress on specific dates
|
If this option is enabled, system calculates the planned progress based on specific dates. If this option is disabled, hyperlink against ‘PLANNED PROGRESS AS ON’ option will be disabled in the WBS window.
When the setting is disabled, in the schedules tab of task details, the hyperlink ‘View planned progress as on a different date’ is hidden.
|
|
9
|
Disallow task progress across multiple roles:
|
Once this setting is enabled, the earned progress percentage of date-based tasks cannot exceed the planned percentage of its subsequent rule.
|
|
10
|
Auto-reforecast Forecasted Finish Date of Rules
|
On enabling the setting, if actual finish date of a rule of a date-based task with sequential ruleset is updated, the forecast finish dates of the subsequent rules will be updated automatically.
|
|
11
|
Prefix Ruleset names with Rule name in the templates
|
If this option is selected, ruleset names are prefixed with rule names while generating import templates or exporting tasks to the excel file. If this option is not selected, while generating import templates or exporting the tasks to excel file, ruleset names are removed from the rule names and unique project rule names are generated.
|
|
12
|
Auto-reforecast Forecasted Finish Date of Rules
|
If the checkbox next to this option is selected, forecasted finish date of rules are re-forecasted automatically.
|
|
13
|
Prefix Ruleset Name with Rule Name in the templates
|
If the checkbox next to this option is selected, in the import template generated, rule names are prefixed with ruleset names.
|
|
14
|
Roll-up child level weightage
|
If the checkbox next to this setting is enabled, on updating progress, the weightage of the child level tasks is rolled up to the summary tasks.
|
|
15
|
Save Actual Dates of Tasks/Rules in Forecasted Dates.
|
If the checkbox next to this option is selected and the actual finish date gets captured against date or quantity-based tasks, the actual start date of the task is updated into the forecasted start date and the actual finish date of the tasks is updated into the forecasted finish date.
When a user updates the actual finish date for a rule of quantity-based task, the forecasted finish date of the rule gets updated with the Actual Finish Date.
When a user updates the actual start and finish of the tasks using an MS Excel template, the actual start and finish dates of the tasks are updated on successful import or update.
When a user updates the actual finish dates of rules of date and quantity-based tasks using an MS Excel template, the actual finish dates of the rules are updated into the forecasted finish dates.
|
|
16
|
Prevent multiple earned quantities on the same date
|
Construction progress is often updated in batches, by different people. Hence it is observed that people update the earned quantities of specific dates multiple times. This results in incorrect project progress information. However, there are scenarios where earned quantities are updated multiple times a day after the change of each work shift. Hence this setting is provided to prevent updating multiple earned quantities in a day.
When the checkbox next to this option is selected, users of the same origin will be restricted from entering multiple earned quantities for the same actual finish date.
|
|
17
|
Allow finish dates on rules only in sequence of progress %
|
In SmartProject, without considering the order of the percentage of rules, it is possible to input, planned, forecasted, and actual finish dates against rules in any order. In certain scenarios, to generate a proper S-Curve report, planned/forecasted/actual finish dates of the rules must be specified in the sequential order of the percentage If this setting is selected, system validate the rules’ planned/forecasted/actual finish dates based on their order.
|
Under the heading Timesheet, the following settings are available.
|
#
|
Setting
|
Description
|
|
1
|
Allow time log entry only to work resource.
|
If this option is selected only the project resources can create time log entries. If this option is not selected any resources can create time log entry for this project.
|
|
2
|
Time logs on tasks cannot exceed the planned time of the tasks
|
if the checkbox next to this option is selected, user is restricted from entering time logs more than budgeted or forecasted hours.
While entering timesheet, if time entered is more than budgeted or forecasted hours, a warning message is displayed.
|
|
3
|
Normal timelogs cannot exceed resource booking in Project
|
If the checkbox next to this option is selected, timelogs entered should not exceed the values provided while booking resources in Project
|
|
4
|
Allow timelogs only as per resource booking
|
If the checkbox next to this option is selected, timelog entry is permitted for a user only based on the resource booking combination defined in the Project/WBS.
|
|
5
|
Approval required for logging overtime
|
If this setting is selected the request for approval of overtime entry will be mandatory, if this setting is disabled overtime can be entered without overtime request approval.
If the checkbox next to this option is selected, browse button next to the option Assign overtime approver is enabled. Click the browse button to select an overtime approver from Search User window.
|
|
6
|
Assign overtime approver
|
If this filed is enabled, click the browse button to select an overtime approver.
|
|
7
|
Number of hierarchical time sheet approvers
|
In certain organizations work happens over disciplines as well as projects. Therefore, the time spent by the resources will have to be reviewed and approved by multiple levels of approval authorities. The logs submitted by the user will first get submitted to the first level authority and the first level authority will forward them to the concerned second level approval authority and so on. In such cases number of hierarchical users can be selected her, based on the project requirement.
|
|
8
|
Role is mandatory to save time logs
|
If the checkbox next to this option is selected, only time logs with a role specified will be saved.
|
|
9
|
Task is mandatory to save time logs
|
To keep track of the actual hours spent on a particular task by a resource, SmartProject® captures the hours entered by the resource in timesheet and updates the same against the task. As ‘Task’ field is not mandatory in the timesheet module, users may forget to specify the task while entering the time log which makes it difficult for the organization to monitor the actual hours spent on the task. Hence a setting Task is mandatory to save time logs, which helps in making selection of tasks mandatory while logging the time. If this setting is enabled and task is not selected while clicking on Save or Submit for time log entries against that project, then an alert message is displayed.
|
|
10
|
Enable Timesheet Locking
|
When the setting is selected, the fields Locking Interval and ‘Interval Day/date’ are enabled.
.jpg)
Locking interval can be selected from a drop-down list. Options available are Day of each Week and Day of each Month. If the option Day of each Week is selected, Friday is displayed by default as interval. Days of the week are available in the drop-down list. If the option Day of each Month is selected, End of the Month is displayed by default as interval. Dates of the month are available for selection in the drop-down list.
If this setting is enabled, user will not be able to submit time logs if any of the selected time log date is before the locking date of the project. Submission of full-Time logs for the week is restricted with a warning message.
Defining exceptions in Project Timesheet Locking
Though the time sheet is locked on Day of each Week or Day of each Month basis, in some cases this lock must be lifted for some users. To handle this in the Project Setting window, option to define exceptions is available.
To define exceptions
1.On the Project Setting window, under the group Timesheet, click the url Exceptions next to the setting Enable timesheet locking.
NOTE: This is enabled only if the checkbox next to Enable timesheet locking is enabled and values are entered.
.jpg)
Timesheet Exceptions Locking window is displayed. Here exceptions already defined are displayed. Details of the exception like From and To date, Validity date of the exception, Status etc are displayed in different columns.
.png)
Figure: Timesheet Locking Exceptions window
1.Click the option Add.
Add Timesheet Locking Exception window is displayed.
.jpg)
Figure: Add Timesheet Locking Exception window
On the window enter values for the following fields.
From: Select the start date for the exception from a date picker.
To: Select the end date for the exception from a date picker.
Valid Till: Select the date on which the validity of the exception will expire.
Users: Click the + sign to add users to the exception. Search User window is displayed. Select the required users.
1.Click Save to store the values. Timesheet exception saved successfully message is displayed.
Obsoleting an exception
If an exception created is no longer valid or applicable, user may obsolete the created exceptions.
To obsolete an exception
1.Select the exceptions that are to be obsoleted.
2.On the window click Obsolete. The following message is displayed.
.png)
Figure: Obsoleting an exception
1.Click YES to obsolete the selected exceptions.
If the validity of an exception selected for obsoletion is already expired, on clicking obsolete, an alert message One or many selected exceptions are already expired. Such exceptions will be ignored. Obsolete the rest? is displayed.
1.Click YES’ to obsolete the rest of the items ignoring the expired ones in the selection. Click No to abort the operation.
Once the exception is obsoleted successfully, status of the exception is changed to Obsolete.
|
Under the headings Smartfolder, Risk, Cost and BOQ, the following settings are available.
|
#
|
Setting
|
Description
|
|
1
|
Project Linked SmartFolders
|
Click the browse button to select a smart folder. The Project linked smart folders will be selected while creating a project from an existing project.
|
|
2
|
Risk analysis with cause and consequence
|
If the checkbox next to this option is selected, advanced risk analysis option is enabled
|
|
3
|
Currency Symbol
|
Though the currency used by an organization is configured in control panel, each project may have a different currency. Hence it is required to use the organization’s currency in each project and allow it to be changed if required. This will help maintain the actual cost of the resource to the organization and the cost to project as well.
Here the currency used in the project that is configured in the masters is displayed. This can be overridden.
|
|
4
|
Precision of decimal places for numeric values
|
Here decimal places for numeric values can be defined.
|
|
5
|
Send Transmittal release email from common email ID’
|
For some organisations, transmittal emails sent out to other organisations need to be sent from an organizational email ID and not from the personal email of the Users. This is because in such cases for these Organisation, transmittal emails are an official communication between both the parties. Hence a facility to define whether the transmittal email must be sent from external mail ID is available against transmittal type in a Project. The configuration is provided against transmittal type in project so that user email IDs may be used for transmittal emails in specific type of transmittals like internal transmittals if required.
If the setting Send Transmittal release email from common email ID, is selected, hyperlink Configure against the setting will be enabled.
1.Click the hyperlink to configure the Common email ID and password against the Transmittal Type.
The following window is displayed.
.jpg)
1.Enter Email ID and Password.
2.Click Test Mail to send a mail to verify the mail credentials.
|
Selecting file matching options
File matching options for documents in a project is configured using this option. Matching options can be configured using basic or advanced options. Now when you replace documents in bulk using the Update option, the matching option defined here will be available in the File Matching Options of Bulk Upload Documents window.
NOTE: While defining matching options, custom properties can also be selected as matching option. Once a custom property is selected, then the document in the folder whose file name matches the custom property is fetched.
To select basic document matching option
1.Click the hyperlink Configure next to File Matching Option.
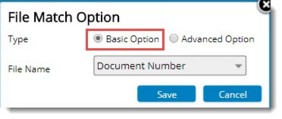
Advance Numbering Option window is displayed. Here Basic Option is selected by default.
2.Select a matching option from the drop-down list.
The selected matching option will be available in the Bulk Update Documents window.
Advanced Options
Advanced matching options for fetching documents for replace is configured from this tab.
To configure advance matching options
1.Click the radio button next to Advanced Option.
File Matching Option window is displayed.
2.Click the + button to insert a row.
For ease of defining a file matching option you can select a reference file and based on this file you can create a matching option.
3.Select a reference file so that you can configure the matching option with reference to this file.
Now let us see how a matching option pattern is created. This can be explained based on the following example.
Suppose in SmartProject there are documents added with the following document number and revision number.
|
Document Number
|
Revision Number
|
|
DOC001
|
A
|
|
DOC002
|
B
|
|
DOC003
|
A
|
|
DOC004
|
A
|
Table: Documents in Wrench
Now you have the following files in a folder in the system.
|
File Name
|
|
DOC001-A-111.DOC
|
|
DOC002-B-22.DOC
|
|
DOC003-A-11.DOC
|
|
DOCBIZ1-2-22.DOC
|
|
DRWG01-6-22.DOC
|
|
DRW222-7-24.DOC
|
Now the files in SmartProject has to be replaced with the files from this set that matches some conditions. Hence you have to create a file matching option using the advanced option. You want to match files based on document number and revision number.
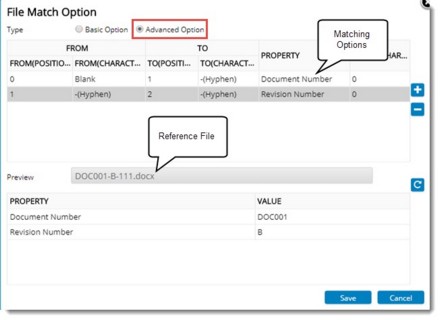
Figure: Defining file matching option
First you have to define a matching option using the property Document Number. Assume that your organization follows the following file naming convention.
<Document Number> - <Revision Number> - <Sheet Number> . <File Type>
1.Select the property as Document Number.
2.Select From (Position) as 0, From (Character) as Blank, To (Position) as 1 and To (Character) as -(Hyphen.)
This will generate a matching option containing the characters in the file up to the first hyphen.
3.Now select the property as Revision Number.
4.Select From (Position) as 1, From (Character) as -(Hyphen), To (Position) as 2 and To (Character) as -(Hyphen.)
This will generate a matching option containing the characters between the first and second hyphen.
5.Click Save to store the file matching option created.
When bulk upload operation is carried out using this advanced matching option, documents satisfying the matching options are fetched as shown in the following figure. Observe the way in which the files with Document Number and Revisions matching are fetched.
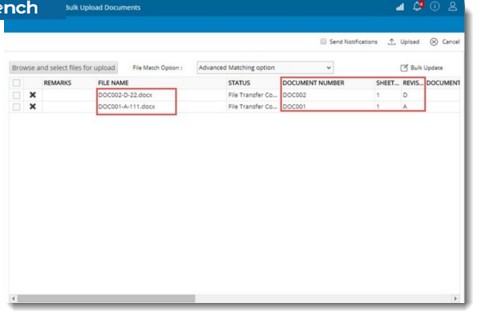
Figure: Bulk Updating Documents
Adding Project Type
Type is a categorization of the project. A project may include multiple types. A Type can be selected from a pre-defined master list.
To add a type
1.On the Type pane click the + sign.

Type window is displayed.
2.Choose a Type and click OK to continue.
3.Enter values for the following fields also.
Site/Location
Sometimes a project may have to be executed at multiple sites/locations.
For Example: An oil pipeline across a state will have multiple project sites (which may act as design and approval office, site offices and warehouses for that area). This field helps in finding a solution to the following scenario faced at some sites.
A normal user (like draftsman) who actually creates and adds document to Wrench may not know which numbering template is to be selected while adding documents into Wrench. A numbering template can be assigned to different sites. While adding documents to a project a unique number is defined for each document. In the document number generation window Project, Site or Location and the corresponding template description is displayed.
This helps the user in identifying the numbering template defined for the site or location on which he is.
1.Type in the location by clicking under the column Site/Location.
Item Name
Item details are specified for the purpose of creating document numbers for project documents automatically. For those documents that are to be created at various stages of delivering the item (design, procurement or construction) the numbering template specified for the particular project type will be used.
Restricting project access for internal domain users
In confidential projects which need high security, project documents are to be made accessible only from specified network segments based on TCP/IP address. Hence, a facility to assign each high security projects with a TCP/IP segment, ensuring only users working from this specified network segments will access files of the project is required.
To make this possible in the Project Settings window an option TCP/IP allowed for project document access, that will help to configure TCP/IP address is provided.
To configure project access restriction
1.Click the hyperlink TCP/IP address allowed for project document access.
Details of TCP/IP addresses window is displayed.

Figure: Details of TCP/IP addresses
To add TCP/IP address
1.On the tool bar click Add. The following window is displayed.
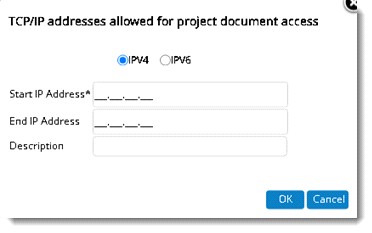
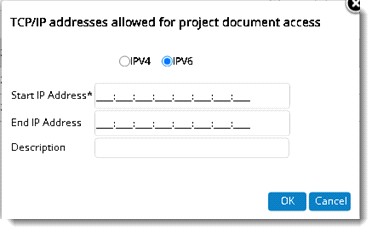
On selecting IPV6, the field for entering IP address will be a bit different as shown in the following figure.
2.On the window enter value for the following properties.
•IPV4/IPV6: Select the radio button next to one of these options to specify the type of TCP/IP address used for identifying the network segment. By default, option IPV4 is selected. IPV4 denotes v.4 type of addressing and IPV6 denotes v.6 type of addressing.
•Start IP Address: Enter the starting IP address here.
•Ending IP Address: Enter the ending IP Address.
•Description: Enter a description.
3.After entering the details click OK to save the IP address.
Once a network address is specified, requests to access project documents is permitted only from the specified addresses only. If Project documents are accessed from a different address, operation is aborted and an alert message is displayed.
|
|