|
SmartProject comprehensively manage human resources from vendors also. Vendors may have a number of contact personnel for various interactions. Operations in SmartProject may even necessitate them to participate by logging in. Such Contact personnel in SmartProject are considered to be authorized SmartProject users and they are given an access to SmartProject accordingly. SmartProject also maintains basic details such as name, address etc. about the vendors.
Adding Vendors
New Vendors can be added to SmartProject.
To add new vendors
1.On the Resources window click Vendors.
2.On the tool bar click Create.
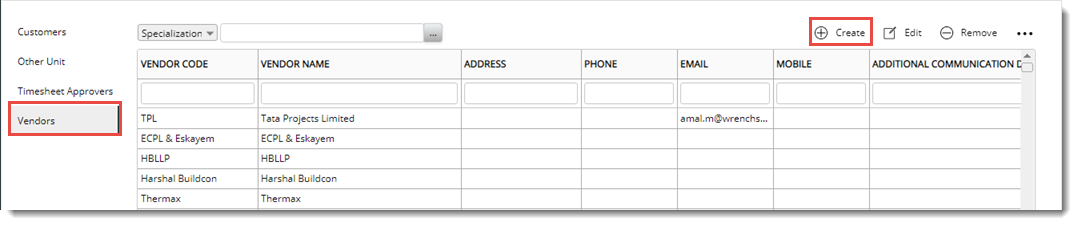
Figure: Adding a vendor
Add Vendor window is displayed.
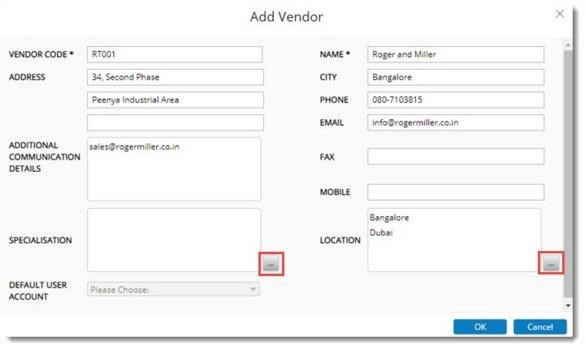
Figure: Add Vendor window
2.Enter a Vendor Code and Vendor Name. These are mandatory fields.
3.Enter address details and contact details of the vendor. In case there are additional communication details, enter it in the column ADDITIONAL COMMUNICATION DETAILS.
4.Click the browse button corresponding to SPECIALISATION to select a Specialisation from Specilasation Master.
5.Click the browse button corresponding to LOCATION to select a Location from Location Master.
6.Click OK to save values. Saved Successfully message is displayed.
Vendor details is added to the Certified Vendors list.
NOTE: For vendors added in this manner, template will not be present.
Searching vendors based on specialisation and location
Before creating a tender, if the tenderer is an EPC contractor, they will list out the vendors fitting the specialization and provide this list to the client. In such cases, the tenderer will need to filter the list based on specialization and location instead of specialization.
Hence on the Vendor Management window for Certified Vendors and Vendor List window in the Masters, provision to filter vendors based on specialisation and location is provided.
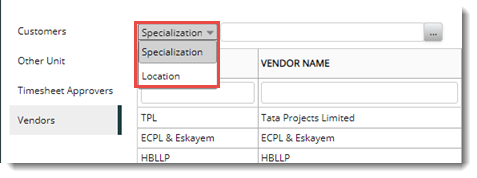
Figure: Filtering vendors
Categories Specialisation or Location can be selected from a drop-down list.
To search vendors based on specialisation.
1.Select the category as Specialisation.
2.Click the browse button.
Specialisations window is displayed. Here all the available specialisations are displayed.
3.Select the specialisation based on which the vendors are to be filtered and click OK.
Vendors filtered based on the selected specialisation are displayed on the grid.
To filter vendors based on Location, follow the same steps after selecting the category as Location
Editing and removing vendor details
Vendor details can be edited and a vendor that is not in use can be removed.
To edit vendor details
1.Select the vendor from the list.
2.On the tool bar click Edit.
Edit Vendor window is displayed.
3.Values of all the fields except VENDOR CODE can be edited.
To remove a vendor
1.Select a vendor from the list and click Remove.
A message Do you want to remove the selected Items is displayed.
2.Click YES to confirm removal of the vendor.
Email settings and authentications can be configured for Vendors. The procedure for this is similar to that in Vendors and Customers. For more information see the topics Configuring authentication for Vendors , Configuring authentication for online storage and Configuring email settings for Vendors.
|