You can add reference files as attachments to the drawings or documents that are being sent through a transmittal. You can add attachments stored in a specific location or add new documents as attachments. Multiple documents can also be added as attachments.

Figure: Adding attachments
 To attach a document stored in a location
- In the transmittal details window tool bar click Edit.
- In the attachments tab, select Attach.
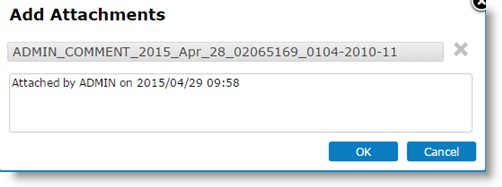
Add Attachments window is displayed.

Figure: Add Attachments window
- In the Add Attachments window, click Select a File to choose single or multiple files from a location in the system.
File selection window is displayed.
- Once you select the correct file click OK. The selected files will be attached to the transmittal.
 To add new document as attachment
- In the attachments tab, select Add Documents.
Add Document window is displayed.
- Enter the values in this window and save the document as an attachment to the transmittal.
NOTE: In the File Remarks field, details of the user who attached the file and the date on which the attachment was added are displayed. This field can be edited.
For more information on adding a new document refer Adding a Single Document.
Adding documents to the transmittal
Documents that have to be issued for different purposes can be added to a transmittal. You can either add a new document or add a document in your workspace which is in the transmittal stage.
NOTE: New documents can be added to a General transmittal and Release transmittals. Documents from workspace can be added only to Release and Final Release transmittals.
 To add a new document
- Select the tab Documents.
- On the documents pane click Add Document.

Figure: Adding Documents
A pop-up menu is displayed. The menu will have options to add a new document or add a document from workspace. Options New and From Workspace will be available only for Release and Final Release transmittals. For General transmittals only option New will be available.
- New: Select this option to create a new document and attach it to the transmittal. On selecting this option Multiple Document Addition window is displayed. Enter values for fields in the Document Addition window. For more information on entering values in the document addition window refer Adding Multiple Documents.
- From Workspace: Select this option to choose the documents available in your workspace which are in the transmittal stage. Multiple Items in Workspace window is displayed with a list of documents in the transmittal queue.
- Choose the documents that you want to add to the transmittal and click Select.
The selected documents are displayed in the grid of the documents pane.
 To add existing documents
- Click the drop-down arrow in search box next to Add Existing.

Figure: Adding Existing Documents
List of documents are displayed.
- Select the document that is to be added using keyboard keys or mouse. Document is added to the grid.
 To search for documents
- Click the hyperlink Advanced Search.

Figure: Searching for documents (Advanced Search)
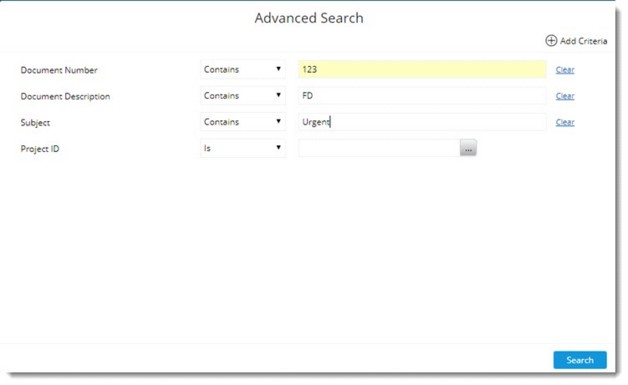
On clicking this hyperlink, the advanced search window is displayed.

Figure: Advanced Search window
- In the Advanced Search window enter values for different search criteria and click Search.
- From the search results, select the documents that you want to add and click Apply Selected.
Documents are added to the transmittal. Selected documents will be displayed in the grid.
Uploading documents
While creating a transmittal large files can be uploaded and registered in WRENCH. The facility to upload files from transmittal would allow the document controllers to work only with the transmittal and file upload window.
 To upload files
- Select the document tab.
- On the tool bar click Upload Files.

NOTE: Before clicking the Upload Files option, ensure the transmittal is saved. Or else a warning message is displayed. Upload option will be available only for transmittals that are in edit mode and not released.
File Uploader window is displayed.

Figure: File Uploader
- In the File Uploader window you can upload files and register files. For more information on working with File Uploader window see Bulk Uploading of Documents.
Once the upload is complete, the transmittal from which the upload request was generated will display a note stating that files are pending for registration.

Figure: Files pending for registration message
- Click the hyperlink here, or the Upload Files option to go back to File Uploader and register the files.
Once the file is registered, the files are removed from the File Uploader window grid and is displayed in the transmittal document grid. The user can proceed with transmittal release process as usual.
When releasing the transmittal, if there are documents pending for registration the following warning message is displayed.

If this message is displayed, user can remove the files pending for registration by clicking the link “here” in the message “There are files pending for registration. Click here to register”, navigate to the file uploader menu, select the files and click ‘Remove’. Once all the files linked to the transmittal are removed, the message will not be displayed and the transmittal can be released with the remaining documents.
Updating receive back dates
Receive back dates can be updated for the documents that are sent with the transmittal. In the case of general transmittal Expected Receipt Date has to be updated and in the case of release transmittal Expected Receive Back Date can be updated from the transmittal grid.
 To update receive back date
- In the document grid locate the column Expected Receipt Date.

Figure: Updating expected receipt date
- Select the date from a date picker and save changes.
An option to update receipt dates in bulk is also available.
To update expected receipt date in bulk
- Select the checkbox next to documents for which you want to update dates.
- Select a date from the date picker and click Apply.

Selected date is applied to the documents.
Viewing Checklists
If the document added to the transmittal have checklists assigned to them, then the checklists can be viewed from here.
To view checklists
- In the more options menu click Checklists.
Assigned Checklists window is displayed. Here checklists assigned to the document will be listed.
Creating time log entries
For General, Release and Final Release transmittals having documents which are in the workflow stage for which the setting Timelog Entry is Mandatory is enabled, releasing of the transmittal is permitted only after entering time logs for the document.
 To enter time log
- Select the documents and in the More menu click Add to Timesheet.
Timelog window is displayed with the selected documents added to the window.
- Enter time logs for the selected objects and save. After entering time logs for all objects, release the transmittal.


 To attach a document stored in a location
 To add new document as attachment