|
Security rights can be assigned to users and user groups. If security rights for the user are not specified, then the rights assigned to the user group are inherited to the user. Security rights for managing Documents, Projects and Tasks can be assigned to users and user groups.
The following sections explains different types of security rights that can be assigned to a user or user group for a document genealogy.
Document security rights
Managing critical documents in an organization is controlled using security rights. Every operation that is carried out on a document is controlled assigning the required security rights to a user or user group. The document security rights that can be assigned to a user or user are mentioned in the following table.
|
#
|
Security Right
|
Description
|
|
1
|
Add
|
Assigning this right allows the user to Add a document.
|
|
2
|
Add Comments/Markups
|
Assigning this right allows the user to add comment and markup files to the document.
|
|
3
|
Add Related Files
|
Assigning this right allows the user to add related files to the document.
|
|
4
|
Allow Stamping
|
Assigning this options allows the user to insert a digital stamp in a document.
|
|
5
|
Approve Change Request
|
Assigning this right allows the user to Approve or Reject a Change Request.
|
|
6
|
Approve Print Request
|
Assigning this right allows the user to Approve/Reject a Print Request raised by a user.
|
|
7
|
Approve Scan Request
|
Assigning this right allows the user to Approve or Reject a Scan Request raised by any User.
|
|
8
|
Assign Checklist
|
Assigning this right allows the user to manually assign checklists to objects
|
|
9
|
Assign / Start Workflow
|
Assigning this right allows the user to Assign a workflow, start a workflow .
|
|
10
|
Bypass
|
Assigning this right allows the current stage user to Bypass to any Stage of the Work flow.
|
|
11
|
Cancel Others Check out
|
Assigning this right allows the user to Cancel Check Out performed by other users.
|
|
12
|
Copy Transmittal Released / Work Flow Completed
|
Assigning this right allows the user to copy documents that are released through a transmittal and those documents for which the workflow is completed.
|
|
13
|
Copy Work In Progress
|
Assigning this right allows the user to Copy documents that are in work in progress.
|
|
14
|
Delete
|
Assigning this right allows the user to Delete documents.
|
|
15
|
Edit Transmittal Released
|
Assigning this right allows the user to Edit, Check Out, Check In and Replace a document which is in transmittal released stage.
|
|
16
|
Edit in Work In Progress
|
Assigning this right allows the user to Edit, i.e. Check Out, Check In and Replace a document that is in Work In Progress stage.
|
|
17
|
Edit Workflow Completed
|
Assigning this right allows the user to Edit, Check Out, Check In and Replace a document which has completed all the stages of the work flow.
|
|
18
|
Flush Workflow
|
Assigning this right allows the user to remove the workflow from workspace of active stage users.
|
|
19
|
Handle Obsolete
|
Assigning this right allows the user to work with documents that are in obsolete status.
|
|
20
|
Handle Old Revisions
|
Assigning this right allows the user to update meta-data of old revision and to view, copy old revision file.
|
|
21
|
Handle Print Request
|
Assigning this right allows the user to Handle (Close) a Print Request raised by a user.
|
|
22
|
Handle Scan Request
|
Assigning this right allows the user to Handle (Attach) a Scan Request raised by a User.
|
|
23
|
Manage Security
|
Administrator in an organization can assign Manage Security right to a user. User possessing this right can assign different security rights to other users.
|
|
24
|
Multiple Update Checklist
|
Certain users like the group heads needs permission to bulk update a checklist without manually checking each checkpoint. For such users, if this security is checked two buttons ‘Update Comments’ and ‘Check / Un-check’ would be enabled in ‘Active Checklist’ window, using this button they would be able to update the comments and check the checkboxes in bulk.
|
|
25
|
Obsolete
|
Assigning this right allow the user to render a document obsolete. User may also specify an end-of-life period for the document.
|
|
26
|
Print Transmittal Released / Workflow completed
|
Assigning this right allow the user to print documents that are released through a transmittal or have their workflow completed.
|
|
27
|
Print Work In Progress
|
Assigning this right allow the user to print a document that is work in progress.
|
|
28
|
Raise Change Request
|
Assigning this right allow the user to raise a Change Request on a document.
|
|
29
|
Reassign (Add)
|
Assigning this right allows the user to add resources to a workflow stage.
|
|
30
|
Reassign (Remove)
|
Assigning this right allows the user to remove resources from a workflow stage.
|
|
32
|
Reassign Workspace Items
|
Assigning this right allow the user to reassign active items in a workflow stage.
|
|
32
|
Redirect
|
Assigning this right allow the user to redirect the work to a different workflow stage.
|
|
33
|
Release
|
Assigning this right allow the user to release a document.
|
|
34
|
Replace/Remove Comment and Markups
|
Assigning this right allow the user to replace or remove comments and markup files attached by another user.
|
|
35
|
Replace/Remove Related files
|
Assigning this right allow the user to replace or remove related files attached by another user.
|
|
36
|
Revoke
|
Assigning this right allow the user to revoke a document. On revoking an obsolete document its status is restored to that existed at the instance of making the document obsolete.
|
|
37
|
Send Print Request
|
Assigning this right allow the user to Send a Print Request.
|
|
38
|
Send Scan Request
|
Assigning this right allow the user to Send a Scan Request.
|
|
39
|
Update Approval Status Code
|
Assigning this right allow the user to update the Approval Status Code, even though he is not in the Release stage. (This right is not required for a user in "Release Stage" to update the Approval Status Code.
|
|
40
|
Update Comment Code
|
If this option is selected, respective user or user group will be able to update comment code in CRS. If users without this permission tries to update the comment code, operation is aborted, and a warning message is displayed.
|
|
42
|
Update Internal Status Code
|
Assigning this right allow the user to update the Internal Approval Status Code.
|
|
42
|
View Comments/Markups
|
Assigning this right allow the user to view comments/markups attached to the document.
|
|
43
|
View Related Files
|
Assigning this right allow the user to view related files attached to the document.
|
|
44
|
View Transmittal Released
|
Assigning this right allow the user to view documents that are released.
|
|
43
|
View Work In Progress
|
Assigning this right allow the user to view documents that are work in progress.
|
|
46
|
View Workflow Completed
|
Assigning this right allow the user to view documents that have completed the workflow.
|
|
47
|
View/Copy Specter
|
Assigning this right allow the user to View and Copy Specter Files.
|
The following section explains the steps to assign a security right to a user or user group.
Assigning security rights for documents
Security rights can be assigned for all the levels of the document genealogy, so that specific Users or User Groups are assigned security rights according to their hierarchy in the organizations. The security rights window for document genealogy is displayed in the following figure.
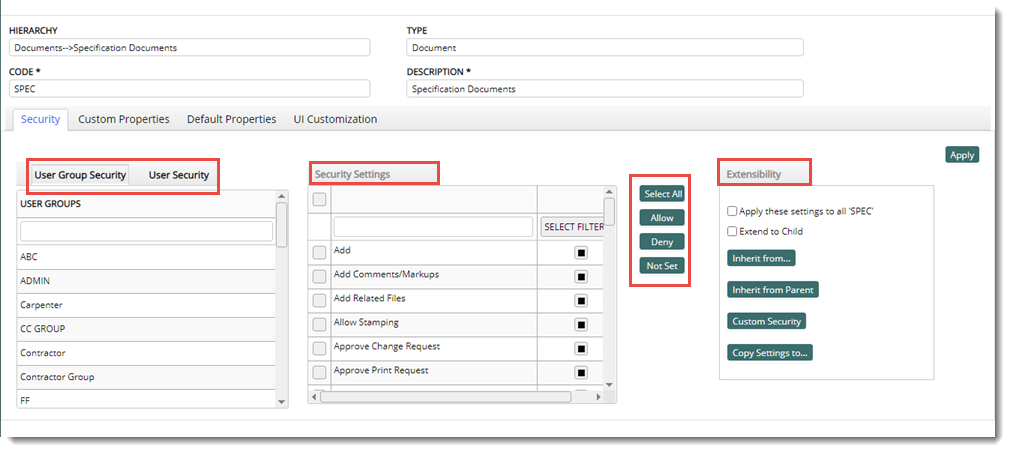
Figure: Document Security right window
On the window security rights can be assigned for users and user groups. By default the tab User Group Security is selected. Available user groups are listed on the grid. If the tab User Security is selected, available user name and login name of the available users are listed on the grid, as shown in the following figure. Different security rights that can be assigned to users or user groups are listed in the Security Settings pane.
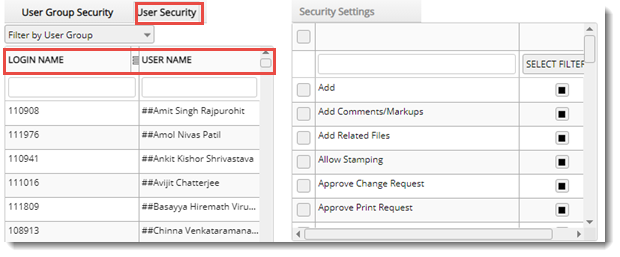
Figure: User Security window
Users listed in the window can be filtered based on their groups.
To filter users based on groups
1.Click the down arrow next to Filter by User Group. User groups available are listed.
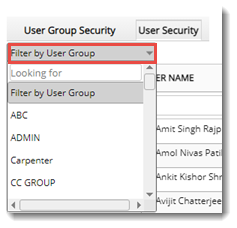
Figure: Filtering users based on groups
2.Select a User Group from the list.
Only Users belonging to the selected group is displayed on the grid.
To assign security rights
1.Select a User or User Group.
2.Select the checkbox next to security right.
3.Click Select All to select all the security rights listed on the window.
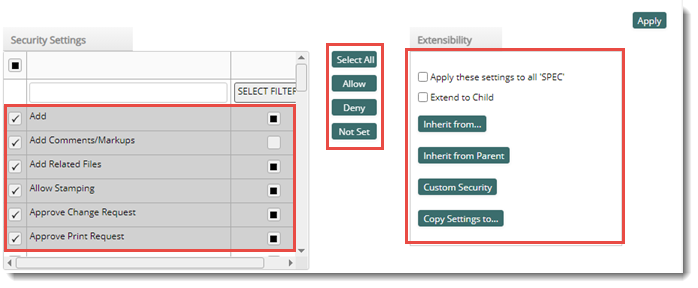
Figure: Selecting security rights
4.Click Allow to assign the selected security right to user or user group. On clicking this button the check box next to the security right is selected.
5.Click Deny for denying the user the selected security right. On clicking this button the checkbox next to the security right is cleared.
6.Click Not Set to set the security right as not specified. On clicking this option the check box next to the security right appears as black in colour.
7.Click Apply to assign the selected security rights.
Extending the assigned security rights
Different options are available on the window to extend the assigned security rights.
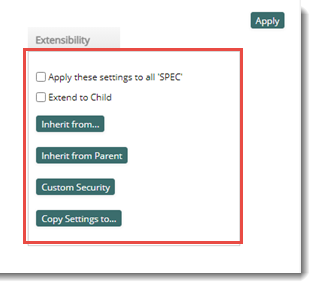
Figure: Extensibility settings
Apply these settings to all ‘<<Folder Name>>’: If the checkbox next to this option is selected, the assigned security rights are applyed to all folders and sub folders, with this name.
Extend to Child: If the checkbox next to this option is selected, the security rights assigned to a folder is extended to its child folders also.
Inherit from: Using this option, the security rights from the existing genealogies can be copied or inherited to the current genealogy.
To inherit from a genealogy
1.Click the button Inherit from. Document genealogy window is displayed. All the available genealogies are listed on the window.
2.Select a genealogy and click OK.
The security rights assigned to the selected genealogy is inherited or copied to your genealogy.
Inherit from Parent: Click this option to inherit the security rights from the parent folder.
Custom Security: A set of security rights can be assigned for a genealogy to selected users or user groups.
To assign custom security
1.Click the button Custom Security. Custom Security window is displayed.
.png)
Figure: Custom Security window
On the left pane USER GROUP or USER NAME can be added. This depends on whether the security right is assigned to a user or user group. On the right pane security rights can be added for the selected users.
2.Click the + button to add users or user groups.
Search User or User Group window is displayed.
3.Select the required users or user groups.
4.On the right pane click the + button to select security rights. Security Settings window is displayed. Available security rights are listed on the window.
5.Select the checkbox next to required security rights and click OK.
The selected users or user groups and security rights are displayed on the Custom Security window.

Figure: Created custom security
6.After selecting the required users, user groups and security right click Apply to save the custom security. A message Settings saved successfully is displayed. A custom security is created.
Copy Settings to: Click this option to copy, the assigned settings for a User or User Group to a selected User or User Group.
NOTE: After creating a genealogy different properties can be assigned to the genealogy later. To assign properties later On the Genealogy Masters window, select a genealogy and click Properties.
|